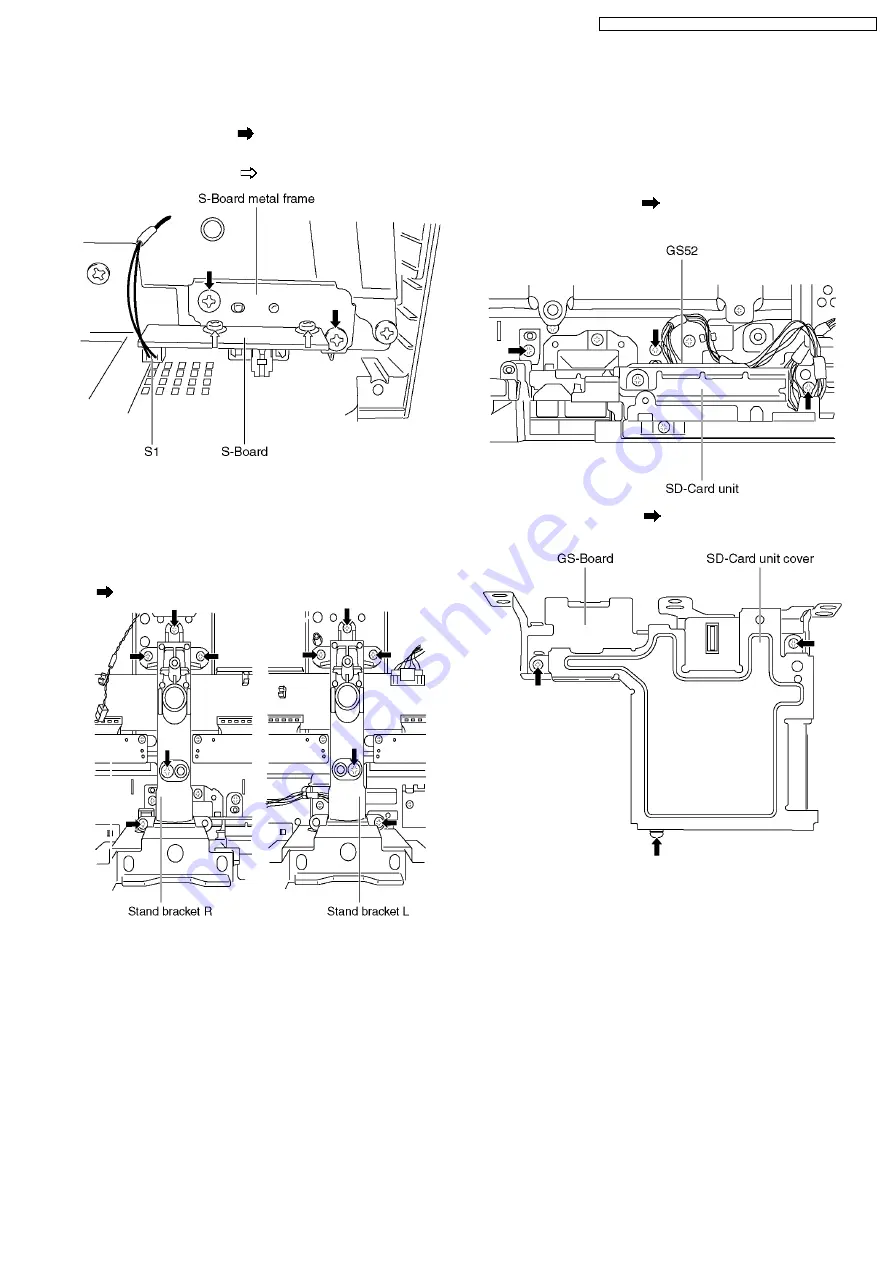
6.22. Remove the S-Board
1. Disconnect the coupler (S1).
2. Remove the screws (×2
) and remove the S-Board metal
frame.
3. Remove the screws (×2
) and remove the S-Board.
6.23. Remove the stand brackets
1. Remove the plasma panel section from the servicing stand
and lay on a fiat surface such as a table (covered) with the
plasma panel surface facing downward.
2. Remove the stand brackets (left, right) fastening screws (×5
each) and remove the stand brackets (left, right).
6.24. Remove the GS-Board and SD-
Module
1. Remove the stand bracket R. (See section 6.23.)
2. Unlock the cable clampers to free the cable.
3. Disconnect the coupler (G52).
4. Remove the screws (×3
).
5. Remove the SD card unit.
6. Remove the screws (×3
) and remove the SD card unit
cover.
15
TH-42PV600AZ / TH-42PV600H / TH-42PV600M / TH-42PV600MT
Summary of Contents for TH-42PV600H
Page 5: ...1 Applicable signals 5 TH 42PV600AZ TH 42PV600H TH 42PV600M TH 42PV600MT ...
Page 27: ...8 3 No Picture 27 TH 42PV600AZ TH 42PV600H TH 42PV600M TH 42PV600MT ...
Page 30: ...30 TH 42PV600AZ TH 42PV600H TH 42PV600M TH 42PV600MT ...
Page 31: ...9 3 Option Description 31 TH 42PV600AZ TH 42PV600H TH 42PV600M TH 42PV600MT ...
Page 32: ...32 TH 42PV600AZ TH 42PV600H TH 42PV600M TH 42PV600MT ...
Page 66: ...TH 42PV600AZ TH 42PV600H TH 42PV600M TH 42PV600MT 66 ...
Page 120: ...TH 42PV600AZ TH 42PV600H TH 42PV600M TH 42PV600MT 120 ...
Page 122: ...15 2 Packing Exploded Views 1 122 TH 42PV600AZ TH 42PV600H TH 42PV600M TH 42PV600MT ...
Page 123: ...15 3 Packing Exploded Views 2 123 TH 42PV600AZ TH 42PV600H TH 42PV600M TH 42PV600MT ...
Page 124: ...15 4 Packing Exploded Views 3 124 TH 42PV600AZ TH 42PV600H TH 42PV600M TH 42PV600MT ...


