background image

‹3DQDVRQLF&RUSRUDWLRQ

8QDXWKRUL]HG FRS\LQJ DQG GLVWULEXWLRQ LV D YLRODWLRQ

RIODZ

/('

7HOHYLVLRQ

0RGHO1R

7+(0

06/&$3

&KDVVLV

Summary of Contents for TH-43E330M

Page 1: ... 3DQDVRQLF RUSRUDWLRQ 8QDXWKRUL HG FRS LQJ DQG GLVWULEXWLRQ LV D YLRODWLRQ RI ODZ 7HOHYLVLRQ 0RGHO 1R 7 0 06 3 KDVVLV ...

Page 2: ...electric shock to the person The exclamation point within an equilateral triangle is intended to alert the user to the presence of important operating and maintenance servicing instructions in the literature accompanying the appliance CAUTION Use of controls adjustments or procedures other than those specified herein may result in hazardous radiation exposure CA U T ION RISK RISK OF ELECTRI ELECTR...

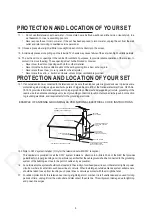
Page 3: ...o impact of any kind Be particularly careful not to damage the picture tube surface 9 Unplug this television set from the wall outlet before cleaning Do not use liquid cleaners or aerosol cleaners Use a damp cloth for cleaning 10 1 Do not place this television set on an unstable cart stand or table The television set may fall causing serious injury to a child or an adult and serious damage to the ...

Page 4: ...ing conductors location of antenna discharge unit connection to grounding electrode and requirements for the grounding electrode 15 2 Note to CATV system installer Only for the television set with CATV reception This reminder is provided to call the CATV system attention to Article 820 40 of the NEC that provides guidelines for proper grounding and in particular specifies that the cable ground sha...

Page 5: ...edurein youroperatinginstructions do not attempt any further adjustment Unplug the set and call your dealer or service technician 22 Whenever the television set is damaged or fails or a distinct change in performance indicates a need for service unplug the set and have it checked by a professional service technician 23 It is normal for some TV sets to make occasional snapping or popping sounds par...

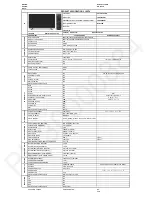
Page 6: ...RT 2TB max HDD reading thru USB PICTURE FORMAT JPG JPEG BMP PNG AUDIO FORMAT MP3 AAC VIDEO FORMAT H 264 MPEG4 MPEG2 HEVC FHD MKV w o Divx PANEL MODEL NO AND TYPE LGD LC430DUY SHA1 IPS SCREEN SIZE DIAGONAL 43 109CM ASPECT RATIO 16 9 RESOLUTION 1920 H X 1080 V DISPLAY AREA H x V 953mm x 543mm PIXEL PITCH 0 1634 mm x 0 4902 mm DISPLAY COLOURS 16 7M 8bit CONTRAST RATIO 800 1 Typical MAX BRIGHTNESS 240...

Page 7: ...MSD3463 Factory Menu Spec ...

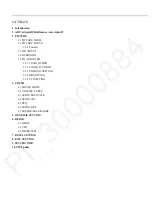
Page 8: ...AN 3 5 PQ ADVANCED 3 5 1 LUMA_OTHER 3 5 2 COLOR ICC BK2B 3 5 3 PEAKING SETTING 3 5 4 NR SETTING 3 5 5 CTI SETTING 4 SOUND 4 1 SOUND MODE 4 2 VOLUME CURVE 4 3 AUDIO PRESCALE 4 4 AUDIO AVC 4 5 PEQ 4 6 AUDIO DRC 4 7 TREBLE BASS RANGE 5 GENERAL SETTING 6 DEBUG 6 1 QMAP 6 2 VIF1 6 3 TIMER TEST 7 PANEL SETTING 8 EMC SETTING 9 SYSTEM INFO 10 SW Update ...

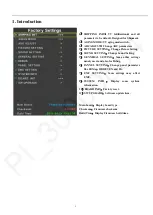
Page 9: ...UND SETTING Change Sound Setting 5 GENNERAL SETTING Some other settings usualy used and also for Debug 6 PANNEL SETTING Change panel paramters like BitMap ODD EVEN and Etc 7 EMC SETTING Some settings may affect EMC 8 SYSTEM INFO Display some systtem information 10 BOARD INIT Factory reset 11 SW UPGRADE Software update item Main board Display board type Checksum Firmware checksum Build Time Display...

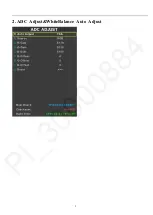
Page 10: ...2 2 ADC Adjust WhiteBalance Auto Adjust ...

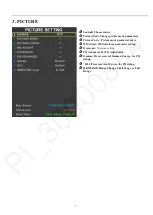
Page 11: ...cture Curve Picture mode parameter curve 3 WB Adjust White Balance parameter setting 4 Overscan Overscan setting 5 PQ Advanced For PQ Adjustment 6 Gamma Preset serveral Gamma Curves for PQ debug 7 DLC Preset serveral Curves for PQ debug 8 HDMI RGB Range Change Limit range or Full Range ...

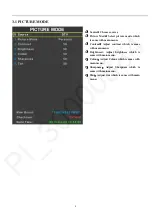
Page 12: ...e with main menu 2 Contrast Adjust contrast which is same with main menu 3 Brightnesst Adjust brightness which is same with main menu 4 Colour Adjust Colour which is same with main menu 5 Sharpness Adjust Sharpness which is same with main menu 6 Tint Adjust tint which is same with main menu ...

Page 13: ...trast for main menu from osd 0 to osd 100 2 Brightnesst Adjust the real brightness for main menu from osd 0 to osd 100 3 Colour Adjust the real colour for main menu from osd 0 to osd 100 4 Sharpness Adjust the real sharpness for main menu from osd 0 to osd 100 5 Tint Adjust the real tint for main menu from osd 0 to osd 100 ...

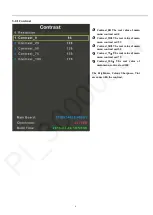
Page 14: ...25 The real value of main menu contrast osd 25 3 Contrast_50 The real value of main menu contrast osd 50 4 Contrast_75 The real value of main menu contrast osd 75 5 Contrast_100 The real value of main menu contrast osd 100 The Brightness Colour Sharpness Tint are same with the contrast ...

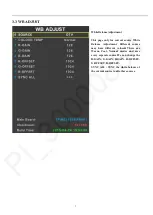
Page 15: ...e White Balance Adjustment Different source may have different values There are Warm Cool Normal modes and save every seperate source We can change the R GAIN G GAIN B GAIN R OFFSET G OFFSET B OFFSET SYNC ALL SYNC the white balance of the current source to all other sources ...

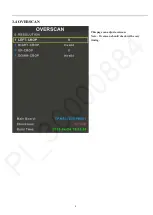
Page 16: ...8 3 4 OVERSCAN This page can adjust overscan Note Overscan should check with every timing ...

Page 17: ...9 3 5 PQ ADVANCED PQ Adjustment Page Adjust luminance Colors peakings NR and etc ...

Page 18: ...s 2 Volume Curve Adjust volume curve 3 Audio Prescale Adjust the power of current source 4 Audio AVC For Desginer Only 5 PEQ For Desginer Only 6 Audio DRC For Desginer Only 7 Treble Bass Range Adjust the Treble Bass range 8 SPDIF Audio Delay Adjust the SPDIF Audio delay ...

Page 19: ...11 4 1 SOUND MODE ...

Page 20: ...12 4 2 VOLUME CURVE NOTE 1 Volume Offset User overall volume control every source has a unique value 2 VOL1 VOL100 All sources share a same value make sure the next value bigger than the before ...

Page 21: ...dby Last boot status 1 LOGO Set boot logo on or off 2 Test Pattren Test pictures from IC which can help to judge panel issue or not 3 Channel Export Export channel table 4 Channel Import Import channels table to TV 5 Watch Dog watch dog switch ...

Page 22: ...14 6 DEBUG 0 UART Debug For deignger only 1 QMAP Map adjustment 3 Timer Test Speed up timer ...

Page 23: ...15 7 PANEL SETTING ...

Page 24: ...16 8 EMCSETTING ...

Page 25: ...17 9 SYSTEM INFO ...

Page 26: ...18 10 SW UPGRADE 0 Upgrade TV update item 1 Bin Name Software bin name ...

Page 27: ... а 0 1 а 2 1 1 3 а a 4 567а 89 7 0 4 4 0 568 8 а а а а а A B а C а а DB DD 0 ...

Page 28: ... E E а a ࡈ䘚ਹ F F F ᶘ䗮ᇼ F F a a a a a a a a a a a a a a a a a a a a a a a a F a a F a a a a a a E а a ...

Page 29: ...2 2 2 2 2 2 2 2 2 2 2 2 1 21 2 1 2 1 1 1 2 1 1 1 1 2 2 2 2 2 2 2 2 2 2 2 2 2 2 2 2 2 2 1 1 1 2 2 1 2 2 1 1 1 1 1 1 1 1 2 2 2 1 2 1 GHI 2 2 1 1 0J 0 2 GHI a a 0 a а 0а а а 0 K 6L 6 2 2 2 322 322 а а 8 2 12 0 3 1 GHI 3 а а а а а а 21 3 1 M 0 0 0 N N N N N N N N N N N N N N N N N N N N N N 0 0 0 0 0 0 0 а M а M 2 M 2 HI ...

Page 30: ... 01 01 2 12 1 2 12 1 886 а O P 28 0 886 а O P 28 76 0 0 2 12 12 A A 12 86Q а 886 7 28 0 86Q 86Q 86Q 2 3 2 3 3 2 3 ...

Page 31: ...2 1 1 0 0 0 0 0 0 8 а 5 а 9O 0 0 0 1 21 2 1 1 0 0 0 2 1 1 2 2 3 0 2 0 0 0 0 0 0 0 0 0 0 0 0 2 2 2 2 2 2 2 2 0 0 0 0 0 2 2 0 2 3 2 2 3 2 2 2 2 2 2 1 2 3 2 2 3 2 2 2 2 2 2 2 2 2 2 2 2 0 0 2 3 2 2 3 0 a a a a a 0 0 а P 0 QQ а 2 2 2 0 0 0 0 0 0 0 0 2 1 1 0 0 0 0 4 4 4 0 0 0 0 2 1 2 1 2 1 2 1 2 1 2 1 2 1 2 1 0 0 2 2 2 2 3 0 0 ...

Page 32: ... 0 0 0 a 4 0 а P 0 KQ6 Q P Q 8 6 2 0 322 322 2 1 а 7 8 67 8 3 3 3 3 A K 7 K K 7 7 а P 0 7 8 6 0 6 Q 7 86а P 0 Φ 0 Q P 6 Q 7 86а P 0 Φ 0 Q P 6 Q K 7 K K 7 7 а P 0 6QQ 5 0 6 Q A 3 00 33 3 ...

Page 33: ... 8 8 8 8 3 3 3 M M M M M M 3 3 3 M M M 3 3 3 3 а QQ 6 ...

Page 34: ... 6 а 7 8 7 67 0 4 0 3 3 2 а 1 2 1 2 2 1 2 1 0 0 0 0 0 0 0 0 0 0 0 0 6 5 7Pа 67 8 Q A 2 2 0 0 0 0 0 2 2 ...

Page 35: ... a a a a a a a a a a a a a a а O P 00 ...

Page 36: ... 2 1 2 1 567а 89 7 0 4 4 0 568 8 567а 89 7 0 4 4 0 568 8 567а 89 7 0 4 4 0 568 8 567а 89 7 0 4 4 0 568 8 а а 0 0 0 0 а а а а а а 0 a 4 0 Q 6 ...

Page 37: ...DD а aа DD DD DD aа DB а a 8 4 а 0 8 Q6 0 0 5 Q6 4 4 4 4 0 а 0 3 8 8 8 3 8 8 0J 0 5 8 0 а 89 7 80 8Q 79 8 80 8 0 а а 867 6Q 1 2 33 1 33 80 80 4 4 4 0 0J 0 4 4 4 0 3 1 2 1 1 2 33 1 33 1 3 5 1 2 1 1 3 5 1 1 а 0J 6P a 4 2 5 a 4 8 ...

Page 38: ...ial Signal output from processor and input for panel O C Open Cell panel with source board BL Back Light light source for panel module LB LED Light Emitting Diode Bar light source for BL module VBL Voltage for Back Light before Boost VLED Voltage for LED after Boost OVP Over Voltage Protection OSD On Screen Display AMP Amplifier ...

Page 39: ...1 No power No power LED RC or Key can not turn on TV Power LED no light no change ...

Page 40: ...2 No Display Black Panel Back light is OK sound is OK but no picture ...

Page 41: ...3 No back light Power LED logic OK sound OK but no picture Different from No Display ...

Page 42: ...4 No sound One or all signal source without sound ...

Page 43: ...5 Signal source no function One or several source no function ...

Page 44: ...6 Abnormal Display OSD NG or picture NG ...

Page 45: ......

Page 46: ...65420 0HAX4G DECOR KEY BLACK 五向按键 1 PC 10 56 487960 0HHZ2G LENS LIGH PURPLE R Y 透镜 1 PC 11 56 487810 0HA6RG DECOR KEY SUPPORT BLACK 五向按键支架 1 PC 12 55 742030 1UL6RG BACKCOVER 小后壳_上 1 PC 13 55 486320 1HN6RG BACKCOVER 小后壳_下 1 PC 14 46 FW0357 51DA3G WIRE LVDS 数据线 1 PC 15 46 FM065L 05PG WIRE IR WIRE 标准 5PIN IR 线 1 PC 16 46 FM060L 04P01G WIRE CABLE WIRE 按键线 600MM 4 A2008 A1250 1255 2 0 1 PC 17 42 WDF413...

Reviews: