background image

15

Using Media Player

Insert the USB Flash Memory.

Select the mode.

[PHOTO]:

Displays the thumbnail of all photos in the 

USB Flash Memory.

[MUSIC]:

Displays the thumbnail of music folders in 

the USB Flash Memory.

[VIDEO]:

Displays the thumbnail of video titles in the 

[DISK]:

Displays the thumbnail of all document in 

the USB Flash Memory.

USB Flash Memory.

[Contents Display]

Follow the operation guide to perform 

available operations.


When the cursor stays on the icon,it displays the 

information of the highlighted content.

 Using Media Player

Media Player allows you to enjoy photo, music or video 

recorded on a USB Flash Memory.


The picture may not appear correctly on this TV 

depending on the digital cameras used.


Display may take some time when there are many files 

and folders in the USB Flash Memory.


Partly degraded files might be displayed at a reduced 

resolution.


The folder and file names may be different depending 

on the digital camera used.

Starting Media Player

Inserting / Removing the USB Flash 

Memory

TV


Insert or remove 

straight and 

completely.

Access

Select

Photo:

1. Select Picture icon, then press OK button to view the

picture.

2. Press Up, Down, Left or Right direction button to select 

your desired  picture file and press  OK to show.

3. While showing picture, press OK to display the play console. 

For Previous and Next use remote left and Right key. 

4. Use OK key to see more option: Left rotation, Right rotation,

ZOOM+, ZOOM-, Manual play/Auto play, Information, Play 

interval, Play mode,BGM:on or off.

Video:

1. Select Video icon, then press OK button to view movie file.

2. Press Up, Down, Left or Right direction button to select 

your desired file and press OK to Play.

3. While playing a Video, press OK Menu of remote to display  

the play console. For the Play console, Press Ok key of remote 

to Play and Pause the video file.Left key of remote to Fast

backward.Right key of remote to Fast forward.

4. Use       key to see more option: Photo scale, Looping

mode, Subtitle, Subtitle codeAudio track, info and Settings. 

5. Press Return key of remote to Stop playing and Press

Return to Exit.

1. Select 

Disk

 icon, then press OK button to choose folder.

2. Press Up, Down, Left or Right direction button to select your 

desired  file and press OK to Play.

3. Press Return key of remote to Stop playing.

Photo

Video

Music

Disk

Disk:

1. Select Music icon, then press OK button to listen to Music.

2. Press Up, Down, Left or Right direction button to select your 

desired  file and press  OK to Play.

3. The Play console includes Previous, Play/Pause,Fast

backward/Fast forward,Next.

Press          key to see PlayList. 

4. Press Return key of remote to Stop playing.

Music:

500mA

MAX

5V

500mA

MAX

5V

Summary of Contents for TH-43JX600Z

Page 1: ...els and countries The images shown in this manual are for illustrative purposes only Some illustrations are presented as conceptual images and may be different from the actual products The illustrations for 50 inch model is used in this manual unless otherwise mentioned Transport only in upright position Model No TH 43JX600Z TH 50JX600Z TH 55JX600Z TH 65JX600Z TH 75JX600Z 43 inch model 50 inch mod...

Page 2: ... Precautions 3 Setting Up the TV 4 Connecting the TV 6 Operating the TV 10 Watching External Inputs 11 Initial Setup 8 Using Homepage Apps 12 Using the Menu Functions 13 Additional Information 16 Troubleshooting 20 Maintenance 21 Specifications 22 Using Media Player 15 ...

Page 3: ...o help avoid risk of electrical shock fire damage or injury please follow the warnings and cautions below Mains plug and lead Warning If you detect anything unusual immediately remove the mains plug Mains plug types vary between countries This TV is designed to operate on AC 100 240 V 50 60 Hz Insert the mains plug fully into the socket outlet Ensure that the mains plug is easily accessible Discon...

Page 4: ...mly tied and fixed on the table and other solid position Replace only with the same or equivalent type Do not mix old and new batteries Do not mix different battery types such as alkaline and manganese batteries Do not use rechargeable batteries Ni Cd etc Do not burn or break up batteries Do not expose batteries to excessive heat such as sunshine fire or the like Make sure you dispose of batteries...

Page 5: ...and injury remove the TV from its fixed wall position when it is no longer in use Warning Setting Up the TV Depth of screw Screw for fixing the TV onto the wall hanging bracket not supplied Holes for wall hanging bracket installation Model a b 43 inch 300 mm 300 mm 50 inch 300 mm 300 mm 55 inch 300 mm 300 mm 65 inch 400 mm 300 mm 75 inch 400 mm 300 mm Model Type 43 inch M6 12 mm 15 mm 50 inch M6 1...

Page 6: ...l cable away from the mains lead to avoid and minimise mains interference pickup Do not place the RF cable under the TV An aerial correct cable 75 Ω coaxial and correct terminating plug are required to obtain optimum quality picture and sound If a communal aerial system is used you may require the correct connection cable and plug between the wall aerial socket and the TV Your local Television Ser...

Page 7: ...plifier To enjoy the sound from the external equipment in multi channel sound e g Dolby Digital 5 1ch connect the equipment to the amplifier For the connections Blu Ray Player Blu Ray Player TV HDMI cable AV Game equipment Using HDMI terminal TV HDMI cable Equipment Amplifier Equipment TV HDMI cable HDMI 1 ARC Amplifier with speaker system Use HDMI1 to connect the TV to an amplifier which has ARC ...

Page 8: ...V location Initial Setup When you turn on the TV for the first time there will show a wizard to guide you to finish the following initial settings Step 1 Select the menu language as you need Note English New Zealand is recommended Step 2 Only for some countries Select whether or not to use and Android device to setup the TV Google Initial Setup Note If you don t want to use your Android device to ...

Page 9: ... make any changes by using button Country Region NEWZEALAND Environment Home Step 1 Step 2 Step 3 Step 4 Step 5 Home Shop 1 2 3 4 5 Next Environment Please choose your Environment Home Shop Shop with demo Where are you We will provide you with the local time climate and more information Country Region AUSTRALIA NEWZEALAND Next step is to represent you have read and agreed Terms Conditions Please r...

Page 10: ...r it with the TV firstly The following steps are for your reference Remote Control Functions Most of your television s functions are available via the menus that appear on the screen The remote control supplied with your set can be used to navigate through the menus and to configure all the general settings POWER On Off button Turns the TV on or off up down left and right direction buttons Highlig...

Page 11: ...cators on the TV 6 7 75 inch model 43 50 55 65 inch model Indicators on the TV 2 3 1 1 3 2 4 5 2 Displays Menu Source Select Mains power On Off switch 3 Volume Down Cursor Left Makes selections and or adjustments when in the menu system 5 Volume Up Cursor Right Makes selections and or adjustments when in the menu system The TV is on press it bring up the main menu or confirm selections in submenu ...

Page 12: ...roduct appearance And for some models certain options are not available You can select all the features from homepage Press to display homepage Press to select icons from the screen list Press OK to enter each option CUSTOMISE CHANNELS Add and remove channels from your Home screen Using Homepage Apps Using Homepage Apps To exit the APP press or ...

Page 13: ...s you to the TV with your preferences TV Each menu is outlined and detailed to help you get the most from your TV To access the menu system 1 2 Press to select the desired item then press OK to open the corresponding submenu 3 In submenu use and OK buttons to make the adjustments or use to select an item use OK to enter and operate according to the on screen display or guide Press to return to the...

Page 14: ... Sound Modes Note Picture mode setting will not be accessible when you select Shop Mode Shop Demo Enter to set E sticker Power Enter to set Power mode Wake on Wifi Enable wake on WIFI Settings Network stand by Enable STR Settings Sleep Timer Set the TV to turn off automatically Idle TV standby Select the inactivity time that TV enter standby Available space Show system and memory free space Smart ...

Page 15: ... and press OK to show 3 While showing picture press OK to display the play console For Previous and Next use remote left and Right key 4 Use OK key to see more option Left rotation Right rotation ZOOM ZOOM Manual play Auto play Information Play interval Play mode BGM on or off Video 1 Select Video icon then press OK button to view movie file 2 Press Up Down Left or Right direction button to select...

Page 16: ... may damage the data or device Panasonic is not liable for any deterioration or damage of data or device during operations with the TV It is recommended to connect the USB Flash Memory directly to the TV s USB port Some USB devices or USB HUB may not be used with this TV You cannot connect any devices by using USB card reader Additional information for USB devices may be on the following website E...

Page 17: ...Do not disconnect USB devices while they are transferring files Limitations on use of photo video and music files When connecting an external hard drive use the USB HDD port We recommend that you use an external hard drive with its own power adapter Certain digital cameras and audio devices may not be compatible with the TV The TV supports the FAT file systems After sorting files in the Folder vie...

Page 18: ...265 MP LV 5 1 H 265 MP LV 6 1 8 H 265 MP10 LV 5 1 H 265 MP10 LV 6 1 8 9 10 Generic Motion JPEG WMV Window Media Video v9 VC1 VC 1 SP MP AP VP9 VP9 profile 2 10bit 50 М 8 10 RV 8 rv30 RV 9 rv40 RV 10 rv40 AVS Jizhun Profile LV 6 0 AVS Plus MPEG 1 2 4 1920x1080 60 50 М 8 125 М H 264 4096х2160 30 150 М 4096х2160 60 RM 1920x1080 30 25 М 8 AVS MPEG1 MPEG2 MP HL MPEG 4 SP HL 3 0 MPEG 4 ASP HL 4 0 1920x1...

Page 19: ...IS VORBIS MPEG 1 2 4 AAC PCM MPEG1 Layer1 2 MPEG1 Layer1 2 MPEG2 MP3 MPEG1 Layer3 MPEG2 AAC AAC LC MPEG4 AAC LC HE AAC v1 v2 raac MPEG4 AAC LC RealAudio9 racp MPEG4 HE AAC v2 RealAudio10 PN Audio Decoder For MM Video TS ts tsv tsa M2TS m2ts MP4 mp4 m4a m4p m4b m4r 3GP 3gp MKV MKAs mkv mk3d mka mks FLV flv f4v f4p f4a f4b ASF WMV WMA wmv wma RM RMVB rm rmvb AVI avi MPG MPEG dat vob mpg mpeg m4a OGG...

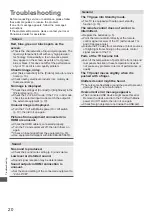
Page 20: ... match the output of the external equipment p 10 Unusual image is displayed Turn the TV off with Mains power On Off switch p 10 then turn it on again Pictures from equipment connected via HDMI are unusual Check the HDMI cable is connected properly Turn the TV and equipment off then turn them on again Check an input signal from the equipment p 18 Use equipment compliant with EIA CEA 861 861D Genera...

Page 21: ...way all the moisture Caution Do not use a hard cloth or rub the surface too hard as this could scratch the surface Do not subject the TV s surfaces to water or detergent Liquid inside the TV could lead to product failure Do not subject the surfaces to insect repellent solvent thinner or other volatile substances This may degrade surface quality or cause peeling of the paint The surface of the disp...

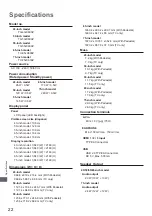
Page 22: ... model 164 cm 75 inch model 189 cm 43 inch model 3 840 W 2160 H 50 inch model 3 840 W 2160 H 55 inch model 3 840 W 2160 H 65 inch model 3 840 W 2160 H 75 inch model 3 840 W 2160 H 50 inch model 10 1 kg With Pedestal 9 7 kg TV only Mass Connection terminals Speaker Output Audio output 20 W 10 W 10 W 75 inch model Audio output 24 W 12 W 12 W 43 inch model 7 2 kg With Pedestal 7 0 kg TV only 55 inch ...

Page 23: ...rating conditions Temperature 0 C 45 C Humidity 20 80 RH non condensing Note Design and Specifications are subject to change without notice Mass and Dimensions shown are approximate 9 Systems Systems Function 1 PAL B G 2 PAL I 3 PAL D K PAL Reception of broadcast 6 Playback from Special VCR s or DVD 4 NTSC 4 43 5 NTSC 3 58 7 PAL 60 Hz 5 5 MHz 8 PAL 60 Hz 6 0 MHz 9 PAL 60 Hz 6 5 MHz Playback from S...

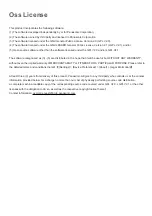
Page 24: ...l be useful but WITHOUT ANY WARRANTY without even the implied warranty of MERCHANTABILITY or FITNESS FOR A PARTICULAR PURPOSE Please refer to the detailed terms and conditions thereof Settings Device Preferences About Legal information At least three 3 years from delivery of this product Panasonic will give to any third party who contacts us at the contact information provided below for a charge n...

Page 25: ...ation on Disposal in other Countries outside the European Union This symbol is only valid in the European Union If you wish to discard this product please contact your local authorities or dealer and ask for the correct method of disposal Web Site http www panasonic com Panasonic Corporation 2021 WARRANTY New Zealand only Distributed in New Zealand by Panasonic New Zealand Limited 18 Sir Woolf Fis...

Reviews: