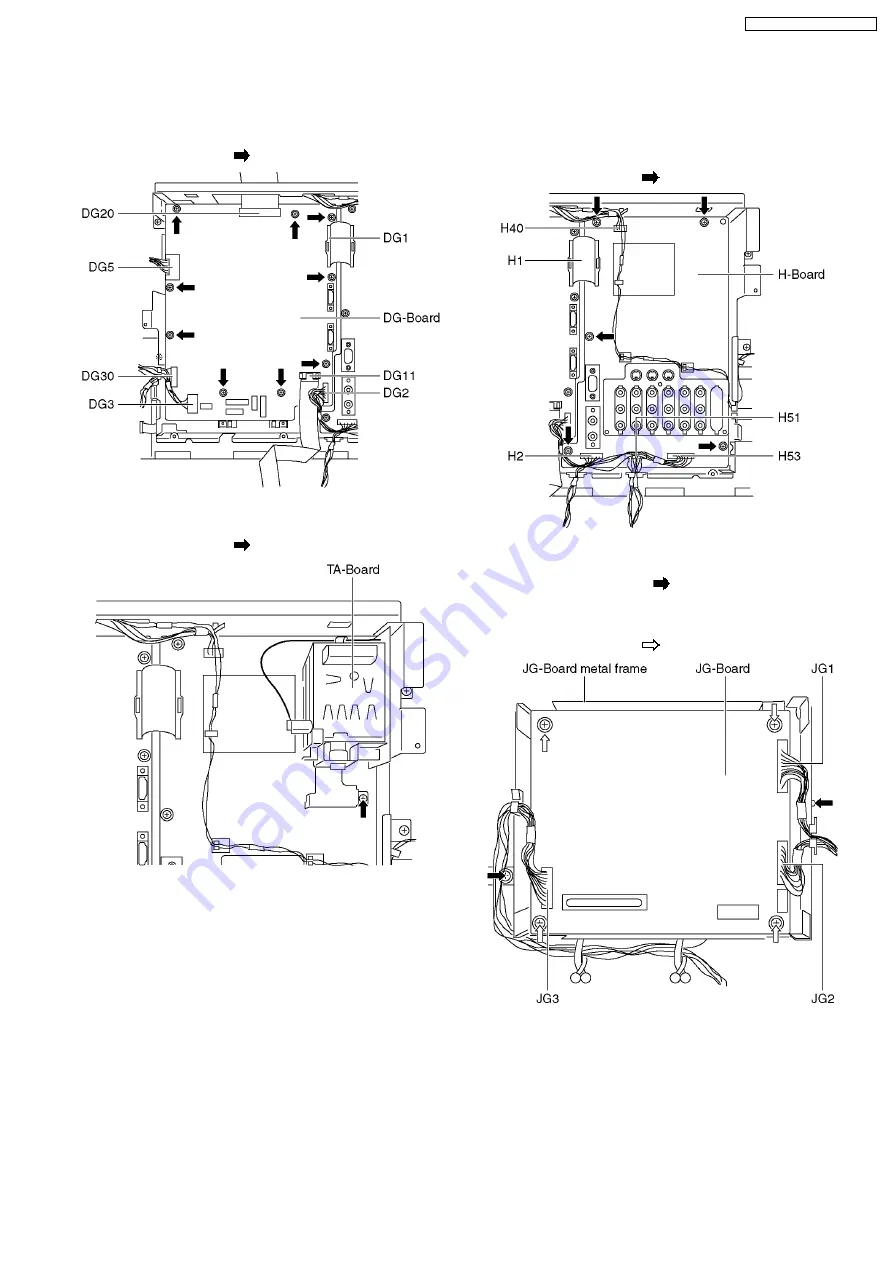
6.8. Remove the DG-Board
1. Disconnect the couplers (DG2, DG3, DG5 and DG90).
2. Disconnect the flexible cables (DG1, DG11 and DG20).
3. Remove the screw (×9
) and remove the DG-Board.
6.9. Remove the TA-Board
1. Remove the screw (×1
) and remove the TA-Board.
6.10. Remove the H-Board
1. Unlock the cable clampers to free the cable.
2. Disconnect the couplers (H2, H40, H51 and H53).
3. Disconnect the flexible cable (H1).
4. Remove the screws (×5
) and remove the H-Board.
6.11. Remove the JG-Board
1. Remove the screws (×2
) and remove the JG-Board
metal frame.
2. Disconnect the couplers (JG1, JG2 and JG3).
3. Remove the screws (×4
) and remove the JG-Board.
13
TH-65PV600A / TH-65PV600M
Summary of Contents for TH-65PV600M
Page 6: ...1 Applicable signals 6 TH 65PV600A TH 65PV600M ...
Page 25: ...8 3 Lead of Wiring 2 25 TH 65PV600A TH 65PV600M ...
Page 26: ...8 4 Lead of Wiring 4 26 TH 65PV600A TH 65PV600M ...
Page 27: ...8 5 Lead of Wiring 5 27 TH 65PV600A TH 65PV600M ...
Page 31: ...9 4 No Picture 31 TH 65PV600A TH 65PV600M ...
Page 34: ...34 TH 65PV600A TH 65PV600M ...
Page 35: ...10 3 Option Description 35 TH 65PV600A TH 65PV600M ...
Page 36: ...36 TH 65PV600A TH 65PV600M ...
Page 39: ...11 4 Adjustment Volume Location 11 5 Test Point Location 39 TH 65PV600A TH 65PV600M ...
Page 48: ...48 TH 65PV600A TH 65PV600M ...
Page 83: ...15 Schematic and Block Diagram 15 1 Schematic Diagram Notes TH 65PV600A TH 65PV600M 83 ...
Page 164: ...16 2 Packing Exploded View 1 164 TH 65PV600A TH 65PV600M ...
Page 165: ...16 3 Packing Exploded View 2 165 TH 65PV600A TH 65PV600M ...
Page 166: ...16 4 Packing Exploded View 3 166 TH 65PV600A TH 65PV600M ...


