background image

48

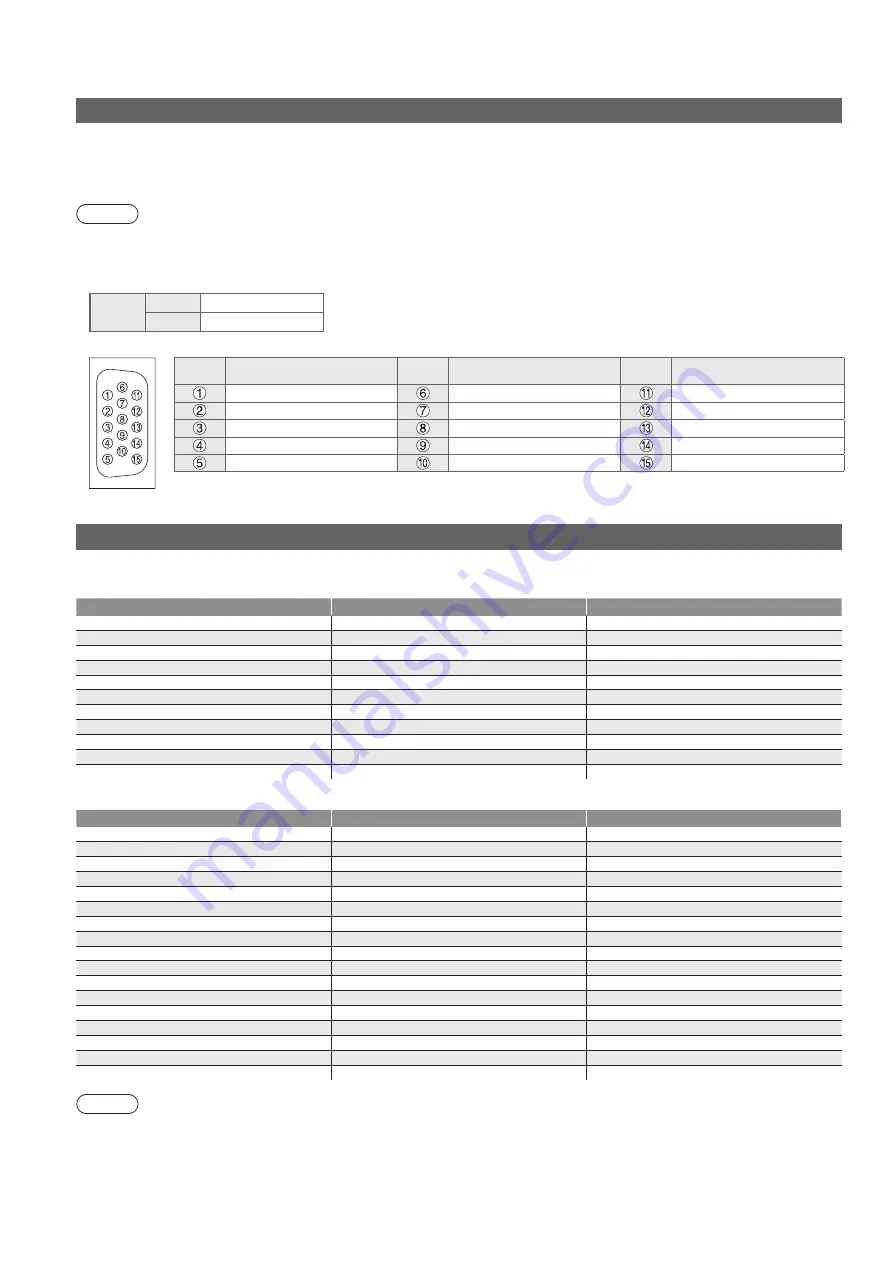
PC connection

A PC may be connected to this TV so that the PC screen is displayed and sound is heard from the TV.

PC signals that can be inputted: Horizontal scanning frequency 31 to 69 kHz; vertical scanning frequency 

59 to 86 Hz (more than 1,024 signal lines could result in incorrect display of the image).

A PC adapter is not necessary for the DOS/V-compliant D-sub 15-pin connector.

Note

Some PC models cannot be connected to this TV.

When using PC, set the colour display quality of PC to the highest position.

For details of the applicable PC signals, see below.

Max. display resolution

Aspect

4:3

1,024 × 768 pixels

16:9

1,366 × 768 pixels

D-sub 15-pin connector signal

Pin No.

Signal Name

Pin No.

Signal Name

Pin No.

Signal Name

R

GND (Ground)

NC (not connected)

G

GND (Ground)

NC (not connected)

B

GND (Ground)

HD

NC (not connected)

NC (not connected)

VD

GND (Ground)

GND (Ground)

NC (not connected)


Technical Information

Input signal that can be displayed

COMPONENT 

(Y, P

B

/C

B

, P

R

/C

R

)

, HDMI

 Mark: Applicable input signal

Signal name

COMPONENT

HDMI

525 (480) / 60i

525 (480) / 60p

625 (576) / 50i

625 (576) / 50p

750 (720) / 60p

750 (720) / 50p

1,125 (1,080) / 60i

1,125 (1,080) / 50i

1,125 (1,080) / 60p

1,125 (1,080) / 50p

1,125 (1,080) / 24p

PC 

(D-sub 15P)

Signal name

Horizontal frequency (kHz)

Vertical frequency (Hz)

640 × 400 @70 Hz

31.47

70.07

640 × 480 @60 Hz

31.47

59.94

640 × 480 @75 Hz

37.50

75.00

800 × 600 @60 Hz

37.88

60.32

800 × 600 @75 Hz

46.88

75.00

800 × 600 @85 Hz

53.67

85.06

852 × 480 @60 Hz

31.44

59.89

1,024 × 768 @60 Hz

48.36

60.00

1,024 × 768 @70 Hz

56.48

70.07

1,024 × 768 @75 Hz

60.02

75.03

1,024 × 768 @85 Hz

68.68

85.00

1,280 × 1,024 @60 Hz

63.98

60.02

1,280 × 768 @60 Hz

47.70

60.00

1,366 × 768 @60 Hz

48.39

60.04

Macintosh13” (640 × 480)

35.00

66.67

Macintosh16” (832 × 624)

49.73

74.55

Macintosh21” (1,152 × 870)

68.68

75.06

Note

Signals other than above may not be displayed properly.

The above signals are reformatted for optimal viewing on your display.

Applicable input signal for PC is basically compatible to VESA standard timing.

PC signal is magnified or compressed for display, so that it may not be possible to show fine detail with sufficient 

clarity.

Summary of Contents for TH-L32X10A

Page 1: ... the Service Centre Locator for the name address of the nearest Authorised Service Centre Send or bring the product to a Panasonic Authorised Service Centre together with your proof of purchase receipt as a proof of purchase date Please note that freight and insurance to and or from your nearest Authorised Service Centre must be arranged by you Note that home or pick up delivery service is availab...

Page 2: ...ructions LCD TV Model No TH L32X10A Please read these instructions before operating your set and retain them for future reference The images shown in this manual are for illustrative purposes only TQB0A0227 1 English ...

Page 3: ...link ups with VIERA Link without complicated settings Trade Mark of the DVB Digital Video Broadcasting Project 1991 to 1996 TH L32X10A Declaration of Conformity No 6266 05 December 2008 Notice about Digital TV Functions The MPEG 4 AVC feature was designed to specifications as we know them today This specification may be subject to future changes beyond our control that may not guarantee the decodi...

Page 4: ... Auto Tuning 12 Basic Features Watching TV 14 Using TV Guide 17 Viewing Teletext 18 Watching Videos and DVDs 20 Advanced Features How to Use Menu Functions 22 picture sound quality etc Input Labels 26 Digital TV Settings 27 Editing Channels 28 Tuning Channels 30 Restore Settings 32 Displaying PC Screen on TV 33 HDMI Functions 34 Viewing from SD Card VIERA IMAGE VIEWER 35 VIERA Link HDAVI ControlTM...

Page 5: ...s away from the TV To prevent damage which may result in fire or shock hazard do not expose this appliance to dripping or splashing Do not place containers with water flower vase cups cosmetics etc above the TV including on shelves above etc Do not expose to direct sunlight and other sources of heat Avoid exposing the TV to direct sunlight and other sources of heat To prevent fire never place any ...

Page 6: ...t going to be used for a long period of time remove the mains plug This TV will still consume some power even in the Off mode as long as the mains plug is still connected to a live socket outlet Transport only in upright position Allow sufficient space around the TV for radiated heat Minimum distance 10 10 10 10 cm When using the pedestal keep the space between the bottom of the TV and the surface...

Page 7: ...ke contact with a rubber or PVC substance for a long time Mains plug Wipe the mains plug with a dry cloth at regular intervals Moisture and dust may lead to fire or electrical shock Licence DVB is a trademark of the DVB Digital Video Broadcasting Project 1991 to 1996 VGA is a trademark of International Business Machines Corporation S VGA is a registered trademark of the Video Electronics Standard ...

Page 8: ...NG Failure to use a Panasonic bracket or choosing to mount the unit yourself will be done at the risk of the consumer Any damage resulting from not having a professional installer mount your unit will void your warranty Always be sure to ask a qualified technician to carry out set up Incorrect fitting may cause equipment to fall resulting in injury and product damage Do not mount the unit directly...

Page 9: ...t Caution Do not use any other TV and displays Otherwise the TV may fall over and become damaged and personal injury may result Do not use the pedestal if it becomes warped or physically damaged If you use the pedestal while it is physically damaged personal injury may result Contact your nearest Panasonic dealer immediately During set up make sure that all screws are securely tightened If insuffi...

Page 10: ...htness Colour Sharpness Tint NTSC mode Bass Treble Balance Digital TV Auto Tuning or Analogue TV Auto Tuning p 24 25 Change the channel up down When a function is displayed press up down to adjust the setting of the selected function When in standby mode switches TV on Change the input mode 15 359 mm 230 mm 15 Set the mark at the centre as illustrated to have the swivel positioned at the centre of...

Page 11: ...to the normal viewing screen Numeric buttons Changes channel and teletext pages When in Standby mode switches TV On SD Card p 35 Switches to SD Card viewing mode Stereo Bilingual Sound Selection p 46 Changes the sound track when more than two choices are available Digital TV mode p 16 Sound Mute Switches sound mute On or Off Subtitles p 14 Displays subtitles Input mode selection TV switches Digita...

Page 12: ...ity picture and sound an Aerial the correct cable 75 Ω coaxial and the correct terminating plug are required If a communal Aerial system is used you may require the correct connection cable and plug between the wall Aerial socket and the TV Your local Television Service Centre or dealer may be able to assist you in obtaining the correct Aerial system for your particular area and the accessories re...

Page 13: ...io Wales Digital TV 10 62 E4 Digital TV 10 62 Cartoon Nwk Digital TV 10 29 Analogue TV 33 Digital TV 4 Analogue TV 2 Searching Analogue TV Analogue TV Scan CH 0 75 Digital TV Scan CH 6 69 Auto Tuning will start to search for TV channels and store them The sorted channel order depends upon the TV signal the broadcasting system and reception conditions 5 Select the viewing environment Please select ...

Page 14: ...de How to use remote control MENU Open the Main Menu Move the cursor select the menu Move the cursor adjust levels select from a range of options Access the menu store settings after adjustments have been made or options have been set RETURN Return to the previous menu EXIT Exit the menu system and return to the normal viewing screen Note To edit channels Editing Channels p 28 If tuning has failed...

Page 15: ...e If one or two digit channel number quickly changes the channel To select from the Channel List Cartoon Nwk All Digital Channels BBC Radio Wales BBC Radio Cymru BBC ONE Wales BBC THREE BBCi CBBC Channel 6 7 8 1 2 3 4 Select View EXIT RETURN Page up Page down watch select a channel Select a channel using information banner p 15 Possible to confirm the programme name before selecting channels Displ...

Page 16: ... 90 Off Timer remaining time For settings see below Off Timer To cancel Set to 0 set to Off or turn the TV off To display the remaining time Information banner When the remaining time is within 3 minutes the remaining time will flash on screen Select the region where you live to adjust the standard time The time contained in the broadcast signal is UTC Universal Time coordinated formally known as ...

Page 17: ...isplays a 2 35 1 letterbox anamorphic image full screen without distortion At 16 9 displays the image at its maximum with slight enlargement Note Only 16 9 and 4 3 Full are available in Digital TV mode Only 16 9 and 4 3 are available in PC mode Only 16 9 is available when Viewing Mode is set to Game Not available in teletext mode Aspect mode can be memorized separately for SD Standard definition a...

Page 18: ...m Eastender DIY SOS The Bill Red Cap Live junction POP 100 Rugby D 2 ABC TV Sydney D 4 FTV guide D 3 SBS DIGITAL D 7 7 Digital View Select programme Select channel RETURN 24 hours Prog Type Favourites EXIT All Types All Channels TV Guide Portrait Wed 26 03 2008 11 27 am Wed 26 03 2008 Info Portrait Landscape GUIDE Portrait Displays by time Example To the previous day R To the next day G To watch t...

Page 19: ...t overview of the teletext information available Easy to use step by step selection of the topical subject Page status information at the bottom of the screen Available page up down R G To select among subject blocks B To select next subject within the subject block After the last subject it moves to the next subject block Y What is List mode In List mode four differently coloured page numbers are...

Page 20: ...ess and hold The number changes to white To change stored pages Colour button you want to change Enter new page number press and hold View sub page Only when teletext is more than one page Appears at top of the screen To view specific sub page MENU B example P6 Enter the 4 digit number Sub pages The number of sub pages varies depending on the broadcasters It may take some time for searching during...

Page 21: ...eturn to TV TV 1 Display the input select menu AV 2 Select the input mode of the connected equipment Input Selection AV1 AV2 AV3 PC HDMI1 HDMI2 TV HDMI3 select watch You can also select the input using the AV button on the remote control or the side panel of the TV Press the button repeatedly until the desired input is selected You can label or skip each input mode Input Labels p 26 3 View Display...

Page 22: ...t recording Panasonic equipment connected to the TV can be directly operated with the remote control How to change the code for each equipment Each type of Panasonic equipment has its own remote control code Please change the code for each equipment you want to operate Press and hold POWER during the following operations Enter the appropriate code See table below Press Type of equipment Code DVD R...

Page 23: ...m among alternatives To reset the settings To reset the picture settings only Reset Picture Defaults in Picture Menu p 24 To reset the sound settings only Reset Sound Defaults in Sound Menu p 25 To reset all settings Shipping Condition p 32 in Setup Menu Colour Balance Normal Changed Number and positions of alternatives Adjust using the slide bar Sharpness 50 Moved Go to the next screen Digital TV...

Page 24: ... Menu Speaker Distance to Wall Over 30cm 1 2 4 4 0 0 17 MPX Stereo Channel List Auto Tuning Digital TV Tuning Menu Update Channel List Signal Condition Manual Tuning Access Favourites Edit Access Access Access Access Access Add MPEG 4 AVC Channels Access New Channel Message On p 30 Display Settings On Playing Time Display Access Input Labels TOP Teletext Banner Display Timeout 3 seconds p 25 Acces...

Page 25: ...ases or decreases level to enhance or minimise lower deeper sound output Treble Increases or decreases level to enhance or minimise sharper higher sound output Balance Adjusts volume level of right and left speakers Headphone Volume Adjusts the volume of the headphones Surround Surround sound settings Off V Audio V Audio Provides a dynamic enhancer to simulate improved spatial effects Switching is...

Page 26: ...tes for playing game Off On When Viewing Mode is set to Game VIERA Link Settings VIERA Link Sets to use VIERA Link functions Off On VIERA Link functions become available when VIERA Link is set to On Power on Link Sets to use Power on Link functions Off On p 39 Power off Link Sets to use Power off Link functions Off On p 39 Standby Power Save Controls the power consumption in Standby mode of the co...

Page 27: ...AV3 AV3 PC PC HDMI1 HDMI1 HDMI2 HDMI2 HDMI3 HDMI3 Digital TV Digital TV Analogue TV Analogue TV AV1 AV1 select set The labels you set will be displayed in Input Selection menu p 20 or banner If Skip is selected you cannot select the mode For easier identification and selection of the input mode you can label each input terminals or skip terminal that is not connected to any equipment To select the...

Page 28: ...ails p 46 If System Update is performed the software will be updated It may change TV functions If you do not wish to do so set Auto Update Search in Standby to Off Select Auto Update Search in Standby and then set On or Off System Update Auto Update Search in Standby System Update Search Now On set select On Automatically performs a search in standby and downloads an update if any software update...

Page 29: ...y the menu MENU 3 Select Setup Main Menu Picture Sound Setup access select 4 Select Digital TV Tuning Menu or Analogue TV Tuning Menu Setup Menu VIERA Link Settings Display Settings System Menu Off Timer Other Settings Digital TV Tuning Menu Off Access access select 5 Select Favourites Edit or Channel List Channel List New Channel Message On Auto Tuning Digital TV Tuning Menu Update Channel List S...

Page 30: ...ed channels The hidden channels cannot be displayed except in this function Use this function to skip unwanted channels Select a channel and add delete CBBC Channel Digital TV Channel List Cartoon Nwk BBCi BBC Radio Wales BBC Radio Cymru BBC ONE Wales BBC THREE 70 72 105 719 720 1 7 add delete select add delete skip To retune each channel Manual Tuning p 31 R You can edit channels If a VCR is conn...

Page 31: ... EXIT Automatically retune all Digital TV or Analogue TV channels received in the area Only Digital TV channels are retuned in Digital TV mode Only Analogue TV channels are retuned in Analogue TV mode Start Auto Tuning Settings are made automatically EXIT RETURN Start Auto Tuning All digital TV tuning data will be erased Digital TV Auto Tuning Digital TV Auto Tuning EXIT This will take about 3 min...

Page 32: ...l Name The Digital TV Channel List is updated with the current settings saved as they are Normally use Digital TV Auto Tuning or Update Channel List to update Digital TV channels on your channel list If tuning has not been done completely or for adjusting the direction of the aerial use this function Digital TV Manual Tuning Analogue Scan 21 68 Physical Channel No Type New Digital TV 0 Signal Stre...

Page 33: ... System Information System Update System Menu Shipping Condition Access access select 5 Set Resets the TV to its original condition i e no channels tuned in All settings channels picture sound quality etc are reset Restore Settings Shipping Condition To return to TV EXIT Check the message and reset EXIT RETURN Confirm All tuning data will be erased Are you sure Are you sure Shipping Condition Foll...

Page 34: ...minates flicker and distortion Adjust after Clock adjustment Set to the minimum level if noise occurs Sync PC sync signal type H V SOG H V Horizontal and Vertical sync from your PC Most common sync format SOG Sync on Green sync from your PC Reset PC Settings Press the OK button to reset to the default Setup settings Other items p 24 and p 25 INDEX HOLD STTL TEXT MENU ASPECT OPTION RETURN R G Y B P...

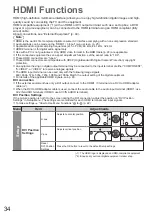
Page 35: ...PC is not guaranteed Only HDMI video formats in the HDMI table p 48 are applicable If the connected equipment has an aspect adjustment function set the aspect ratio to 16 9 These HDMI connectors are type A These HDMI connectors are compatible with HDCP High Bandwidth Digital Content Protection copyright protection An equipment having no digital output terminal may be connected to the input termina...

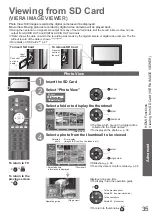
Page 36: ...older name Number of pictures 100_PANA 1 23 38 pictures 200_PANA 20 pictures 102_PANA 14 pictures 101_PANA 3 pictures 100_PANA 38 pictures Nature 14 pictures Fruit 18 pictures ROOM 1 picture 201_PANA 7 pictures Photo View Mode Folder view Select EXIT Select RETURN All pictures View Folder view select thumbnail The files which are not in a folder will be collected to the folder named To display all...

Page 37: ... picture 201_PANA 7 pictures Photo View Mode Folder view Select EXIT Select RETURN All pictures View Folder view G File name Date Pixel p1010001 1 175 23 10 2008 1600 x 1200 p1010004 p1010003 p1010002 p1010001 p1010008 p1010007 p1010006 p1010005 p1010012 p1010011 p1010010 p1010009 Photo View Mode All pictures Slideshow Folder view Sort by Month Sort by Date Select EXIT Select RETURN View Thumbnail...

Page 38: ...rn to list stop To change aspect ratio only for the 4 3 movie content ASPECT To return to TV EXIT or To return to the previous screen RETURN Movie View You can enjoy the multi channel sound via an amplifier connected to DIGITAL AUDIO OUT terminal To confirm or change the current sound status during playback Display the Option menu Change the sound if the movie has multiple audio signals OPTION Aud...

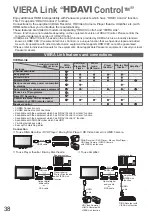
Page 39: ...Blu ray Disc theatre 2 Amplifier 2 Channel download 4 Easy playback 7 7 Power on link Power off link Reduce unnecessary power consumption in standby 5 5 5 Auto standby for unnecessary equipment 3 3 3 8 3 8 3 Pause Live TV programme 4 6 Direct TV Recording 4 Control the menu of the connected equipment by VIERA remote control 3 3 3 3 3 Speaker control 1 HDMI Connection only 2 HDMI and Audio out conn...

Page 40: ...o use this function Power on Link p 25 When the connected equipment starts playback or direct navigator function menu for the equipment are activated the TV is automatically turned on Only when the TV is in Standby mode Power off link Set Power off Link On in Setup Menu to use this function Power off Link p 25 When the TV is set to Standby mode the connected equipment is also automatically set to ...

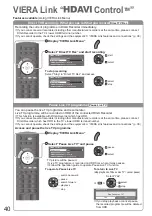
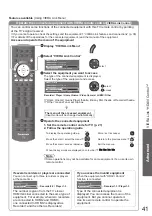
Page 41: ...ramme Pause Live TV You can pause the live TV programme and resume later Live TV programme will be recorded on HDD of the connected DIGA Recorder This function is available with DIGA Recorder which has HDD If you connect several recorders including other manufacturers recorders at the same time please connect DIGA Recorder which has HDD to the TV s lower HDMI terminal number If you cannot operate ...

Page 42: ... be changed automatically Operate the connected equipment 1 Set the remote control code for TV p 21 2 Follow the operation guide To display the operation guide OPTION Store set access Move the cursor select the menu Return to the previous menu RETURN Move the cursor access adjust Exit the menu EXIT When the key words are displayed on colour bar R G Y B Note Some operations may not be available for...

Page 43: ...lume slide bar will be displayed when adjusting the volume of the equipment Mute MUTE The sound of TV speakers is mute When the equipment is turned off TV speakers will be active TV TV speakers are active Note If you wish to enjoy the multi channel sound e g Dolby Digital 5 1ch via an Amplifier connect with HDMI cable and Optical digital audio cable p 38 and then select Home Cinema To enjoy the so...

Page 44: ...ol p 41 The connected device can be operated with the VIERA remote control When multiple devices are connected an indicator appears below the icon so that one device can be selected Pause Live TV Pause Live TV p 40 A live TV programme can be paused and resumed later Direct TV Rec Direct TV Rec p 40 What is on TV can be recorded immediately Speaker Selection Speaker Control p 42 Theatre speaker can...

Page 45: ... OUT VIDEO AUDIO L R To record playback videocassettes DVDs VCR DVD recorder To watch DVDs DVD player To watch camcorder images Video camera To watch satellite broadcasts Set top box To play games Game equipment To use amplifier with speaker system VIERA Link Recommended Connection Amplifier with speaker system To listen with speakers Viewing Listening PC Headphones VIDEO or S VIDEO AUDIO To adjus...

Page 46: ...C on device 12 TMDS Clock 10 TMDS Clock 8 TMDS Data0 Shield 6 TMDS Data1 4 TMDS Data1 2 TMDS Data2 Shield HDMI terminal Connect the S VIDEO or VIDEO terminal when using AV3 IN terminal Connect the COMPONENT or VIDEO terminal when using AV1 AV2 IN terminals To watch satellite broadcasts Set top box To record playback DVD Recorder VCR Fully wired HDMI compliant cable or RF cable To watch DVDs DVD pl...

Page 47: ...y buttons The TV is automatically activated after downloading is completed When the TV is switched to standby there will be a clicking sound after a short delay Similar clicking sounds will also occur at 3 00 AM and 5 00 AM when Auto update Search in Standby p 27 is set to On These sounds are normal Stereo Bilingual Sound Selection Analogue TV mode When you receive the stereo bilingual sound syste...

Page 48: ...th the adapter Check the latest information on the card type at the following website English only http panasonic co jp pavc global cs DCF Design rule for camera file system Unified standard established by Japan Electronics and Information Technology Industries Association JEITA Note Format the card with the recording equipment The picture may not appear correctly on this TV depending on the recor...

Page 49: ...layed COMPONENT Y PB CB PR CR HDMI Mark Applicable input signal Signal name COMPONENT HDMI 525 480 60i 525 480 60p 625 576 50i 625 576 50p 750 720 60p 750 720 50p 1 125 1 080 60i 1 125 1 080 50i 1 125 1 080 60p 1 125 1 080 50p 1 125 1 080 24p PC D sub 15P Signal name Horizontal frequency kHz Vertical frequency Hz 640 400 70 Hz 31 47 70 07 640 480 60 Hz 31 47 59 94 640 480 75 Hz 37 50 75 00 800 600...

Page 50: ...hat higher panel resolutions contain more pixels To create a colour image each pixel consists of three tiny coloured dots known as sub pixels one each of red green and blue Each one of these dots is precisely controlled by the electronics of the TV to produce the picture Whilst Panasonic maintains the highest standards in manufacturing technology and processes in the construction of these panels t...

Page 51: ...Signal message Check Signal Condition p 31 If Signal Quality or Signal Strength are displayed in red or constantly changing check aerial If problem persists consult your local TV aerial installer Check that the aerial and antenna cable are designed for DVB For your safety the aerial and cable should be inspected installed by a licenced installer that should comply with Australian Standard AS1417 1...

Page 52: ...ure 0 C 35 C Humidity 20 80 RH non condensing Connection Terminals AV1 Input AUDIO L R RCA PIN Type 2 0 5 V rms VIDEO RCA PIN Type 1 1 0 V p p 75 Ω COMPONENT Y PB CB PR CR 1 0 V p p including synchronization 0 35 V p p AV2 Input AUDIO L R RCA PIN Type 2 0 5 V rms VIDEO RCA PIN Type 1 1 0 V p p 75 Ω COMPONENT Y PB CB PR CR 1 0 V p p including synchronization 0 35 V p p AV3 Input AUDIO L R RCA PIN T...

Reviews: