background image

14

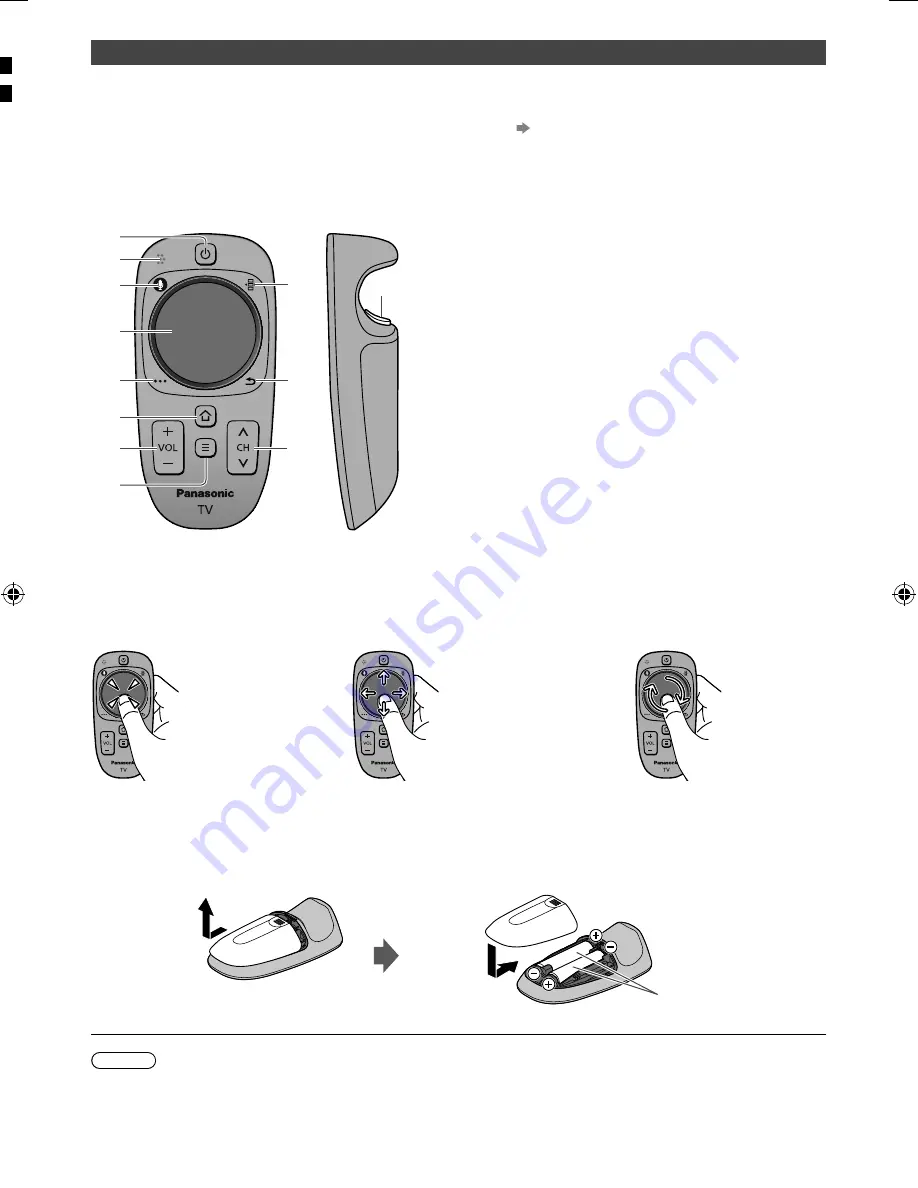
  VIERA Touch Pad Controller

 This touch pad controller is designed for the convenient operations, especially, on Home Screen or internet contents. 
You can operate the TV intuitively with this controller.

Ɣ


 The touch pad controller can be used by registering to this TV with Bluetooth wireless technology. Setup screen to 
register will appear in “First time Auto Tuning” for first using the TV.   

(p. 15)

Ɣ


 After registering, you can operate the TV without pointing this controller at the TV (except Standby On / Off switch).

Ɣ


 To use Standby On / Off switch, point the controller directly at the TV's remote control signal receiver because it 
works with the infrared. (You can operate the switch without registration.)

Ɣ


 It is recommended to speak within about 15 cm from microphone of VIERA Touch Pad Controller when using Voice 
Control function.


 2

 7

 9

 10

 12

 11

 1

 8

 5

 3

 4

 6

 1

 Standby On / Off switch

Ɣ


 Same function of the remote control button 1 (p. 13).

 2

 Microphone

 3

 Microphone button

 4

 Touch pad (see below)

 5

 [Option Menu]

 6

 HOME

Ɣ


 Same function of the remote control button 17 (p. 13).

 7

 Volume Up / Down

Ɣ


 Same function of the remote control button 11 (p. 13).

 8

 APPS

Ɣ


 Same function of the remote control button 5 (p. 13).

 9

 On-screen remote control

Ɣ


 Press to display the remote control GUI (Graphical User 
Interface). Press again to move the position of GUI. (To 
change the page of GUI, slide your finger to the left / right 
on the touch pad.)

 10

 Return

Ɣ


 Same function of the remote control button 20 (p. 13).

 11

 Channel Up / Down

Ɣ


 Same function of the remote control button 23 (p. 13).

 12

 OK


Ŷ

 Touch Pad


Ɣ


 Tap the centre of the pad for “OK”.

Ɣ


 Slide your finger to move the cursor (on 
internet contents or [Cursor Settings] in 
[VIERA Touch Pad Controller] (Setup 
Menu)), select the item, adjust levels, etc.

Ɣ


 Trace the fringe to scroll.


Ŷ

  Installing / Removing batteries


 Slide open


 Note the correct polarity 
(+ or -)

 Close

 Note

Ɣ


 It is recommended to hold the touch pad controller with your hand when using.

Ɣ


 The battery power will be used whenever you use the touch pad controller (including the touch of the touch pad) even 
if not operating the TV. It may decrease the battery life.

Ɣ


 Some operations differ depending on the application.

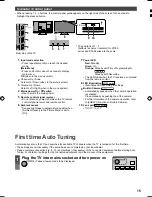
 Ind

Ɣ


 Whe
high

 1

 2

 3

 4

 5

 6

 Rear

  Fir

 Autom

Ɣ


 The

Ɣ


 Plea
Tun

 1


TH-L47_50_55_60DT_WT60AZ_EN TEMP.indd   14

TH-L47_50_55_60DT_WT60AZ_EN TEMP.indd   14

3/26/2013   9:38:29 AM

3/26/2013   9:38:29 AM

Summary of Contents for TH-L50DT60A

Page 1: ...o Tuning 15 Using your VIERA Operations 16 How to Use eHELP 17 Viewing 3D images 18 Others FAQs 19 Maintenance 19 Specifications 20 Model No Australia New Zealand TH L50DT60A TH L50DT60Z TH L55DT60A T...

Page 2: ...nty of fitness for a particular purpose any loss of data and any implied warranties arising from course of dealing or course of performance of data communication between the USB devices and the USB po...

Page 3: ...eople Install or remove the TV by the specified procedure Radio wave Warning Do not use the TV and VIERA Touch Pad Controller in any medical institutions or locations with medical equipment Radio wave...

Page 4: ...Eyewear Be careful not to trap your fingers in the hinge section of the 3D Eyewear Do not use the 3D Eyewear if it is physically damaged If you suffer from any eyesight problems short far sighted asti...

Page 5: ...le tie p 11 12 Operating Instructions with Warranty statement Fall prevention parts p 6 7 Accessories may not be placed all together Take care not to throw them away unintentionally For the informatio...

Page 6: ...ver However no measure can guarantee protection in all cases Band Screw Wood screw F G H Adjusting the panel to your desired angle 50 inch model 55 inch model Do not place any objects within the full...

Page 7: ...l to a furniture as shown to prevent the TV from falling over This information is designed to reduce the risk of injuries caused by the TV falling over However no measure can guarantee protection in a...

Page 8: ...ame Basic connections Mains lead and aerial Digital TV Analogue TV AC 220 240 V 50 60 Hz Mains lead supplied Aerial RF cable Mains lead Insert the mains plug firmly into place When disconnecting the m...

Page 9: ...ork environment If you do not have any broadband network services please consult your retailer for assistance Prepare the internet environment for wired connection or wireless connection Setup of the...

Page 10: ...stem External equipment DVD Player etc TV Use HDMI2 for connecting an amplifier This connection is applicable when using an amplifier that has ARC Audio Return Channel function As for an amplifier wit...

Page 11: ...function 2 Use USB 1 port for connecting the Communication Camera DT60 series 3 Use USB 3 port for connecting the USB HDD Using the cable tie and cable clamp supplied DT60 series Do not bundle the RF...

Page 12: ...d via the On Screen Display menu Operation guide Operation guide will help your operation by using the remote control Example Sound Menu 1 2 0 0 0 0 Mode Standard Bass Treble Equaliser Auto Gain Contr...

Page 13: ...tches to teletext mode New Zealand 11 Volume Up Down 12 Numeric buttons Changes channel Australia Changes channel and teletext pages New Zealand Sets characters When in Standby mode switches TV on 13...

Page 14: ...see below 5 Option Menu 6 HOME Same function of the remote control button 17 p 13 7 Volume Up Down Same function of the remote control button 11 p 13 8 APPS Same function of the remote control button...

Page 15: ...ing The LED blinks when the TV receives a command from the remote control 8 LED illumination WT60 series Illuminates LED according to settings 9 Built in Camera WT60 series Automatically pops up when...

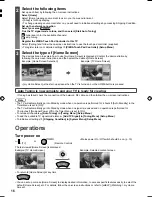
Page 16: ...n the TV is turned on or the HOME button is pressed Auto Tuning is now complete and your TV is ready for viewing If tuning has failed check the connection of the network RF cable and then follow the o...

Page 17: ...p of APPS List follow the on screen instructions or refer to eHELP Functions APPS List How to Use eHELP eHELP is the detailed operating instructions built into the TV and helps you to get more underst...

Page 18: ...patible player via a fully wired HDMI compliant cable If you use the non 3D compatible player the images will be displayed in 2D mode If the input mode is not switched automatically select the input m...

Page 19: ...of parts of the front top and rear panels has risen these temperature rises do not cause any problems in terms of performance or quality The LCD panel moves slightly and clattered sound is heard when...

Page 20: ...1 368 mm 796 mm 39 mm TV only Mass 20 5 Net With Pedestal 16 0 Net TV only 26 5 Net With Pedestal 21 0 Net TV only 34 0 Net With Pedestal 27 5 Net TV only WT60 series 47 inch model 55 inch model Model...

Page 21: ...rs HDMI 1 3 3D Content Type Deep Colour HDMI 2 3D Content Type Audio Return Channel Deep Colour This TV supports HDAVI Control 5 function Card slot SD Card slot 1 ETHERNET 10BASE T 100BASE TX USB 1 2...

Page 22: ...ne at the owner s risk Always use a qualified installer to perform a TV wall bracket installation Incorrect fitting may cause equipment to fall resulting in injury and product damage Any such damage w...

Page 23: ...r for the name address of the nearest Authorised Service Centre Send or take the product to a Panasonic Authorised Service Centre together with your proof of purchase receipt as a proof of purchase da...

Page 24: ...and for Warranty Service purposes Model Number Serial Number Information on Disposal in other Countries outside the European Union This symbol is only valid in the European Union If you wish to disca...

Reviews: