background image

18

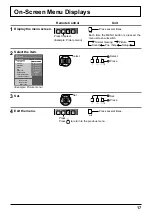
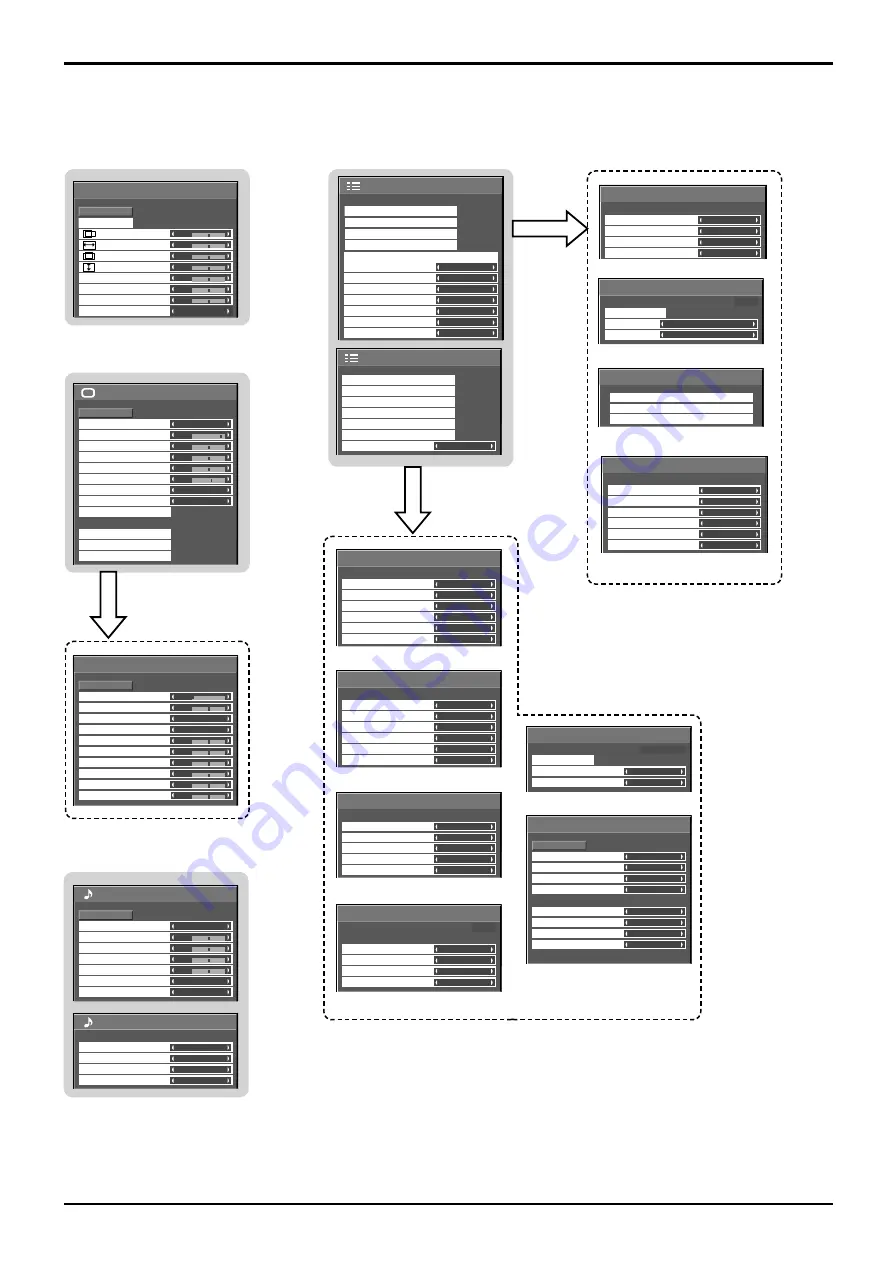
On-Screen Menu Displays

Overview

Note:


Menu that cannot be adjusted is grayout. Adjustable menu changes depending on signal, input and menu setting.

1/2 

Signal 

Screensaver

Extended life settings

Input label

Off

Standby save

Off

PC Power management

Off

DVI-D Power management

Off

Auto power off

Off

OSD Language

English (UK)

Component/RGB-in select

RGB

Power save

Setup 

SLOT INPUT
VIDEO

Input label

COMPONENT
HDMI
DVI
PC

SLOT INPUT

VIDEO

COMPONENT

HDMI

DVI

PC

3D Y/C Filter (NTSC)
Colour system

Signal

Cinema reality

[ AV ]

Noise reduction

On

Auto

Off
Off


0

Normal 

Normalise 

Auto Setup

Pos. /Size 

V-Pos 

H-Pos 

V-Size 

Dot Clock

H-Size 

Clock Phase
Clamp Position
1:1 Pixel Mode

Off


25

0
0
0
5

Picture

Normal

Normalise

Normal

Brightness

Sharpness

Picture Mode

Colour

Contrast

Hue

Colour Management

Advanced settings

Memory save

White balance

Normal

Off

Memory load

Memory edit

Black extension

AGC

Gamma

Input level

Advanced settings

Normal

Normalise

W/B Low B

W/B High R

W/B Low R
W/B Low G

W/B High G
W/B High B

0
0

2.2

0
0

0
0

0
0

Off

2/2

Sound Out

Left Channel
Right Channel

Channel 1
Channel 1

Off

Level Meter

Off

SDI Sound Output

Sound 

Normal 

Normalise 

Normal 


Off 

Treble 

Mid 

Sound Mode 

Balance 

Bass 

Surround 

Main 

Audio Out (PIP) 

1/2

2/2 

Setup

MULTI DISPLAY Setup

Set up TIMER

PRESENT TIME Setup

Network Setup

Display orientation

Landscape

MULTI PIP Setup

Portrait Setup

Set up TIMER 

POWER OFF Function 
POWER OFF Time 

POWER ON Time 

POWER ON Function 

Off 

0:00 

Off 

0:00 

PRESENT  TIME    99:99 

MULTI DISPLAY Setup

Off

Horizontal Scale 

× 2

Vertical Scale

× 2

Seam hides video

Off

Location

A1

AI-synchronization

Off

MULTI DISPLAY Setup

Off

Portrait Setup
Seam hides video

Off

1

Off

AI-synchronization

Viewing Area
Location

16 : 9

Portrait Setup

Blend PIP

Off

0%

Off

1

MULTI PIP Setup

MULTI PIP
Display Mode
Transparency
Transparency level
Insert
Insert level

Screensaver 

Start 

Function 

Scrolling bar only

Mode

Off

PRESENT  TIME    99:99 

Express settings

Custom settings

Reset

Extended life settings

PRESENT  TIME Setup 

Set

PRESENT  TIME

99:99

DAY

MON

PRESENT  TIME    MON  99:99

--:--:--:--:--:--

DHCP

Network Setup

Save

0

192.168.    0.    8
255.255.255.    0
192.168.    0.    1

1024

Auto

RS-232C

Off

Subnet mask

LAN Speed

Gateway

IP address

Port

Control I/F Select

Network ID

MAC address

Summary of Contents for TH42PF20ER

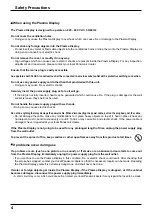
Page 1: ... a computer equipped with a CD ROM drive and Adobe Reader Version 7 0 or later is recommended installed on your computer Depending on the operating system or settings on your computer the Operating Instructions may not start automatically In this case open the PDF file under the MANUAL folder manually to view the instructions Important Safety Notice 2 Safety Precautions 3 Accessories 6 Connections...

Page 2: ...hock ensure the earthing pin on the AC cord power plug is securely connected CAUTION This appliance is intended for use in environments which are relatively free of electromagnetic fields Using this appliance near sources of strong electromagnetic fields or where electrical noise may overlap with the input signals could cause the picture and sound to wobble or cause interference such as noise to a...

Page 3: ...y cause damage to the internal circuitry Ventilation should not be impeded by covering the ventilation openings with items such as newspapers table cloths and curtains For sufficient ventilation If using the pedestal optional accessory leave a space of 10 cm or more at the top left and right and 7 cm or more at the rear and also keep the space between the bottom of the display and the floor surfac...

Page 4: ... electric shocks Do not do anything that may damage the power cable When disconnecting the power cable pull on the plug body not the cable Do not damage the cable make any modifications to it place heavy objects on top of it heat it place it near any hot objects twist it bend it excessively or pull it To do so may cause fire and electric shock If the power cable is damaged have it repaired at your...

Page 5: ... from direct or reflected light from your Plasma Display Cleaning and maintenance The front of the display panel has been specially treated Wipe the panel surface gently using only a cleaning cloth or a soft lint free cloth If the surface is particularly dirty wipe with a soft lint free cloth which has been soaked in pure water or water in which neutral detergent has been diluted 100 times and the...

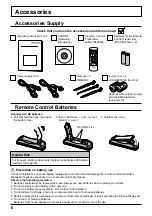
Page 6: ...for longer life Precaution on battery use Incorrect installation can cause battery leakage and corrosion that will damage the remote control transmitter Disposal of batteries should be in an environment friendly manner Observe the following precaution 1 Batteries shall always be replaced as a pair Always use new batteries when replacing the old set 2 Do not combine a used battery with a new one 3 ...

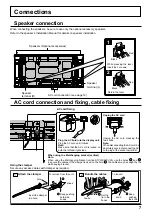
Page 7: ...oth the left and right sides AC cord fixing Unplug the AC cord Unplug the AC cord pressing the two knobs Note When disconnecting theAC cord be absolutely sure to disconnect theAC cord plug at the socket outlet first While pressing the lever insert the core wire Black Red Return the lever Black Red hole To loosen hooks To remove from the unit Insert the clamper in a hole Bundle the cables snaps Kee...

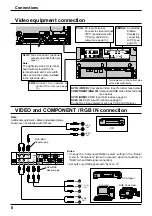
Page 8: ...w AV IN HDMI HDMI Input Terminal see page 9 DVI D IN DVI D Input Terminal see page 9 Connect to video equipment such as VCR or DVD player PC IN PC Input Terminal Connect to video terminal of PC or equipment with Y PB CB and PR CR output see page 10 SERIAL Control the Plasma Display by connecting to PC see page 11 Y PB PR OUT PR PB Y AUDIO OUT R L VIDEO OUT AUDIO OUT R L Notes Change the Component ...

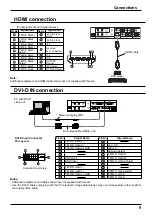
Page 9: ...Name Pin No Signal Name 1 T M D S data 2 13 2 T M D S data 2 14 5 V DC 3 T M D S data 2 shield 15 Ground 4 16 Hot plug detect 5 17 T M D S data 0 6 DDC clock 18 T M D S data 0 7 DDC data 19 T M D S data 0 shield 8 20 9 T M D S data 1 21 10 T M D S data 1 22 T M D S clock shield 11 T M D S data 1 shield 23 T M D S clock 12 24 T M D S clock Notes Additional equipment and cables shown are not supplie...

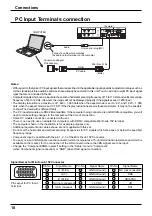
Page 10: ...OS V compatible Mini D sub 15P terminal The computer shown in the illustration is for example purposes only Additional equipment and cables shown are not supplied with this set Do not set the horizontal and vertical scanning frequencies for PC signals which are above or below the specified frequency range Component Input is possible with the pin 1 2 3 of the Mini D sub 15P Connector To use sync in...

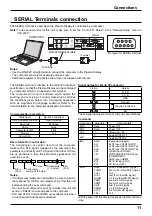
Page 11: ...it for the response for the first command to come from this unit before sending the next command If an incorrect command is sent by mistake this unit will send an ER401 command back to the computer S1A and S1B of Command IMS are available only when a dual input terminal board is attached Communication parameters Signal level RS 232C compliant Synchronization method Asynchronous Baud rate 9600 bps ...

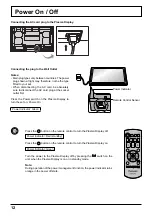
Page 12: ...the Plasma Display is on or in standby mode Note During operation of the power management function the power indicator turns orange in the power off state Connecting the plug to the Wall Outlet Notes Main plug types vary between countries The power plug shown at right may therefore not be the type fitted to your set When disconnecting the AC cord be absolutely sure to disconnect the AC cord plug a...

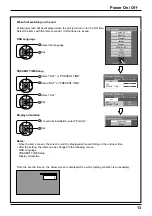
Page 13: ...g on the unit Following screen will be displayed when the unit is turned on for the first time Select the items with the remote control Unit buttons are invalid OSD Language PRESENT TIME Setup Display orientation 1 Select the language 2 Set 1 Select DAY or PRESENT TIME 2 Setup DAY or PRESENT TIME 1 For vertical installation select Portrait 2 Set Notes Once the items are set the screens won t be di...

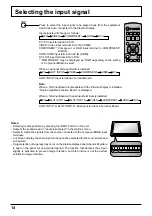
Page 14: ...elect the input signal to be played back from the equipment which has been connected to the Plasma Display Input signals will change as follows PC COMPONENT DVI HDMI VIDEO PC PC input terminal in PC IN VIDEO Video input terminal in AV IN VIDEO COMPONENT Component or RGB input terminal in COMPONENT RGB IN HDMI HDMI input terminal in AV IN HDMI DVI DVI input terminal in DVI D IN COMPONENT may be dis...

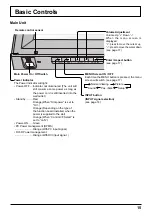
Page 15: ...nter Aspect button see page 17 Remote control sensor Main Power On Off Switch Power Indicator The Power Indicator will light Power OFF Indicator not illuminated The unit will still consume some power as long as the power cord is still inserted into the wall outlet Standby Red Orange When Slot power is set to On Orange Depending on the type of the function board installed when the power is supplied...

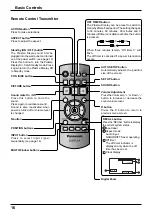
Page 16: ...al Zoom AUTO SETUP button Automatically adjusts the position size of the screen SET UP button SOUND button Volume Adjustment Press the Volume Up or Down button to increase or decrease the sound volume level R button Press the R button to return to previous menu screen OFF TIMER button The Plasma Display can be preset to switch to stand by after a fixed period The setting changes to 30 minutes 60 m...

Page 17: ... Normal Viewing Picture Sound Pos Size Setup 2 Select the item 25 0 0 0 5 Picture Normal Normalise Normal Brightness Sharpness Picture Mode Colour Contrast Hue Colour Management Advanced settings Memory save White balance Normal Off Memory load Memory edit Example Picture menu Select Select Press 3 Set Set Set Press 4 Exit the menu Press Press to return to the previous menu MENU Press several time...

Page 18: ...2 0 0 0 0 0 0 Off 2 2 Sound Out Left Channel Right Channel Channel 1 Channel 1 Off Level Meter Off SDI Sound Output Sound Normal Normalise Normal 0 0 0 Off Treble 0 Mid Sound Mode Balance Bass Surround Main Audio Out PIP 1 2 2 2 Setup MULTI DISPLAY Setup Set up TIMER PRESENT TIME Setup Network Setup Display orientation Landscape MULTI PIP Setup Portrait Setup Set up TIMER POWER OFF Function POWER ...

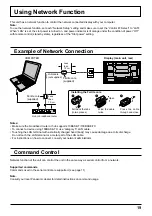
Page 19: ...ry 5 LAN cable Touching the LAN terminal with a statically charged hand body may cause damage due to its discharge Do not touch the LAN terminal or a metal part of the LAN cable For instructions on how to connect consult your network administrator Network function of the unit can control the unit in the same way as serial control from a network Supported commands Commands used in the serial contro...

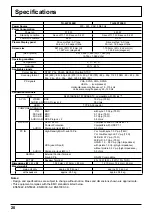
Page 20: ... L R BNC RCA Pin jack 2 1 0 Vp p 75 Ω 0 5 Vrms HDMI TYPE A Connector COMPONENT RGB IN Y G PB CB B PR CR R AUDIO L R BNC BNC BNC RCA Pin jack 2 with sync 1 0 Vp p 75 Ω 0 7 Vp p 75 Ω 0 7 Vp p 75 Ω 0 5 Vrms DVI D IN AUDIO DVI D 24 Pin Content Protection Stereo mini jack M3 1 Compliance with DVI Revision 1 0 Compatible with HDCP 1 1 0 5 Vrms PC IN AUDIO High Density Mini D sub 15 Pin VBS use HD port S...

Page 21: ...21 Memo ...

Page 22: ...22 Memo ...

Page 23: ...23 Memo ...

Page 24: ...ons are stated Copyright 1980 1986 1993 The Regents of the University of California All rights reserved Redistribution and use in source and binary forms with or without modification are permitted provided that the following conditions are met 1 Redistributions of source code must retain the above copyright notice this list of conditions and the following disclaimer 2 Redistributions in binary for...

Reviews: