21
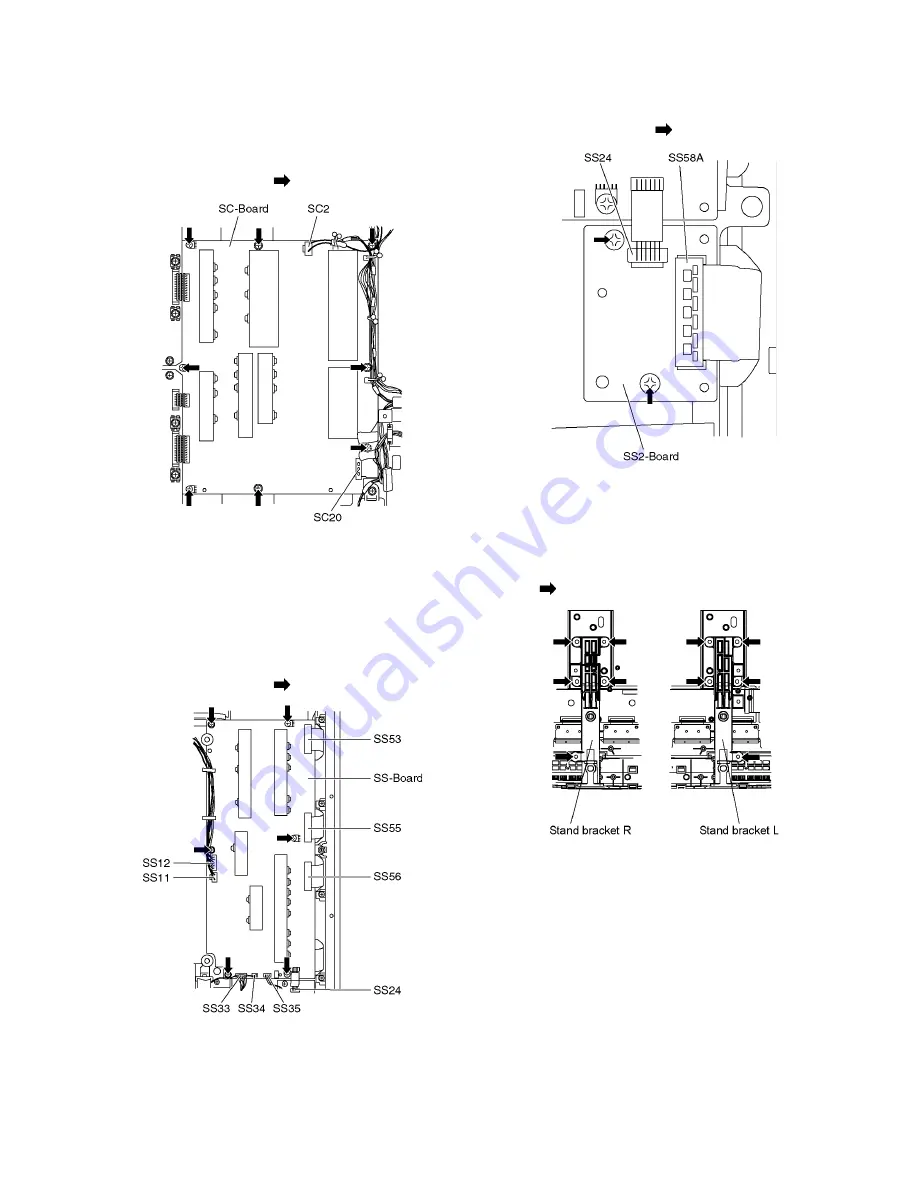
7.11. Remove the SC-Board
1. Remove the SU-Board and SD-Board. (See section 7.9.
and 7.10.)
2. Unlock the cable clampers to free the cable.
3. Disconnect the connector (SC2).
4. Disconnect the flexible cable (SC20).
5. Remove the screws (
×
8
) and remove the SC-Board.
7.12. Remove the SS-Board
1. Unlock the cable clampers to free the cable.
2. Disconnect the connectors (SS11, SS12, SS24, SS33
and SS35).
3. Remove a short-jumper connector SS34 and re-use for
new SS-Board.
4. Disconnect the flexible cables (SS53, SS55 and SS56).
5. Remove the screws (
×
6
) and remove the SS-Board.
7.13. Remove the SS2-Board
1. Disconnect the connector (SS24) and disconnect the flex-
ible cable (SS58A).
2. Remove the screws (
×
2
) and remove the SS2-Board.
7.14. Remove the Stand brackets
1. Remove the Plasma panel section from the servicing
stand and lay on a flat surface such as a table (covered)
with the Plasma panel surface facing downward.
2. Remove the Stand brackets (L, R) fastening screws
(
×
5
each) and remove the Stand brackets (L, R).
Summary of Contents for THC50FD18A - 50" PLASMA TV
Page 7: ...7 3 4 Applicable signals ...
Page 16: ...16 6 4 No Picture ...
Page 28: ...28 8 1 4 Adjustment Volume Location 8 1 5 Test Point Location ...
Page 30: ...30 ...
Page 38: ...38 10 3 Wiring 2 ...
Page 39: ...39 10 4 Wiring 3 ...
Page 40: ...40 10 5 Wiring 4 ...
Page 41: ...41 10 6 Wiring 5 ...
Page 42: ...42 10 7 Wiring 6 ...
Page 43: ...43 11 Schematic Diagram 11 1 Schematic Diagram Note ...
Page 106: ...106 13 1 2 Accessories ...
Page 107: ...107 13 1 3 Fan part location ...
Page 108: ...108 13 1 4 Mechanical Replacement Parts List ...
Page 111: ...111 13 2 Electrical Replacement Parts List 13 2 1 Replacement Parts List Notes ...


