background image

50

1

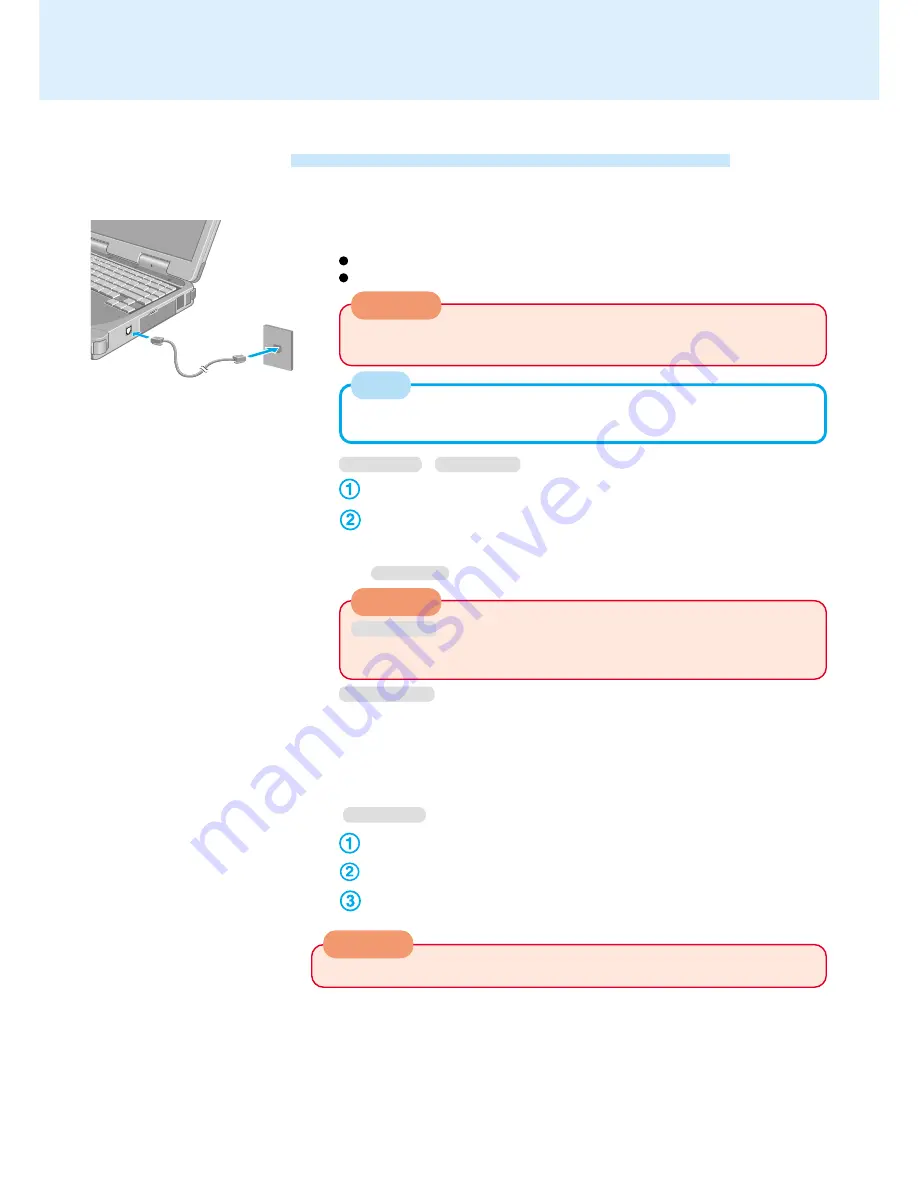
Connecting a telephone line to the modem

It is not possible to connect the modem to any of the following lines.

Internal home phones
Intercoms

There are cases telephone construction (or installation) work will be neces-
sary depending on the shape of the connector of the telephone line.

NOTE

CAUTION

Do not use the PBX internal phone lines installed in company offices.  Doing
so may lead to a fire or electric shock.

2

Windows 98

Windows NT

Select [Modems] in [Start] - [Settings] - [Control Panel].

Select [Dialing Properties].
Input the necessary information (items such as the country, area code, etc.)
and then select [OK]*.

*

Windows NT

: [Close]

Modem

Connecting to a Telephone Line and Settings

When using the internal modem, set [Modem] to [Enable]* in the Setup Utility. (* Default)

Windows NT

Be sure that the country is properly set in this screen.  Unless the country is
properly set, HyperTerminal will not work properly when it is run the first time.

3

Set the region the modem is to be used in

Windows 98

Select [HCF Modem Region Select] in [Start] - [Settings] - [Control Panel].

Select [MP3930V-W(C) Modem] in [Modem Region Select].

Set the country in [Select a region] and then select [OK].

Windows 2000

Select [Edit] in [Start] - [Settings] - [Control Panel] - [Phone and Modem Op-
tions] - [Dialing Rules].
Input the necessary information (items such as the country, area code, etc.) and
then select [OK].

CAUTION

CAUTION

Do not enter either the standby or hibernation mode during communications.

Summary of Contents for Toughbook CF-28 Series

Page 1: ...ed Data Communications Windows 98 Windows 2000 48 Modem 50 Hard Disk Drive 52 Setup Utility 53 Technical Information 59 DMI Viewer 62 List of Error Codes 63 Dealing with Problems Advanced 65 Model No CF 28 Series Reference Manual Personal Computer Contents 98 NT 2000 We recommend that this Reference Manual be printed When the cursor is moved to an item under Contents or to page green display the s...

Page 2: ...ndows 98 Second Edition users Windows 2000 Information for Microsoft Windows 2000 Professional users Windows NT Information for Microsoft Windows NT Workstation Version 4 0 users page When the cursor is moved to an item under Contents or to page green display the shape of the cursor will change to Under this condition if characters are tapped or a click is made the corresponding page in the Refere...

Page 3: ...een on the display to be saved to the hard disk and powers off the computer page 16 LCD brightness con trol down LCD brightness con trol up Display change Speaker on off switch Volume control down Volume control up Power off using the standby function Remaining capacity of the battery pack Power off using the hibernation function Key Functions Popup Window Key Combinations CAUTION Do not press the...

Page 4: ...he details of the status display are the same as for the main battery pack status see below This indicator lights when the hard disk drive is accessed This indicator lights when power is supplied to a device in the multimedia pocket It is not lit when a second battery pack is installed in the multimedia pocket You can confirm the status of the second battery pack with multimedia pocket device stat...

Page 5: ... down Typical mouse operations use this area When no check mark is added for IntelliMouse Wheel mode Horizontal and Vertical of Scroll Configuration the entire surface can be used for typical mouse operations Scrolling Area Scrolling up down Possible when a check mark is added for Vertical For the Pan and Auto Scroll functions the en tire work surface of the touch pad can be used for scrolling Cha...

Page 6: ... over the surface Wheel Indicates an operation applicable to the Microsoft IntelliMouseTM Wheel mode Indicates an operation applicable to the original mode Original Wheel Original tapping clicking double tapping Wheel Original Wheel Original Wheel Original When releasing the auto scroll function One tap on the work surface Wheel Wheel Original Wheel Original Touch Pad Advanced Operate while holdin...

Page 7: ...uttons Double click Speed Windows 98 When a mouse is connected to the serial port touch pad settings can no longer be changed in the Mouse Properties screen This is because the Mouse Prop erties screen is overwritten by the driver of the connected mouse To return to the original screen reinstall the driver with the following procedure 1 In Control Panel Add Remove Programs select touchpad touchscr...

Page 8: ...ge Remove to delete it then select Yes to confirm the deletion 2 The display will ask you to restart Windows select No 3 Power off your computer Starting Up Shutting Down and connect the external mouse or trackball device to the computer 4 Turn the power on and run the Setup Utility page 53 In Main menu set Touch Pad and Touchscreen to Disable and close the Setup Utility Log on to Windows by using...

Page 9: ...e driver or application software of an external mouse or trackball de vice Refer to the operation manual of the external device on how to uninstall the driver If the explanation of uninstalling the driver or application software can not be found in the operating instructions for the external device execute the following steps In Control Panel System Hardware Device Manager when an external mouse o...

Page 10: ... such as gauze or a soft cloth first applied with detergent diluted with water and then thoroughly wrung Do not use benzene or thinner or disinfectant type alcohol Windows NT 1 Uninstall the driver or application software of an external mouse or trackball de vice Refer to the operation manual of the external device on how to uninstall the driver 2 Power off your computer Starting Up Shutting Down ...

Page 11: ...en you want to uninstall or reinstall the touchscreen touch pad driver refer to the Touch Pad Advanced page 8 If a change is made to the screen resolution or the cursor can not be pointed correctly be sure to perform Calibration page 12 Even when only an external display is in use the cursor will move on the external display if the surface of the internal LCD is touched when the touchscreen driver...

Page 12: ...uded and your fin ger touches do not appear to agree Necessary for changes in the alignment of the touchscreen with visual images or an adjust ment of the display resolution Touch the mark on the calibra tion screen for about one second After the calibration procedure is executed e g after the nine marks are touched the procedure ends when Enter is pressed The double click speed of the touchscreen...

Page 13: ... using a dry soft cloth included with the computer Do not use benzene or thinner or disinfectant type alcohol For more information refer to Suggestions About Cleaning the LCD Surface that comes with the soft cloth Touchscreen Clean the stylus tip and screen prior to operation Foreign particles can scratch the screen and impede the operation of the stylus Use the accessory stylus only for the compu...

Page 14: ...cy may be degraded if another application such as disk accessing is being executed simultaneously Begin drawing only after other applications have been closed 1 Select from the taskbar or select Panasonic Hand Writing from Start Programs Panasonic 2 Draw a character or figure using the work surface of the touchscreen To draw an object with a rounded tip e g the stylus included with the com puter c...

Page 15: ...n drawing Determine the position to begin drawing while pressing down on the right button of the touch pad After determining this position release your finger from the button and draw Drawing is not possible while the right button of the touch pad is being pressed The above function will not work even when the right side button of a USB mouse is pressed Using the Touch Pad Mode NOTE The Touch Pad ...

Page 16: ...er button on my computer and then select OK The operation of the computer when the LCD is closed can also be set in Ad vanced NOTE Windows 98 Windows 2000 1 Run the Setup Utility page 53 2 Using either or select Power 3 Using either or select Power Switch and then press Enter 4 Using either or select Standby or Hibernation and then press Enter 5 Press F10 and select Yes then press Enter Windows NT...

Page 17: ...y using the hiber nation function Fn F10 page 3 Windows 2000 In Start Shut Down select Hibernate CAUTION At the beep 1 sound release your finger from the power switch If you continue to rotate the power switch and hold it for more than four seconds the computer will emit a second beep 1 then power off Data not previously saved will be lost Windows 98 Windows 2000 Even when When I press the power b...

Page 18: ...pad touchscreen or power switch Connect or disconnect the AC adaptor Close the display Windows 98 Windows 2000 Even when a password has been set in the Setup Utility does not appear when the computer resumes from the standby or hibernation mode If you want to use the security function when using the standby or hiberna tion function use the Windows password as the following Select Start Settings Co...

Page 19: ... device may have to be removed temporarily and the com puter restarted in cases where the computer is unable to start up properly Do not enter either the standby or hibernation mode when using an operating system other than the one that comes with your computer the Setup Utility or when experi encing static electricity or noise Do not install or remove peripherals while your computer is in the sta...

Page 20: ...ing a PC Card note that some cards may cease to function if the standby or hibernation function is used When this occurs restart the computer When Hibernation is not displayed in Power Switch of the Power menu in the Setup Utility the hibernation specific partition on the hard disk is not available Rein stall the OS to create a partition by using the Product Recovery CD ROM Windows NT Confirm that...

Page 21: ...en the Setup Utility is started with User Password You can not register Advanced menu The User Password can be changed only when User Password Protection has been set to No Protection The User Password cannot be deleted F9 does not work Over three incorrect attempts Reference You do not want your computer to be used without permission You do not want the data on the hard disk to be read or data to...

Page 22: ...forgotten you will be unable to use your computer Contact Panasonic Technical Support When running the Setup Utility do not leave your computer even for a short time as the possibility exists for the password to be set changed by another person Setting the Supervisor Password enabling changing disabling Your password will not be displayed on the screen Limit your password to seven characters Note ...

Page 23: ...rd and then press Enter To disable the User Password Press only Enter When the Supervisor Password has not been set the User Password can not be set Set the Supervisor Password if you have not done so page 22 Your password will not be displayed on the screen Limit your password to seven characters Note that there is no distinction between upper and lower case letters Only the alphabet keys or numb...

Page 24: ...er you can read and write data as before In this case however make the settings in the Setup Utility exactly the same as they were before the hard disk was removed It is possible to set the Hard Disk Lock even if Password on boot is set to Disable but we recommend that Password on boot be set to Enable for security reasons Note that this Hard Disk Lock does not guarantee complete protection of dat...

Page 25: ...set your computer to be unbootable from a disk 1 Run the Setup Utility page 53 2 Using either or select Security 3 Using either or select Floppy Operation and then press Enter 4 Using either or select Disable and then press Enter To enable the floppy operation Select Enable 5 Press F10 and then select Yes then press Enter Preventing theft or damage to data using a disk ...

Page 26: ...1 By holding down on the keys will be displayed the degree of brightness will be lowered thereby lowering the power consumption Before stepping away from your computer press Fn F7 or Fn F10 to put your computer in the standby or hibernation mode page 3 Setting the Intel SpeedStep technology page 29 30 You can control power consumption by setting CPU performance separately for AC adaptor connected ...

Page 27: ...53 2 Using either or select Power 3 Using either or select Power Management Mode and then press Enter 4 Using either or select either Enable Battery or Enable Always and then press Enter 5 Press F10 and select Yes then press Enter Setting the Power Management Windows NT HDD MotorTimeout ECO Mode Timeout If there is no input from a key the touch pad touchscreen or a mouse for more than two minutes ...

Page 28: ... APM 2 0 for Windows NT execute the following procedure In Start Run input c util drivers apm setup exe and then select OK Follow the on screen instructions Enabling Power Conservation Windows NT The LCD will be powered off To resume press any key On this screen the condition the power of the display is off is called standby The computer will enter the standby mode To resume rotate the power switc...

Page 29: ...all times Setting the Intel R SpeedStep TM technology Displays settings currently in effect Display detailed settings screen in the CAUTION shown below Other start up methods Right click either or and then select Adjust Properties Choose Start Settings Control Panel Power Management and select Intel R SpeedStep TM technology Windows 2000 Power Options Windows 2000 Only the Administrator or a Power...

Page 30: ...ethods Right click either or and select Adjust Properties Choose Start Settings Control Panel Power Management and select Intel R SpeedStep TM technology Do not add the check mark for Disable Intel SpeedStep technology control Do not delete the check mark for Disable au dio notification when performance changes Start up methods Windows NT When this checkmark is on a confirmation screen is displaye...

Page 31: ...rging of the battery by recharging only when the remaining power is less than approx 95 of capacity after the battery is fully charged Getting a detailed reading Fn F9 The actual remaining battery capacity and the displayed indication may differ NOTE Status of second battery pack Status of main battery pack A 78 B When the battery pack is not in the computer A B is displayed There may be a discrep...

Page 32: ... menu of the Setup Utility to High Temperature Note that a level of 100 in the High Temperature mode is about a level of 80 in the Normal Temperature mode After switching from Normal Temperature to High Temperature or vice versa the remaining battery will not be displayed properly until the battery pack is completely discharged or fully charged Remaining Battery Level Confirmation by Alarm 1 The c...

Page 33: ...pack and AC adaptor 2 Use the Refresh Battery utility to fully discharge the battery pack 1 Run the Setup Utility page 53 2 Select Refresh Battery from the Exit menu and then press Enter 3 At the confirmation message select Yes and then press Enter Once the battery indicator turns green the battery pack will be completely dis charged It takes approximately 3 5 hours until the power automatically g...

Page 34: ...e contacts are dirty or damaged The battery pack is not charged when the computer is first purchased Be sure to charge it before using it for the first time When the AC adaptor is connected to the computer charging begins automatically Use only the specified battery pack CF VZSU18 with your computer To next page 3 Remove the battery pack Lift the battery pack slightly by pulling the tab Hold the b...

Page 35: ...he cover back into place holding both sides and slide the latches outward If the cover is not attached properly the battery may fall out while the computer is being carried When attaching the cover be careful not to get your fingers and the tab caught in the cover ...

Page 36: ...nt of the device Confirm that and indicators are not lit Perform the step1 and 2 of Installing Removing page 37 Follow the procedure below only in the case of removal except for the second battery pack Insertion is carried out with the power on When the multimedia pocket device has been removed after the com puter is turned off these steps are not necessary Select on the taskbar Select the multime...

Page 37: ...nto place Do not install the device upside down The bottom of the drive may become disfigured CAUTION CAUTION NOTE Cover Latch A MP Release Lever Install the device with the plastic side on top Latch B Multimedia Pocket 2 Windows 98 Select OK on the BaySwap screen Whether the device is properly recognized or not can be con firmed in Main of the Setup Utility If the device is not recognized or if a...

Page 38: ...removing the floppy disk drive select Stan dard floppy disk controller and then select Stop When the computer is on or in the standby or hibernation mode if the floppy disk drive is accessed after it had earlier been disconnected there are in stances where the contents of the floppy disk set prior to the drive removal are displayed Do not try to access any of the files If an attempt is made an err...

Page 39: ...ize the PC Card depending on the type of card In such cases restart the computer Windows 98 Windows 2000 When inserting one more CardBus type card with one already inserted after entering either the standby or hibernation mode the computer may not function properly If the computer freezes after resuming from the standby or hibernation mode try removing and then reinserting the PC Card If this does...

Page 40: ...he taskbar and select the PC Card then select Stop Follow the on screen instructions When the PC Card has been removed after the computer is turned off this step is not necessary Press the button Slide the PC Card out PC Card Utility Program Windows NT When using a Windows NT model confirm that Phoenix Card Executive 2 0 for Windows NT is installed When Card Executive 2 0 for NT is displayed in th...

Page 41: ...rnation function 3 Installing the RAM module Slide in the module at an angle Snap the module into place by pushing down on it 2 Remove the battery pack page 34 4 Put the battery pack back into place and attach the cover page 34 Removing the RAM module Open the left and right hooks Gently remove the RAM module from the slot Use a RAM module meeting the RAM module specifications below If a module is...

Page 42: ... connecting the external display to the display port on the port replicator the characters on the external display may be blurred if 1280 x 1024 or a higher resolution is set In this case select a resolution that is lower than 1280 x 1024 NOTE Expansion Bus Connector Setting the Port Replicator The serial port B of the port replicator cannot be used with the default settings To be able to use the ...

Page 43: ...uctions Windows 2000 Set as Default Printer Printer NOTE You may need to install a driver for your printer Follow the on screen instruc tions and refer to the operation manual of the printer on how to install the driver Confirm whether or not the setting for the Parallel Port in the Setup Utility is optimal page 56 Parallel Port Before connecting a printer change the multimedia pocket device in ac...

Page 44: ... operation manual of the external display NOTE 4 Windows 98 Windows 2000 Select your external display Set your external display for Monitor in Start Settings Control Panel Dis play Settings Advanced When a monitor that does not conform to the Plug Play standards is connected select Change and make the monitor settings Windows 2000 Monitor Properties Driver Update Driver About Intel GraphicsTechnol...

Page 45: ...e monitor number matches the actual arrange ment position of the external display 5 Select OK When an external display is connected it is possible to use both the LCD of the com puter i e internal LCD and the external display as an extended display domain with the Dual Display Mode It is possible to drag a window from the internal LCD to the external display In Intel Graphics Technology the Dual D...

Page 46: ...Dual Display Mode again move the application from the external display external display 2 to the internal LCD internal LCD 1 and then disable the Dual Display Mode To prevent images from being burned onto the external display manually shut off the power to the external display when the display does not have to be used When the display domain for the Dual Display Mode is changed there are cases the...

Page 47: ...f it is properly installed NOTE For more detailed information refer to the operation manual of the USB de vice You may need to install drivers compatible with the OS you are using for your USB devices Refer to the operation manual of the USB devices on how to install the driver When a USB device is connected there are cases the standby or hiberna tion function will not operate in a normal manner d...

Page 48: ...e computers are not in direct contact with one another A port to port distance of 20 cm to 50 cm 8 to 20 is recommended Problems with Infrared Data Communications An object is located between both ports There are other electronic devices nearby causing interference such as a television VCR wireless headphone etc Direct sunlight or white glowing light such as fluorescent lighting can cause interfer...

Page 49: ...ing at a transfer speed of 4 Mbps or when communicating with a computer running Windows 95 or Windows NT Data Communications Infrared Data Communications Windows 98 Windows 2000 NOTE NOTE 1 Position your computer so that the infrared communication port is face to face with the port of another computer 2 Double click Wireless Link on the desktop on the computer that will send a file 3 Select the fi...

Page 50: ...dows NT Close Modem Connecting to a Telephone Line and Settings When using the internal modem set Modem to Enable in the Setup Utility Default Windows NT Be sure that the country is properly set in this screen Unless the country is properly set HyperTerminal will not work properly when it is run the first time 3 Set the region the modem is to be used in Windows 98 Select HCF Modem Region Select in...

Page 51: ...one is connected to the line of a mo dem e g a PC Card modem other than the internal modem Concerning the setting for System standby in Start Settings Control Panel Power Management roughly consider the communication time and then set System standby There may be cases where the computer enters the standby mode after the time set for System standby elapses even during communications and cuts off th...

Page 52: ...onents Installing Removing the Hard Disk For technicians at Panasonic Technical Support 1 Power off your computer Starting Up Shutting Down Do not shut down using the standby or hibernation function Disconnect the AC adaptor 2 Remove the cover page 34 3 Removing the hard disk Slide the hooks of the hard disk toward the inside Pull the tab A and release the hard disk from the connector Pull the tab...

Page 53: ...e F10 To save the settings and exit 1 Turn on or restart the computer 2 Press F2 while Press F2 to enter SETUP is displayed soon after the computer begins the startup procedure If you fail to press F2 at this time restart your computer If Enter Password is displayed Enter your password The Supervisor Password must be entered to change items of the Advanced menu Entering the User Password will not ...

Page 54: ...ltaneous Environment Normal Temperature Parameters Default On Off Disable Enable Disable Enable Disable Enable Disable Enable External Monitor Internal LCD Simultaneous Normal Temperature High Temperature 1 Does not operate for Windows 2000 or Windows NT 2 Select Disable to be able to use the external microphone connected to the port replicator 3 After Windows starts up the screen is displayed on ...

Page 55: ... 2F8 IRQ3 3E8 IRQ11 2E8 IRQ10 Disable Enable Auto 3F8 IRQ4 2F8 IRQ3 3E8 IRQ11 2E8 IRQ10 Setup Utility Advanced Menu Serial Port A Auto Serial Port B Disable IrDA Port Auto MP Serial Port Disable Parallel Port Auto Mode ECP CardBus Controller A Enable Modem Enable Default 1 This item is displayed only when the setting of each port is Enable In addition an asterisk displayed in front denotes competi...

Page 56: ...able Enable To the sub menu Disable Enable Disable Enable No Protection Protected To the sub menu Disable Enable Setting impossible when the Supervisor Pass word is not set NOTE Parallel Port Mode 1 I O IRQ 2 CardBus Controller A Modem Advanced Menu 1 This item is displayed only when Parallel Port is set to Enable or Auto 2 This item is displayed only when the setting of each port is Enable In add...

Page 57: ...s for Windows 98 3 At the time of purchase Power Management Mode is set to Dis able Note It differs from the de fault setting 4 OnWindows 98 or Windows NT this is not displayed when a hibernation specific partition on the hard disk is not available Reinstall the OS to create a partition by using the Prod uct Recovery CD ROM On Windows 2000 this item is not displayed Power Management Modes Windows ...

Page 58: ...rive 2 The default order is as follows Floppy Drive Hard Disk CD Drive To move a device up by one in the order select the device with and and then press F6 To move a device down by one in the order select the device with and and then press F5 NOTE Boot First Menu The device for starting up the Operating System can also be selected during computer start up After the computer is turned on the device...

Page 59: ...under the condition the power of the display is off for energy conservation purposes and the standby hibernation mode When network or communication software is to be used set System standby System hibernates Turn off monitor and Turn off hard disks in Start Settings Control Panel Power Options to Never The network connection may be severed when entering the ECO mode and standby hibernation mode Th...

Page 60: ...S mode perform the operation below after modifying config sys and autoexec bat File decompression method 1 Turn your computer on 2 When Press F2 to enter SETUP is displayed immediately press Ctrl until the menu is displayed 3 Select Command prompt only 4 Insert the Product Recovery CD ROM 5 At the prompt input the following L en addfile Enter Follow the on screen instructions After this program is...

Page 61: ... 2 Select Option Properties 3 Check Playback and then add the check mark for WAVE 4 Select OK 5 Adjust the volume of WAVE 6 Click in the top of right corner of the window Volume Adjustment of MIDI File Windows NT Technical Information ...

Page 62: ...fications of the Desktop Management Interface DMI The DMI Viewer can be used when you want to know information on the internal systems this computer supports starting with the CPU and memory Click to close the DMI Viewer Saving Information to a File Displayed information can be saved to a text file txt Run the DMI Viewer and dis play the information you wish to save To save the item that is displa...

Page 63: ...configure the system 0251 System CMOS checksum bad Default configuration used System CMOS has been corrupted or modified incorrectly perhaps by an application program that changes data stored in CMOS The BIOS installed Default SETUP Values If you do not want these values enter Setup and enter your own values If the error persists check the system battery or contact Panasonic Technical Support 0260...

Page 64: ...ry Invalid System Configuration Data Problem with NVRAM CMOS data I O device IRQ conflict I O device IRQ conflict error Operating System not found Operating system cannot be located on either drive A or drive C Enter Setup and see if fixed disk and drive A are properly identified Parity Check 1 nnnn Parity error found in the system bus BIOS attempts to locate the address and display it on the scre...

Page 65: ...ock may need to be replaced Contact Panasonic Technical Support This computer will not correctly recognize the date and time starting from the year 2100 A D Windows NT When APM 2 0 for NT is not displayed in Control Panel this indicates that Phoe nix APM 2 0 for Windows NT is not installed When the standby or hibernation function is used under this condition the date and time may be incorrectly di...

Page 66: ...aracter Map will be displayed Point to the desired font name and select it Windows NT Select Start Programs Accessories Character Map The Character Map will be displayed Point to the desired font name and select it Setup Utility Enter the User Password or Supervisor Password If you have forgotten it contact Panasonic Technical Support Restart the Setup Utility with the Supervisor Password Restart ...

Page 67: ...of time an afterimage may appear This is not a malfunction The afterimage will disappear when a different screen is displayed High precision and advanced technologies are necessary in the production of color liquid crystal displays color LCDs Therefore if 0 002 or less of the picture elements either fail to light or remain constantly lit that is more than 99 998 of elements are functioning properl...

Page 68: ... Confirm that Serial Port has not been set to Disable Depending on the device the operable I O and IRQ may be limited Try different I O and IRQ settings in the Setup Utility Try setting Touch Pad Touchscreen to Disable in the Setup Utility In some circumstances if a PS 2 external mouse with a serial interface conversion function is connected to the port it may not operate normally Try connecting i...

Page 69: ...aling with Problems Advanced Cannot read write to a disk Unable to write to a disk How to format a disk is unclear Unable to read write to the hard disk When the previous item is not the cause Has the disk been correctly inserted Has the disk been correctly formatted Has the Setup Utility been used to set Floppy Operation to Enable page 56 Your disk content may be corrupted Is the disk write prote...

Page 70: ...the Setup Utility been used to set Speaker to Disable page 54 Windows NT Sound function may not work when the standby or hibernation function is used In such cases restart the player Windows Media Player XGPlayer etc and right click on the task bar then select Adjust Audio Properties and then change Volume in Playback In addition when the recording function is used change Volume in both Playback a...

Page 71: ...iver failed during system start up Use EventViewer to examine the event log for details is displayed When adding new software or hardware components reinstall Service Pack 6 page 60 Others Windows NT Dealing with Problems Advanced ...

Page 72: ...ctric Industrial Co Ltd assumes no liability for damage incurred directly or indirectly from errors omissions or discrepancies between the computer and the manuals Trademarks PS 2 is a trademark of International Business Machines Corporation Microsoft MS DOS Windows and IntelliMouse are registered trademarks of Microsoft Corporation of the United States and or other countries Intel Pentium and Spe...

Reviews: