background image

14

Getting Started

First-time Operation

Setting up the computer


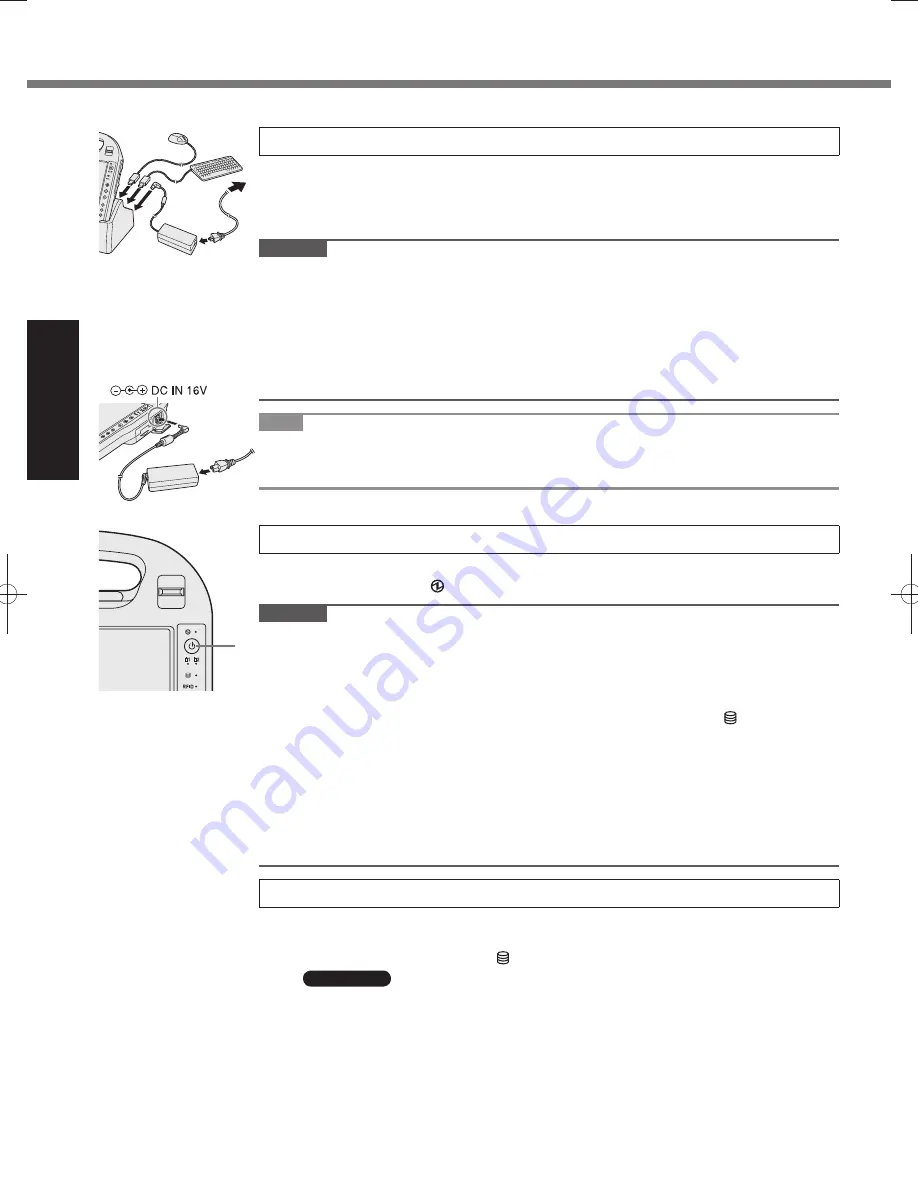
Set your computer to the Cradle.

Set the computer to the cradle, and connect the external keyboard and mouse to the 


cradle.
Connect the AC adaptor to the Cradle and a power outlet.


The battery charging starts automatically.

CAUTION

Do not remove the computer from the Cradle until the “First-time Operation” procedure is 


completed.
When using the computer for the first time, do not connect any peripheral device except 


the battery pack, Cradle, keyboard, mouse and AC adaptor.

Handling the AC adaptor


Problems such as sudden voltage drops may arise during periods of thunder and 

• 

lightning. Since this could adversely affect your computer, an uninterruptible power 
source (UPS) is highly recommended unless running from the battery pack alone.

NOTE

After Windows setup, alternatively you can use without Cradle.


In that case, connect your computer to a power outlet.
The battery charging starts automatically.

A

Turn on the computer.

1

 Press the power switch (A).

The power indicator   lights.

CAUTION

Do not press the power switch repeatedly.


The computer will forcibly be turned off if you press and hold the power switch for 4 


seconds or longer.
Once you turn off the computer, wait for 10 seconds or more before you turn on the 


computer again.
Do not perform the following operation until the hard disk drive indicator 


 turns off.

Connecting or disconnecting the AC adaptor

• 

Pressing the power switch

• 

Touching the screen, external keyboard or external mouse

• 

When the CPU temperature is high, the computer may not start up to prevent overheating 


of the CPU. Wait until the computer cools down, and then turn the power on again. If the 
computer does not power on even after cooling down, contact Panasonic Technical Support.
Any changes from the default setting of the Setup Utility must not be made until the 


“First-time Operation” procedure is completed.

Setup Windows.

1

 Follow the on-screen instructions.

The computer restarts several times. Do not touch the keyboard or mouse, and 


wait until the hard disk drive   indicator has turned off.

Windows 7

After the computer is turned on, the screen remains black or unchanged for a 


while, but this is not a malfunction. Wait for a moment until the Windows setup 
screen appears.
During setup of Windows, use the mouse and clicking to move the cursor and to 


click an item.
Setup of Windows will take approximately 20 minutes. Go to the next step, 


confirming each message on the display.
“Join a wireless network” screen may not appear.


You can set the Wireless Network after the setup of Windows is complete.

DFQW5523ZA̲CF-H2mk1.indb   14

DFQW5523ZA̲CF-H2mk1.indb   14

2011/06/22   14:21:06

2011/06/22   14:21:06

Summary of Contents for Toughbook CF-H2ALFHA1M

Page 1: ...Precautions Description of Parts 10 Preparation 12 First time Operation 13 OPERATING INSTRUCTIONS Personal Computer Model No CF H2 series Useful Information On screen Manual 17 Handling and Maintenanc...

Page 2: ...d to help your understanding and may look different from the actual unit If you do not log on as an administrator you cannot use some functions or cannot display some screens Refer for the latest info...

Page 3: ...to co channel Mobile Satellite systems High power radars are allocated as primary users of the 5 25 to 5 35 GHz and 5 65 to 5 85 GHz bands These radar stations can cause interference with and or damag...

Page 4: ...ry Information We are not responsible for any radio or television interference caused by unauthorized modification of this product The correction of interference caused by such unauthorized modificati...

Page 5: ...the presence of flammable gases or fumes Switch off the cellular terminal when you are near petrol stations fuel depots chemical plants or where blasting operations are in progress Operation of any el...

Page 6: ...le au lithium Le micro ordinateur renferme une pile au lithium qui permet de sauvegarder certaines donn es notamment la date et l heure La pile ne doit tre remplac e que par un technicien qualifi Dang...

Page 7: ...If a Malfunction Occurs Immediately Unplug the AC Plug and the Battery Pack This product is damaged Foreign object inside this product Smoke emitted Unusual smell emitted Unusually hot Continuing to...

Page 8: ...result in electric shock short circuit or fire Take a Break of 10 15 Minutes Every Hour Using this product for long periods of time may have detrimental health effects on the eyes or hands Do Not Use...

Page 9: ...it before using it for the first time When the AC adaptor is connected to the computer charging begins automatically Should the battery leak and the fluid get into your eyes do not rub your eyes Immed...

Page 10: ...tooth Reference Manual Bluetooth H Fingerprint Reader Only for model with Fingerprint Reader Reference Manual Fingerprint Reader I Ambient Light Sensor Backlight will be turned off with a bright envir...

Page 11: ...Strap G Camera Only for model with Camera Reference Manual Camera H USB 2 0 Port Reference Manual USB Devices I Battery 1 Case Only for model with wireless WAN The SIM Card Slot is inside the Battery...

Page 12: ...ED USE LICENSE AGREEMENT before breaking the seal on the computer s packaging page 26 Inserting the Battery Packs Insert the battery pack to 2 battery cases 1 1 Slide the battery cover and open it 2 I...

Page 13: ...eference Manual Sleep Standby and Hibernation Functions about resuming from sleep Windows XP The screen automatically turns off after 15 minutes of inactivity The computer automatically enters standby...

Page 14: ...ger Once you turn off the computer wait for 10 seconds or more before you turn on the computer again Do not perform the following operation until the hard disk drive indicator turns off Connecting or...

Page 15: ...orming the calibration close Tablet PC Input Panel Windows 7 Before performing the calibration rotate the display to primary landscape 1 Click Windows 7 Start Windows XP start All Programs Panasonic C...

Page 16: ...c drive in the default setting and click Shrink Volume The partition size depends on the computer specifications 4 Input the size in Enter the amount of space to shrink in MB and click Shrink You can...

Page 17: ...played by following steps Windows 7 1 Double click on the desktop Alternatively click Start All Programs Panasonic On Line Manuals Important Tips Windows XP 1 Double click on the desktop Alternatively...

Page 18: ...lane take the computer with you and never put it in your checked luggage When using the computer on airplane follow the airline s instructions When carrying a spare battery put it in a plastic bag to...

Page 19: ...ay adversely affect the surface causing discoloration etc Do not use commercially available household cleaners and cosmetics as they may contain components harmful to the surface Do not apply water or...

Page 20: ...es and press Enter Press 5 F10 At the confirmation message select Yes and press Enter The computer will restart Press 6 F2 or Del while Panasonic boot screen is displayed The Setup Utility starts up I...

Page 21: ...the computer 14 then remove the DVD drive Turn on the computer 15 If the password is requested enter the Supervisor Password Perform the steps 3 to 4 for setting up the computer 16 pages 14 to 15 Sta...

Page 22: ...t in an environment of 5 C 41 F to 35 C 95 F for about an hour then turn on the power again You have forgotten the password Supervisor Password or User Password Contact Panasonic Technical Support Adm...

Page 23: ...uming set the Windows password Windows 7 1 Click Start Control Panel User Accounts and Family Safety Add or remove user accounts and select the account and set the password 2 Click Start Control Panel...

Page 24: ...ble connection Turn on the display Check the settings of external display The display is turned off by the power saving function To resume do not press the direct selection keys but press any other ke...

Page 25: ...s as an administrator 2 Windows 7 Click Start and input c util reader Pinstall bat in Search for programs and files then press Enter Windows XP Click start Run input c util reader Pinstall bat then cl...

Page 26: ...s for backup purposes only in support of your use of the Programs on the single Product which was accompanied by the Programs You shall not modify or attempt to modify the Programs E You may transfer...

Page 27: ...ntel Corporation 2200 Mission College Blvd Santa Clara CA 95052 U S GOVERNMENT RESTRICTED RIGHTS The software and documentation are commercial items as that terms is defined at 48 C F R 2 101 consisti...

Page 28: ...modifier ni tenter de modifier les Logiciels E Vous ne pouvez c der les Logiciels et en octroyer la licence une autre partie qu en rapport avec votre cession du Produit unique qui est accompagn par l...

Page 29: ...tel High Definition Audio subsystem support Security Chip TPM TCG V1 2 compliant 10 Fingerprint Reader 11 Array Size 192 4 pixels Image Size 192 512 pixels Image Resolution 508 DPI Camera 12 Effective...

Page 30: ...02 11a Channels 36 40 44 48 52 56 60 64 100 104 108 112 116 132 136 140 149 153 157 161 165 IEEE802 11b IEEE802 11g Channels 1 11 IEEE802 11n Channels 1 11 36 40 44 48 52 56 60 64 100 104 108 112 116...

Page 31: ...g the product in a hot or cold environment page 8 When using in hot or cold environment some peripherals may fail to work properly Check the operation environment of the peripherals Using this product...

Page 32: ...egrated by Panasonic or an Authorized Panasonic Wireless Integrator are covered under the warranty for the remaining warranty period of the computer in which the modem is installed For computers with...

Page 33: ...ns Failures due to service by anyone other than a Panasonic Authorized Service Provider Failures caused by improper installation of options or accessories or due to integration by any company other th...

Page 34: ...0 76A or JAA JAA TGL Temporary Guidance Leaflets No 36 IF YOU SHIP THE PRODUCT FOR WARRANTY SERVICE Carefully pack the product preferably in the original carton Include details of defect claimed and p...

Page 35: ...rcular 120 76A ou le feuilet n 36 JAA JAA TGL Temporary Guidance Leaflets No 36 EXP DITION DU PRODUIT POUR SERVICE SOUS GARANTIE Emballez soigneusement le produit de pr f rence dans son emballage d or...

Page 36: ...an international program that promotes energy saving through the use of computers and other office equipment The program backs the development and dissemination of products with functions that effect...

Reviews: