background image

19

Getting Started

Starting Up/Shutting Down

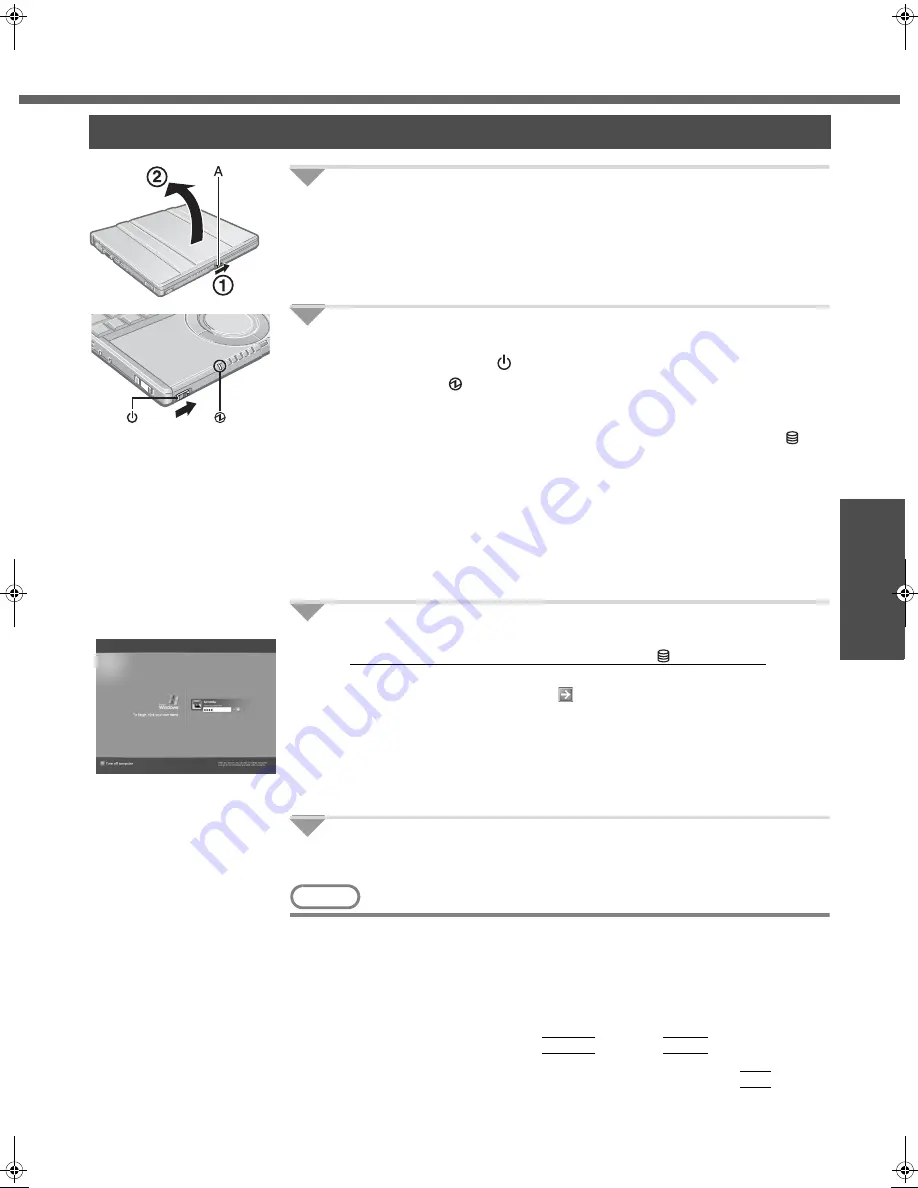
1

Open the display.

A

Slide the latch (A) located at the front.

B

Lift open the display.

z

Do not open the display wider than necessary (135° or more), and do 
not apply excessive pressure to the LCD.  Also, do not hold the LCD 
when opening or closing the display.

2

Turn your computer on.

Slide the power switch 

 and hold it for approximately one second until the 

power indicator 

 turns on before releasing it.

z

Do not slide the power switch and hold it for more than four seconds; this 
will cause the power to be turned off forcibly.

z

While booting, avoid the following until the hard disk drive indicator   has 
turned off.
• Connecting or disconnecting the AC adaptor.
• Touching the power switch.
• Performing any keyboard, touch pad, or external mouse operations.
• Closing the display.

z

Do not slide the power switch repeatedly.

z

Once the computer is powered off, you must wait at least ten seconds 
before powering it on again.

3

Log-on to Windows.

After confirming that the hard disk drive indicator 

 has turned off, click the 

user (user's icon).

z

Input the password, then click 

. Until the correct password is entered, 

the computer will not operate.
Confirm that character input is not set to “Caps Lock” or “NumLK.” 
(

Î

page 12)

z

This operation may differ according to [Use the Welcome screen setting].

z

When only one user has been created and no password has been set, the 
screen for selecting the user will not be displayed (automatic log-on).

4

Select your application.

Run various software applications, etc. and operate them.

NOTE

z

The power saving function is factory set, so if there is no input from a key, the touch 
pad or an external mouse (when one is connected) for a certain interval of time, the 
power to the LCD and hard disk may be turned off.  The LCD will resume operation 
when the touch pad or an external mouse (when one is connected) is used or a key 
is pressed.
The power to the LCD may be turned off even when an application software is 
being installed.  In this case, because it is conceivable that a selection dialog 
box will be shown, do not press the 

Space

 key or the 

Enter

 key to attempt to 

resume from this condition as doing so may trigger a selection, but instead, 
press a key unrelated to the direct triggering of a selection, like the 

Ctrl

 key.

In addition, when the computer is left alone, it automatically enters the standby 
or hibernation mode. The computer will resume by sliding the power switch. 
(

Î

“Chapter 2: Standby/Hibernation Functions” in onscreen Reference Manual) 

Starting Up

W2mk4.book  19 ページ  2004年12月1日 水曜日 午後9時22分

Summary of Contents for Toughbook CF-W2DWADZBM

Page 1: ...ng Memory 23 Setup Utility 25 Usage Handling Maintenance 32 Wireless LAN 34 Windows 35 Antivirus Measures When Disposing of This Device 36 Use of Peripheral Devices Internal Hard Disk 37 Using CD DVD 38 List of Error Codes 39 How to Resolve the Problem 40 Dealing with Problems Summary 41 Information for Installed Applications 48 Reinstalling Software 49 LIMITED USE LICENSE AGREEMENT 54 Hard Disk D...

Page 2: ...ushita Electric Industrial Co Ltd assumes no liabil ity for damage incurred directly or indirectly from errors omissions or discrepancies between the computer and the manuals Trademarks Microsoft Windows and the Windows logo are registered trademarks of Microsoft Corporation of the United States and or other countries Intel Pentium and PROSet are either registered trademarks or trademarks of Intel...

Page 3: ...ering Keep SD memory cards and MultiMedia Cards both sold separately away from infants and small children Accidental swallowing will result in bodily injury In the event of accidental swallowing see a doctor immediately Handling Avoid Magnetic Fields Keep the computer away from magnets Data stored on the hard disk may be lost Avoid Stacking Do not place heavy objects on top of the computer Do Not ...

Page 4: ...Do not use a damaged plug or loose electrical socket Do not place metal objects or contain ers of liquid on top of the computer z If water or other liquid spills or if paper clips coins or other metal objects get inside the computer fire or electrical shock may result Do not place the computer on unstable surfaces If balance is lost the computer may fall over or drop resulting in an injury Do not ...

Page 5: ... hospitals and other loca tions with electrical medical devices do not bring into operating rooms intensive care units CCUs 2 etc Radio waves from this computer may affect electrical medical devices resulting in damage due to malfunctions Turn off 1 in crowded areas as persons wearing heart pacemakers may be nearby Pacemaker operations may be affected by radio waves 1 If it is necessary to use the...

Page 6: ...allow it to become wet z If the battery pack will not be used for a long period of time a month or more charge or discharge use the battery pack until the remaining battery level becomes 30 to 40 and store it in a cool dry place z This computer prevents overcharging of the battery by recharging only when the remaining power is less than approx 95 of capacity z The battery pack is not charged when ...

Page 7: ... described as follows WinDVD 5 OEM Version as WinDVD B s Recorder GOLD7 BASIC as B s Recorder B s CLiP 5 as B s CLiP z Circular media such as DVD ROM and CD ROM is described as a disk z Optional Products or Accessories Confirm the latest information on optional products or accessories from other sources Usage Precautions z When using the drive for the first time slide the open lever A on the left ...

Page 8: ...o be accessed from start All Programs Panasonic On Line Manuals Important Tips How to access Windows Help 1 Click start Help and Support Manual Types and Contents Using the hard copy Operating Instructions This manual This manual explains startup methods and basic operations required when using the computer for the first time Using the onscreen manual Reference Manual PDF format The Reference Manu...

Page 9: ...screen Reference Manual Enjoy wireless broadband wireless LAN functions conforms to IEEE802 11b g Before using a wireless LAN check the wireless LAN on Î page 34 Various methods for connecting to the Internet z Use a telephone line LAN or wireless LAN Î Chapter 5 Modem LAN Wireless LAN in onscreen Reference Manual Protect your computer from viruses z Use Internet Connection Firewall and other func...

Page 10: ...y to restart operations E LEDs Î page 12 F Power Switch Slide the switch for about one second to turn the power on Î page 14 G Speaker z To adjust the volume Fn F5 Fn F6 z Speaker on off Fn F4 H Display Internal LCD I Security Lock A Kensington cable can be connected For more information read the manual that comes with cable J Modem Port Connect modem telephone cable Î Chapter 5 Modem in onscreen ...

Page 11: ...dphones or amplifier equipped speakers Audio output from the internal speaker is disabled when headphones or external speakers are con nected G Open Lever Slide the lever to open the disk cover This works only when the power is on When using the drive for the first time slide the open lever to open the disk cover after the computer has been powered on and if the protective sheet is attached to the...

Page 12: ...Ten key mode z This indicator lights green when the NumLk key is pressed Part of the keyboard see figure below will function as a ten key numeric input When the green light is on if the Fn key is pressed along with keys on certain other segments of the keyboard then those keys will operate as numeric keys The Enter key functions differently depending on the application To disable press the NumLk k...

Page 13: ...facing the correct direction slide it in the direction of the arrow C Slide the left side latch to the lock position and then check to ensure that the battery pack is held firmly Right side latch is locked automatically CAUTION z Confirm that the latch is properly locked If it is not the battery pack may come off while you are carrying the computer z Do not touch the terminals on the battery pack ...

Page 14: ... strong impact such as being dropped may result in electrocution short circuit or fire z Use only the specified AC adaptor with your computer Using an AC adaptor other than the one supplied might damage the battery and or the computer z Problems such as sudden voltage drops may arise during periods of thunder and lightning Since this could adversely affect your computer an uninterrupt ible power s...

Page 15: ...me and administrator password and then click Next z Computer name is for recognizing this computer when multiple com puters are connected via the network z Remember this password This password may be needed to manage the computer F Enter the correct date time and the time zone then select Next z Click or to set z If set properly click Next z After being set automatically the computer will restart ...

Page 16: ... the password click Create a password and the password following the onscreen instructions and click Create Password Remember the password you have set It is useful to input a hint in password hint in case you forget your password In addition we rec ommend that you create a password reset disk beforehand Î page 18 Refer to When administrator password is forgotten Î page 42 in Dealing with Problems...

Page 17: ... z To have DVD video and MPEG files played back automatically on WinDVD Î Chapter 3 Watching DVD Video in onscreen Reference Manual remove the check mark from DVD Video and Movie file mpeg on screen A or B on the left A When starting up Windows Media Player for the first time one of the set ting screens will be displayed After removing the check mark select Finish B After starting up Windows Media...

Page 18: ... the software application will run and the window will open z start menu When you click start the menu will be displayed Select the software application etc that you want to use from the menu and click it z Notification area see the bottom right on the screen Each of the icons has a separate role for example to set functions or confirm sta tus z When disconnecting the AC adaptor the icon will be d...

Page 19: ...l not operate Confirm that character input is not set to Caps Lock or NumLK Î page 12 z This operation may differ according to Use the Welcome screen setting z When only one user has been created and no password has been set the screen for selecting the user will not be displayed automatic log on 4 Select your application Run various software applications etc and operate them NOTE z The power savi...

Page 20: ...e 35 Change the Way Users log on or off 3 Click Turn Off Your computer will power off automatically z Restarting your computer without shutting down click Restart To shut down using the keyboard A Press the key the U key and select Turn Off with Î Í Ï Ð B Press the Enter key CAUTION z Do not do the following during the shutdown restart procedure Connecting or disconnecting the AC adaptor Touching ...

Page 21: ...ng the touch pad keep the following in mind By design the touch pad is to be used with a finger tip only Do not place any object or press down forcefully with sharp pointed objects i e finger nails pencils or pens on the work surface Try to avoid having any harmful substances such as oil come in contact with the touch pad The cursor may not work properly in such cases Function Operation Moving the...

Page 22: ...t possible to replace the markings on the keys or the keys themselves Key Functions Pop up Window Displayed after logging on to Windows Fn F1 Fn F2 LCD brightness control Fn F1 down Fn F2 up Fn F3 Display change When the external display is connected Fn F4 Speaker on off switch OFF MUTE ON Fn F5 Fn F6 Volume control Fn F5 down Fn F6 up Fn F7 Forcing the standby function Fn F9 Remaining capacity of...

Page 23: ... are extremely sensitive to static electricity There are cases where static electricity generated by the human body has adversely affected such RAM modules When inserting or removing a RAM module do not touch the terminals or internal components insert objects other than the module or allow foreign particles to enter Doing so has been known to cause damage fire or electric shock Inserting 1 Power ...

Page 24: ...press down do not force it Check once more to ensure that the module is positioned correctly 4 Put the cover back in place A Insert the cover at an angle then fit it into place B Fasten the screw NOTE z The memory size in Information menu of the Setup Utility Î page 26 has increased if the RAM module has been recognized If the RAM module is not recognized power off the computer and insert it again...

Page 25: ...played Password on boot SD Startup SD Setting Method Setup Utility Prompt Boot First Menu and User Password Protection will be displayed but cannot be set The User Password can be changed only when User Password Pro tection has been set to No Protection The User Password cannot be deleted z On the Exit menu Get Default Values option will not be displayed z The F9 key does not work NOTE z When Pass...

Page 26: ...this key when changing setting values z Enter To display sub menu of each item Use this key after selecting the item by using the Ï key or the Ð key z F9 To set default settings except the password System Time and System Date z F10 To save the settings and exit Parameters An underline indicates the factory default settings Information Menu Language English Model No CF xxxxxxxxx Serial No xxxxxxxxx...

Page 27: ...z Do not attempt to replace the markings on the keys or the keys themselves Normal Replace Display z The display destination in cases where Windows is not run ning is set here z If an external display is not connected all information will appear on the internal LCD even if External Monitor or Simultaneous is selected After Windows starts up the screen is displayed on the dis play destination set i...

Page 28: ...able This does not work for the external LAN card Disable Enable Boot up from LAN z Select whether to use the function starting the computer from a LAN server Enable or not Disable z This can be set only when LAN is set to Enable This function works only for the internal LAN This does not work for an internal wireless LAN and external wireless LAN card Disable Enable Wireless LAN z Select whether ...

Page 29: ...assword Enter Setup Utility Prompt Enable Boot First Menu Enable Hard Disk Lock Disable User Password Protection No Protection XSet User Password Enter Password on boot z Select whether you will need to input Enable or not Dis able the Supervisor Password or the User Password on booting Disable Enable SD Startup 2 z Select whether to use an SD memory card instead of enter ing the password on booti...

Page 30: ...is changed the selection screen display Setup Utility Prompt z Select whether to display Enable or not to display Dis able the message Press F2 for Setup F12 for LAN shown on the bottom of the Panasonic boot screen that is dis played after starting this computer Disable Enable Boot First Menu z Select whether to display Boot Menu Enable or not Disable Disable Enable Hard Disk Lock z Select whether...

Page 31: ...ttery Recalibration Save Values Exit Exit the Setup Utility and save your changes to CMOS Exit Without Saving Changes Exit the Setup Utility without saving your changes to CMOS Get Default Values Set the Setup Utility to the default settings Load Previous Values Load previous values from CMOS for all Setup items Save Current Values Save your changes to CMOS Battery Recalibration To accurately disp...

Page 32: ... the display or the cabinet around the display see figure B z Do not drop or hit the computer against solid objects z When taking an airplane Always carry your computer and disks etc with you Never check it in with lug gage Before using the computer inside an airplane we recommend asking the airlines regarding their policy on this issue z When transporting a spare battery pack sold separately insi...

Page 33: ...e surface e g discoloration In addition do not use commercially available household cleaners and cosmetics as they may contain components harmful to the surface z Do not directly add or spray water or detergent onto the computer If liquid enters the inside of the computer it may cause it to work improperly or be dam aged ...

Page 34: ...AN adaptor and click General 3 Click On or Off for Switch radio 4 Click OK Do not click Disable 1 in Network Connections 1 This is displayed by right clicking Wireless Network Connection in Network Connections Do not use the wireless LAN in airplanes hospitals or in other locations where wireless LAN signals may affect the operation of devices in the vicinity Abide by instructions regarding use in...

Page 35: ...ings When adding the check mark for this setting you can change to another user without logging on again when multiple users use the computer In the following case Fast User Switching cannot be used z When the check mark is not added for Use the Welcome screen z When joining the network domain z When the Use when logging on to Windows is set in SD Card Setup Î Chapter 4 SD Memory Card Security Fun...

Page 36: ... Computer from Viruses and Chapter 8 To Update this Compute to its Latest Version in onscreen Reference Manual When disposing of or transferring ownership of this device erase all data on the hard disk in order to prevent the theft of hard disk data Even if you delete data or initialize the hard disk through normal Windows commands data can still be read using special software In order to erase al...

Page 37: ... running or hard disk drive indicator is on Properly shut Windows down from the start menu to avoid problems Î page 20 z Do not place the Computer close to objects that emit electromagnetic waves magnets electromagnetic bracelets etc The data saved on the hard disk may be erased z Important data saved on the hard disk should be saved regularly e g in case of failures unexpected data updates erasur...

Page 38: ...over and accidentally opens it wider than 70 degrees pull it forward slowly until the stopper holds the cover in its proper posi tion z Do not leave the disk cover in the open position or touch the lens Over time dust may build up on the lens or on a disk This may result in a read or write malfunction z Insert the disk securely If the disk cover is closed without inserting the disk securely it may...

Page 39: ...ontact your technical support office 0280 Previous boot incomplete Default configuration used Startup has failed repeatedly so the Setup Utility settings have been returned to their default values and the computer has been booted z Run the Setup Utility and load the default values then change the settings to the appropriate values as needed Î page 25 Press F1 to resume F2 to Setup z Write down the...

Page 40: ...ms Summary in this manual Î page 41 2 Does the software application run Yes No Refer to each software application s help section For Windows click start Help and Support and refer to Windows Help If you cannot resolve the problem refer to step 3 Regarding the pre installed software on this com puter Î page 59 ask the makers of the soft ware applications Î page 48 3 Do the connected peripherals wor...

Page 41: ... is connected z The computer may not operate when certain USB devices are connected Disconnect the USB device or set Legacy USB Support to Disable in Advanced menu of the Setup Utility Î page 28 Enter Password is displayed z Enter your Supervisor Password or User Password If you have forgotten your password contact your technical support office Î page 60 POST Startup Error s are displayed Î page 3...

Page 42: ...ected Remove the USB device or set Legacy USB Support in the Advanced menu of the Setup Utility to Disable z If the message still appears even after trying the above measures this may be an indication that some type of hard disk failure has occurred Contact your technical support office When the previous items are not the cause z Press the F9 key in the Setup Utility This will restore the Setup Ut...

Page 43: ...appear This is not a malfunction The afterimage will disappear when a different screen is displayed z High precision and advanced technologies are used in the production of color liquid crystal displays color LCDs Therefore if 0 002 or less of the picture s elements either fail to light or remain constantly lit that means that more than 99 998 of the elements are functioning properly this is not c...

Page 44: ... or with your system administrator about LAN and wireless LAN settings Standby Hibernation Function Unable to enter standby or hiberna tion mode z If a USB device is connected to the computer the standby or hibernation function may not work properly Simply remove the USB device If the prob lem persists restart the computer z It may take a minute or two to enter standby or hibernation mode z The co...

Page 45: ...brates excessively or is noisy z Is the disk bent or labeled z Check to see if the disk is inserted correctly and it is in good condition If the disk is good and inserted correctly set CD DVD Drive Speed to Low in the Setup Utility Î page 27 z When writing to a disk using B s Recorder you can minimize vibration while writing by setting the writing speed at 8x or less Cannot eject disk z Is the com...

Page 46: ...nding Memory You do not know the available RAM module Î page 57 Cannot tell whether the RAM module has been correctly installed z You can check whether the RAM module is recognized using the Informa tion menu in the Setup Utility Î page 26 If the RAM module is not recognized turn the computer off and reinsert The RAM module has not been rec ognized z Make sure the RAM module has been properly inse...

Page 47: ... the screen currently being displayed to a file in bitmap format bmp A Display the screen you want to save B Press the Ctrl Alt F8 key C When a message The copy of the screen was saved is displayed click OK pcinfo bmp file will be saved in My Documents folder If pcinfo bmp file already exists it will ne overwritten If pcinfo bmp file is set as a Read only of Hidden file the new file cannot be save...

Page 48: ...o the address shown below When forwarding an inquiry include information on your computer s usage conditions z B s Recorder B s CLiP B H A URL http www bhacorp com http www bha co jp In Japanese E mail addresses U S Canada Australia English French BHAxpsupport bhacorp com Europe English German French eurosupport bhacorp com Asia Chinese asiasupport bhacorp com z WinDVD InterVideo Inc URL http www ...

Page 49: ...shipment Reinstallation Procedure When reinstallation procedure is performed the contents of the hard disk will be erased Be sure to back up any crit ical data on your hard disk to another media or to an external hard disk before running the reinstallation procedure The reinstallation procedure will return the computer to its original condition If you have created partitions for data the data may ...

Page 50: ... computer and press the F2 key while Panasonic boot screen is displayed The Setup Utility will start up z If the password has been set enter the Supervisor Password and press the Enter key B Press the F9 key At the confirmation message select Yes and press the Enter key C Select the Boot menu then select CD DVD Drive and press the F6 key until CD DVD Drive is at the top of the Boot menu D Place th...

Page 51: ...tus at the time of purchase Press the 1 key z To divide the hard disk into two partitions for OS and data Press the 2 key Enter the basic partition size GB for the operating system installation and press the Enter key You can cancel this operation by pressing the 0 key The data partition size is the remainder after subtracting the basic partition size Data partition 1 GB or more Maximum settable s...

Page 52: ... complete will be displayed Remove the Product Recovery DVD ROM and press any key to shut down the com puter 4 Return the Setup Utility settings to their default values Return the Setup Utility to its settings at the time of shipment to ensure proper setup of Windows A Turn on the computer and press the F2 key while Panasonic boot screen is displayed The Setup Utility will start up If the password...

Page 53: ...ange the drive letter for the DVD ROM CD R RW drive or hard disk drive by the following steps z Drive letters can only be changed when two or more partitions have been created on the hard disk drive The name of the C drive cannot be changed z We recommend that you make these changes before installing applications A Click start Control Panel Performance and Maintenance Admin istrative Tools and dou...

Page 54: ...ngle Product which was accompanied by the Programs to such other party At the time of such a transfer you must also transfer all copies whether in printed or machine readable form of every Program and the related documentation to the same party or destroy any such copies not so transferred F You may not remove any copyright trademark or other notice or product identification from the Programs and ...

Page 55: ...t the Boot menu then select CD DVD Drive and press the F6 key until CD DVD Drive is at the top of the Boot menu C Place the Product Recovery DVD ROM into the DVD ROM CD R RW drive D Press the F10 key At the confirmation message select Yes and press the Enter key The Setup Utility will close and the computer will restart If Enter Password is displayed during the following procedure enter the Superv...

Page 56: ...firmation message press the Enter key The operation of erasing the hard disk starts z If necessary the hard disk data erase operation can be cancelled after it has begun by pressing the Ctrl C key If the operation is cancelled before being completed a part of data will not be erased J The message Hard disk data has been deleted will be displayed Remove the Product Recovery DVD ROM and press any ke...

Page 57: ... speed 8X speed 10X speed zUltra Speed CD RW write 10 11 8X speed 10X speed 8 16X speed Compatible Disk and Compatible For mats 5 Playback DVD ROM Single Layer Dual Layer DVD R 7 1 4 GB 3 95 GB 4 7 GB 3 DVD RW Ver 1 1 4 7 GB 9 4 GB 3 DVD RAM 6 1 4 GB 2 8 GB 2 6 GB 5 2 GB 4 7 GB 9 4 GB 3 CD Audio CD ROM XA compatible CD R Photo CD multiple session com patible VideoCD CD EXTRA CD RW CD TEXT Compatib...

Page 58: ...eds The transfer rate is 2 MB per second even if you use an SD memory card that supports high speed transfer rates Does not guarantee connection operation of all SD devices Does not support SD I O 17 A PC2700 compliant RAM module added to this computer operates at the same speed as a PC2100 compliant RAM module 18 For the RAM module s model number refer to your technical support office Î page 60 1...

Page 59: ...Pack 2 DirectX 9 0 c Microsoft Windows Media Player 9 Microsoft Windows Movie Maker 2 1 Adobe Acrobat Reader Intel PROSet SD MovieStage SD Utility Icon Enlarger Touch Pad Utility DMI Viewer PC Information Viewer WinDVD 5 OEM Version B s Recorder GOLD7 BASIC B s CLiP 5 2 Hotkey Settings Setup Utility Hard Disk Data Erase Utility 3 z Wireless LAN Data Transfer Speeds IEEE802 11b 11 Mbps 5 5 Mbps 2 M...

Page 60: ... If the problem is not handled to your satisfaction then write to the Consumer Affairs Division at the address indicated below SOFTWARE LIMITED WARRANTY Panasonic Computer Solutions Company referred to as Panasonic warrants to you only that the disk s or other media on which the Programs are furnished will be free from defects in materials and workmanship under normal use for a period of sixty 60 ...

Page 61: ...so have other rights which vary from state to state This Limited Warranty will be governed by the laws the State of New York without regard to its conflict of laws rules To obtain service or technical assistance within the continental U S A and Alaska Correspondence requesting product information should be sent to Panasonic Computer Solutions Company 50 Meadowlands Parkway Panazip 2F 5 Secaucus NJ...

Page 62: ...62 Important Information Memo ...

Page 63: ...63 Important Information ...

Page 64: ...r 12 Hibernation Function Deal ing with Problems 44 Important Tips 8 Maintenance 32 Notification Area 18 NumLk 12 PC Information Viewer 47 Peripheral Devices 37 Popup Window 22 Power Indicator 12 RAM Module Dealing with Problems 46 Reference Manual 8 Dealing with Problems 45 Reinstalling B s Recorder B s CLiP 45 Right Click 21 ScrLk Indicator 12 Scroll 21 SD Card Setup Dealing with Problems 45 SD ...

Reviews: