background image

ー 46 ー

ー 47 ー

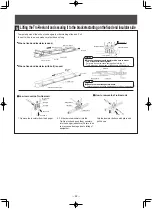
Maintenance schedule of Tro-Reel 

Please check by the maintenance table based on this maintenance schedule.

Refer to the maintenance table for a concrete check item.

At introduction      The 5th year     

The 10th year

Maintenance done by the electrical work trader.

The product-life is different in use conditions and the service space, however, It is possible to use it for about t 10 years

by regularly maintaining and the regular service in correct construction.

・Check the presence of remarkable dirt of the surface of the conductor. 

   (Once every 3 to 6 months) → Clean it with the cotton waste etc.

・ Check the Tro-Reel unit doesn't become it in a zigzag line. 

   (Once every 3 to 6 months) →Review the size between conductors in the joint.

・Check the Tro-Reel unit is not away from the hanger. 

   (Once every 3 to 6 months) →Install the Tro-Reel unit on thehanger.

・Check  whether there is not crack and a lack of the insulation sheath 

(Once every 3 to 6 months) 

    →Product exchange recommendation that exchanges the Tro-Reel unit.

Tro-Reel unit

・Check the coil spring length. (Once every 3 to 6 months) →Adjust to proper length.

・Check whether there is loosening of the nut of the coil spring.

   (Once every 3 to 6 months) →Retighten.

・Check whether the resin has not been damaged. (Once every 3 to 6 months)  

    →Exchange products.

End tension

insulator

・Check whether there is loosening of the fixation screw or the terminal screw. 

   (Once every 3 to 6 months)  →Retighten.

・Check whether the resin has not been damaged. (Once every 3 to 6 months)  

    →Exchange products.

Joiner

End tension 

insulator
Center fixed 

insulator
Guide cap
Insulating piece

Center feed-in joiner 

・Check whether there is loosening of the nut. (Once every 3 to 6 months)  →Retighten.

・Check whether the resin has not been damaged. (Once every 3 to 6 months)  

    →Exchange products.

Hanger

・Check whether there is loosening of the bolt.  (Once every 1 to

・Check whether the resin has not been damaged. (Once every 3 to 6 months)

→Exchange products

 3 months)  →Retighten.

・Check whether wear has reached the replacement line. (Once every 1 to 3 months)

→Exchange the collector, when worn out to the replacement line.

・Check damage of spring pin and rotation axis, wear-out of metal fittings of spring receiving.

(Once every 1 to 3 months)→Exchange products when damage or abnormality is found. Please keep normal.

Collector arm

Product exchange recommendation.

A title

Check day

  Y  D  M

The check 

person in 

charge

Name

Contents of inspection

Remedy

Result Measures

Inspection cycle (standard)

Tro-Reel unit

Check to see if there is any foreign particles 

adhering on its sliding surface or if it is seriously contaminated? 

Clean with a specific purpose cleaner or waste 

cloth.

Once 
every

3 to 6 

months

Is there any ark generated protrusion on its 

sliding surface?

Remove any protrusion (convex) on the arc 

scratch using a file.

Is there damage and crack at the insulating 

sheath ?

When damage and crack occurred in the insulating 

sheath of the duct, please change the duct.

Is there sharpen at the insulating sheath ?

When thickness of the insulating sheath is equal 

to or less than 1.2mm, please change the duct.

Is the duct installed in parallel for a rail?

Please adjust the duct so that it is parallel at a rail.

Isn’t the unit dislocated from the hanger?

Review for any dislocated position on the unit. 

Correct if any.

Are not there remarkable torsion and the curve of the duct? Please revise turning remarkable torsion.

Fixed end 

insulator

witho

ut bo

lt

Are not there the cracks and damaged on a 

resin part?

When damage and crack occurred in the fixed 

end insulator, please change it.

Do stop it i in an insulating tape?

Please install an insulating tape.

Fixed end 

insulator

with bolt

Are not there the cracks and damaged on a 

resin part?

When damage and crack occurred in the fixed 

end insulator, please change it.

Is’t there the slack of the lock bolt?

Retighten

Is not there the torsion?

Please revise torsion.

Is not there the exposure of the conductor?

Please install a repair cover for sheaths

End tension insulator

Is the coil spring set definitely?

Length of the coil spring  L =115-125mm

Please adjust it to reasonable length

When  tighten the duct, Please tighten a nut of 

the tightening bolt with balancing in turn.

Does not a nut (a double nut) of the coil spring 

part have the slack?

Retighten

Does not a bolt for electric wire connection of 

the feeding-in terminal part have the slack?

Retighten

Are not there the cracks and damaged on a resin part? When damage and crack occurred in it, please change it.

Are not there a loser of the cover part, the falling off?  When loser and the falling off occurred, confirm 

the state of the cover, and please install the cover. 

Is not there the exposure of the conductor?

Please install a repair cover for sheaths

Is not there the torsion?

Please revise torsion.

Center 

fixed 

insulator

Are not there the cracks and damaged on a 

resin part?

When damage and crack occurred in it, please 

change it.

Are not there a loser of the cover part, the falling off?  Please install the cover.

Joiner

Isn’t there the conductor of the joint have a gap and the step? Please revise a gap, the step.

Isn’t there the slack of the connection bolt?

Retighten (tightening torque 6.9

7.9N

m)

Are not there the cracks and damaged on a 

resin part?

When damage and crack occurred in it, please 

change it.

Are not there a loser of the cover part, the falling off? Please install the cover.

Ambient temperature

L

the case of less than 10℃ 115mm
the case of 11℃〜 40℃

125mm

Amount of wear of the conductor is correct?

Amount of wear of the conductor o

0.5 mm or less

Don't the insulated sheath and the resin part 

of collector spinning shaft  touch?

If it exceeds a threshold amount of wear, please replace the main conductor

In case of wearing down to the replacement indication line at next inspection,

 please replace earlier than usual.

Check the amount of wear of the collector and 

conductor of the duct,replace it if necessary.

○:Exchange required

Measures

●:Finished with exchange
△:Adjustment required
▲:Finished with adjustment

Result

○:Normal

×:Abnormality


 Inspections item at the time of the pre-use test run(Checking at periodic inspection).


 For using safely, please inspect the system one month after starting regular 

operation.


 The inspection cycle is mentioned below. However, determine your own 

inspection cycle based on the actual operating rate and environmental condition.


 Items in bold: Inspection items requiring particular attention.

Notes

To Maintenance manager

Summary of Contents for Tro-Reel 150A

Page 1: ... Otherwise electric shock may occur Be sure to do a pre use test run of equipment and do periodic inspections Otherwise electric shock fire or damage due to falling of equipment may occur When damage and crack occurred in the insulating sheath of the duct please change the duct Otherwise sparking may occur causing fire poor contact or derailing of the trolley etc This product is for general indoor...

Page 2: ...lace where corrosion resistance is absolutely necessary for example at ocean district cement factory or sewage treatment plant Electric shock fire or damage due to equipment falling may occur In case of using outdoor or at a very damp indoor use hanger with an insulator Position the opening of a unit facing downward or sideways If installed with the opening facing upward a unit may produce sparks ...

Page 3: ...Adjust to proper length Check whether there is loosening of the nut of the coil spring Once every 3 to 6 months Retighten Check whether the resin has not been damaged Once every 3 to 6 months Exchange products End tension insulator Check whether there is loosening of the fixation screw or the terminal screw Once every 3 to 6 months Retighten Check whether the resin has not been damaged Once every 3...

Page 4: ...en Does not a bolt for electric wire connection of the feeding in terminal part have the slack Retighten Are not there the cracks and damaged on a resin part When damage and crack occurred in it please change it Are not there a loser of the cover part the falling off When loser and the falling off occurred confirm the state of the cover and please install the cover Is not there the exposure of the...

Page 5: ...se adjust so that the gap between the ducts is set to 15mm 5mm Is the coil spring set definitely Length of the coil spring L 115 125mm L Please adjust it to reasonable length Ambient temperature L the case of less than 10 115mm the case of 11 40 125mm Does not a nut a double nut of the coil spring part have the slack Retighten Isn t there the slack of a bolt for electric wire connection of the fee...

Page 6: ...on line by the time of the next check The center of the both sides of the collector arm attachment and Tro Reel unit arranges Tro Reel unit Collector arm attachment Please revise it so that the center matches Is there any ark generated protrusion Remove the protrusion convex on the arc scratch using a file Is there any mounting nut loosen Retighten Is there any curve or variation on the arm Replace...

Page 7: ...lease be sure to confirm if follow or not the precautions during the work and after installation Otherwise fire electric shock or damage due to falling of equipment may occur Coil spring length If the Tro Reel unit is tilted the collector arm will separate from the wires Be sure to correct any tilting found during installation A spacer to prevent tilting and twisting is also available 15 Inclination...

Page 8: ...e at a heavily vibrating position or outdoor is 2m or less distance Center fixed insulator When part of the Tro Reel unit is installed on a horizontal curve it should be attached at the joint between the curved section and the straight section to maintain tension in the straight section Fixed end insulator with bolt Fixes one end of the Tro Reel unit for easy tension application during installatio...

Page 9: ...dard installation A Collector arm mount rod 25 25mm not included A 2 5 2 5 B 2 B 1 Two stage installation A A B 2 B 1 B 3 B 2 B 1 Horizontal installation A A 40mm or more B1 B2 The asterisk indicates the conductor sliding surface Installation size mm mm The following drawing shows the dimensions for mounting Ⅰ beams and other building structures support brackets not included and Tro Reel unit to Ⅰ...

Page 10: ...tetensioninsulator End tension insulator Joint Joint Coil spring Hanger Center fixed insulator Intermediatetensioninsulator End tension insulator Collector arm Joint Power supply For brackets adjacent to Center fixed ediate insulators use a shape bracket 75mm 40mm 5mm or larger Range of practical collector servicing 4m or less 4m or less approx 0 5m approx 0 5m Collector arm mount rod 25 25mm not ...

Page 11: ...erval Minimum curve radius Rated current of collector arm Hanger interval curved sectoin staight section 800mm 30A 60A 100A 1200mm 2400mm 0 5m or less 4m or less 0 5m or less 0 5m or less 0 5m or less 0 5m or less 0 5m or less 0 5m or less 4m or less 4m or less approx 0 5m Fixed intermediate insulator bracket not included Center fixed insulator Center fixed insulator End tension insulator End tens...

Page 12: ... less 0 5m or less 0 5m or less 0 5m or less 0 5m or less 0 5m or less 0 5m or less 4m or less 4m or less 0 5m 0 5m 4m or less 4m or less 50m or longer 0 5m 0 5m Center fixed insulator Center fixed insulator Center fixed insulator Intermediate tension insulator Intermediate tension insulator bracket not included Intermediate tension insulator bracket not included Center fixed insulator bracket not...

Page 13: ... drawn to show the work clearly Fixed end insulator bracket In case of using hanger with an insulator φ11 B B A 46 Fixed end insulator section In case of using hanger with an insulator Intermediate bracket for hanger h Fixed end insulator bracket End tension insulator bracket fixed end insulator bracket with bolt Intermediate bracket for hanger approx 0 5m 4m or less 4m or less 46mm 100mm 4m or le...

Page 14: ...ize 40 40 5 75 40 5 100 50 5 A size 250 300mm B size Minimum Standard 75mm 100mm Type and use brackets For hanger For end tension insulator For intermediate tension insulator For center fixed insulator For intermediate tension insulator In case of using hanger with an insulator End tension insulator bracket Center fixed insulator bracket Center fixed insulator bracket Intermediate tension insulato...

Page 15: ...he straightener to remove curl in the coil and prevent unit twisting Measure the distance between the brackets at both ends the range of practical collector servicing 1m and cut the unit to that length When a fixed end insulator is used When a fixed end insulator with bolt is used One end tension system Cutting the unit to the length of the line Both end tension system Length of Tro Reel A 350mm D...

Page 16: ...he end of the Tro Reel insulating sheath Attach the special washer and terminal plate Tighten the terminal plate screws 2 Drill a φ5mm hole into the Tro Reel conductor and drive in a knock pin Insulating sheath Tro Reel unit Special washer φ5mm drill bit Terminal plate 45mm Screw Knock pin 4 Be sure to mount the special washer Failure to do so may cause damage due to falling of equipment Notes The...

Page 17: ...ount the Tro Reel unit How to remove the Tro Reel unit Fixed end insulator Mounting direction Hanger Tro Reel unit Bracket for hangers Pull here Bracket for hangers Mounting direction Fixed end insulator with bolt Tro Reel unit Pull here 46mm Hanger with insulator Fixed end insulator Close together 20 75 Insulator Special washer Fixing piece M10 Bolt for hanger Hanger Insulator Push here Pull down...

Page 18: ...to the insulator Cover Special washer Insulator Insulator Insert into the groove Terminal plate End tension insulator bracket End tension insulator Nut bolt M12 I beam L Coil spring Tro Reel unit 10 or lower 11 40 Ambient temperature during installation 115mm 125mm L 2254 1568 Tension N 6 7 Feeding power to the Tro Reel Power can be fed from the line end via an end tension insulator Connect the po...

Page 19: ...o so may cause poor collector arm contact When you want to use the collector arms with centerring horizontally please contact Panasonic electric Works Ltd In a horizontal ways case be sure to use the horizontal support parts Failure there is a risk of derailment or loose arms collector Distance to the center of the collector arm from the center of the duct Notes Tro Reel unit Collector arm Collect...

Page 20: ...eel unit 80mm Conductor cleaner installation Set the distance from the bottom surface of the Tro reel conductor to the center of the collector arm mount rod not included to 95mm in the center of the conductor clerner mounting tolerance movable range 95 20mm Tro Reel unit Adjustment screw 95 20 Conductor cleaner 25 25mm Collector arm mount rod 25 25mm not included The conductor cleaner must be moun...

Page 21: ... a hex wrench Setting Torque 6 9 7 9N m Failure to do so may cause fire 3 Connect the conductors with the terminal plates and drill φ5mm boles in the conductors Insert knock pins through the holes 4 Fit on a cover Apply the insulator along the center line of the insulating sheath cutaway When power is fed from an intermediate point on a line When connecting units and feeding power simultaneously W...

Page 22: ... wrench not included 80mm Tro Reel unit Terminal plate Bypass wire φ5mm knock pin φ5mm drill bit Drill 40mm 40mm Bypass wire Feed in cover Cover screw Caution Be sure to use a file of φ5 size Terminal screws and φ5mm knock pins must be securely tightened tightening torque 6 9 7 9N m Failure to do so may cause poor collector arm contact or damage due to falling of equipment Notes Be sure to use a f...

Page 23: ... to do so may cause poor collector arm contact or damage due to falling of equipment Notes 200A and 300A 1 Cut 40mm off of each end of the insulating sheath Cut the insulating sheath completely off the recess on the side 2 Sandwichthe conductor between joiner terminals Tighten the bolts with a hex wrench tight Setting Torque 6 9 7 9N m Failure to do so may cause poor collector arm contact or damag...

Page 24: ...lector arm derailing Notes Notes Cover Guide Cap φ5mm hole Tro Reel unit 20mm knock pin φ5 18 7A I beam Use a tandem type collector arm and set the traveling speed for switching sections to 60m min or less Be sure to use only the specified dimensions for each mounting part Failure to do so may cause poor collector arm contact or separation from wires In the case using at outdoors Please contact Pa...

Reviews: