ー 44 ー
ー 45 ー
Name
Contents of inspection
Remedy
※
Result Measures
Inspection cycle (standard)
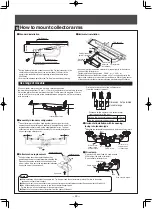
Collector arm
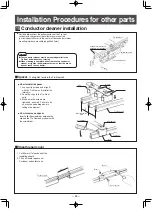
Is installation dimensions H of the collector
arms
collector arm mount rod
sliding surface
H
Please correct so that the distance H
is set to 95mm(Central value of the
collector arm permitted movable range
± 20mm) between the conductor sliding
surface and collector arm mount rod.
Please measure H size, where the
collector shoes is touched in the hanger.
○
Once
every
1 to 3
months
Does not the collector arm mount rod
have the remarkable torsion?
Torsion
When there is remarkable torsion, please
revise the collector arm.
○
Does not the collector shoes have the
outbreak such as Bali?
Please remove it with sandpaper.
Is there any serious wear to replacement
indication line.
Rplacement
indication line
Collector shoes should be replaced
when they partially wear down to the
replacement indication line.
Please exchange the collector shoes
ahead of time when it will be worn out
to the replacement indication line by the
time of the next check.
The center of the both sides of the
collector arm attachment and Tro-Reel
unit arranges.
Tro-Reel unit
Collector arm
attachment
Please revise it so that the center
matches.
○
Is there any ark generated protrusion ?
Remove the protrusion (convex) on the
arc scratch using a file.
Is there any mounting nut loosen?
Retighten
○
Is there any curve or variation on the arm? Replace the arm if there is curve or variation.
Is there any chip or broken?
Replace if chip or broken spring pin is found.
Is there any wear or hole loosen on spring
bearing metal?
Replace the collector shoes if there is
wear to replacement indication line.
Is there any damage on the sheath of lead wire? If there is damage, replace the collector shoes.
○
Is the collector shoes pulled by the lead
Are there abnormal wear?
wire?
If the collector shoes pulled, correct to
If there is abnormal wear of the arm,
replace the collector arm.
have extra length on lead wire.
○
○
Collector arm
support parts
for transverse
Are there modification of a spring (6.2mm or more
clearance between the spring) or rust on the spring?
Deformation of the spring, if there is
rust, replace
Is there a loose the screws?
Tighten screws more.
○
10
Name
Contents of inspection
Remedy
※
Result Measures
Inspection cycle (standard)
Center feed-in
joiner
Isn’t there the slack of a bolt for electric
wire connection of the feeding-in joiner ?
Retighten
○
Once
every
3 to 6
months
Are not there the cracks and damaged
on a resin part?
When damage and crack occurred in it,
please change it.
○
Are not there a loser of the cover part,
the falling off?
Please install the cover.
○
Hanger
Is the hanger installation pace equal to
or less than 4m?
Please install a hanger to become equal
to or less than 4m.
○
As for the curve department and the
hanger installation of both ends of the
terminal tightening insulator, is the pace
equal to or less than 500mm?
Please install a hanger to become equal
to or less than 500mm.
○
Is not there the slack of the installation
bolt?
Retighten
○
Are not there the cracks and damaged
on a resin part?
When damage and crack occurred in it,
Please change it.
○
Intermediate
tension
insulator
Is the center fixed insulator attached so
that the gap between the ducts may be
set to 15mm ± 5mm?
Please adjust so that the gap between
the ducts is set to 15mm ± 5mm.
○
Is the coil spring set definitely?
Length of the coil spring L =115-
125mm
L
Please adjust it to reasonable length.
Ambient temperature
L
the case of less than 10℃
115mm
the case of 11℃~ 40℃
125mm
○
Does not a nut (a double nut) of the coil
spring part have the slack?
Retighten
○
Isn’t there the slack of a bolt for electric
wire connection of the feeding-in joiner ?
Retighten
○
Are not there the cracks and damaged
on a resin part?
When damage and crack occurred in it,
Please change it.
○
Are not there a loser of the cover part,
the falling off?
Please install the cover.
○
Insulating
piece
Are not there the cracks and damaged
on a resin part?
When damage and crack occurred in it,
Please change it.
○
Are not there a loser of the cover part,
the falling off?
Please install the cover.
○
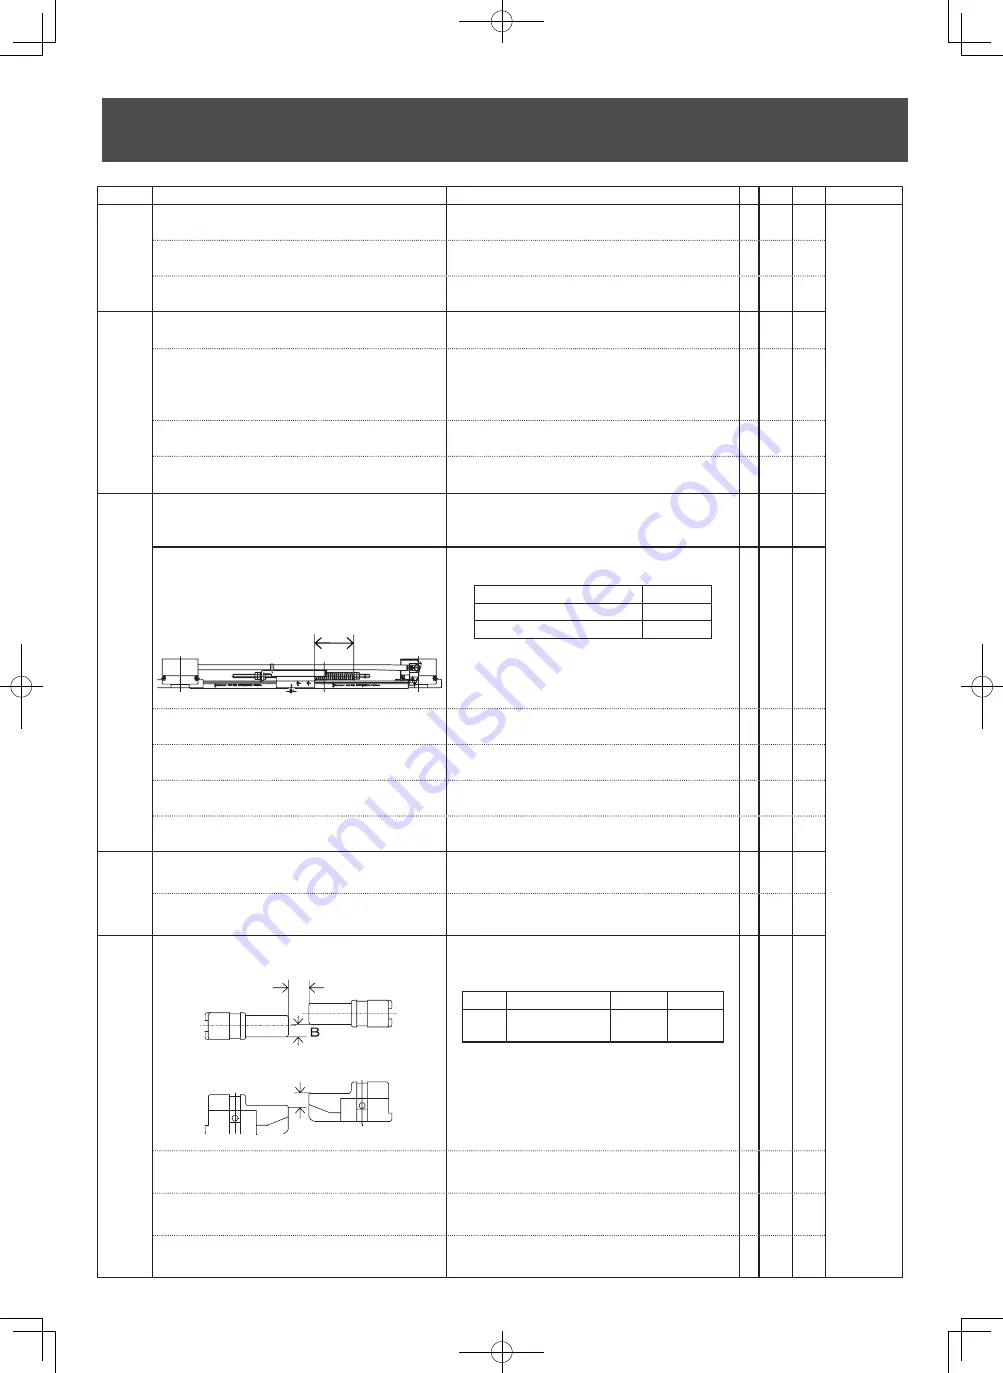
Guide cap
A r e t h e i n s t a l l a t i o n d i m e n s i o n s
clearance?
A
C
Please revise it to dimensions in the
clearance
A
B
C
length 10 ~ 30mm
5mm
lower
7mm
lower
○
Are not there a loser of the cover part,
the falling off?
Please install the cover.
○
D o e s n o t t h e r e s i n p a r t h a v e t h e
abrasion?
When I am worn, please change
Are not there the cracks and damaged
on a resin part?
When damage and crack occurred in it,
Please change it.
○