ー 40 ー
ー 41 ー
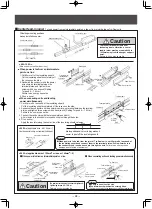
approx.500
4000 or less (standard)
500 or less
500 or less
4000 or less
(standard)
500 or less
●
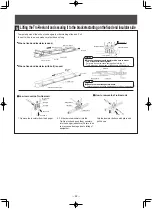
End tension insulator (with feed-in terminal)
Applies tension to the Tro-Reel unit to absorb
sag or expansion and contraction due to
temperature fluctuation.
It supplies a power supply from here.
●
Spacer
If there are no hangers available near the end tension
insulator, attach a spacer, making sure that the
Tro-Reel unit is not tilted.
●
Tro-Reel unit
AC 600V, 60A, 150A, 200A, and 300A.
Standard length is 100m/coil. 80m, 60m,
40m, and 10m coils are also available.
●
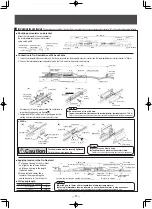
Standard hanger (JAPANESE
Regulations on Electrical
Installation, Article 199)
Fix properly so that the Tro-Reel unit
won’t deflect.Use hanger with insulators
for outdoor.and use hanger with porcelain
insulator for sea side areas use or bad
environmental areas.
●
Bracket (not included)
Use a L-shape bracket of 40mm
×
40mm
×
5mm or larger.
Brackets should be positioned at an interval of 4m or less
for straight sections and 0.5m or less for curved sections.
●
Horizontal mounting distance is 2m or less.
●
For a standard mounting, distance at a heavily vibrating
position or outdoor is 2m or less distance.
●
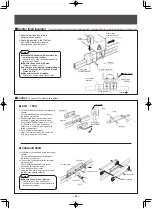
Center fixed insulator
When part of the Tro-Reel unit is installed on a horizontal
curve, it should be attached at the joint between the curved
section and the straight section to maintain tension in the
straight section.
●
Fixed end insulator (with bolt)
Fixes one end of the Tro-Reel unit for easy
tension application during installation.
The insulator should be mounted to the same
type of bracket as used with the end tension
insulator (with feed-in terminal).
●
Fixed end insulator
Fixes one end of the Tro-Reel unit for easy
tension application during installation.
Drill a hole in the end of the Tro-Reel unit
and put a pin through the hole.
●
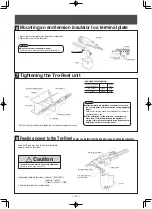
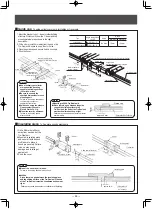
Collector arm
●
Traveling speed is 300m /min. or lower.
●
For a tandem configuration,easily assemble it at
the job site if you use two collector arms.
●
If you use on a horizontal run way, set a
Collector arm support parts(for transverse).
(Collector arm mount rod (25
×
25mm) is not
included.)
Instllation Procedure
Unit : mm
●
If the installation length exceeds 50m,
use end tension insulators on both ends.
Notes
●
If the installation length exceeds 50m,
use end tension insulators at both ends.
●
When a hanger with the porcelain
insulator is used,use fix end
insulators(with bolt).
Notes
Standard Installation Procedures for Tro-Reel
Installation Procedures for Tro-Reel unit and hanger supporting distance
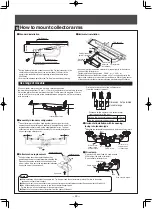
Hanger types
Standard hanger
Hanger with insulator
A size
Minimum Standard
B size
B
1
B
2
B
3
Size
75
100
95
135
295
160
320
Tro-Reel unit mounting method and hanger intervals.
Hanger
intervals
Standard
installation
Horizontal
installation
4m or less
2m or less
Note: The B
3
size is applied for a L-shape bracket of 40mm
×
40mm
×
5mm.
When installed
outdoors or in a
place exposed to
heavy vibration such
as for horizontal
wiring in cranes:
2m or less
●
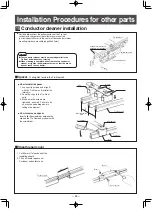
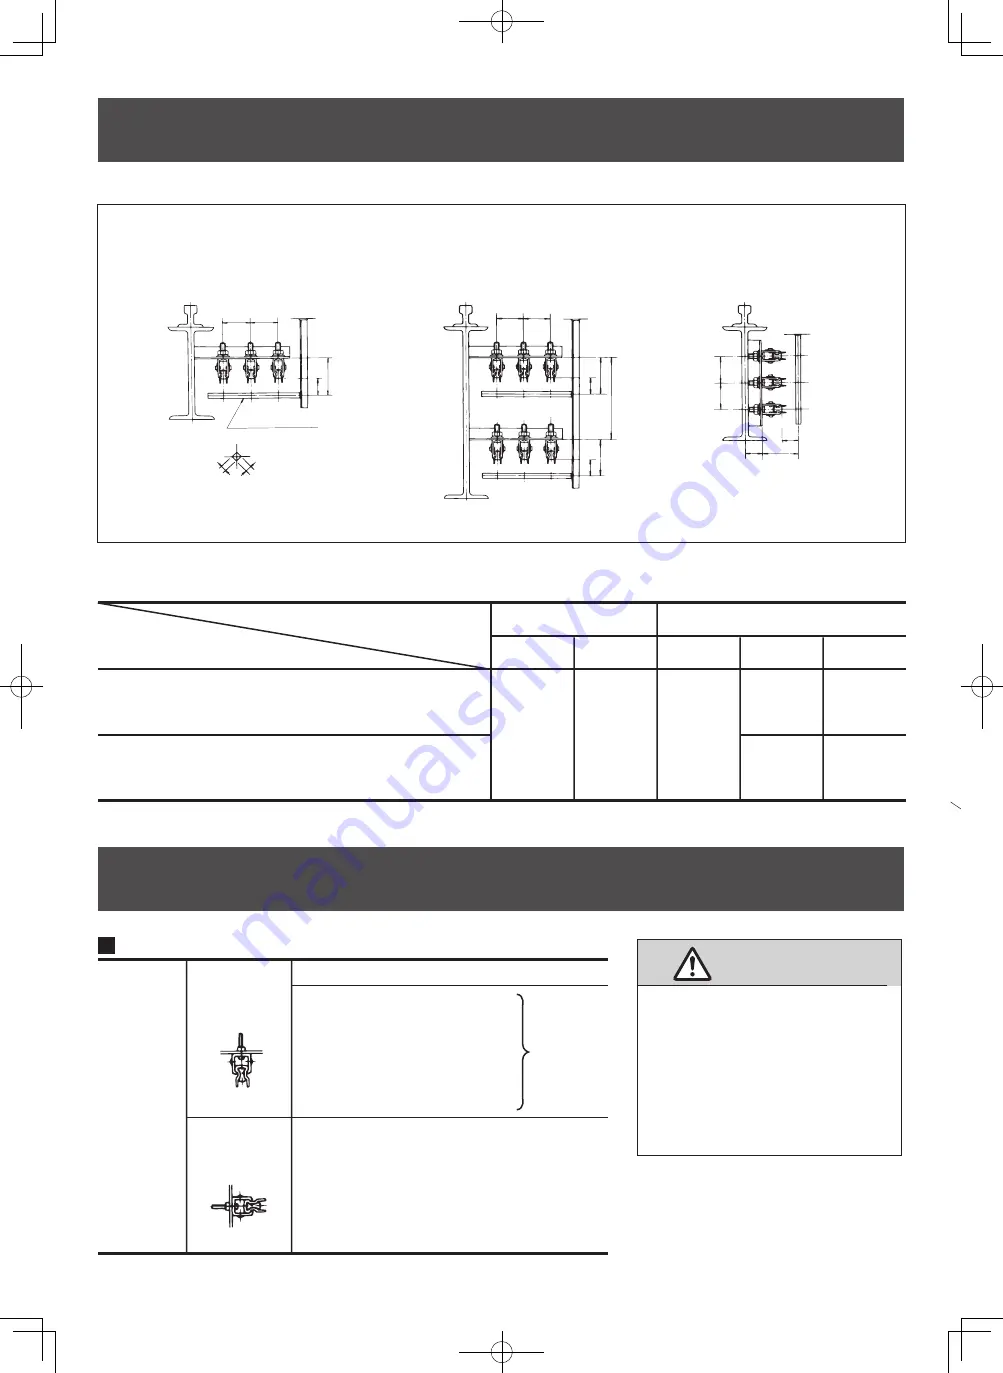
Standard installation
A
Collector arm
mount rod, 25
×
25mm
(not included)
A
25
25
※
B
2
B
1
●
Two-stage installation
A
A
B
2
B
1
B
3
B
2
B
1
※
※
●
Horizontal installation
A
A
40mm or more
B
1
B
2
※
The asterisk (
※
) indicates the conductor sliding surface.
Installation size (mm)
(mm)
The following drawing shows the dimensions for mounting
Ⅰ
-beams and other building structures, support brackets(not
included) and Tro-Reel unit to
Ⅰ
-beams and other building
structure.
Do not step on or bang the Tro-Reel unit on
the ground to straighten.
The insulating sheath of Tro-Reel unit is made of
rigid PVC, which becomes fragile and stiffen
under low temperatures. As this may damage the
unit. Use a straightener to straighten the coils
before installation. Failure to do so may cause
poor collector arm contact or separation from
wires.
Caution


