6
TV
OK
1
3
2
4
6
5
7
9
8
0
+
-
-
+
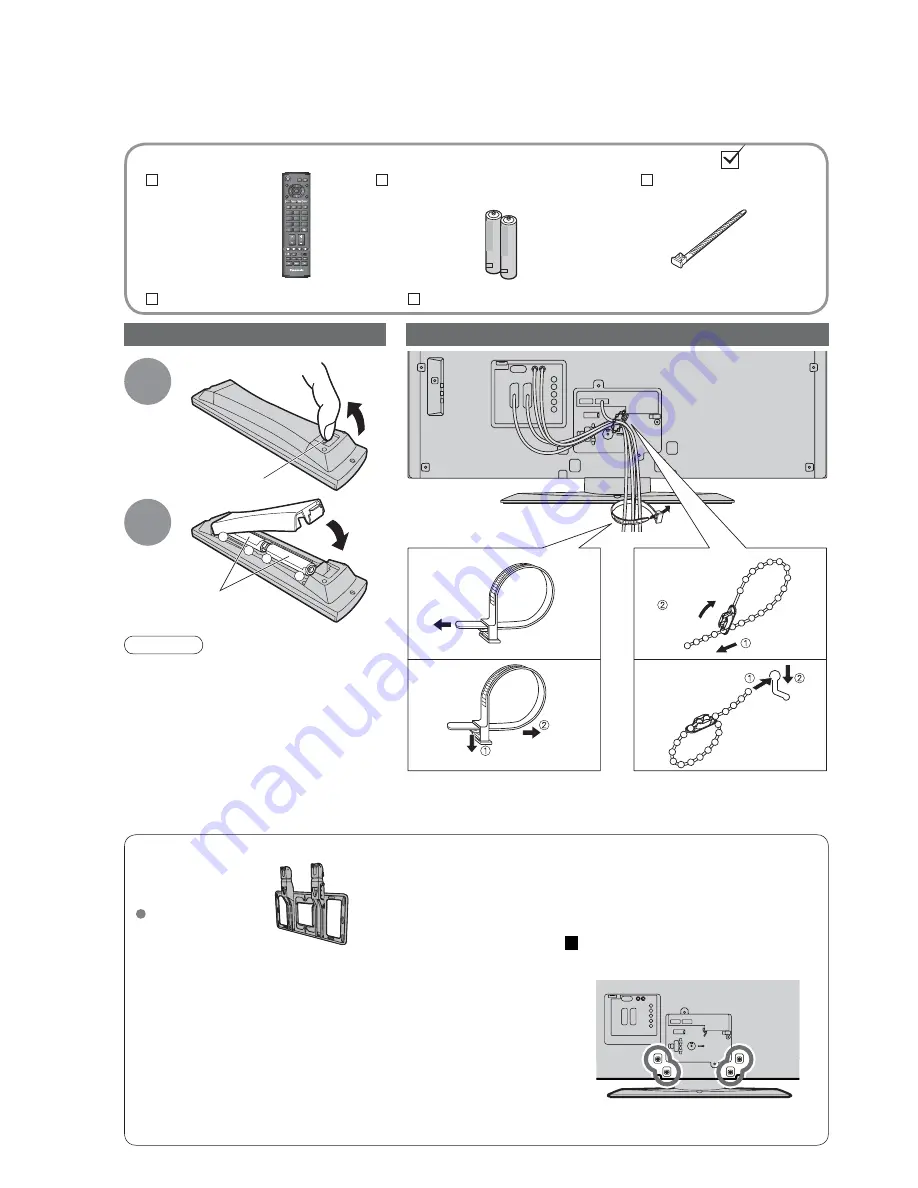
Accessories / Options
Batteries for the Remote
Control Transmitter
(2)
•
R6 (UM3)
Clamper
Remote Control
Transmitter
•
EUR7651110
Standard accessories
Check that you have the accessories and items shown
Operating Instructions
Pan European Guarantee Card
Installing remote’s batteries
Caution
•
Incorrect installation may cause battery
leakage and corrosion, resulting in
damage to the remote control.
•
Do not mix old and new batteries.
•
Do not mix different battery types (such
as alkaline and manganese batteries).
•
Do not use rechargeable (Ni-Cd)
batteries.
•
Do not burn or breakup batteries.
1
Pull
open
Hook
2
Note the correct
polarity (+ or -)
Close
Using the clamper
•
Do not bundle the RF cable and mains lead together (could cause distorted image).
•
Fix cables with clampers as necessary.
•
When using the optional accessory, follow the option’s assembly manual to fi x cables.
To tighten:
Keep the
knob pressed
Rear of the TV
To loosen:
Clamper
(Standard accessory)
Clamper
that bundle
mains lead
Bundle the
cables:
Hook the
clamper:
Tight
Lock
Optional accessories
Wall-hanging
bracket
TY-WK32LR2W
WARNING!
•
Failure to use a Panasonic bracket or choosing to mount the
unit yourself will be done at the risk of the consumer.
Any damage resulting from not having a professional installer
mount your unit will void your warranty.
•
Always be sure to ask a qualifi ed technician to carry out set-up.
Incorrect fi tting may cause equipment to fall, resulting in injury
and product damage.
•
Do not mount the unit directly below ceiling lights (such as
spotlights, fl oodlights or halogen lights) which typically give off
high heat. Doing so may warp or damage plastic cabinet parts.
•
Take care when fi xing wall brackets to the wall. Always ensure that there
are no electrical cables or pipes in the wall before hanging bracket.
Please contact your nearest Panasonic dealer to purchase the
recommended wall-hanging bracket. For additional details, please
refer to the wall-hanging bracket installation manual.
How to remove the TV Stand
Remove four screws.
Rear of the TV


