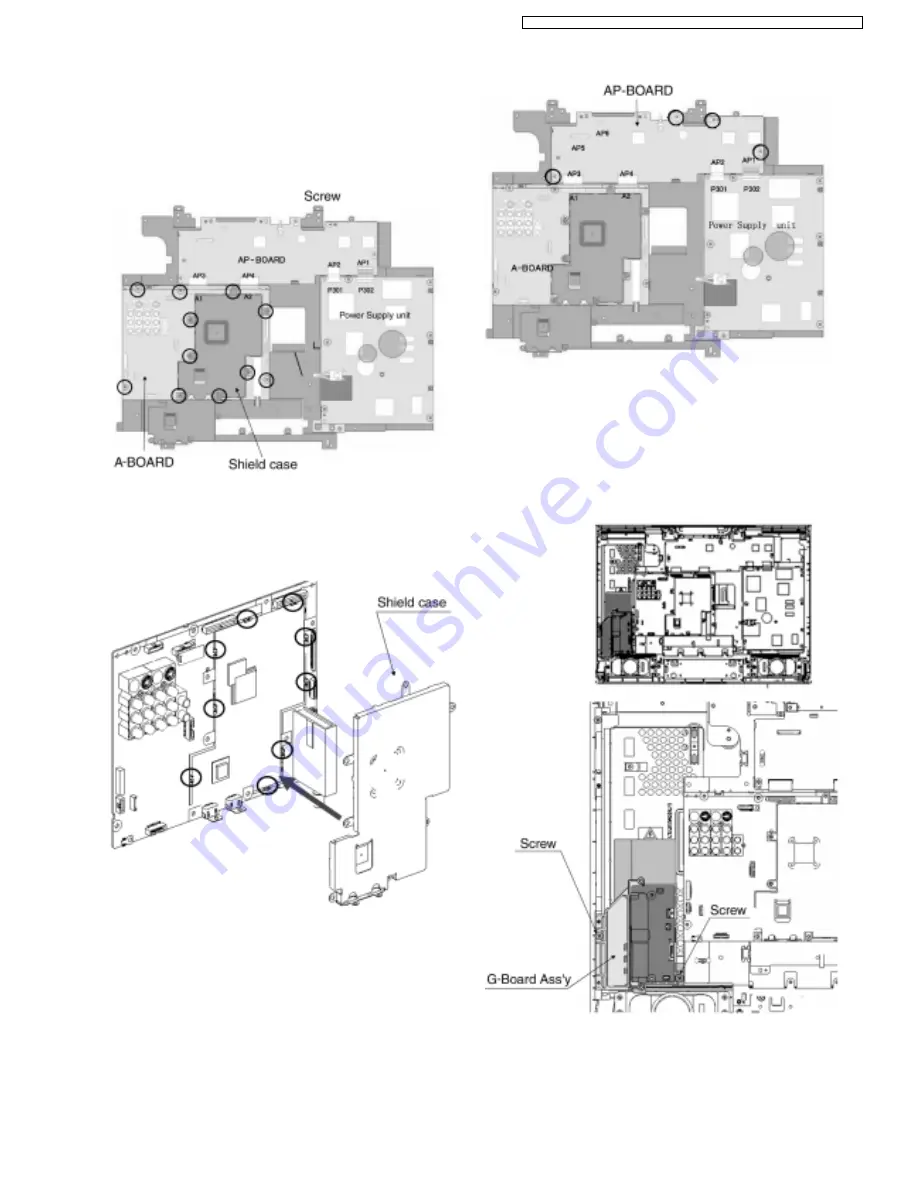
7.9. A-Board
1. Remove the Tuner Cover Ass’y. (See 7.5)
2. Remove the fixing screws (11 pcs).
3. Disconnect the couplers (AP1, AP2......AP7).
4. Remove the A-Board.
Fix the A shield case to A-Board as follow:
Caution
Fix carefully shield case to shield clip (ZA4001-ZA4008,
and ZA4030).
7.10. AP-Board
1. Disconnnect the couplers (AP1-AP6).
2. Remove the fixing screws (4 pcs).
3. Remove the AP-Board.
7.11. G-Board
G-Board (26")
1. Remove the Rear Cover. (See 7.2)
2. Disconnect the couplers (G1 and G2).
3. Remove the fixing screws (2 pcs).
4. Remove the G-Board Ass’y.
5. Remove the fixing screws (2 pcs).
6. Remove the G-Board.
13
TX-32LX60M / TX-32LX60X / TX-32LX60A / TX-26LX60M / TX-26LX60X / TX-26LX60A
Summary of Contents for TX-26LX60A
Page 20: ...EMI Processing 32 20 TX 32LX60M TX 32LX60X TX 32LX60A TX 26LX60M TX 26LX60X TX 26LX60A ...
Page 22: ...22 TX 32LX60M TX 32LX60X TX 32LX60A TX 26LX60M TX 26LX60X TX 26LX60A ...
Page 23: ...10 3 Option Description 23 TX 32LX60M TX 32LX60X TX 32LX60A TX 26LX60M TX 26LX60X TX 26LX60A ...
Page 26: ...26 TX 32LX60M TX 32LX60X TX 32LX60A TX 26LX60M TX 26LX60X TX 26LX60A ...
Page 38: ...TX 32LX60M TX 32LX60X TX 32LX60A TX 26LX60M TX 26LX60X TX 26LX60A 38 ...
Page 54: ...32 54 TX 32LX60M TX 32LX60X TX 32LX60A TX 26LX60M TX 26LX60X TX 26LX60A ...
Page 56: ...32 56 TX 32LX60M TX 32LX60X TX 32LX60A TX 26LX60M TX 26LX60X TX 26LX60A ...


