30
AV Select and Setup
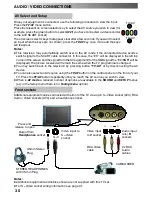
Once your equipment is connected, use the following procedure to view the input:
Press the
TV/AV
menu button
Press the relevant on screen selector key to select the AV source you wish to view (for
example, press the green button to select
AV2
if you have connected a video recorder
to the AV2 SCART socket).
The on screen selector keys that appear clear after a few seconds. If you want to select
an input when the keys are not shown, press the
TV/AV
key once more and the keys
will reappear.
Notes:
D
This television may automatically switch over to the AV mode if the connected device sends a
switch signal to the SCART cable connector. In this case, the “EC” will be displayed in the left top
corner of the screen and the signal from the AV equipment (for the RGB signal the “EC/RGB” will be
displayed).The picture received will remain the same when the TV programme is changed.
D
You may switch back to the television by pressing button
“TV/AV”
or by disconnecting the AV
device.
D
You can also select an AV source using the
TV/AV
button on the control panel on the front of your
TV. Press the
TV/AV
button repeatedly until you reach the AV source you wish to view.
D
When in
AV mode
a reduced number of options are available in the
SOUND
and
SETUP
menus
(eg: in the Setup menu there is no
Tuning menu
option).
Front sockets
Additional equipment can be connected at the front of the TV via a 4 pin S---Video socket (AV3), RCA
Audio / Video sockets (AV3) and a headphone socket.
S---V
Press and
release to open
CAMCORDER
Output from
Headphones
socket
3.5mm Stereo
Plug
STEREO HEADPHONES
with 3.5mm Plug
Video input to
S---Video
socket
Video input
to
V
socket
Audio input
to
L / R
sockets
RCA Video
cable
2 x RCA
Audio
cables
Notes:
D
Additional equipment and cables shown are not supplied with this TV set.
D
For S---Video socket wiring information see page 31.
AUDIO / VIDEO CONNECTIONS
TV/AV
TV/AV
Summary of Contents for TX-29PX20DM
Page 35: ...35 ...
Page 36: ...36 2005CS ...

