background image

10

English


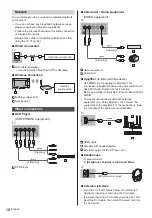
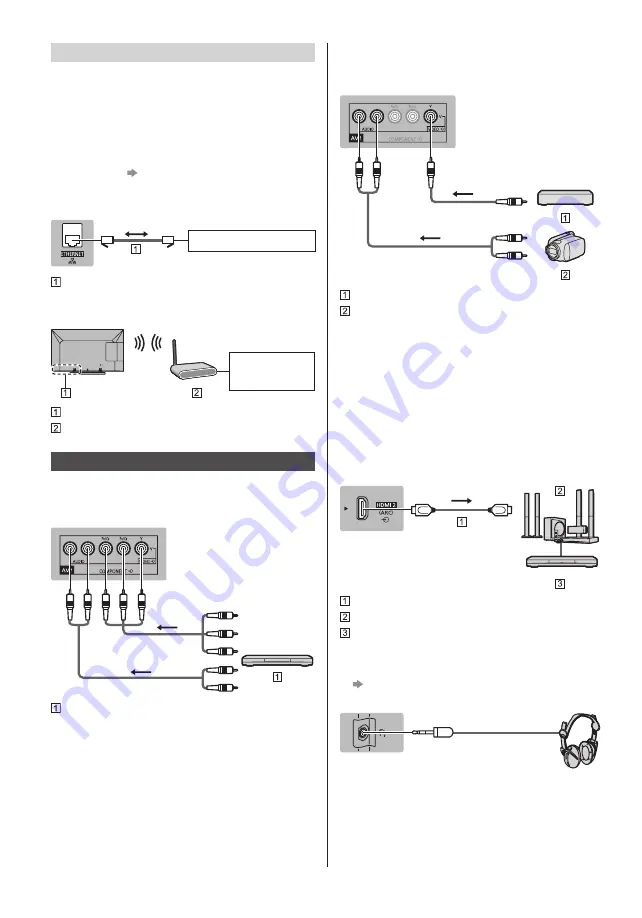
  Camcorder / Game equipment

 (VIDEO equipment)

 TV


 (Listening)

 (Viewing)

   Game equipment
   Camcorder


  Amplifier 

(to listen with speakers)


 Use HDMI2 for connecting an amplifier. This 
connection is applicable when using an amplifier that 
has ARC (Audio Return Channel) function.
 As for an amplifier without ARC function, use DIGITAL 
AUDIO.


 To enjoy multi-channel sound from external 
equipment (e.g. Dolby Digital 5.1ch), connect the 
equipment to the amplifier. For the connections, read 
the manuals of the equipment and amplifier.

 TV

 
   HDMI cable
   Amplifier with speaker system
   External equipment (DVD Player, etc.)


  Headphones


 To adjust volume 


[Headphone Volume] in the Sound Menu

 TV


 (M3 stereo mini plug)


  Common Interface


 Turn the TV off with Mains Power On / Off switch 
whenever inserting or removing the CI module.


 If a smart card and a CI module come as a set, first 
insert the CI module, then insert the smart card into 
the CI module.

  Network

 To use internet service, you need a broadband network 
environment. 


 If you do not have any broadband network services, 
please consult your retailer for assistance.


 Prepare the internet environment for wired connection 
or wireless connection.


 Setup of the network connection will start when first 
using the TV.   

(p. 14)


 Wired connection

 TV


 Internet environment

   LAN cable (Shielded)


 Use the Shielded Twist Pair (STP) LAN cable.


 Wireless connection


 Internet 

environment

   Built-in wireless LAN
   Access point

 Other connections


  DVD Player

 (COMPONENT equipment)

 TV


 (Listening)

 (Viewing)

   DVD Player

Summary of Contents for TX-32AS600Y

Page 1: ...them for future reference The images shown in this manual are for illustrative purposes only Please refer to Pan European Guarantee Card if you need to contact your local Panasonic dealer for assistan...

Page 2: ...s otherwise mentioned Illustrations shown may be different depending on the model Contents Be Sure to Read Important Notice 3 Safety Precautions 4 Quick Start Guide Accessories 6 Connections 8 Identif...

Page 3: ...available services at the following website English only http panasonic net viera support Panasonic does not guarantee operation and performance of peripheral devices made by other manufacturers and...

Page 4: ...ons with medical equipment Radio waves may interfere with the medical equipment and cause accidents due to the malfunction Do not use the TV near any automatic control Safety Precautions To help avoid...

Page 5: ...atic control equipment and cause accidents due to the malfunction Keep the distance at least 22 cm from the TV when you have a cardiac pacemaker Radio waves may interfere with the operation of the pac...

Page 6: ...cessories refer to eHELP Support Optional accessories http www doc panasonic de Authorized Representative Panasonic Testing Centre Panasonic Marketing Europe GmbH Winsbergring 15 22525 Hamburg Germany...

Page 7: ...inch model Assembly screw 4 M5 15 Assembly screw 4 M4 12 Bracket 2 Base Assembling the pedestal A C D 1 Assembling Removing the pedestal 32 inch model Assembly screw 3 Assembly screw 4 M4 15 Bracket B...

Page 8: ...tc or equipment with an infrared sensor otherwise distortion of image sound may occur or operation of other equipment may be affected Please also read the manual of the equipment being connected Termi...

Page 9: ...top box 6 AV2 COMPONENT VIDEO p 10 7 ETHERNET p 10 8 DIGITAL AUDIO 9 AV1 SCART p 9 Basic connections Mains lead AC 220 240 V 50 60 Hz Mains lead supplied Insert the mains plug firmly into place 32 in...

Page 10: ...e Sound Menu TV M3 stereo mini plug Common Interface Turn the TV off with Mains Power On Off switch whenever inserting or removing the CI module If a smart card and a CI module come as a set first ins...

Page 11: ...that do not work fully interoperable with this new CI v1 3 TV In this case please contact your content provider For more information refer to eHELP Functions Common Interface read the manual of the C...

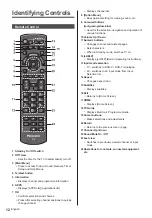
Page 12: ...urns to Home Screen 17 HOME Displays Home Screen 18 TV Guide Displays Electronic Programme Guide 19 Cursor buttons Makes selections and adjustments 20 Return Returns to the previous menu page 21 Chann...

Page 13: ...ss repeatedly until you reach the desired mode Main Menu Press and hold for about 3 seconds to display main menu OK when in the menu system 2 Channel Up Down Cursor Up Down when in the menu system 3 V...

Page 14: ...l channels Auto Setup in Tuning Menu Setup Menu To add the available TV signal mode later Add TV Signal in Tuning Menu Setup Menu To initialise all settings Shipping Condition in System Menu Setup Men...

Page 15: ...setup of APPS List follow the on screen instructions or refer to eHELP my Home Screen APPS List Operations Turn power on TV or Remote Control Mains power On Off switch should be on p 13 The last viewe...

Page 16: ...when the TV is turned on the confirmation screen is displayed to select whether First Page or Last Page 2 Select the category and item Category field Item field select category access select item acce...

Page 17: ...shine on the TV s remote control signal receiver No image can be displayed Check the TV is turned on Check the mains lead is plugged into the TV and the socket outlet Check the correct input mode is s...

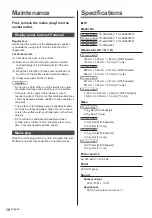
Page 18: ...et Pedestal Regular care Gently wipe the surface of the display panel cabinet or pedestal by using a soft cloth to clean the dirt or fingerprints For stubborn dirt 1 First clean the dust on the surfac...

Page 19: ...or the information of power consumption display resolution etc please refer to Product fiche For the information of the open source software refer Connection terminals AV1 input output SCART Audio Vid...

Page 20: ...ar of the TV 200 mm 200 mm View from the side Depth of screw minimum 7 mm maximum 12 mm Diameter M4 Screw for fixing the TV onto the wall hanging bracket not supplied with the TV 39 inch model 42 inch...

Page 21: ......

Page 22: ...rect disposal of this waste in accordance with national legislation For business users in the European Union If you wish to discard electrical and electronic equipment please contact your dealer or su...

Page 23: ...ventuali consultazioni future Le immagini in questo manuale hanno soltanto uno scopo illustrativo Fare riferimento alla garanzia pan europea se necessario rivolgersi al rivenditore Panasonic locale pe...

Page 24: ...e illustrazioni mostrate potrebbero differire in base al modello Indice Leggere con attenzione Avviso importante 3 Precauzioni per la sicurezza 4 Guida all avvio rapido Accessori 6 Collegamenti 8 Iden...

Page 25: ...disponibili Questo televisore potrebbe non funzionare correttamente con i moduli CI non approvati dal provider di servizi A seconda del provider di servizi possono essere applicate tariffe aggiuntive...

Page 26: ...ti fuori della portata dei bambini Piedistallo Avvertenza Non smontare o modificare il piedistallo Precauzioni Non usare piedistalli diversi da quello fornito con il televisore Precauzioni per la sicu...

Page 27: ...ini non salgano sul piedistallo Per l installazione o la rimozione del televisore dal piedistallo necessario l intervento di almeno due persone Installare o rimuovere il televisore attenendosi alla pr...

Page 28: ...cessivo ad esempio luce del sole fiamme libere o simili Smaltire correttamente le batterie Rimuovere la batteria dall unit quando non la si utilizza per periodi prolungati per prevenire perdite corros...

Page 29: ...50 Vite di montaggio 4 M5 15 Vite di montaggio 4 M4 12 Staffa 2 Base Montaggio del piedistallo A C D 1 Montaggio rimozione del piedistallo Modello da 32 Vite di montaggio 3 Vite di montaggio 4 M4 15 S...

Page 30: ...triche apparecchiature video ecc o apparecchiature con un sensore a infrarossi in caso contrario potrebbero verificarsi distorsioni di immagini audio o interferenze nel funzionamento dell altra appare...

Page 31: ...nale terrestre cavo pag 9 6 AV2 COMPONENT VIDEO pag 10 7 ETHERNET pag 10 8 DIGITAL AUDIO 9 AV1 SCART pag 9 Collegamenti di base Cavo di alimentazione C a 220 240 V 50 60 Hz Cavo di alimentazione in do...

Page 32: ...re esterne lettore DVD ecc Cuffia Per regolare il volume Volume cuffia nel menu Audio TV Minispina stereo M3 Common Interface Prima di inserire o rimuovere il modulo CI spegnere il televisore mediante...

Page 33: ...i moduli CI con versioni del firmware obsolete che non sono totalmente interoperabili con questo televisore CI v1 3 In questo caso rivolgersi al fornitore dei contenuti Per ulteriori informazioni cons...

Page 34: ...o 14 Formato Cambia il formato 15 Sottotitoli Per visualizzare i sottotitoli 16 Esci Per tornare a Schermata iniz Pers 17 HOME Per visualizzare Schermata iniz Pers 18 Guida TV Per visualizzare la Guid...

Page 35: ...modalit di ingresso Premere ripetutamente fino a quando viene visualizzata la modalit desiderata Menu principale Tenere premuto per circa 3 secondi per visualizzare il menu principale OK nel sistema...

Page 36: ...Standby automatico nel menu Timer impostato a On Il televisore entra automaticamente in modalit Standby quando non ricevuto alcun segnale e nessuna operazione eseguita per 10 minuti se Standby No Seg...

Page 37: ...nare la Schermata iniz Pers predefinita ecc Per informazioni dettagliate seguire le istruzioni visualizzate sullo schermo o consultare eHelp Schermata iniz Pers Schermata iniz Pers Visione dei program...

Page 38: ...e pi lunga di 1 pagina Mentre la descrizione evidenziata Per visualizzare il menu associato alla descrizione solo per alcune descrizioni Rosso Le modalit selezionabili dipendono dai canali memorizzati...

Page 39: ...ceso Le batterie potrebbero essere scariche Sostituirle con nuove Puntare direttamente il telecomando verso il ricevitore dei segnali del telecomando del televisore entro una distanza di circa 7 m e a...

Page 40: ...catamente la superficie del pannello del display del mobile o del piedistallo con un panno morbido Per lo sporco pi ostinato 1 Rimuovere innanzitutto la polvere sulla superficie 2 Inumidire un panno m...

Page 41: ...nza e il canale variano a seconda del paese Terminali di collegamento Ingresso uscita AV1 SCART ingresso audio video uscita audio video ingresso RGB Ingresso AV2 COMPONENT VIDEO VIDEO Tipo RCA PIN 1 1...

Page 42: ...zioni sul consumo sulla risoluzione dello schermo ecc fare riferimento alla scheda del prodotto Per informazioni sul software open source consultare eHelp Supporto Licenza Questo apparecchio conforme...

Page 43: ......

Page 44: ...zioni sullo smaltimento rifiuti in altri Paesi fuori dall Unione Europea Questi simboli sono validi solo all interno dell Unione Europea Se desiderate smaltire questi articoli vi preghiamo di contatta...

Page 45: ...udouc nahl dnut Obr zky pou it v tomto n vodu k obsluze slou pouze pro n zornost Pokud pot ebujete kontaktovat m stn ho prodejce spole nosti Panasonic pros m pou ijte informace v bro u e Celoevropsk z...

Page 46: ...en uvedeno jinak Ilustrace se mohou v z vislosti na modelu li it Obsah Nezapome te p e st D le it upozorn n 3 Bezpe nostn upozorn n 4 Stru n n vod P slu enstv 6 P ipojen 8 Uspo d n ovl dac ch prvk 12...

Page 47: ...na poskytovateli slu eb mohou b t tov ny poplatky Kompatibilita s budouc mi slu bami nen zaru ena Zkontrolujte aktu ln informace o dostupnosti slu eb na n sleduj c internetov str nce pouze anglicky ht...

Page 48: ...estavov n zkontrolujte e jsou v echny rouby bezpe n uta eny Televizor v pr b hu instalace podstavce nesm b t vystaven dn m n raz m Zajist te aby d ti nelezly na podstavec P ipevn n nebo sund n televiz...

Page 49: ...l ka sk vybaven a zp sobit tak nehodu Neumis ujte televizor do bl zkosti automaticky ovl dan ho za zen jako jsou automatick dve e nebo po rn alarmy R diov vlny mohou ru it automaticky ovl dan za zen a...

Page 50: ...larace shody DoC Panasonic Corporation t mto prohla uje e tento televizor spl uje z kladn po adavky a dal platn ustanoven sm rnice 1999 5 ES Chcete li si st hnout kopii origin lu deklarace shody DoC p...

Page 51: ...op kou 42 Model s hlop kou 50 Mont n rouby 4 M5 15 Mont n rouby 4 M4 12 Podp ra 2 Z kladna Mont podstavce A C D 1 Mont sund n podstavce Model s hlop kou 32 Mont n rouby 3 Mont n rouby 4 M4 15 Podp ra...

Page 52: ...en atd nebo za zen s infra erven m sn ma em jinak m e doj t ke zkreslen obrazu zvuku nebo ovlivn n innosti dal ch za zen P e t te si tak n vod k p ipojovan m za zen m Konektory 1 2 4 5 3 9 8 7 6 1 Slo...

Page 53: ...OMPONENT VIDEO str 10 7 ETHERNET str 10 8 DIGITAL AUDIO 9 AV1 SCART str 9 Zapojen Nap jec kabel St d 220 240 V 50 60 Hz Nap jec kabel sou st balen Zasu te s ovou z str ku pevn na jej m sto Model s hlo...

Page 54: ...sluch tek v nab dce Nastaven zvuku TV Stereofonn minijack M3 Modul Common Interface P i vkl d n nebo vyj m n modulu CI mus b t televizor vypnut vyp na em Pokud byly ipov karta Smart Card a modul CI d...

Page 55: ...emi firmwaru kter pln nespolupracuj s touto novou verz CI v1 3 TV V takov m p pad se obra te na sv ho poskytovatele obsahu Dal informace z sk te pomoc n pov dy eN pov da Funkce Common Interface v n vo...

Page 56: ...om r stran Slou k zm n n pom ru stran 15 Titulky Zobraz titulky 16 Konec N vrat na vodn obrazovka 17 Hlavn obrazovka Zobrazuje vodn obrazovka 18 Pr vodce TV Zobrazuje elektronick ho programov ho pr vo...

Page 57: ...upn ho re imu Stiskn te opakovan dokud nedos hnete po adovan ho re imu Hlavn menu Stisknut m a podr en m tla tka po dobu 3 sekund zobrazte hlavn menu OK v syst mu menu 2 P ep n n kan l nahoru dol Kurz...

Page 58: ...n ho re imu pokud po dobu 4 hodin nen provedena dn operace Pokud je polo ka Vypnut bez sign lu v menu asova nastavena na Zapnuto televizor automaticky p ejde do pohotovostn ho re imu pokud po dobu 10...

Page 59: ...la snadn p stup k funkc m umo ovala v b r v choz vodn obrazovka apod Zaj maj li v s podrobnosti postupujte podle pokyn na obrazovce nebo pou ijte n pov du eN pov da Moje vod obrazovka Moje vod obrazov...

Page 60: ...oz pole Posun popisu pokud m v ce ne 1 str nku Pokud je popis zv razn n Zobrazen menu souvisej c ho s popisem pouze pro n kter popisy erven Voliteln re imy z vis na ulo en ch kan lech vybrat vstoupit...

Page 61: ...do vzd lenosti p ibli n 7 m a hlu 30 stup od p ij ma e sign lu Televizor um st te stranou od slune n ho sv tla nebo jin ch zdroj jasn ho sv tla aby nedoch zelo k oz en sn ma e sign lu d lkov ho ovlad...

Page 62: ...10 W Sluch tka Stereo minijack M3 3 5 mm 1 dr ba Nejprve vyjm te z str ku nap jec ho kabelu ze z suvky Panel r me ek podstavec Pravideln p e Zlehka vy ist te plochu zobrazovac ho panelu sk nebo podsta...

Page 63: ...ES WEP 64 bit 128 bit Frekvence a kan l se li dle zem P ipojovac konektory Vstup v stup AV1 SCART vstup Audio Video v stup Audio Video vstup RGB Vstup AV2 COMPONENT VIDEO VIDEO Typ RCA PIN 1 1 0 V p p...

Page 64: ...osti a rozm r jsou uvedeny p ibli n Informace o spot eb elektrick energie rozli en zobrazovac ho panelu atd naleznete v Informac ch o produktu Informace o softwaru open source naleznete v n pov d eN p...

Page 65: ......

Page 66: ......

Page 67: ......

Page 68: ...uta v souladu s n rodn legislativou a m stn mi p edpisy Informace pro pr vnick osoby se s dlem v zem ch Evropsk Unie EU Pokud chcete likvidovat elektrick nebo elektronick za zen obra te se na prodejce...

Reviews: