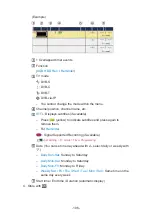
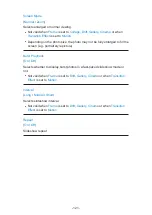
background image

- 106 -

(Example)

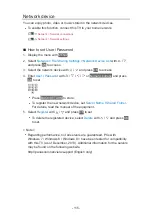
  !: Overlapped timer events
 Function

(

USB HDD Rec.

 / 

Reminder

)

  TV mode

: DVB-S
: DVB-C
: DVB-T
: DVB-via-IP

–  You cannot change the mode within the menu.

  Channel position, channel name, etc.
 

STTL

: Displays subtitles (if available)

– Press   (yellow) to indicate subtitles and press again to 

remove them.

– For 

Reminder

 : Signal Supported Recording (if available)

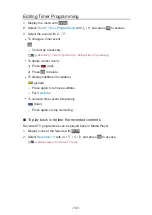
 Watching > TV Guide > Timer Programming

  Date (You can set one day ahead with  , select daily or weekly with 

.)

– 

Daily Sun-Sat

: Sunday to Saturday

– 

Daily Mon-Sat

: Monday to Saturday

– 

Daily Mon-Fri

: Monday to Friday

– 

Weekly Sat / Fri / Thu / Wed / Tue / Mon / Sun

: Same time on the 

same day every week

  Start time / End time / Duration (automatic display)

4.  Store with 

OK

.

Summary of Contents for TX-39ASW654

Page 1: ...glish TX 39ASW654 TX 42ASM655 TX 42ASW654 TX 47ASM655 TX 47ASW654 TX 55ASM655 TX 50ASW654 TX 39ASN658 TX 55ASW654 TX 42ASN658 TX 60ASW654 TX 39AST656 TX 39ASF657 TX 42AST656 TX 42ASF657 TX 39ASX659 TX 42ASX659 ...

Page 2: ... Selecting channel 23 Information banner 25 Option Menu 28 Subtitle 30 Last view 30 Off Timer 31 Energy saving functions 31 Adjusting time 33 Language 33 External equipment External connection 34 Watching external input 38 Operating with TV s remote control 40 HDMI features 42 Terminal information 44 Valid input signals 45 For best picture Viewing Mode 46 Ambient Sensor 47 ...

Page 3: ...ngs 62 Volume settings 64 Voice Guidance Settings 65 Audio Description 66 Advanced settings 67 TV Guide Using TV Guide 69 Timer Programming 73 Teletext Viewing Teletext 75 Teletext mode 77 Teletext Character Set 78 3D Note 79 3D Eyewear Maintenance 79 Viewing 3D 80 3D Mode Selection 81 3D Settings 82 Source image format 84 Tuning and editing channels Setting menu 85 Favourites Edit 85 Channel List...

Page 4: ...SB HDD 100 Recording current programme One Touch Recording 102 REW LIVE TV 103 Timer Programming Setting Timer Programming 105 Editing Timer Programming 107 Remote recording 108 Note 108 Technical information USB HDD 110 Media Player Using Media Player Information 111 Selecting device mode 113 Network device 115 Photo mode Selecting file 116 Viewing photo 117 Sorting photos 117 Multi Shot 3D 118 ...

Page 5: ...ontents 130 Deleting content 131 Changing device 131 Chapter List 131 Audio output settings 132 Music mode Selecting file 133 Playing music 134 Music Setup 135 Technical information Device handling caution 136 SD Card 136 USB devices 137 Photo format 138 Video format 139 Music format 142 Network Internet content Information 143 Selecting internet content 144 Note 145 DLNA Information 146 ...

Page 6: ...Status 161 my Home Cloud Settings 161 VIERA Name 161 TV Remote App Settings 162 Network Link Settings 164 TV Anywhere Settings 165 File Sharing Settings 165 Software Update 165 New Software Message 166 Photos Selecting file 166 Viewing photo 167 Using Slideshow 167 Videos Selecting file 169 Watching video 170 Video Setup 172 Audio output settings 173 Music Selecting file 174 Playing music 175 Musi...

Page 7: ...trol Preparations 185 How to use 186 Touch Pad Controller Information 187 My button 187 Settings 188 DVB via IP DVB via IP client connection 189 DVB via IP Server Selection 191 Note 192 Multi Window Picture in Picture 193 VIERA Link HDAVI Control Summary of VIERA Link 194 Preparations 198 Easy playback 198 Power on Link 199 Power off Link 199 Standby Power Save 199 Intelligent Auto Standby 199 ...

Page 8: ...lication 206 Cookie 206 Note 207 Common Interface Caution 208 Using Common Interface 209 Shipping Condition Shipping Condition 210 Updating the TV Software Information 211 Auto update 211 Manual update 212 Setting characters Using Numeric buttons 213 Bluetooth devices Bluetooth Setup 214 Keyboard Keyboard 216 Settings Setting menu How to use 217 Picture Viewing Mode 219 ...

Page 9: ...Volume settings 227 Voice Guidance Settings 228 Audio Description 229 Advanced settings 230 Reset to Defaults 230 Network Network Connection 231 Network Status 231 my Home Cloud Settings 231 VIERA Name 231 TV Remote App Settings 231 Network Link Settings 231 TV Anywhere Settings 231 File Sharing Settings 231 Other settings 232 Timer Off Timer 233 Timer Programming 233 Time Zone 233 Auto Standby 23...

Page 10: ...h Setup 234 Child Lock 235 Tuning Menu 235 Language 237 Display Settings 238 Common Interface 240 VIERA Link Settings 240 Data Service Application 241 System Menu 241 Other Settings 242 Support FAQs Picture 243 Digital TV 245 Analogue TV 246 Sound 247 3D 248 HDMI 249 Network 250 Other 251 Maintenance Care and Cleaning 253 Information Using Help menu 254 ...

Page 11: ...era 255 Wall hanging bracket 256 Licence Licence 257 OK Letters enclosed in a box indicate remote control buttons Menu Letters in cyan indicate on screen display items References in this eHELP The images shown in this eHELP are for illustrative purposes only ...

Page 12: ...V applications and more It provides easy access to special features such as Media Player videos games communication tools etc as shown below example HOME OK OK HOME Home Screen Selected content screen TV application etc Home Screen Selection Your preferred Home Screen can be selected ...

Page 13: ... with HOME Example The last viewed Home Screen is displayed when the TV is turned on Press again to select or add your preferred Home Screen layout my Home Screen my Home Screen Settings 2 Select a feature with and press OK to access To watch full screen TV 1 Select the TV viewer with Example 2 Press OK to watch Example Also refer to Tutorial from the tool guide ...

Page 14: ...een Selection with HOME Example 2 Select the screen with and press OK to set Full Screen TV Displays full screen TV TV Home Screen To make your TV experience more convenient and comfortable Lifestyle Screen Displays the TV with useful information and services for everyday life Info Screen Enjoy internet content while watching TV ...

Page 15: ... the wallpaper renaming freely editing applications setting the screen launched when the TV is turned on etc 1 Select Settings from the tool guide 2 Follow the on screen instructions Search You can search the content from various features 1 Select Search from the tool guide 2 Follow the on screen instructions Note To change the colour type of on screen displays set OSD Colour my Home Screen my Hom...

Page 16: ...tings OSD Colour with and press OK to access 3 Set with and press OK to store OSD Colour Jet black Pale grey Organic brown Sand beige Selects the preferred colour type of on screen displays This function is available for the information banner menu screen Home Screen etc ...

Page 17: ...7 APPS List Information Various applications internet contents network contents Media Player etc can be accessed easily from APPS List APPS List Example Note APPS List is subject to change without notice ...

Page 18: ...tents Network Internet content my Stream Provides recommended contents TV programme internet content etc You need a broadband network environment to use this function fully Follow the on screen instructions to operate the application Functions User profile my Stream Media Player Media Player Using Media Player Selecting device mode Recorded TV Media Player Recorded TV mode Media Server Network DLN...

Page 19: ...tomise APPS List screen settings etc 1 Display APPS List with APPS 2 Select the icon for settings on APPS List with and press OK to access 3 Follow the on screen instructions Note Setup menu items may be changed without notice ...

Page 20: ... Satellite dish For DVB S To ensure your satellite dish is correctly installed please consult your local dealer Also consult the received satellite broadcasting companies for details Selectable satellites and dish alignment to tune DVB S channels Watching Tuning and editing channels Selectable satellites Aerial Terrestrial cable terminal RF cable Terrestrial aerial Cable For DVB C DVB T Analogue ...

Page 21: ... 21 DVD Recorder VCR Terrestrial cable terminal RF cable DVD Recorder VCR Terrestrial aerial Cable AV1 SCART terminal SCART cable ...

Page 22: ...Control Summary of VIERA Link External equipment and cables shown are not supplied with this TV Please also read the manual of the equipment being connected Keep the TV away from electronic equipment video equipment etc or equipment with an infrared sensor otherwise distortion of image sound may occur or operation of other equipment may be affected Use a fully wired HDMI compliant cable Use a full...

Page 23: ... Up Down or Numeric buttons Press Numeric buttons to select a channel position with 2 or more digit e g 399 press To select a channel from the channel list 1 Display the channel list with OK 2 Select a channel from the list with and press OK to watch To sort channel names in alphabetical order red To change the category blue To select a channel using information banner 1 Display information banner...

Page 24: ... View with and press OK to watch DVB Watching TV Guide Using TV Guide The postcode entry or update may be required depending on the country you select Follow the on screen instructions To watch pay TV For information of the encrypted channels Functions Common Interface Using Common Interface Consult the operator broadcaster or CI module manufacturer for more information and conditions of the servi...

Page 25: ...Analogue Category To change the category DVB 1 Display the category list with blue 2 Select the category with and press OK to change Current time Features available message meanings Bad signal Poor quality TV signal Dolby D Dolby D HE AAC Dolby Digital Plus Dolby Digital or HE AAC audio track AD Audio Description service available This function can aid visually impaired viewers by adding an additi...

Page 26: ...e Application 1 90 Off Timer remaining time Watching Basic Off Timer To confirm another tuned channel To watch the channel listed in the banner OK Information on the next programme DVB Extra information DVB Press again to hide the banner To hide the banner EXIT To adjust banner timeout set Banner Display Timeout 1 Display the menu with MENU 2 Select Setup Display Settings Banner Display Timeout wi...

Page 27: ...t OSD Colour my Home Screen my Home Screen OSD Colour To display the introduction banner for the internet service 1 Display the menu with MENU 2 Select Setup Display Settings Smart Banner with and press OK to access 3 Select On Off with and press OK to set ...

Page 28: ...ng For best audio Voice Guidance Settings Audio Type Set to Audio Description if the programme has Audio Description service then you will hear an additional audio track to describe events on screen if available For DVB To adjust the volume for Audio Description Watching For best audio Audio Description Multi Video Selects from a group of multiple videos if available This setting is not memorised ...

Page 29: ...es if available For DVB Teletext Character Set Sets the teletext language font Watching Teletext Teletext Character Set Teletext Language Selects between alternative languages for teletext if available For DVB MPX Selects multiplex sound mode if available Watching For best audio Advanced settings For Analogue Volume Correction Adjusts the volume of each individual channel or input mode ...

Page 30: ...nding and enjoyment with DVB subtitles depending on the broadcaster Preferred Subtitles 1 2 in Language are given priority Watching Basic Language Note Subtitles may not be displayed properly in 3D images If you press STTL in Analogue the TV switches to teletext service and calls up a favourite page Press EXIT to return to TV mode Last view Switch to a previously viewed channel or input mode easil...

Page 31: ...andby mode in the following conditions Eco Navigation is set to Set to Eco Off Timer is active Watching Basic Off Timer No operation is performed for 4 hours while Auto Standby is set to On No signal is received and no operation is performed for 10 minutes while No signal Power off is set to On Note This function does not affect the recording Auto Standby 1 Display the menu with MENU 2 Select Time...

Page 32: ... them to the energy saving settings at once 1 Display the menu with MENU 2 Select Setup Eco Navigation with and press OK to access 3 Select Set to Eco with and press OK to set Auto Standby and No signal Power off are active when Eco Navigation is set to Set to Eco Radio Mode Sets the timer for turning off the screen automatically when a radio channel is selected 1 Display the menu with MENU 2 Sele...

Page 33: ...cess OSD Language Preferred Audio 1 2 Preferred Subtitles 1 2 Preferred Teletext 4 Set with and press OK to store OSD Language Changes language for on screen displays Preferred Audio 1 2 Selects the first and second preferred language for DVB multi audio depending on the broadcaster Preferred Subtitles 1 2 Selects the first and second preferred language for DVB subtitles depending on the broadcast...

Page 34: ...tooth wireless technology Functions Bluetooth devices Check the terminal type and cable plugs are correct when connecting HDMI equipment HDMI terminal HDMI cable Recorder Player 3D compatible player Set top box Camcorder Amplifier with speaker system Note Use a fully wired HDMI compliant cable For VIERA Link connections Functions VIERA Link HDAVI Control Summary of VIERA Link Use HDMI2 for connect...

Page 35: ... 35 AV devices AV2 COMPONENT terminals Component cables DVD Player AV2 VIDEO terminals Composite cables Camcorder Game equipment ...

Page 36: ...ot be used with this TV You cannot connect any devices by using USB card reader Additional information for the devices may be on the following website http panasonic net viera support English only To listen with speakers DIGITAL AUDIO Optical digital audio cable Amplifier with speaker system To enjoy multi channel sound from external equipment e g Dolby Digital 5 1ch connect the equipment to the a...

Page 37: ...one jack M3 stereo mini plug Headphones To adjust volume set Headphone Volume Watching For best audio Advanced settings To select the sound output to adjust volume set Speaker Setting Watching For best audio Volume settings ...

Page 38: ...On Functions VIERA Link HDAVI Control Easy playback When input mode is not switched automatically perform as above or check the setup of the equipment You can also select the input pressing AV Press repeatedly until the desired input is selected To switch between COMPONENT and VIDEO in AV2 select with You can label or skip each input mode Skipped inputs will not be displayed when AV is pressed Inp...

Page 39: ...d press OK to access 3 Set with and press OK to set To name each input mode freely select User input and set characters maximum 10 characters To skip the input mode select Skip Playing Time Display Set to On to display a time period of continuous use in Game mode on the top right of the screen every 30 minutes 1 Display the menu with MENU 2 Select Setup Display Settings Playing Time Display with a...

Page 40: ...in reverse VCR Skip to the previous track title or chapter DVD video content Rewind view the picture rapidly in reverse VCR Search backward DVD video content Fast forward view the picture rapidly forward VCR Skip to the next track title or chapter DVD video content Fast forward view the picture rapidly forward VCR Search forward DVD video content Pause Resume Press and hold to play at slow speed D...

Page 41: ...s with Numeric buttons Codes for each product and features 70 DVD Recorder DVD Player Blu ray Disc Player 71 Player theatre Blu ray Disc theatre 72 VCR 73 default Using in USB HDD recording Media Player DLNA features or VIERA Link 3 Press to change Note Confirm if the remote control works correctly after changing the code The codes may be reset to defaults if batteries are replaced Some operations...

Page 42: ...to the HDMI terminal using a fully wired HDMI compliant cable Watching External equipment External connection The HDMI logo is displayed on HDMI compliant equipment Applicable HDMI features Input audio signal 2ch Linear PCM sampling frequencies 48 kHz 44 1 kHz 32 kHz Input video signal Matches the output setting of the digital equipment Watching External equipment Valid input signals VIERA Link HD...

Page 43: ... shop Note Audio settings can be made on HDMI Input in the Sound Menu Watching For best audio Advanced settings If the connected equipment has an aspect adjustment function set the aspect ratio to 16 9 These HDMI connectors are type A These HDMI connectors are compatible with HDCP High Bandwidth Digital Content Protection copyright protection Equipment having no digital output terminal may be conn...

Page 44: ...o out R 2 Audio in R 3 Audio out L 4 Audio earth 5 Blue earth 6 Audio in L 7 Blue in 8 Status CVBS 9 Green earth 10 11 Green in 12 13 Red earth 14 Earth 15 Red in 16 Status RGB 17 CVBS earth 18 RGB status earth 19 CVBS out video 20 CVBS in video 21 Socket Earth ...

Page 45: ...DS Clock 13 CEC 14 Utility 15 SCL 16 SDA 17 DDC CEC Ground 18 5V Power 19 Hot Plug Detect Valid input signals COMPONENT HDMI Signal name COMPONENT HDMI 525 480 60i 60p 625 576 50i 50p 750 720 60p 50p 1 125 1 080 60i 50i 1 125 1 080 60p 50p 24p Applicable input signal Note Signals other than above may not be displayed properly The above signals are reformatted for optimal viewing on your display ...

Page 46: ...eproduction for watching movies in a darkened room True Cinema Reproduces the original image quality precisely without any revision Custom Adjusts each menu item manually to suit your favourite picture quality In each Viewing Mode Backlight Contrast Brightness Colour Tint Sharpness Colour Temperature Vivid Colour Adaptive Backlight Control Ambient Sensor Noise Reduction MPEG Remaster Intelligent F...

Page 47: ...elect the mode with and press OK to set You can also change the mode pressing ASPECT Press repeatedly until you reach the desired mode Auto The best ratio is selected automatically according to the Aspect Control Signal Watching For best picture Aspect Control Signal 16 9 Directly displays the image at 16 9 without distortion anamorphic 14 9 Displays the image at the standard 14 9 without distorti...

Page 48: ...nd right edges For HD High definition signals Sidecut Zoom Displays a 16 9 letterbox anamorphic image full screen without distortion For HD High definition signals Note Display the image TV external input etc full screen to use this function completely Aspect mode can be memorised separately for SD Standard definition and HD High definition signals Aspect cannot be changed in teletext service and ...

Page 49: ...ppropriate ratio Watching For best picture Aspect Available conditions Satellite terminal WSS only Valid input signal format DVB S Terrestrial cable terminal WSS only Valid input signal format DVB C DVB T DVB T2 PAL B G H I D K SECAM B G L L D K Invalid input signal format PAL 525 60 6 5 MHz PAL 525 60 6 0 MHz PAL 525 60 5 5 MHz M NTSC 6 5 MHz M NTSC 6 0 MHz M NTSC 5 5 MHz AV1 SCART terminal AV2 V...

Page 50: ... 1 080 60i 50i HDMI terminal Valid input signal format 525 480 60i 60p 625 576 50i 50p 750 720 60p 50p 1 125 1 080 60i 50i 1 125 1 080 60p 50p 24p HDMI terminal does not receive WSS signal Note If the screen size looks unusual when a widescreen recorded programme is played back on a VCR adjust the tracking of the VCR Read the manual of the VCR ...

Page 51: ...ature Sets the overall colour tone of the picture bluer redder Vivid Colour On Off Automatically adjusts colours to vivid ones Adaptive Backlight Control Automatically controls the level of backlight according to the images Not valid in multi window mode ASF657 ASM655 ASN658 AST656 ASX659 series Intelligent Frame Creation Max Mid Min Off Automatically compensates the picture frame rate and removes...

Page 52: ...mode photo contents of Media Player Network services or when Game Mode is set to On ASF657 ASM655 ASN658 AST656 ASX659 series Noise reduction settings 1 Display the menu with MENU 2 Select Picture Noise Reduction MPEG Remaster with and press OK to access 3 Set with and press OK to store Noise Reduction Auto Max Mid Min Off Reduces unwanted picture noise MPEG Remaster Auto Max Mid Min Off Reduces f...

Page 53: ...Display the menu with MENU 2 Select Picture Advanced Settings with and press OK to access 3 Select one of the following items with and press OK to access Contrast Control White Balance Colour Management Gamma Reset to Defaults 4 Set with and press OK to store Contrast Control Contrast Control Auto Custom Off Automatically adjusts the detailed contrast settings Select Custom to set Contrast Control...

Page 54: ...dark red green blue areas More Detailed Adjustment Adjusts more detailed items of White Balance Input Signal Level Adjusts the input signal level R Gain G Gain B Gain Adjusts the detailed white balance of bright red green blue areas Reset to Defaults Resets items of More Detailed Adjustment Reset to Defaults Resets White Balance to the default settings ...

Page 55: ...uminance of blue areas More Detailed Adjustment Adjusts more detailed items of Colour Management Y Hue C Hue M Hue Adjusts the picture hue of yellow cyan magenta areas Y Saturation C Saturation M Saturation Adjusts the saturation of yellow cyan magenta areas Y Luminance C Luminance M Luminance Adjusts the luminance of yellow cyan magenta areas Reset to Defaults Resets items of More Detailed Adjust...

Page 56: ...sts more detailed items of Gamma Input Signal Level Adjusts the input signal level Gain Adjusts the gain of gamma for selected signal level Reset to Defaults Resets items of More Detailed Adjustment Reset to Defaults Resets Gamma to the default settings Reset to Defaults Reset to Defaults Resets Advanced Settings to the default settings ...

Page 57: ...sponse signals when playing games Not valid in TV mode To display a continuous record of time spent using Game mode set Playing Time Display Film Cadence Mode On Off Improves vertical resolution for movie images This function is available for interlaced signals except in the mode of multi window Network services or when Game Mode is set to On ASF657 ASM655 ASN658 AST656 ASX659 series 1080p Pure Di...

Page 58: ...ting For HDMI input HDMI RGB Range Auto Full Normal Adjusts the black level of the image for each HDMI input When the black level is not suitable select Full For HDMI input AV Colour System Auto PAL SECAM M NTSC NTSC Selects optional colour system based on video signals For AV input 3D COMB On Off Makes still or slow moving pictures more vivid Occasionally while viewing still or slow moving pictur...

Page 59: ...ys the image in the original size Set to On if noise occurs on the edge of the screen This function can be memorised for SD Standard definition and HD High definition signals respectively Not valid in Network services H Size H Size1 H Size2 Switches the horizontal display range to reduce noise on the side edge of the image For TV mode AV and HDMI input Not valid in 3D mode Zoom Adjustments Adjusts...

Page 60: ...icture settings of True Cinema or Custom to those of the other input mode or Viewing Mode 1 Display the menu with MENU 2 Select Picture Copy Adjustment Destination Viewing Mode Destination Input with and press OK to access 3 Select the destination to copy to with and press OK to set 4 Select Copy Start with and press OK to copy 5 When the confirmation screen is displayed select Yes with and press ...

Page 61: ...proves sound quality for watching music videos etc Ambience Improves spatial effects and provides clear sounds User Adjusts the sounds manually using the equaliser to suit your favourite sound quality In each mode Bass Treble Surround and Bass Boost can be adjusted and stored For the User mode Equaliser will be available in the Sound Menu instead of Bass and Treble Select Equaliser and adjust the ...

Page 62: ...igher sound output Equaliser Adjusts the frequency level to suit your favourite sound quality This function is available when Mode is set to User Select the frequency and change the frequency level using To enhance the bass sound raise the level of the lower frequency To enhance the treble sound raise the level of the higher frequency To reset the levels of each frequency to the default settings s...

Page 63: ...658 AST656 ASX659 series Provides a more progressive enhancer and reverberation to simulate improved spatial effects Virtual Surround Provides a dynamic enhancer of width and depth to simulate improved spatial effects This function is effective only for the sound from TV speakers Bass Boost On Off Enhances the effect of bass sounds This function is effective only for the sound from TV speakers ...

Page 64: ...off when Headphone or Off is selected Headphone Volume Adjusts the volume of headphones Auto Gain Control On Off Automatically regulates large sound level differences between channels and inputs Volume Correction Adjusts the volume of each individual channel or input mode Speaker Distance to Wall Up to 30cm Over 30cm Compensates for the low frequency sound due to the distance between the speakers ...

Page 65: ...sic features on screen messages etc for visually impaired users Speed Fast Normal Slow Selects the readout speed for the voice guidance Volume Max Mid Min Selects the volume for the voice guidance Language Changes language for the voice guidance All languages may not be available When the selected language is not supported Language is set to English automatically User Level Beginner Expert Selects...

Page 66: ...tion Narration settings for visually impaired users Set to Audio Description to activate the narration sound track when available on the broadcast The availability of audio description sound track is indicated by AD in the information banner For DVB Volume Adjusts the volume for Audio Description For DVB Speakers Mix Standard Set to Mix to activate the description sound track from TV speakers For ...

Page 67: ...y depending on the country you select Selects the initial setting for audio tracks Auto Automatically selects the audio tracks if a programme has more than two tracks The priority is given in the following order Dolby Digital Plus HE AAC Dolby Digital MPEG Multichannel The priority is given to multi channel audio track Stereo The priority is given to stereo 2ch audio track MPEG The priority is giv...

Page 68: ...tput as DTS for video contents of Media Player Network services PCM Digital output signal is fixed to PCM ARC Audio Return Channel is a function of digital audio output using HDMI cable For DVB or video contents of Media Player Network services Media Player Video mode Audio output settings Network Videos Audio output settings SPDIF Delay Adjusts the delay time of the sound output from DIGITAL AUDI...

Page 69: ... 3 Display TV Guide with GUIDE Press again to change the layout Landscape Portrait View Landscape to see several channels View Portrait to see one channel by time Depending on the country you select you can select the default screen when pressing GUIDE Default Guide 1 Display the menu with MENU 2 Select Setup Display Settings Default Guide with and press OK to access 3 Select Channel List TV Guide...

Page 70: ... to access The current programme is displayed on the top left of the screen 2 Select View with and press OK to watch DVB To use Timer Programming Watching TV Guide Timer Programming To the previous day DVB red To the next day DVB green To view a channel list of the selected type 1 Display the type list with yellow 2 Select the type with and press OK to view ...

Page 71: ...y list with blue 2 Select the category with and press OK to view To list favourite channels set Favourites Edit Watching Tuning and editing channels Favourites Edit To view more details of the programme DVB 1 Select the programme with 2 Press to view Press again to return to TV Guide To exit TV Guide EXIT Note When this TV is turned on for the first time or the TV is switched off for more than a w...

Page 72: ...mation in the GUIDE Plus system only available in some countries System Information Displays the system information of the GUIDE Plus system only available in some countries DVB T and Analogue channels are displayed on the same TV Guide screen D and A may be displayed to distinguish DVB T and Analogue channels There will be no programme listings for Analogue channels ...

Page 73: ...ppears Select Timer Programming with and press OK to set USB HDD Rec to record from the time you finish the timer event setting Depending on the country you select you can set Signal Supported Recording see below Note Not valid in Analogue Timer Programming only works reliably if correct time information is received via the signal from the broadcaster or service provider No other channels can be s...

Page 74: ...ted Recording only works reliably if correct information is received from broadcasters The availability of this function depends on the country and TV mode you select is displayed on the timer event if Signal Supported Recording is set Note If you edit the start time or end time of a signal supported recording event by more than 10 minutes it will no longer follow the broadcaster s changes to the ...

Page 75: ... on the bottom of the screen 2 Select the page with Numeric buttons or coloured buttons To adjust contrast 1 Press MENU three times to display Contrast 2 Adjust with and press OK to set To exit teletext EXIT Reveal hidden data 1 Press MENU 2 Reveal with red Press again to rehide To view a favourite page stored Press STTL to view a favourite page Call up the page stored on blue List mode Factory se...

Page 76: ...er changes to white To change stored pages 1 Press coloured buttons to change 2 Enter a new page number with Numeric buttons 3 Press and hold OK View sub page The number of sub pages is displayed on the top of the screen Press to view sub page Only when teletext has more than one page The number of sub pages varies depending on the broadcasters up to 79 pages Searching may take time while you are ...

Page 77: ... access to information on the subjects shown TOP mode in case of TOP text broadcasting TOP is a particular improvement of the standard teletext service that results in an easier search and effective guide Fast overview of the teletext information available Easy to use step by step selection of the topical subject Page status information on the bottom of the screen Available page up down red green ...

Page 78: ...up Display Settings Teletext Character Set with and press OK to access 3 Select the font with and press OK to set West English French German Greek Italian Spanish Swedish Turkish etc East1 Czech English Estonian Lettish Rumanian Russian Ukrainian etc East2 Czech Hungarian Lettish Polish Rumanian etc ...

Page 79: ... screens digital clocks or calculators etc may be difficult to see while wearing the 3D Eyewear Do not use the 3D Eyewear as sunglasses 3D effects may be perceived differently depending on the person 3D Eyewear Maintenance Storing and cleaning the 3D Eyewear Store the 3D Eyewear in a cool dry place Clean using a soft dry cloth Wiping the 3D Eyewear with a cloth that is covered in dust or dirt may ...

Page 80: ...after Mains Power On Off switch is next turned on Select No if you do not want to display this message again Playing back 3D compatible Blu ray disc Frame Sequential Connect the 3D compatible player via a fully wired HDMI compliant cable If you use the non 3D compatible player the images will be displayed in 2D mode If the input mode is not switched automatically select the input mode connected to...

Page 81: ...use this manual setting 1 Display 3D Mode Selection Manual with red during above operation 2 Select the mode with and press OK to set Original Displays the source image as it is Use to identify the format type of the source image Watching 3D Source image format Side by Side 3D Side by Side 2D Top and Bottom 3D Top and Bottom 2D Displays the mode you select Not valid in Analogue and AV mode 2D 3D C...

Page 82: ...h to the 3D mode automatically or not On Advance Detects all the 3D format signals and displays the 3D image automatically On Detects the particular 3D format signals Frame Sequential etc and displays the 3D image automatically To view 3D images without any notifications and operations set to On Advance 3D Signal Message On Off Selects whether to give a notification message when a signal of 3D for...

Page 83: ...erence This setting will not be memorised when changing the input mode or channel L R Picture Swap L R Normal R L Reversed Swaps pictures for left eye and right eye except in 2D 3D mode Select R L Reversed if you feel that the sense of depth is unusual This setting will not be memorised when changing the input mode or channel Edge Smoother On Off Set to On if you feel the contoured parts of an ima...

Page 84: ...mages are displayed correctly with appropriate 3D format as following yellow boxes Source image format Side by Side Top and Bottom Normal format 2D 3D Mode Selection Original Side by Side 3D Top and Bottom 3D 2D 3D When selecting Side by Side 2D or Top and Bottom 2D the images will be displayed without 3D effect Depending on the player or broadcasts the image may be different from the above illust...

Page 85: ...nnel List Auto Setup Manual Tuning Update Channel List Favourite Network New Channel Message Service Replacement Signal Condition Attenuator Add TV Signal The function items vary depending on the TV mode and country you select Favourites Edit List favourite DVB channels Create your favourite channel lists from various broadcasters up to 4 Favourites 1 to 4 The favourites lists are available from C...

Page 86: ... DVB favourites list You can edit the favourites list while the cursor is on the channel in the favourites list To move the channel 1 Select the channel with 2 Press green 3 Select the new position with or Numeric buttons 4 Press green to store To delete the channel 1 Select the channel with 2 Press OK to delete Press yellow to delete all channels To name the favourites 1 Press red 2 Enter charact...

Page 87: ... sort channel names in alphabetical order DVB red To change the category DVB blue Edit DVB Analogue Channels To swap move the channel position if available 1 Press green to edit 2 Set the new position with Numeric buttons or and press green to store To retune each channel Manual Tuning red For Analogue Watching Tuning and editing channels Manual Tuning Only for the revealed channels To rename the ...

Page 88: ...h MENU 2 Select Setup Other Settings Exchange Channel List with and press OK to access 3 Follow the on screen instructions During the operation remove USB devices other than the USB Flash Memory used for this function Note If a VCR is connected only with the RF cable in Analogue edit VCR ...

Page 89: ...ss 2 Select One LNB MiniDiSEqC DiSEqC 1 0 Single Cable with and press OK to set One LNB Compatible with single LNB MiniDiSEqC Up to 2 LNBs can be controlled DiSEqC 1 0 Up to 4 LNBs can be controlled Single Cable When using the Single Cable router up to 8 user bands are available You can receive several satellites if you have DiSEqC control antenna system This TV supports DiSEqC Version 1 0 3 Selec...

Page 90: ...ngle Cable router Watching Tuning and editing channels Selectable satellites 5 Press BACK RETURN to store 6 Select Auto Setup with and press OK to access 7 Select Search Mode Scan Mode with and press OK to access 8 Set with and press OK to store Scan Mode Full Scans the whole frequency range Quick Scans the suitable frequency for the selected satellite After settings select Start scan with and pre...

Page 91: ... country Normally set Frequency Symbol Rate and Network ID to Auto If Auto is not displayed or if necessary enter each value specified by your cable provider with Numeric buttons After settings select Start scan with and press OK to search 3 The confirmation screen is displayed and press OK to start Auto Setup Settings are made automatically When the operation is completed the channel at the lowes...

Page 92: ...lect Multicast Environment to use in multi family housing units hotel hospital etc All servers are selected automatically 3 Select Server List with and press OK to access 6 Select Search Channels with and press OK to access 7 Set DVB via IP Search Mode with and press OK to start Auto Setup Settings are made automatically Set DVB via IP Satellite Configuration to tune DVB S channels When the operat...

Page 93: ... broadcasting companies for the setting 1 Select Transponder Frequency Symbol Rate Polarisation Modulation Service ID with and set with or Numeric buttons 2 Select Start scan with and press OK to search DVB C 1 Enter the frequency with Numeric buttons Normally set Symbol Rate and Service ID to Auto 2 Select Start scan with and press OK to search DVB T 1 Select a channel with and adjust frequency w...

Page 94: ...l Up Down 3 Search with 4 Select Store with and press OK to set Use Fine Tuning to make small adjustments to the tuning of an individual programme affected by weather conditions etc If a VCR is connected only with the RF cable select channel position 0 DVB via IP DVB S Please consult the received satellite broadcasting companies for the setting 1 Select Transponder Frequency Symbol Rate Polarisati...

Page 95: ...et to Multicast Environment DVB via IP Update Channel List By updating the DVB channel list you can add new channels delete removed channels or change channel names and positions automatically The channel list is updated while keeping your settings in Favourites Edit Channel List Child Lock etc Depending on the signal condition the update may not work properly To update DVB S channels set Search M...

Page 96: ...channel To change the channel For DVB Other settings Favourite Network Selects your favourite network for each broadcaster only available in some countries For DVB C DVB T Service Replacement On Off Set to On to display a message to switch to the available service only available in some countries For DVB C Attenuator On Off Sets the antenna system to use plural LNBs for receiving several satellite...

Page 97: ...rksat at 42 East Express at 40 East Hellas at 39 East Eutelsat at 36 East Eutelsat at 33 East Astra at 28 2 East Arabsat at 26 East Eutelsat at 25 5 East Astra at 23 5 East Eutelsat at 21 5 East Astra at 19 2 East Eutelsat at 16 East Hot Bird at 13 East Eutelsat at 10 East Eutelsat at 9 East Eutelsat at 7 East Astra at 4 8 East Thor at 0 8 West Intelsat at 1 West Amos at 4 West Eutelsat at 5 West ...

Page 98: ...Check the terminal type and cable plugs are correct when connecting USB port USB cable USB HDD Socket outlet Caution All data in the USB HDD will be erased in the following cases When formatting the USB HDD with this TV Recording USB HDD setup Setting for USB HDD When formatting the USB HDD to use on PC etc When the TV is repaired due to a malfunction you may have to format the USB HDD again with ...

Page 99: ...n electric outage may also be a cause of malfunction Note Analogue TV programme cannot be recorded on the USB HDD The data broadcasting MHEG etc radio broadcasting will not be recorded and also the recording function will not work during the period without any signal Not all the programmes can be recorded depending on the broadcaster and service provider Depending on the network condition recordin...

Page 100: ...hen the caution and confirmation screen for using USB HDD is displayed select Yes with and press OK to proceed 5 When the confirmation screen of USB HDD name is displayed select Yes with and press OK to set The name for the USB HDD is created automatically If you want to edit the name select Yes 1 Enter characters with or Numeric buttons and press OK to set 2 Press BACK RETURN to store 6 When the ...

Page 101: ... To edit USB HDD name green To format red To remove the USB HDD safely from the TV yellow Note You can only select one USB HDD for recording at a time You cannot change the settings for the USB HDD while recording is in progress ...

Page 102: ...h and press OK to set To start One Touch Recording Press to start Other channels cannot be selected while recording is in progress To stop recording in progress Press to stop To play back or delete the recorded contents Recorded TV programmes can be played back in Media Player 1 Display icons of the feature with APPS 2 Select Recorded TV with and press OK to access Media Player Recorded TV mode Ev...

Page 103: ...ith to start REW LIVE TV When you select Auto recording will start automatically This recording may not start if another recording is in progress TV signal condition is bad or there are no images displayed To operate REW LIVE TV To pause To search backward up to 90 minutes After pausing or searching backward the following buttons are available for operation Search backward Search forward Return to...

Page 104: ...will be deleted automatically in the following conditions Even if REW LIVE TV stops for the following conditions as long as the setting is Auto a new recording will start automatically in a condition that makes the recording available Other channels selected Locked channel selected Invalid channel selected No TV signal External input selected When the full screen application TV Guide Media Player ...

Page 105: ...ss OK to start making the settings 2 Select USB HDD Rec Reminder with USB HDD Rec Records the programme to the USB HDD When the start time comes the channel will be switched automatically and the video and audio signals will be output 2 minutes before the start time a reminder message appears if you are watching TV Reminder Reminds you to watch the programme When you are watching TV a reminder mes...

Page 106: ... indicate subtitles and press again to remove them For Reminder Signal Supported Recording if available Watching TV Guide Timer Programming Date You can set one day ahead with select daily or weekly with Daily Sun Sat Sunday to Saturday Daily Mon Sat Monday to Saturday Daily Mon Fri Monday to Friday Weekly Sat Fri Thu Wed Tue Mon Sun Same time on the same day every week Start time End time Duratio...

Page 107: ...mming To delete a timer event 1 Press red 2 Press OK to delete To display subtitles if available yellow Press again to remove subtitles For Reminder To cancel a timer event temporarily blue Press again to stop cancelling To play back or delete the recorded contents Recorded TV programmes can be played back in Media Player 1 Display icons of the feature with APPS 2 Select Recorded TV with and press...

Page 108: ...imer Programming Timer Programming can store up to 15 events Timer Programming only works reliably if correct time information is received via the signal from the broadcaster or service provider For recording using Timer Programming the TV must be either on or in Standby For reminders to be displayed the TV must be on No other channels can be selected while the recording of Timer Programming is in...

Page 109: ...event starts and finishes as programmed The next event can then start The recording of Timer Programming will automatically change the channel to the programmed channel a few seconds before the start time The recording of Timer Programming will be performed even if the TV is in REW LIVE TV recording In this case REW LIVE TV recording will be cancelled Recording Recording current programme REW LIVE...

Page 110: ...re guaranteed Check the USB HDDs that have been tested for compatibility with this TV at the following website http panasonic net viera support English only Note Data modified with a PC may not be displayed Do not remove the device while the TV is accessing data Otherwise this can damage the device or TV Do not touch the pins on the device Do not subject the device to a high pressure or impact Ins...

Page 111: ...ing the operation audio signal is output from DIGITAL AUDIO and HDMI2 ARC function terminals But no video signals are output To use HDMI2 with ARC function connect an amplifier that has ARC function and set to use theatre speakers Functions VIERA Link HDAVI Control Date shows the date on which the recording was made by the recording equipment For a file without a valid record date is shown Picture...

Page 112: ... USB Flash Memory safely from the TV perform Safely remove USB in USB Device Setup 1 Display the menu with MENU 2 Select Setup USB Device Setup with and press OK to access 3 Select the device with and press yellow to set Connect the USB Flash Memory to the USB 1 or 2 port Note To connect the USB HDD Recording USB HDD setup Check the terminal type and devices are correct when connecting For the inf...

Page 113: ...work device 2 Display APPS List with APPS 3 Select Media Player with and press OK to access 4 Select the device with and press OK to access If only one device is connected this step will be skipped The network device already connected to the TV is also displayed Enter User Password to access User Password are already entered 5 Select Photo Video Music Recorded TV with and press OK to access Photo ...

Page 114: ...e the current device to another device directly in the same mode when two or more available devices are connected 1 Display the device selection screen with yellow while the thumbnail is displayed 2 Select the device with and press OK to access Not valid in Recorded TV mode To change the device in Recorded TV mode Media Player Recorded TV mode Changing device To change the mode You can switch to a...

Page 115: ...ter User Password with or Numeric buttons and press OK to set Press BACK RETURN to store To register the new network device set Server Name Shared Folder For details read the manual of the equipment 5 Select Register with and press OK to set To delete the registered device select Delete with and press OK to set Note Regarding performance not all servers are guaranteed PCs with Windows 7 Windows 8 ...

Page 116: ...Display the option menu with OPTION 2 Select Change Size with and press OK to change For supported file formats Media Player Technical information Photo format Thumbnail view To display hide information of the highlighted content To display Slideshow Settings red Media Player Photo mode Using Slideshow To sort green To change the device yellow To change the contents blue ...

Page 117: ...humbnail view with green 2 Select Folder view Sort by Date Sort by Month with and press OK to set Folder view Displays the thumbnail grouped by folder Files which are in the root folder will be collected to the folder named Sort by Date Sort by Month Displays the thumbnail grouped by the same date or month The group of the photos without recorded dates is shown as Unknown To return to the thumbnai...

Page 118: ...t 3D with and press OK to access 3 Select two photos for L left and R right with and red You can only select photos of the same recorded date and the same pixels You may not be able to view the created 3D photo properly if you transpose the left and right photos 4 Create the 3D photo with OK If your selected photos are not suitable for the 3D photo the error message will be displayed and you will ...

Page 119: ...splay the option menu with OPTION 2 Select Slideshow Settings with OK 3 Select one of the following items with and press OK to access Frame Colour Effect Transition Effect Auto Makeup Screen Mode Burst Playback Interval Repeat Back Ground Music 4 Set with and press OK to store Frame Off Multi Collage Drift calendar Drift Gallery calendar Gallery Cinema Selects the frame type of the slideshow Multi...

Page 120: ...llery or Cinema Transition Effect Off Fade Dissolve Motion Random Selects the transition effect for switching photos during the slideshow Fade The next photo fades in gradually Dissolve Each photo is dissolved when switching to the next photo Motion Each photo is displayed with an effect of enlarging reducing moving up or moving down Random The transition effect is selected at random This function...

Page 121: ...arged to fill the screen e g portrait style picture Burst Playback On Off Selects whether to display burst photos in a fast paced slideshow mode or not Not valid when Frame is set to Drift Gallery Cinema or when Transition Effect is set to Motion Interval Long Normal Short Selects slideshow interval Not valid when Frame is set to Drift Gallery Cinema or when Transition Effect is set to Motion Repe...

Page 122: ...sic files have been registered or the device which had registered music files is removed no sound will be played back To register music 1 Select the music file with and press OK to access Depending on the condition of the device select folders until you reach the desired music file 2 Select File Folder with and press OK to set File The selected music file will be registered Folder All the music fi...

Page 123: ...ideo Preview to Off Media Player Video mode Video Setup 2 Start playback with red If you have stopped the last playback halfway the confirmation screen is displayed to select whether to start from where you stopped last time or from the beginning For supported file formats Media Player Technical information Video format Thumbnail view To display hide information of the highlighted content To start...

Page 124: ...back may not continue depending on the condition To repeat playback Media Player Video mode Video Setup Playback To operate playback Rewind Fast forward Stop OK Pause displays the time seek bar Playback To jump to the specified time point 1 Display the time seek bar with OK 2 While the time seek bar is displayed Press Search approx 10 seconds Press and hold Search rapidly 3 Jump to the specified t...

Page 125: ...Displays the content enlarged without distortion Aspect2 Displays the content full screen Original Displays the content original size You can also change the mode pressing ASPECT Press repeatedly until you reach the desired mode Aspect cannot be changed depending on the content To return to thumbnail BACK RETURN ...

Page 126: ...thumbnail view Images may not be displayed for an instant in the thumbnail view Set the preview Off to solve this This function is available in the thumbnail view Multi Audio Dual Mono Audio Selects for selectable sound tracks if available It may take several seconds to change the sound This function is available during playback Subtitle Display hide subtitles if available This function is availab...

Page 127: ...to access 3 Select Auto PCM with and press OK to set SPDIF Selection Auto PCM Selects the initial setting for digital audio output signal from DIGITAL AUDIO and HDMI2 ARC function terminals SPDIF is a standard audio transfer file format Auto Dolby Digital Plus Dolby Digital and HE AAC multi channel are output as Dolby Digital Bitstream MPEG is output as PCM DTS is output as DTS PCM Digital output ...

Page 128: ...ed Content not played back yet Once you play back the content this icon will disappear Protected content cannot be deleted Content under recording You can play back this content even if under recording Two or more contents are grouped 2 Select the content with and press OK to start playback If you have stopped the last playback halfway the confirmation screen is displayed to select whether to star...

Page 129: ... Press Search approx 10 seconds Press and hold Search rapidly 3 Jump to the specified time point with OK To display hide the operation guide and information banner To repeat between the starting point A and finishing point B blue Set A and B in order The points will be reset by pressing again or by other operations To the previous next chapter red green A recorded content is automatically divided ...

Page 130: ...ts and then select Create Group Release Group Select the created group to release and then select Release Group To release several groups at once tick all the desired groups Exclude from Group Select the group and press OK to display the grouped contents To exclude one specific content from the group tick it and then select Exclude from Group To exclude several contents at once tick all the desire...

Page 131: ...ve Select with and press OK to access 3 Select the device with and press OK to access If you select the device to play back photos videos or music change to the appropriate content 1 Display the option menu with OPTION 2 Select Contents Select with and press OK to access Chapter List You can start playback from the chapter list you select 1 Display the chapter list with yellow 2 Select the chapter...

Page 132: ...to access 3 Select Auto PCM with and press OK to set SPDIF Selection Auto PCM Selects the initial setting for digital audio output signal from DIGITAL AUDIO and HDMI2 ARC function terminals SPDIF is a standard audio transfer file format Auto Dolby Digital Plus Dolby Digital and HE AAC multi channel are output as Dolby Digital Bitstream MPEG is output as PCM DTS is output as DTS PCM Digital output ...

Page 133: ...bnail view with 2 Start playback with red For supported file formats Media Player Technical information Music format Thumbnail view To display hide information of the highlighted content To start playback red To change the device yellow To change the contents blue ...

Page 134: ...Fast forward Stop OK Pause displays the time seek bar Playback To jump to the specified time point 1 Display the time seek bar with OK 2 While the time seek bar is displayed Press Search approx 10 seconds Press and hold Search rapidly 3 Jump to the specified time point with OK To display hide the operation guide To the previous track red To the next track green To return to thumbnail BACK RETURN ...

Page 135: ...nction is available in the thumbnail view 1 Display the option menu with OPTION 2 Select Music Setup Repeat with OK 3 Select Off Folder One with and press OK to set Folder Playback repeat within the selected folder One Playback repeat of the selected one file ...

Page 136: ... erroneous operation may damage the data or device Back up the recorded data at regular intervals to prevent data deterioration data damage or erratic operation of the TV Panasonic is not liable for any deterioration or damage of recorded data SD Card SD Card Use an SD Card which meets SD standards Failure to do so may cause the TV to malfunction 2 1 mm 32 mm 24 mm Card format SDXC Card exFAT SDHC...

Page 137: ...Memory format FAT16 FAT32 or exFAT USB HDDs formatted on a PC are not guaranteed to work in Media Player USB HDD The capacity of USB HDD that works with this TV is from 160 GB to 3 TB Connect the USB HDD to the socket outlet to record and play back properly with this TV Use the USB HDD formatted with this TV Recording USB HDD setup Setting for USB HDD Regarding performance not all USB HDDs are gua...

Page 138: ...8 8 to 30 719 17 279 DCF and EXIF standards Progressive JPEG is not supported Note Some files may not be played back even if they fulfil these conditions Do not use multi byte characters or other special codes for file names Connected devices may become unusable with this TV if the file or folder names are changed ...

Page 139: ...fied AVCHD mts Video codec H 264 BP MP HP Audio codec Dolby Digital AVCHD Standard Ver 2 0 AVCHD 3D AVCHD Progressive The data may not be available if a folder structure on the device is modified AVI avi Video codec H 264 BP MP HP MPEG1 MPEG2 MPEG4 SP ASP VC 1 Windows Media Video Ver 9 Audio codec AAC ADPCM Dolby Digital Dolby Digital Plus DTS core HE AAC LPCM MPEG Audio MP3 WMA WMA Pro Some subti...

Page 140: ... MPEG1 MPEG2 MPEG4 SP ASP Audio codec AAC Dolby Digital Dolby Digital Plus DTS core HE AAC MPEG Audio MP3 Vorbis Some subtitles or chapter functions may not be available ASF asf wmv Video codec MPEG4 SP ASP VC 1 Windows Media Video Ver 9 Audio codec AAC Dolby Digital Dolby Digital Plus HE AAC LPCM MP3 WMA WMA Pro Copy protected files cannot be played back FLV flv Video codec H 264 BP MP HP Audio c...

Page 141: ...he video file and subtitles text file are inside the same folder and the file names are the same except for the file extensions If there are more than one subtitles text files inside the same folder they are displayed in the following order of priority srt sub txt Note Some files may not be played back even if they fulfil these conditions Do not use multi byte characters or other special codes for...

Page 142: ...WMA Pro wma Copy protected files cannot be played back WMA Lossless is not supported LPCM wav Note Some files may not be played back even if they fulfil these conditions Do not use multi byte characters or other special codes for file names Connected devices may become unusable with this TV if the file or folder names are changed ...

Page 143: ...by Panasonic and enjoy internet contents such as videos games communication tools etc from APPS List Example To enable this function you need a broadband network environment Ensure the network connections and network settings are completed Network Network connections Network Network settings ...

Page 144: ...rate the internet contents with the free cursor and Voice Control function of Touch Pad Controller supplied Functions Voice Control You can connect a keyboard for character input in the applications You can also use the keyboard for TV operation as well as for APPS List Functions Bluetooth devices Functions Keyboard Video communication for example Skype requires an exclusive Communication Camera T...

Page 145: ...ist You can update the software later manually Network Network settings Software Update The services through APPS List are operated by their respective service providers and such service may be discontinued either temporarily or permanently without notice Therefore Panasonic will make no warranty for the contents or the continuity of the services Some contents may be inappropriate for some viewers...

Page 146: ... your home network And then you can enjoy these contents on this TV Example For watching and operating contents on this TV Network DLNA Using DLNA For supported file formats Network Technical information To use a PC as a media server Prepare the PC with Windows 7 Windows 8 or ensure the server software is installed on the PC Windows 7 Windows 8 and Twonky 7 installed on the PC with Windows XP or M...

Page 147: ...edia servers Please read the manual of your DIGA Recorder to check if the recorder is compatible with DLNA Playback of sharing contents on this TV with the DMC Digital Media Controller network equipment You can enjoy contents stored in the media server by controlling with the DMC network equipment smartphone PC with Windows 7 Windows 8 installed etc connected to your home network To use this funct...

Page 148: ...the operations refer to the support information of the application To use this function with another DLNA Certified VIERA set Network Link Settings of this TV Network Network settings Network Link Settings Sharing the current programme may not be available when selecting radio channels encrypted copy protected programmes the programme in DVB via IP or when the broadcast prohibits the output of vid...

Page 149: ...ns to access another TV select the name of another TV from the displayed media server list To display hide information of the highlighted media server 4 Select the file with and press OK to access Example Depending on the condition of media server you may need to select the folder before selecting the file To display hide information of the highlighted file Note Non playable files are also listed ...

Page 150: ... cannot be used Required speed effective at least 1 5 Mbps for SD Standard Definition and 6 Mbps for HD High Definition picture quality respectively If the transfer speed is not enough contents may not be played back properly Wireless connection Built in wireless LAN Rear of the TV Access point Internet environment Wired connection ETHERNET terminal LAN cable Shielded Use the Shielded Twist Pair S...

Page 151: ...broadband network environment To use internet service you need a broadband network environment Network Network connections Internet connection Wireless connection For DLNA and internet service Built in wireless LAN Rear of the TV Access point Hub or Router Internet environment Smartphone DLNA Certified media server PC etc ...

Page 152: ...ed Use the Shielded Twist Pair STP LAN cable Hub or Router Internet environment DLNA Certified media server PC etc Wireless connection For DLNA TV To use the TV as a wireless access point Network Network settings Custom Wireless Access Point DLNA Certified media server PC etc Smartphone ...

Page 153: ... category 5 or later LAN cables are required Contact your Internet Service Provider ISP or telecommunications company for further assistance regarding the network equipment Confirm the terms and conditions of the contracts with your Internet Service Provider ISP or telecommunications company Depending on the contracts additional fees may be charged or multiple connections to the internet may be im...

Page 154: ...nd press OK to access Available Wireless Networks are displayed automatically Encrypted access point For WPS Push button 1 Select Easy setup with Push button with and press OK to access 2 Press the WPS button on the access point until the light flashes 3 Connect the TV with the access point with OK WPS Wi Fi Protected Setup If the connection has failed check the settings and positions of your acce...

Page 155: ...ctions are completed before starting network setup Network Network connections 1 Display the menu with MENU 2 Select Network Network Connection Custom Wireless with and press OK to access Confirm the encryption key settings and position of your access point before starting setup For details read the manual of the access point 3 Select your desired access point with and press OK to access Available...

Page 156: ...d access point select AES for the encryption type To search access points again blue To display hide information of the highlighted access point It is recommended to select the encrypted access point 4 Enter the encryption key of the access point with and press OK to set You can set characters using Numeric buttons Press BACK RETURN to store 5 IP DNS Settings is displayed Acquire IP Address Acquir...

Page 157: ...ta to the browser 1 Select Proxy with and press OK to access 2 Enter the address with or Numeric buttons and press OK to set 3 Press BACK RETURN to store Proxy Port This number is also specified by the provider with the proxy address 1 Select Proxy Port with 2 Enter the number with Numeric buttons 3 Press BACK RETURN to store 6 Select Network Status with and press OK to access Network Network sett...

Page 158: ...k Default Gateway DNS Address Proxy Settings It is not required for normal household use Some internet services may not be available depending on the proxy settings Proxy This is the address of the relay server which is connected between the browser and the target server to send data to the browser 1 Select Proxy with and press OK to access 2 Enter the address with or Numeric buttons and press OK ...

Page 159: ... Select Network Status with and press OK to access Network Network settings Network Status 5 Select Exit with and press OK to set Note When the network connection type is set to Wired Wireless is deactivated ...

Page 160: ...details read the manual of the equipment WPS PIN Enter the PIN code of the equipment If the connection has failed check the settings and positions of the equipment And then follow the on screen instructions Change settings You can set up Network name SSID Encryption key Wireless type and Channel setting method manually Follow the on screen instructions and set manually Set Reset settings to reset ...

Page 161: ...SID security type encryption type etc For more information of the network connection select Help my Home Cloud Settings Displays the terms of service for the cloud services 1 Display the menu with MENU 2 Select Network my Home Cloud Settings Notices with and press OK to access 3 Follow the on screen instructions To set up an account for the cloud services Functions User profile Settings VIERA Name...

Page 162: ...efault configuration may increase Standby Power Consumption Powered On by Apps On Off Enables to turn the TV on from the network equipment smartphone etc Depending on the network condition you may have to turn the TV on with Standby On Off switch of the TV s remote control Changing the default configuration may increase Standby Power Consumption LED will turn to orange in Standby mode if Powered O...

Page 163: ...ou need to install the application for controlling VIERA on your smartphone For information of the application http panasonic net viera support English only For the operations refer to the support information of the application Depending on the network condition this function may not be available Depending on the area this function may not be available For details consult your local Panasonic deal...

Page 164: ...select the content to share Also read the manual of another VIERA To use this function with your smartphone you need to install the application for controlling VIERA on your smartphone For information of the application http panasonic net viera support English only For the operations refer to the support information of the application Changing the default configuration may increase Standby Power C...

Page 165: ... support English only Changing the default configuration may increase Standby Power Consumption LED will turn to orange in Standby mode if TV Anywhere is set to On Note This function is not available when the TV is turned off with Mains Power On Off switch Depending on the network condition and broadcasts this function may not be available File Sharing Settings Network Device List Lists the access...

Page 166: ...work connections Network Network settings 1 Display APPS List with APPS 2 Select Media Server with and press OK to access 3 Select one of the media servers with and press OK to access For the operations to access another TV select the name of another TV from the displayed media server list To display hide information of the highlighted media server 4 Select the file with and press OK to access Dep...

Page 167: ... thumbnail of photos for the first view with 2 Start Slideshow with red and OK To display hide the operation guide To pause return to Single view OK To return to list BACK RETURN Slideshow Settings Set up the settings for photo file operations on this TV 1 Display the option menu with OPTION 2 Select Slideshow Settings with and press OK to access 3 Select one of the following items with and press ...

Page 168: ...displayed with an effect of enlarging reducing moving up or moving down Random The transition effect is selected at random Auto Makeup On Off Automatically detects the face in the photo and improves luminance and contrast Interval Long Normal Short Selects slideshow interval Not valid when Transition Effect is set to Motion Repeat On Off Slideshow repeat Back Ground Music Off Type1 Type2 Type3 Typ...

Page 169: ...elect one of the media servers with and press OK to access For the operations to access another TV select the name of another TV from the displayed media server list To display hide information of the highlighted media server 4 Select the file with and press OK to access Depending on the condition of media server you may need to select the folder before selecting the file To display hide informati...

Page 170: ...op OK Pause displays the time seek bar slow playback Playback To jump to the specified time point 1 Display the time seek bar with OK 2 While the time seek bar is displayed Press Search approx 10 seconds Press and hold Search rapidly 3 Jump to the specified time point with OK To play back slowly 1 Press and hold OK for 5 seconds Press Search slowly 2 Return to the normal playback with OK To displa...

Page 171: ...t1 Displays the content enlarged without distortion Aspect2 Displays the content full screen Original Displays the content original size You can also change the mode pressing ASPECT Press repeatedly until you reach the desired mode Aspect cannot be changed depending on the content To return to list BACK RETURN ...

Page 172: ... or scene in the thumbnail view Images may not be displayed for an instant in the thumbnail view Set the preview Off to solve this Multi Audio Dual Audio Dual Mono Audio Selects for selectable sound tracks if available It may take several seconds to change the sound This function is available during playback Subtitle Display hide subtitles if available This function is available during playback Su...

Page 173: ... DIGITAL AUDIO and HDMI2 ARC function terminals SPDIF is a standard audio transfer file format Auto Dolby Digital Plus Dolby Digital and HE AAC multi channel are output as Dolby Digital Bitstream MPEG is output as PCM DTS is output as DTS PCM Digital output signal is fixed to PCM ARC Audio Return Channel is a function of digital audio output using HDMI cable Note During the operation audio signal ...

Page 174: ...lect one of the media servers with and press OK to access For the operations to access another TV select the name of another TV from the displayed media server list To display hide information of the highlighted media server 4 Select the file with and press OK to access Depending on the condition of media server you may need to select the folder before selecting the file To display hide informatio...

Page 175: ...nd hold Search rapidly 3 Jump to the specified time point with OK To display hide the operation guide To the previous track red To the next track green To return to list BACK RETURN Music Setup Set up the settings for music file operations on this TV 1 Display the option menu with OPTION 2 Select Music Setup Repeat with OK 3 Select Off Folder One with and press OK to set Folder Playback repeat wit...

Page 176: ...rk settings 1 Display APPS List with APPS 2 Select Media Server with and press OK to access 3 Select DIGA with and press OK to access 4 The screen of the DIGA Recorder will be displayed You can control the functions of the DIGA Recorder with this TV s remote control according to the operation guide Example Before operating register this TV on the DIGA Recorder For details read the manual of the DI...

Page 177: ... back even if they fulfil these conditions Do not use multi byte characters or other special codes for file names Connected devices may become unusable with this TV if the file or folder names are changed Video format Supported Video formats SD Video mod Video codec MPEG1 MPEG2 Audio codec Dolby Digital MPEG Audio SD Video Standard Ver 1 31 Entertainment Video Profile The data may not be available...

Page 178: ...re HE AAC LPCM MPEG Audio MP3 WMA WMA Pro Some subtitles or chapter functions may not be available MP4 f4v m4v mp4 Video codec H 264 BP MP HP MPEG1 MPEG2 MPEG4 SP ASP Audio codec AAC Dolby Digital Dolby Digital Plus HE AAC MPEG Audio MP3 This TV supports this container recorded with Panasonic products For details read the manual of the products MKV mkv Video codec H 264 BP MP HP MPEG1 MPEG2 MPEG4 ...

Page 179: ...annot be played back FLV flv Video codec H 264 BP MP HP Audio codec AAC MP3 3GPP 3gp 3g2 Video codec H 264 BP MP HP MPEG4 SP ASP Audio codec AAC HE AAC PS mod mpg mpeg vob vro Video codec MPEG1 MPEG2 Audio codec Dolby Digital LPCM MPEG Audio TS mts m2ts tp trp ts tts Video codec H 264 BP MP HP MPEG1 MPEG2 Audio codec AAC Dolby Digital Dolby Digital Plus HE AAC MPEG Audio ...

Page 180: ...han one subtitles text files inside the same folder they are displayed in the following order of priority srt sub txt Note Some files may not be played back even if they fulfil these conditions Do not use multi byte characters or other special codes for file names Connected devices may become unusable with this TV if the file or folder names are changed Supported formats are different in Media Pla...

Page 181: ...WMA Pro wma Copy protected files cannot be played back WMA Lossless is not supported LPCM wav Note Some files may not be played back even if they fulfil these conditions Do not use multi byte characters or other special codes for file names Connected devices may become unusable with this TV if the file or folder names are changed ...

Page 182: ...dit a user profile 1 Display the main menu with MENU 2 Select Setup User Settings with and press OK to access 3 Select a user with and press OK to access To create a new user select Create new user 4 Select one of the following items with and press OK to access Your icon Your name Your voice Your face Main Home Screen my Home Cloud account 5 Follow the on screen instructions Your icon Sets your fa...

Page 183: ... up an account for the cloud services To delete a user profile 1 Display the main menu with MENU 2 Select Setup User Settings with and press OK to access 3 Select a user with and press OK to access 4 Select Remove this user with and press OK to access 5 When the confirmation screen is displayed select Yes with and press OK to set Note You need a broadband network environment to use this function f...

Page 184: ...fully Face Recognition Voice Print Recognition By using the Communication Camera and Voice Control function this TV recognises your face voice and provides the recommended contents Say my Stream into the microphone of the Touch Pad Controller to use this function To use this function you need to set up a user profile and register face voice data etc Functions User profile Settings Communication Ca...

Page 185: ...ouch Pad Controller is completed Functions Touch Pad Controller Settings Voice Control Settings 1 Display the menu with MENU 2 Select Setup Voice Control Settings Language Speech Detection Level Terms of Service with and press OK to access 3 Set with and press OK to store Language Select the language for Voice Control function All languages may not be available When the selected language is not su...

Page 186: ...en the confirmation screen is displayed read carefully and start Voice Control function 2 The operation guide is displayed and follow the on screen instructions To display voice command list OPTION To exit Voice Control function BACK RETURN Note When you start Voice Control function sound level of the TV becomes low Voice Control function may not work properly in the following conditions Not prono...

Page 187: ...troller directly at the TV s remote control signal receiver because it works with the infrared You can operate the switch without registration It is recommended to speak within about 15 cm from microphone of Touch Pad Controller when using Voice Control function My button Press my button of Touch Pad Controller while watching media content in my Stream and you can register the content as your favo...

Page 188: ... items with and press OK to access Pairing Cursor Settings Operation Guide 4 Follow the on screen instructions Pairing Registers Touch Pad Controller supplied to this TV Only 1 Touch Pad Controller can be registered Cursor Settings Sets for the cursor of Touch Pad Controller Operation Guide Displays the operation guide of Touch Pad Controller ...

Page 189: ...st streaming Please ensure that the unit is disconnected from the mains socket before attaching or disconnecting any cables It is recommended to connect DVB via IP server with the LAN cable Wired connection ETHERNET terminal LAN cable Shielded Use the Shielded Twist Pair STP LAN cable DVB via IP server Satellite dish Terrestrial aerial Cable ...

Page 190: ...erminal type and cable plugs are correct when connecting Depending on the network condition and broadcasts this function may not be available To confirm the current network settings Network Network settings Network Status For details of the connections read the manual of the DVB via IP server Additional information for the servers may be found on the following website http panasonic net viera supp...

Page 191: ...h mode with and press OK to access 7 Set Client Settings 1 Select Client Settings with and press OK to access 2 Select Unicast Environment Multicast Environment with and press OK to set Select Unicast Environment to use in a home network Select Multicast Environment to use in multi family housing units hotel hospital etc All servers are selected automatically If the server has more than 2 tuners s...

Page 192: ...ction may not be available Note Depending on the network condition and broadcasts this function may not be available This function is not available when the TV is turned off with Mains Power On Off switch Additional information for the services may be found on the following website http panasonic net viera support English only Please also read the manual of DVB via IP server ...

Page 193: ...re mode The main screen is displayed on full screen and the sub screen is displayed at the right bottom of the main screen You can swap the main and sub screen with blue Press to display hide the operation guide Note Each input mode can only be displayed either on the main screen or sub screen The sound comes only from the main screen in multi window Some settings in Picture Menu may not be availa...

Page 194: ...IERA Link This TV supports HDAVI Control 5 function Some functions are not available depending on the equipment s version of HDAVI Control Confirm the connected equipment s version of HDAVI Control VIERA Link HDAVI Control is a unique function that we have developed and added based on the control functions provided by HDMI which is an industry standard known as HDMI CEC Consumer Electronics Contro...

Page 195: ...pment with VIERA Link function DIGA Recorder DVD Player Blu ray Disc Player HD Video Camera LUMIX Camera Available features HDMI connection DIGA Recorder DVD Player Blu ray Disc Player Easy playback Power on Link Power off Link Standby Power Save Intelligent Auto Standby VIERA Link Control HD Video Camera LUMIX Camera Easy playback Power on Link Power off Link VIERA Link Control For equipment whic...

Page 196: ... AV1 SCART terminal SCART cable DIGA Recorder with VIERA Link function HDMI cable Optical digital audio cable SCART cable HDMI cable Amplifier with VIERA Link function Speaker system Player theatre Blu ray Disc theatre with VIERA Link function HD Video Camera LUMIX Camera with VIERA Link function If the connected equipment has HDAVI Control 5 function you do not have to use this audio cable Optica...

Page 197: ...Blu ray Disc theatre Easy playback Power on Link Power off Link Standby Power Save Intelligent Auto Standby VIERA Link Control Speaker Selection Amplifier Power off Link Intelligent Auto Standby Speaker Selection For equipment which has HDAVI Control 2 or later function For equipment which has HDAVI Control 4 or later function While playing a disc Except for watching a disc ...

Page 198: ... Amplifier etc Tuner Maximum 4 Set top box etc Preparations Connect the equipment supporting VIERA Link For VIERA Link connections Functions VIERA Link HDAVI Control Summary of VIERA Link Use a fully wired HDMI compliant cable Use a fully wired SCART cable Set up the connected equipment Read the manual of the equipment Set VIERA Link to On in the Setup Menu Set up the TV After connection turn the ...

Page 199: ...te to reduce the consumption When the TV is set to Standby mode the connected equipment is automatically set to Standby and the power consumption of the connected equipment is automatically minimised When the TV is turned on the connected equipment is still in Standby mode but the power consumption is increased to start the connected equipment fast This function is effective if the connected equip...

Page 200: ...e Blu ray Disc theatre or Recorder theatre Other means Tuner set top box 5 Follow the on screen instructions to operate the menu of the equipment Confirm the remote control code is 73 Watching External equipment Operating with TV s remote control To display the operation guide OPTION If other manufacturers product is accessed Setup Contents Selection menu may be displayed Available TV s remote con...

Page 201: ...rol of the connected equipment Note If you cannot operate the equipment check the settings and the equipment Functions VIERA Link HDAVI Control Summary of VIERA Link Some operations may not be available depending on the equipment In this case use the remote control of the connected equipment For details of the operations for the connected equipment read the manual of the equipment ...

Page 202: ... is mute When the equipment is turned off TV speakers will be activated You can use Volume Up Down and MUTE TV TV speakers are active Multi channel sound If you want to enjoy the multi channel sound e g Dolby Digital 5 1ch via an Amplifier connect it with an HDMI cable and Optical digital audio cable and then select Home Cinema If your Amplifier has the HDAVI Control 5 function you only need to co...

Page 203: ...may not be delivered for the first few seconds when the input mode is switched HDAVI Control 5 is the newest standard for HDAVI Control compatible equipment This standard is compatible with conventional HDAVI equipment To confirm the HDAVI Control version of this TV Support Information Using Help menu ...

Page 204: ...s Enter the PIN number twice at first setting Make a note of the PIN number in case you forget it 0000 may be stored as the default PIN number depending on the country you select 4 Select Child Lock List with and press OK to access 5 Select the channel input with and press OK to lock appears when the channel input is locked To cancel 1 Select the locked channel input with 2 Press OK To sort channe...

Page 205: ...tings Parental Rating To watch the DVB programme that has rating information on the selected age enter the PIN number depending on the broadcaster 1 Select Parental Rating with and press OK to access 2 Select an age for the restriction of programmes with and press OK to set The availability of this function depends on the country you select Note Setting Shipping Condition erases the PIN number and...

Page 206: ...set A notification message will appear when the application is available Follow the on screen instructions is displayed on the information banner if the programme has Hybrid Broadcast Broadband TV application Watching Basic Information banner To stop the application EXIT Cookie 1 Display the menu with MENU 2 Select Setup Data Service Application Store Cookie Delete Cookie with and press OK to acce...

Page 207: ...tings Not all the data services are available depending on the country area and broadcaster Not valid in multi window mode ASF657 ASM655 ASN658 AST656 ASX659 series Depending on the connection environment the internet connection may be slow or may not be successful Operations may vary depending on the broadcaster Follow the on screen instructions On screen instructions may not correspond to the re...

Page 208: ... module If a smart card and a CI module come as a set first insert the CI module then insert the smart card into the CI module Insert or remove the CI module completely in the correct direction as shown Remove the CI module from the TV when placing the TV facing upward This may cause damages to the CI module and CI slot Note There might be some CI modules in the market with older firmware versions...

Page 209: ...nsult the operator broadcaster or CI module manufacturer for more information and conditions of the services Insert the CI module optional Normally encrypted channels will appear The viewable channels and its features depend on the CI module If encrypted channels do not appear take the following steps For more details read the manual of the CI module or check with the content provider 1 Display TV...

Page 210: ...ndition with and press OK to access Child Lock PIN number is required depending on the country If you have forgotten your changed PIN input 6969 as the PIN number Functions Child Lock PIN number 3 When the confirmation screen is displayed select Yes with and press OK to set 4 Follow the on screen instructions Auto Setup will automatically start Note To retune TV channels only e g after moving hous...

Page 211: ...th MENU 2 Select Setup System Menu System Update Auto Update Search in Standby with and press OK to access 3 Select the time with and press OK to set If any software updates are available the notification message will appear To install new software select Standby Now with and press OK to set Standby Installs new software in standby condition Now Installs new software now If System Update is perfor...

Page 212: ... reservation for update The update will not start when the TV is off Manual update You can update new software manually 1 Display the menu with MENU 2 Select Setup System Menu System Update System Update Search Now with and press OK to access 3 Searches for an update for several minutes and displays a corresponding message if any 4 Download with OK Note Download may take a few hours During softwar...

Page 213: ...each the desired character 1 _ a b c 2 A B C d e f 3 D E F g h i 4 G H I j k l 5 J K L m n o 6 M N O p q r s 7 P Q R S t u v 8 T U V w x y z 9 W X Y Z Space 0 The character is set automatically if you leave for 1 second You can also set the character pressing OK or other Numeric buttons less than 1 second The characters may vary depending on the input items ...

Page 214: ...t Devices Bluetooth Audio Settings with and press OK to access Devices Searches the available device and displays the status You cannot use two or more A2DP compliant audio devices simultaneously Not paired The device is not registered Register the device by following the on screen instructions to use with this TV Connected The device is registered and you can use with this TV Not connected The de...

Page 215: ...vice set Headphone Volume Watching For best audio Volume settings Settings in the Sound Menu may not be effective for the Bluetooth audio devices This setup has not been designed for Touch Pad Controller supporting Bluetooth wireless technology ...

Page 216: ...guage with and press OK to set Characters may not be displayed correctly on the TV screen depending on the connected keyboard or the keyboard layout setting Some of the keys of keyboards may correspond to the operation of the remote control Keyboard Remote Control Enter OK Backspace BACK RETURN Esc EXIT 0 9 Character Numeric buttons F1 HOME F2 APPS F3 MENU F4 AV F5 F6 Channel Down Up F7 F8 Volume ...

Page 217: ...s with and press OK to set You can adjust using the slide bar with and press OK to set You can go to the next screen with OK You can enter names or numbers freely for some items 1 Enter characters one by one with and press OK to set You can set characters using Numeric buttons Functions Setting characters Using Numeric buttons 2 Press BACK RETURN to store To reset the settings To initialise pictur...

Page 218: ...ork services etc Using control panel buttons 1 Press and hold INPUT OK HOLD for MENU button for 3 seconds to display the menu 2 Select and set with following control panel buttons Move the cursor select from a range of options select the menu item up and down only adjust levels left and right only Access the menu store settings after adjustments have been made or options have been set with INPUT O...

Page 219: ...olours to vivid ones Watching For best picture Basic settings Adaptive Backlight Control Automatically controls the level of backlight according to the images Watching For best picture Basic settings Not valid in multi window mode ASF657 ASM655 ASN658 AST656 ASX659 series Intelligent Frame Creation Max Mid Min Off Automatically compensates the picture frame rate and removes juddering movements to ...

Page 220: ...ightness Control function Adjusts picture settings automatically depending on ambient lighting conditions On Off Watching For best picture Ambient Sensor Noise reduction settings Noise Reduction Auto Max Mid Min Off Reduces unwanted picture noise Watching For best picture Noise reduction settings MPEG Remaster Auto Max Mid Min Off Reduces flicker noise in contoured parts of a picture and block noi...

Page 221: ... set to On ASF657 ASM655 ASN658 AST656 ASX659 series 1080p Pure Direct On Off Reproduces the original image quality in detail for 1080p HDMI input signal Watching For best picture Option Settings Not valid in 3D or multi window mode ASF657 ASM655 ASN658 AST656 ASX659 series HDMI Content Type Graphics Photos Auto Off Adjusts the picture settings of each HDMI input according to the selected content ...

Page 222: ... colour system based on video signals Watching For best picture Option Settings For AV input 3D COMB On Off Makes still or slow moving pictures more vivid Watching For best picture Option Settings For PAL NTSC signal reception in TV mode or from composite connection ...

Page 223: ...tching For best picture Screen Settings For TV mode AV and HDMI input Not valid in 3D mode Zoom Adjustments Adjusts the vertical position and size when aspect is set to Just Sidecut Just Zoom or Sidecut Zoom Watching For best picture Screen Settings Picture in Picture ASF657 ASM655 ASN658 AST656 ASX659 series Displays two windows at once Functions Multi Window Picture in Picture Screen Display On ...

Page 224: ...dvance For DVB Component and HDMI input 2D 3D Depth Max Mid Min Selects a level of 3D image depth for viewing converted 2D images Watching 3D 3D Settings 3D Adjustment On Off Adjustment of the 3D effect except in 2D 3D mode Watching 3D 3D Settings L R Picture Swap L R Normal R L Reversed Swaps pictures for left eye and right eye except in 2D 3D mode Watching 3D 3D Settings Edge Smoother On Off Set...

Page 225: ...ges Watching 3D 3D Settings Copy Adjustment Copies the picture settings of True Cinema or Custom to those of the other input mode or Viewing Mode Watching For best picture Copy Adjustment Reset to Defaults Resets the current Picture Viewing Mode to the default settings ...

Page 226: ...ing For best audio Basic settings Equaliser Adjusts the frequency level to suit your favourite sound quality Watching For best audio Basic settings Balance Adjusts volume level of right and left speakers Watching For best audio Basic settings Surround Diffuse Surround Virtual Surround Off ASF657 ASM655 ASN658 AST656 ASX659 series Virtual Surround Off ASW654 series Selects surround sound settings W...

Page 227: ...o Volume settings Auto Gain Control On Off Automatically regulates large sound level differences between channels and inputs Watching For best audio Volume settings Volume Correction Adjusts the volume of each individual channel or input mode Watching For best audio Volume settings Speaker Distance to Wall Up to 30cm Over 30cm Compensates for the low frequency sound due to the distance between the...

Page 228: ...ice Guidance Settings Volume Max Mid Min Selects the volume for the voice guidance Watching For best audio Voice Guidance Settings Language Changes language for the voice guidance Watching For best audio Voice Guidance Settings User Level Beginner Expert Selects the level of verbosity for the voice guidance Watching For best audio Voice Guidance Settings Web Browser On Off Set to On to enable voic...

Page 229: ...me Adjusts the volume for Audio Description Watching For best audio Audio Description For DVB Speakers Mix Standard Set to Mix to activate the description sound track from TV speakers Watching For best audio Audio Description For DVB Headphones Mix Standard Set to Mix to activate the description sound track from headphones Watching For best audio Audio Description For DVB ...

Page 230: ...gnal from DIGITAL AUDIO and HDMI2 ARC function terminals Watching For best audio Advanced settings For DVB or video contents of Media Player Network services SPDIF Delay Adjusts the delay time of the sound output from DIGITAL AUDIO and HDMI2 ARC function terminals if the sound does not synchronise the image Watching For best audio Advanced settings For DVB HDMI Input Digital Analogue Selects to fi...

Page 231: ...k settings VIERA Name TV Remote App Settings Sets to control the TV from network equipment smartphone etc Network Network settings TV Remote App Settings Network Link Settings Sets to control the TV with devices connected to the network Network Network settings Network Link Settings TV Anywhere Settings Enables to watch TV and set timer programming events of this TV on the network equipment smartp...

Page 232: ...ble software updates from the Panasonic website Network Network settings Software Update New Software Message On Off Selects whether to give a notification message when new software is found via network or not Network Network settings New Software Message ...

Page 233: ...r Programming For DVB Time Zone Adjusts the time data Watching Basic Adjusting time Auto Standby Automatically turns the TV to Standby mode for energy saving when no operation is performed for 4 hours On Off Watching Basic Energy saving functions No signal Power off Automatically turns the TV to Standby mode to prevent unnecessary power consumption when no signal is received and no operation is pe...

Page 234: ...ing for USB HDD Recording Setup Settings for the recording feature of the USB HDD Recording USB HDD setup Setting for USB HDD VIERA Touch Pad Controller Pairing Registers Touch Pad Controller supplied to this TV Functions Touch Pad Controller Settings Cursor Settings Sets for the cursor of Touch Pad Controller Functions Touch Pad Controller Settings Operation Guide Displays the operation guide of ...

Page 235: ...d editing channels Channel List Auto Setup Automatically searches for receivable channels Watching Tuning and editing channels Auto Setup Manual Tuning Searches for channels manually Watching Tuning and editing channels Manual Tuning Update Channel List Updates the channel list while keeping your settings Watching Tuning and editing channels Update Channel List For DVB Favourite Network Selects yo...

Page 236: ...VB C Signal Condition Checks the signal condition Watching Tuning and editing channels Signal Condition Not valid in Analogue Antenna System One LNB MiniDiSEqC DiSEqC 1 0 Single Cable Sets the antenna system to use plural LNBs for receiving several satellites Watching Tuning and editing channels Auto Setup For DVB S LNB Configuration Selects the satellite for each LNB Watching Tuning and editing c...

Page 237: ...g Menu Language OSD Language Changes language for on screen displays Watching Basic Language Preferred Audio 1 2 Selects the first and second preferred language for DVB multi audio depending on the broadcaster Watching Basic Language Preferred Subtitles 1 2 Selects the first and second preferred language for DVB subtitles depending on the broadcaster Watching Basic Language Preferred Teletext Sele...

Page 238: ...t Teletext mode Teletext Character Set West East1 East2 Selects teletext language font Watching Teletext Teletext Character Set Default Guide Channel List TV Guide Selects the default screen when pressing GUIDE Watching TV Guide Using TV Guide This function may not be available in some countries or regions Input Labels Accesses the input labels list to select the label of each input mode or set to...

Page 239: ...asic Information banner Playing Time Display On Off Set to On to display a time period of continuous use in Game mode on the top right of the screen every 30 minutes Watching External equipment Watching external input This function is available when Game Mode is set to On Radio Mode 20 15 10 5 Off seconds Sets the timer for turning off the screen automatically when a radio channel is selected Watc...

Page 240: ...e Power off Link functions Functions VIERA Link HDAVI Control Power off Link Standby Power Save On Off Controls the connected equipment to reduce power consumption in Standby Functions VIERA Link HDAVI Control Standby Power Save This function is available when VIERA Link is set to On and Power off Link is set to On Intelligent Auto Standby On Off Makes non watched or non used connected equipment g...

Page 241: ...V in order to access again quickly Functions Data Service Application Cookie Delete Cookie Deletes all the information from a data service Functions Data Service Application Cookie System Menu Keyboard Layout Selects the language that your USB or Bluetooth Keyboard supports Functions Keyboard Keyboard Shipping Condition Resets all settings to the original condition Functions Shipping Condition Shi...

Page 242: ...g TV Guide Power Save On Off Reduces brightness of the picture to economise on power consumption Exchange Channel List Exports Imports DVB S Channel List settings using the USB device to share the same settings with VIERA which has the same function Watching Tuning and editing channels Channel List ...

Page 243: ...re Aspect Control Signal Press ASPECT if you want to change the aspect ratio manually Watching For best picture Aspect Black and white picture Check that the output of the external equipment matches the input of the TV When connecting with SCART ensure the output setting of the external equipment is not S Video Chaotic image noisy Set Noise Reduction and MPEG Remaster in the Picture Menu to remove...

Page 244: ...and connections are firmly in place Blurry or distorted image no sound or low volume Reset channels Watching Tuning and editing channels Auto Setup There may be red blue green and black spots on the screen This is a characteristic of liquid crystal panels and is not a problem The liquid crystal panel is built with very high precision technology giving you fine picture details Occasionally a few no...

Page 245: ...tching Tuning and editing channels Signal Condition Watching Basic Basic connection Weather conditions will affect signal reception heavy rain snow etc in particular in poor reception areas Even during good weather the high pressure can cause poor reception of some channels Due to the digital reception technologies involved quality of the digital signals may be relatively low in some cases despite...

Page 246: ...lem still persists please contact your local Panasonic dealer for assistance White spots or shadow image ghosting occurs Some channels cannot be tuned Check the position direction and connection of the aerial Weather conditions will affect signal reception heavy rain snow etc in particular in poor reception areas Even during good weather the high pressure can cause poor reception of some channels ...

Page 247: ... on or off Is the volume set to the minimum Check connections and setting of external equipment Watching External equipment Ensure that Speaker Selection is set to TV Functions VIERA Link HDAVI Control Speaker Selection Ensure that Speaker Setting is set to TV Speaker Watching For best audio Volume settings Sound level is low or sound is distorted Sound signal reception may be poor Set MPX in the ...

Page 248: ...gnals may not be automatically recognised as 3D images Set 3D Mode Selection Manual to match the picture format Watching 3D Viewing 3D For some people the 3D images may be difficult to see or cannot be seen especially among users who have a different level of eyesight between the left and right eyes Take necessary measures wearing glasses etc to correct your eyesight before use There is something ...

Page 249: ...tching For best audio Advanced settings If digital sound connection has a problem select analogue sound connection Watching External equipment HDMI features Pictures from external equipment are unusual when the equipment is connected via HDMI Check the HDMI cable is connected properly Watching External equipment External connection Turn the TV and equipment off then turn them on again Check an inp...

Page 250: ...o issue IP address automatically If the network administrator prefers to allocate an IP address set an IP address manually Network Network settings The router may be using MAC address filtering security setting Confirm the MAC Address of this TV and set the router to use it Network Network settings Network Status If the problem persists consult your Internet Service Provider or telecommunications ...

Page 251: ...DAVI Control Summary of VIERA Link Turn the connected equipment on and then switch the TV on Functions VIERA Link HDAVI Control Parts of the TV become hot Even if the temperature of parts of the front top and rear panels has risen these temperature rises do not cause any problems in terms of performance or quality Overcurrent error message appears The connected USB device may cause this error Remo...

Page 252: ...t work Voice Control function may not work properly depending on the pronunciation noise and network environment For details Functions Voice Control LED does not turn to red in Standby mode LED will turn to orange in Standby mode under the following conditions While the recording is in progress Timer Programming is set DLNA Server is set to On Powered On by Apps is set to On Home Streaming is set ...

Page 253: ...e away all the moisture Caution Do not use a hard cloth or rub the surface too hard otherwise this may cause scratches on the surface Take care not to subject the surfaces to insect repellent solvent thinner or other volatile substances This may degrade surface quality or cause peeling of the paint The surface of the display panel is specially treated and may be easily damaged Take care not to tap...

Page 254: ...3 Select TV Self Test System Information Device Information with and press OK to access TV Self Test Makes a diagnosis of picture or sound problems Follow the on screen instructions System Information Displays the system information of this TV Device Information Displays the device information of this TV ...

Page 255: ...assive 3D For more information http panasonic net viera support English only Communication Camera Communication Camera TY CC20W This camera can be used for video communication and face recognition Network Internet content Selecting internet content my Home Screen my Home Screen Settings Depending on the area this optional accessory may not be available For details consult your local Panasonic deal...

Page 256: ...ure the wall hanging brackets Any damage caused by installing without a qualified installer will void your warranty Carefully read the instructions accompanying optional accessories and be absolutely sure to take steps to prevent the TV from falling off Handle the TV carefully during installation since subjecting it to impact or other forces may cause product damage Take care when fixing wall brac...

Page 257: ...respective owners SDXC Logo is a trademark of SD 3C LLC AVCHD AVCHD 3D and AVCHD Progressive are trademarks of Panasonic Corporation and Sony Corporation Skype is a trade mark of Skype Limited DLNA the DLNA Logo and DLNA CERTIFIED are trademarks service marks or certification marks of the Digital Living Network Alliance Windows is a registered trademark of Microsoft Corporation in the United State...

Page 258: ... issued to Rovi Corporation and or its subsidiaries PlayReady is a trademark registered by Microsoft Please be aware of the following a This product contains technology subject to certain intellectual property rights of Microsoft Use or distribution of this technology outside of this product is prohibited without the appropriate license s from Microsoft b Content owners use Microsoft PlayReady con...

Page 259: ...will be useful but WITHOUT ANY WARRANTY without even the implied warranty of MERCHANTABILITY or FITNESS FOR A PARTICULAR PURPOSE Please refer to the detailed terms and conditions thereof shown in the Software License menu on this product At least three 3 years from delivery of this product Panasonic will give to any third party who contacts us at the contact information provided below for a charge...

Page 260: ...Ver 2 02 ...

Reviews: