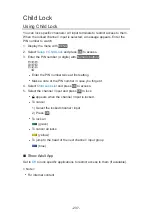
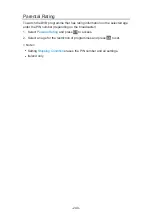
background image

Parental Rating

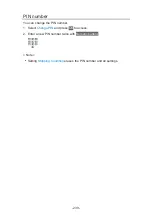
To watch the DVB programme that has rating information on the selected age, 

enter the PIN number (depending on the broadcaster).
1. Select 

Parental Rating

 and press 

OK

 to access.

2.  Select an age for the restriction of programmes and press 

OK

 to set.

= Note =


Setting 

Shipping Condition

 erases the PIN number and all settings.


Ireland only

- 240 -

Summary of Contents for TX-40EX700B

Page 1: ...eHELP English TX 40EX700B TX 50EX700B TX 58EX700B TX 65EX700B TX 40EX600B TX 49EX600B TX 55EX600B TX 65EX600B ...

Page 2: ...w Play EPG 20 Easy Mirroring 21 Home Screen Home Screen Information 22 How to use 24 Pin to HOME 25 Option menu 26 Live TV How to use 27 Option menu 28 Apps How to use 29 My App 30 Option menu 31 Devices How to use 32 Option menu 33 Watching Basic Basic connection 34 Selecting channel 36 Freeview Play banner UK 38 ...

Page 3: ...ernal equipment External connection 56 Watching external input 59 Operating with TV s remote control 61 HDMI features 63 HDMI HDR Setting 65 Valid input signals 66 For best picture Viewing Mode 67 Ambient Sensor 68 Aspect 69 Aspect Control Signal 70 Basic settings 72 Noise reduction settings 74 Advanced Settings 75 Option Settings 79 Screen Settings 82 Copy Adjustment 84 For best audio Sound mode ...

Page 4: ... Viewing Teletext 103 Teletext mode 105 Teletext Character Set 106 Tuning and editing channels Setting menu 107 Channel List Editor 108 Favourites Editor 109 Auto Setup 111 Channel Sorting by Region 112 Manual Tuning 113 Update Channel List 114 Signal Condition 115 Other settings 116 Recording USB HDD setup Preparations 117 Setting for USB HDD 119 Recording current programme One Touch Recording 12...

Page 5: ...e mode 132 Network device 134 Sharing file 135 Easy List View Selecting file 136 Filtering files 138 Mix Folder View Selecting file 139 Filtering files 141 Sorting files 142 Playback Playback 143 Slideshow Settings 145 Video Setup 147 Audio output settings 148 Recorded TV mode Selecting content 149 Watching recorded TV 150 Grouping content 152 Deleting content 153 Chapter List 154 Audio output set...

Page 6: ... DLNA In House streaming 166 Using DLNA 168 Network connections Internet connection 169 DLNA connection 170 Note 172 Network settings Network Connection 173 Custom Wireless 175 Custom Wired 178 Custom Wireless Access Point 180 Network Status 181 my Home Cloud Settings 182 VIERA Name 183 TV Remote App Settings 184 Network Link Settings 186 TV Anywhere Settings 188 File Sharing Settings 189 Mirrorin...

Page 7: ...ile 197 Watching video 198 Video Setup 200 Audio output settings 202 Music Selecting file 203 Playing music 204 Music Setup 205 Supported format Photo format 206 Video format 207 Music format 210 Functions Info Frame Information 211 How to use 212 Settings 213 Voice Control Information 214 How to use 215 Settings 216 Note 217 TV Anywhere How to use 218 ...

Page 8: ...e 231 Intelligent Auto Standby 232 VIERA Link Control 233 Speaker Selection 235 Note 236 Child Lock Using Child Lock 237 PIN number 239 Parental Rating 240 Data Service Application Using Data Service Application 241 Privacy Setting 242 Note 243 Common Interface Caution 244 Using Common Interface 245 Shipping Condition Shipping Condition 246 Updating the TV Software Information 247 Auto update 248 ...

Page 9: ...7 Advanced Settings 258 Option Settings 259 Screen Settings 261 Copy Adjustment 262 Reset to Defaults 263 Sound Mode 264 Basic settings 265 Volume settings 266 Voice Guidance Settings 267 Audio Description 268 Advanced settings 269 Reset to Defaults 270 Network Network Connection 271 Network Status 272 my Home Cloud Settings 273 VIERA Name 274 TV Remote App Settings 275 Network Link Settings 276 ...

Page 10: ...5 No signal Power off 286 Setup Eco Navigation 287 Voice Control Settings 288 TV Guide Settings 289 USB Device Setup 290 Recording Setup 291 Child Lock 292 Tuning Menu 293 Language 295 Display Settings 296 HDMI Auto Setting 298 HDMI HDR Setting 299 VIERA Link Settings 300 Data Service Application 301 System Menu 302 Other Settings 303 Support Help menu Using Help menu 304 FAQs Picture 305 ...

Page 11: ... 11 Digital TV 307 Analogue TV 309 Sound 310 HDMI 311 Network 312 Other 314 Detailed information 316 Maintenance Care and Cleaning 317 ...

Page 12: ...page by pressing OK while the cursor is on the references Operation guide Note Design and specifications are subject to change without notice The images shown in this eHELP are for illustrative purposes only This eHELP covers all models however some features may not be available on certain models Refer to the paper manual and the actual menu in the TV etc to confirm your model s features 12 ...

Page 13: ...gital Living Network Alliance The terms HDMI and HDMI High Definition Multimedia Interface and the HDMI Logo are trademarks or registered trademarks of HDMI Licensing LLC in the United States and other countries x v Colour is a trademark HDAVI Control is a trademark of Panasonic Corporation Manufactured under license from Dolby Laboratories Dolby Dolby Audio and the double D symbol are trademarks ...

Page 14: ...dy to access their content If you decline an upgrade you will not be able to access content that requires the upgrade Firefox OS is a registered trademark of the Mozilla Foundation This product incorporates the following software 1 the software developed independently by or for Panasonic Corporation 2 the software owned by third party and licensed to Panasonic Corporation 3 Firefox OS is powered b...

Page 15: ... performing source code distribution a complete machine readable copy of the corresponding source code covered under GPL V2 0 LGPL V2 1 or the other licenses with the obligation to do so as well as the respective copyright notice thereof Contact Information cdrequest unipf jp The source code and the copyright notice are also available for free in our website below http www unipf jp dl EUIDTV17 15 ...

Page 16: ...Features 4K resolution You can watch content in 4K format that has twice the horizontal and vertical resolution of the 1080p signal Watching 4K resolution 4K compatible equipment 16 ...

Page 17: ...Home Screen Home Screen is a gateway to the TV programmes applications and connected devices It provides you an easy way to access all the features Home Screen Home Screen Information 17 ...

Page 18: ...Info Frame is a convenient feature to provide you relevant information of the programme being watched recommendations etc It is displayed on the edge of screen when you need it Functions Info Frame Information 18 ...

Page 19: ...TV and set timer event with the network equipment smartphone etc from outside the home network Due to network conditions or certain broadcaster restrictions this function may not be available Functions TV Anywhere How to use 19 ...

Page 20: ...Freeview Play EPG Using the Freeview Play EPG enables you to select a programme easily view programme information etc Watching TV Guide Freeview Play EPG UK 20 ...

Page 21: ...watch and display images of other devices smartphone etc on the TV screen using a mirroring function You can also start the mirroring function from the other devices without operating the TV Functions Mirroring How to use 21 ...

Page 22: ...by pressing HOME and it provides you an easy way to access all the features as shown below example Home Screen Live TV Gateway to TV programmes Home Screen Live TV Apps Gateway to various applications internet content etc Home Screen Apps Devices Gateway to connected devices HDMI equipment USB device network device etc Home Screen Devices 22 ...

Page 23: ...e software when a software update notice is displayed on the TV screen If the software is not updated you may not be able to use Home Screen You can update the software later manually Network Network settings Software Update 23 ...

Page 24: ...ous sources 1 Display Home Screen with HOME 2 Select on the top left of Home Screen and press OK to access 3 Follow the on screen instructions My Folder You can create a folder to store your favourite shortcut icons TV programme application device on Home Screen Up to 9 shortcuts can be registered in a folder To add a shortcut icon Home Screen Home Screen Pin to HOME 1 Display Home Screen with HOM...

Page 25: ...Screen with HOME 2 Select Live TV Apps Devices and press OK to access 3 Select a feature TV programme application device 4 Display the option menu with OPTION 5 Select Pin to HOME and press OK to set To remove a shortcut from Home Screen set Unpin from HOME Home Screen Home Screen Option menu 25 ...

Page 26: ...HOME Move Edit folder 3 Set the item and press OK to store Unpin from HOME Removes a shortcut from Home Screen Move Arranges the position of the icons Edit folder Edits the folder for the favourite shortcut icons TV programme application device and the folder name Select the folder name on the top right of the screen and press OK to edit the name 26 ...

Page 27: ...TV is a gateway to the TV programmes 1 Display Home Screen with HOME 2 Select Live TV Example 3 Press OK to access Example For details of watching TV Watching Basic To add a shortcut icon Home Screen Home Screen Pin to HOME 27 ...

Page 28: ... to store Pin to HOME Adds a shortcut for a frequently used feature on Home Screen Home Screen Home Screen Pin to HOME Accessibility Guidance settings for visually impaired users Watching For best audio Voice Guidance Settings AV Options Easy optional setting for viewing sound etc Watching Basic AV Options Menu items and selectable options vary depending on the TV mode 28 ...

Page 29: ...ps and press OK to access Example To exit Apps EXIT To add a shortcut icon Home Screen Home Screen Pin to HOME 3 Select an application and press OK to access 4 Follow the on screen instructions Note A broadband network environment is required to fully use this function Design and specifications are subject to change without notice 29 ...

Page 30: ...ssigned to MY APP To assign an application for the first time 1 Press MY APP to display My App 2 Select the application to assign and press OK to set is displayed on the assigned application To change the application to assign 1 Display Home Screen with HOME 2 Select Apps and press OK to access 3 Select My App and press OK to access 4 Select the application to assign and press OK to set 30 ...

Page 31: ... a frequently used feature on Home Screen Home Screen Home Screen Pin to HOME Move Arranges the position of the applications Lock Unlock Locks unlocks a specific application to restrict access if available Child Lock PIN number is required to access to locked application Functions Child Lock PIN number Uninstall Deletes an application from Apps if available Show Info Displays the information about...

Page 32: ...xit Devices EXIT To add a shortcut icon Home Screen Home Screen Pin to HOME 3 Select a device and press OK to access For external equipment Watching External equipment For USB device network device for Media Player Media Player Using Media Player For network equipment for DLNA Network DLNA For mirroring function Functions Mirroring Note Design and specifications are subject to change without notic...

Page 33: ...the item and press OK to store Pin to HOME Adds a shortcut for a frequently used feature on Home Screen Home Screen Home Screen Pin to HOME Accessibility Guidance settings for visually impaired users Watching For best audio Voice Guidance Settings Switch to Component Switch to Video You can select COMPONENT and VIDEO in AV Show Info Displays the information about the selected device 33 ...

Page 34: ...own are not supplied with this TV Depending on the model it may be necessary to remove the terminal cover cable cover before connecting or disconnecting cables Aerial Terrestrial terminal RF cable Terrestrial aerial For DVB Analogue DVD Recorder Blu ray Recorder etc Terrestrial terminal RF cable DVD Recorder Blu ray Recorder etc Terrestrial aerial HDMI terminal HDMI cable 34 ...

Page 35: ...ary of VIERA Link Please also read the manual of the equipment being connected Keep the TV away from electronic equipment video equipment etc or equipment with an infrared sensor otherwise distortion of image sound may occur or operation of other equipment may be affected Use a fully wired HDMI compliant cable Check the terminal type and cable plugs are correct for connection 35 ...

Page 36: ... displayed Watching Basic Freeview Play banner UK Watching Basic Information banner To select a channel using TV Guide 1 Display TV Guide with GUIDE 2 Select the current programme and press OK to access The current programme is displayed on the top left of the screen 3 Select Watch Now or View and press OK to watch For Ireland Watching TV Guide TV Guide For details of Freeview Play EPG Watching TV...

Page 37: ...splay the menu with MENU 2 Select Setup Other Settings Power on Channel List and press OK to access 3 Select All Channel List Last and press OK to set To watch pay TV For details of the encrypted channels Functions Common Interface Using Common Interface Consult the operator broadcaster or CI module manufacturer for more information and conditions of the services 37 ...

Page 38: ...time Event image when available Features available message meanings AD Audio Description service available This function can aid visually impaired viewers by providing an additional audio track to describe events on screen Watching For best audio Audio Description SD SD broadcasts available SD HD Same programme available as HD broadcast SL Sign language available S Subtitle service available 38 ...

Page 39: ... adjust banner timeout set Banner Display Timeout 1 Display the menu with MENU 2 Select Setup Display Settings Banner Display Timeout and press OK to access 3 Set the item and press OK to store To display the introduction banner for the internet service 1 Display the menu with MENU 2 Select Setup Display Settings Smart Banner and press OK to access 3 Select On Off and press OK to set 39 ...

Page 40: ...gue All DVB Channels All Analogue Channels Favourites Press blue to switch DVB To list favourite channels set Favourites Editor Watching Tuning and editing channels Favourites Editor Current time Features available message meanings Bad signal Poor quality TV signal DD DD HE AAC Dolby Audio Dolby Digital Plus Dolby Digital or HE AAC audio track AD Audio Description service available This function c...

Page 41: ... Timer remaining time Watching Basic Off Timer To confirm another tuned channel To watch the channel listed in the banner OK Information on the next programme DVB Extra information DVB Press again to hide the banner To hide the banner EXIT To adjust banner timeout set Banner Display Timeout 1 Display the menu with MENU 2 Select Setup Display Settings Banner Display Timeout and press OK to access 3...

Page 42: ...ettings Smart Banner and press OK to access 3 Select On Off and press OK to set AD STTL TEXT Multi Audio indications are displayed as available on particular programmes but may not be available for all individual programmes being broadcast Display the extra information to confirm availability of these functions 42 ...

Page 43: ...scription if the programme has Audio Description service then you will hear an additional audio track to describe events on screen if available For DVB To adjust the volume for Audio Description Watching For best audio Audio Description Multi Audio Selects between alternative language or Audio Description for sound tracks if available This setting is not memorised and it returns to the default set...

Page 44: ... in Analogue Teletext Character Set Sets the teletext language font Watching Teletext Teletext Character Set Ireland only Teletext Language Selects between alternative languages for teletext if available For DVB Ireland only NICAM Switches NICAM sound if available Watching For best audio Advanced settings For Analogue Volume Correction Adjusts the volume of each individual channel or input mode 44...

Page 45: ... and enjoyment with digital channel subtitles depending on the broadcaster Ireland only Preferred Subtitles 1 2 in Language are given priority Watching Basic Language Ireland only Analogue Display subtitles with STTL Hide subtitles with EXIT Note If you press STTL in Analogue the TV switches to teletext service and calls up a favourite page Press EXIT to return to TV mode This is the same as switc...

Page 46: ...l or input mode easily with LAST VIEW Press again to return to the current view Note Switching channel may not be available depending on the condition Watching less than 10 seconds is not reflected in the previously viewed channel or input mode 46 ...

Page 47: ... Timer Off Timer and press OK to access 3 Select the time in 15 minute increments and press OK to set 90 75 60 45 30 15 Off minutes To cancel set to Off or turn the TV off The remaining time is displayed on the bottom right of the screen The remaining time will flash on the screen when less than 3 minutes 47 ...

Page 48: ... the menu with MENU 2 Select Timer Auto Standby and press OK to access 3 Select On Off and press OK to set Auto Standby On Off Automatically turns the TV to Standby mode for energy saving when no operation is performed for 4 hours Automatic input switching with the connected equipment affects this function and time count resets A notification message will appear 3 minutes before going into Standby...

Page 49: ...tup Eco Navigation and press OK to access 3 Select Set to Eco and press OK to set Auto Standby and No signal Power off are active when Eco Navigation is set to Set to Eco Radio Mode Sets the timer for turning off the screen automatically when a radio channel is selected 1 Display the menu with MENU 2 Select Setup Display Settings Radio Mode and press OK to access 3 Select the time and press OK to ...

Page 50: ...usting time Adjusts the time data 1 Display the menu with MENU 2 Select Timer Time Zone and press OK to access 3 Set the item and press OK to store The time data are corrected based on GMT Ireland only 50 ...

Page 51: ...ter UK only Preferred Audio 1 2 Selects the first and second preferred language for digital channel multi audio depending on the broadcaster Ireland only Preferred Subtitles 1 2 Selects the first and second preferred language for digital channel subtitles depending on the broadcaster Ireland only To display subtitles Watching Basic Subtitle Preferred Subtitles Selects the preferred language for di...

Page 52: ...Preferred Teletext Selects the preferred language for digital channel teletext service depending on the broadcaster Ireland only 52 ...

Page 53: ...ect the 4K compatible equipment to HDMI terminal using a 4K compatible cable and you can watch content in 4K format Depending on the model it may be necessary to remove the terminal cover cable cover before connecting or disconnecting cables 4K compatible equipment HDMI terminal HDMI cable 4K compatible equipment Check the terminal type and cable plugs are correct for connection Use a fully wired ...

Page 54: ...mpatible equipment Select the mode depending on the equipment Mode1 For better compatibility Set to Mode1 when the image or sound in HDMI input is not played properly Mode2 For the 4K compatible equipment that has the function to output the image precisely with the expanded colour gamut The setting can be stored for each HDMI input For HDMI1 2 Valid format 4K Mode1 4 4 4 4 2 2 30p 25p 24p 4 2 0 60...

Page 55: ...CI 4K 4 096 2 160 60p 50p 30p 25p 24p Actual resolution is 3 840 2 160p Aspect is fixed to V Full Note Connect to HDMI1 or HDMI2 for the following formats 60p 50p 4 4 4 4 2 2 The above signals are reformatted for optimal viewing on your display For details of aspect Watching For best picture Aspect 55 ...

Page 56: ...ection External equipment and cables shown are not supplied with this TV Depending on the model it may be necessary to remove the terminal cover cable cover before connecting or disconnecting cables HDMI equipment HDMI terminal HDMI cable Recorder Player Set top box Camcorder Amplifier with speaker system Note Use a fully wired HDMI compliant cable For details of VIERA Link connections Functions V...

Page 57: ...nt USB devices USB port USB cable USB HDD etc Note It is recommended to connect the device to the TV s USB port directly You cannot use two or more of the same kind of USB devices simultaneously except USB Flash Memory or USB HDD Use USB 1 or USB 2 port for connecting the USB HDD Refer to the terminal indication of TV set 57 ...

Page 58: ...by Digital 5 1ch connect the equipment to the amplifier For information about the connections read the manuals of the equipment and amplifier To select the sound output to adjust volume set TV Speaker Setting Watching For best audio Volume settings Headphones Headphone jack M3 stereo mini plug Headphones To adjust volume set Headphone Volume Watching For best audio Volume settings To select the so...

Page 59: ...nt or external equipment Watching External equipment Operating with TV s remote control To return to TV mode TV Note If the external equipment has an aspect adjustment function set it to 16 9 For details read the manual of the equipment or ask your local dealer Input Labels Accessing the input labels list allows you to change the input name or skip the input if unconnected improving identification...

Page 60: ...uous use in Game Mode on the top right of the screen every 30 minutes 1 Display the menu with MENU 2 Select Setup Display Settings Playing Time Display and press OK to access 3 Select On Off and press OK to set This function is available when Game Mode is set to On 60 ...

Page 61: ... reverse VCR Skip to the previous track title or chapter DVD video content Rewind view the picture rapidly in reverse VCR Search backward DVD video content Fast forward view the picture rapidly forward VCR Skip to the next track title or chapter DVD video content Fast forward view the picture rapidly forward VCR Search forward DVD video content Pause Resume Press and hold to play at slow speed DVD...

Page 62: ...ith Numeric buttons Codes for each product and features 70 DVD Recorder DVD Player Blu ray Disc Player 71 Player theatre Blu ray Disc theatre 72 VCR 73 default Using in USB HDD recording Media Player DLNA features or VIERA Link 3 Press to change Note Confirm if the remote control works correctly after changing the code The codes may be reset to defaults if batteries are replaced Some operations ma...

Page 63: ... equipment External connection The HDMI logo is displayed on HDMI compliant equipment Applicable HDMI features Input audio signal 2ch LPCM Dolby Audio Dolby Digital Dolby Digital Plus Audio settings can be made on HDMI Audio Format in the Sound Menu Watching For best audio Advanced settings Input video signal Matches the output setting of the digital equipment Watching External equipment Valid inp...

Page 64: ...Note Audio settings can be made on HDMI Audio Format HDMI Input in the Sound Menu Watching For best audio Advanced settings If the connected equipment has an aspect adjustment function set the aspect ratio to 16 9 These HDMI connectors are type A These HDMI connectors are compatible with HDCP High Bandwidth Digital Content Protection copyright protection Equipment having no digital output terminal...

Page 65: ...ess OK to store HDMI HDR Setting On Off Set to On when the HDR device is connected to the TV Please turn Off this function if the image looks unnatural This may occur in some cases such as compatibility with the connected device or source images Image may disappear for a few seconds when the setting is changed For HDMI 65 ...

Page 66: ... 60i 50i 1 125 1 080 60p 50p 24p 3 840 2 160 60p 50p 30p 25p 24p 4 096 2 160 60p 50p 30p 25p 24p Applicable input signal Note Signals other than above may not be displayed properly The above signals are reformatted for optimal viewing on your display For details of valid 4K format Watching 4K resolution Valid 4K format 66 ...

Page 67: ...mance of contrast black and colour reproduction for watching movies in a darkened room True Cinema Reproduces the original image quality precisely without any revision Custom Adjusts each menu item manually to suit your favourite picture quality The following items can be adjusted and stored for each mode Backlight Contrast Brightness Colour Tint Sharpness Colour Temperature Vivid Colour Adaptive ...

Page 68: ...h MENU 2 Select Picture Ambient Sensor and press OK to access 3 Select On Off and press OK to set Ambient Sensor On Off Automatic Brightness Control function Adjusts picture settings automatically depending on ambient lighting condition 68 ...

Page 69: ...rphic 4 3 Displays the image at the standard 4 3 without distortion Zoom Displays a 16 9 letterbox or 4 3 image without distortion V Full Displays the image enlarged vertically to fit the screen without distortion For DCI 4K format Note Display the image TV external input etc full screen to use this function completely Aspect mode can be memorised separately for SD Standard definition and HD High ...

Page 70: ...switches to the appropriate ratio Watching For best picture Aspect Available conditions Terrestrial terminal WSS only Valid input signal format DVB PAL I Invalid input signal format PAL 525 60 6 0 MHz M NTSC 6 0 MHz AV VIDEO terminals Valid input signal format PAL PAL 525 60 M NTSC NTSC Control signal through HDMI terminal only AV COMPONENT terminals WSS only Valid input signal format 625 576 50i ...

Page 71: ...3 840 2 160 60p 50p 30p 25p 24p 4 096 2 160 60p 50p 30p 25p 24p HDMI terminal does not receive WSS signal Note If the screen size looks unusual when a widescreen recorded programme is played back on a VCR adjust the tracking of the VCR Read the manual of the VCR For details of valid 4K format Watching 4K resolution Valid 4K format 71 ...

Page 72: ...ence Sharpness is not available when 1080p Pixel by 4pixels is set to On Colour Temperature Sets the overall colour tone of the picture bluer redder Vivid Colour On Off Automatically adjusts colours to vivid ones Adaptive Backlight Control Automatically controls the level of backlight according to the images Resolution Remaster Auto Max Mid Min Off Enhances picture resolution to make the image sha...

Page 73: ...the content images may be noisy To prevent the noise change the setting Not valid in the following conditions Game Mode is set to On 1080p Pixel by 4pixels is set to On 1080p Pure Direct is set to On 4K Pure Direct is set to On Photo content Clear Motion On Off Makes the moving pictures clearer by controlling the level of backlight Not valid for photo content 73 ...

Page 74: ...noise Not valid in the following conditions Game Mode is set to On 1080p Pixel by 4pixels is set to On 1080p Pure Direct is set to On 4K Pure Direct is set to On MPEG Remaster Auto Max Mid Min Off Reduces flicker noise in contoured parts of a picture and block noise Not valid in the following conditions Game Mode is set to On 1080p Pixel by 4pixels is set to On 1080p Pure Direct is set to On 4K Pu...

Page 75: ...U 2 Select Picture Advanced Settings and press OK to access 3 Select one of the following items and press OK to access Contrast Control HDR Brightness Enhancer Colour Gamut White Balance Colour Management Gamma Reset to Defaults 4 Set the item and press OK to store Contrast Control Contrast Control Custom Auto Off Automatically adjusts the detailed contrast settings Select Custom to set Contrast C...

Page 76: ...e colour gamut Native Displays deep colours by expanding the colour gamut to its maximum Not valid for photo content White Balance R Gain G Gain B Gain Adjusts the white balance of bright red green blue areas R Cutoff G Cutoff B Cutoff Adjusts the white balance of dark red green blue areas More Detailed Adjustment Adjusts more detailed items for White Balance Input Signal Level Adjusts the input s...

Page 77: ...as B Hue B Saturation B Luminance Adjusts the picture hue saturation luminance of blue areas More Detailed Adjustment Adjusts more detailed items for Colour Management C Hue M Hue Y Hue Adjusts the picture hue of cyan magenta yellow areas C Saturation M Saturation Y Saturation Adjusts the saturation of cyan magenta yellow areas Reset to Defaults Resets items for More Detailed Adjustment Reset to D...

Page 78: ...more detailed items for Gamma Input Signal Level Adjusts the input signal level Gain Adjusts the gain of gamma for selected signal level Reset to Defaults Resets items for More Detailed Adjustment Reset to Defaults Resets Gamma to the default settings Reset to Defaults Reset to Defaults Resets Advanced Settings to the default settings 78 ...

Page 79: ...ng conditions TV mode 1080p Pixel by 4pixels is set to On 1080p Pure Direct is set to On 4K Pure Direct is set to On To display a continuous record of time spent using Game Mode set Playing Time Display Film Cadence Mode Auto On Off Improves vertical resolution for movie images This function is available for interlaced signals except in Network services or when Game Mode is set to On 1080p Pure Di...

Page 80: ...ability of each content type for Auto mode select Auto Detail Setting For HDMI HDMI EOTF Type Auto Traditional gamma HLG PQ Selects the EOTF type for each HDMI input Set to Auto for general use For HDMI EOTF Type Auto Traditional gamma HLG PQ Selects the EOTF type of broadcast or video content It works correctly only when the signal corresponds the each EOTF type Set to Auto for general use Automa...

Page 81: ...ving pictures more vivid Occasionally while viewing still or slow moving pictures colour patterning may be seen Set to On to display sharper and more accurate colours For PAL NTSC signal reception in TV mode or from composite connection 81 ...

Page 82: ...ge to hide the edge of the image Off Displays the image in the original size Set to On if noise occurs on the edge of the screen This function can be memorised for SD Standard definition and HD High definition signals respectively Not valid in the following conditions 4K content Photo content Game Mode is set to On 1080p Pixel by 4pixels is set to On 1080p Pure Direct is set to On 4K Pure Direct i...

Page 83: ...rns the screen off when you select Off This function is effective in reducing power consumption when listening to the sound without watching the TV screen Press any buttons except Standby On Off switch to turn the screen on 83 ...

Page 84: ... with MENU 2 Select Picture Copy Adjustment Destination Viewing Mode Destination Input and press OK to access 3 Select the destination to copy to and press OK to set 4 Select Copy Start and press OK to copy 5 When a confirmation screen is displayed select Yes and press OK to set Note Option Settings and Screen Settings are not copied 84 ...

Page 85: ...uality for watching music videos etc Ambience Improves spatial effects and provides clear sounds User Adjusts the sounds manually using the equaliser to suit your favourite sound quality The following items can be adjusted and stored for each mode Bass Treble Surround Bass Boost For the User mode Equaliser is available in the Sound Menu instead of Bass and Treble Select Equaliser and adjust the fr...

Page 86: ...ilable when Mode is set to User Select the frequency and adjust the frequency level To enhance the bass sound raise the level of the lower frequency To enhance the treble sound raise the level of the higher frequency To reset the levels of each frequency to the default settings select Reset to Defaults and press OK This function is effective only for the sound from TV speakers Balance Adjusts volu...

Page 87: ...Bass Boost On Off Enhances the effect of bass sounds This function is effective only for the sound from TV speakers 87 ...

Page 88: ...r TV TV speakers are active Home Cinema The sound is delivered from theatre speakers Player theatre Blu ray Disc theatre or Amplifier will be automatically turned on if it is in Standby mode The sound of TV speakers is mute When the equipment is turned off TV speakers will be activated You can use Volume Up Down and MUTE This function is available when the theatre speakers supporting VIERA Link fu...

Page 89: ...n channels and inputs Volume Correction Adjusts the volume of each individual channel or input mode Clear Sound Adjustment On Off If the sound from TV speakers is unclear due to installation environment On is recommended This function is effective only for the sound from TV speakers 89 ...

Page 90: ...f Set to On to enable voice guidance of the basic features on screen messages etc for visually impaired users Speed Fast Normal Slow Selects the readout speed for the voice guidance Volume Max Mid Min Selects the volume for the voice guidance User Level Beginner Expert Selects the level of verbosity for the voice guidance Web Browser On Off Set to On to enable voice guidance of the network content...

Page 91: ...cription Standard Narration settings for visually impaired users Set to Audio Description to activate the narration sound track when available on the broadcast The availability of audio description sound track is indicated by AD in the information banner Volume Adjusts the volume for Audio Description Speakers Mix Standard Set to Mix to activate the description sound track from TV speakers Headpho...

Page 92: ...Companded Audio Multiplex Reproduces NICAM stereo sound Set to Off if reception is poor FM monaural sound For Analogue Audio Preference Multichannel Stereo MPEG Selects the initial setting for audio tracks Multichannel The priority is given to multi channel audio track Stereo The priority is given to stereo 2ch audio track MPEG The priority is given to MPEG MPEG is an audio compression method that...

Page 93: ...nt Media Player Playback Audio output settings Network Videos Audio output settings HDMI Audio Format Auto Bitstream PCM Selects the audio format for the HDMI input signal Auto When the TV speakers are active audio format is fixed to PCM When the sound is delivered from theatre speakers audio format is fixed to Bitstream Bitstream Dolby Audio Dolby Digital Dolby Digital Plus is output as Dolby Aud...

Page 94: ...e sound does not synchronise the image For digital Ireland only HDMI Input Digital Analogue Selects to fit the input signal Watching External equipment HDMI features Digital When sound is carried via the HDMI cable connection Analogue When sound is not carried via the HDMI DVI adaptor cable connection For HDMI 94 ...

Page 95: ... settings are completed Network Network connections Network Network settings 1 Select DVB with TV 2 Display TV Guide with GUIDE Example TV screen Date and time Programme Channel position and name To watch the programme 1 Select a programme and press OK to access 2 Select Watch now and press OK to watch To use Timer Programming select Record Watching TV Guide Timer Programming If a programme exists...

Page 96: ...de To exit TV Guide EXIT Note Be sure to update the software when a software update notice is displayed on the TV screen If the software is not updated you may not be able to use the Freeview Play EPG You can update the software later manually Network Network settings Software Update When this TV is turned on for the first time or the TV is switched off for more than a week it may take some time b...

Page 97: ...2 Display TV Guide with GUIDE To change the layout of TV Guide set TV Guide View 1 Display the menu with MENU 2 Select Setup TV Guide Settings TV Guide View and press OK to access 3 Select Normal Full Info and press OK to set Normal Default TV Guide screen Full Displays channels and programmes full screen without the operation guide Info Displays details of the selected programme at the bottom wit...

Page 98: ...earch and press OK to access 3 Enter characters with Cursor buttons or Numeric buttons and press OK to set 4 Press green to start searching All the programme titles including the word you set are listed Searching without any characters lists all programmes including current programmes To view a channel list of the selected category 1 Display the category list with blue 2 Select the category and pr...

Page 99: ... Note When this TV is turned on for the first time or the TV is switched off for more than a week it may take some time before TV Guide is completely shown 99 ...

Page 100: ...ramme appears Select Timer Programming and press OK to set USB HDD Rec to record from the time you finish the timer event setting Ireland only is displayed on the TV Guide screen if Timer Programming is set from TV Guide UK only Note Not valid in Analogue Timer Programming only works reliably if correct time information is received via the signal from the broadcaster or service provider No other c...

Page 101: ...the timer event will follow the change UK only is displayed on the timer event if the timer is set from the TV Guide Guide link programming Not valid in Analogue Note If you edit the start time or end time of a Guide link programming event by more than 10 minutes it will no longer follow the broadcaster s changes to the start or end time The start and end times will become fixed 101 ...

Page 102: ... control but because the commands available must apply to all manufacturers of digital equipment some on screen commands may not correspond exactly to the remote control buttons To exit a digital text service TEXT Note As soon as you switch to a digital channel with links to a digital text service software is downloaded in the background over air to enable the teletext function This means that whe...

Page 103: ...ast 1 Press MENU twice to display Contrast 2 Adjust and press OK to set To exit teletext EXIT Reveal hidden data 1 Press MENU 2 Reveal with red Press again to hide To view a favourite page stored Press STTL to view a favourite page Call up the page stored on blue List mode Factory setting is P888 subtitle service on blue List mode FULL TOP BOTTOM 1 Press MENU 2 Press green to change the layout Wat...

Page 104: ...oloured buttons to change 2 Enter a new page number with Numeric buttons 3 Press and hold OK View sub page The number of sub pages is displayed on the top of the screen Press to view sub page Only when teletext has more than one page The number of sub pages varies depending on the broadcaster up to 79 pages Searching may take time while you are watching TV To view a specific sub page 1 Press MENU ...

Page 105: ...OK to access 3 Select FASTEXT List and press OK to set FASTEXT mode In FASTEXT mode four differently coloured subjects are situated on the bottom of the screen To access more information about one of these subjects press the appropriate coloured button This facility enables fast access to information on the subjects shown List mode In List mode four differently coloured page numbers are situated o...

Page 106: ...splay Settings Teletext Character Set and press OK to access 3 Select the font and press OK to set West English French German Greek Italian Spanish Swedish Turkish etc East1 Czech English Estonian Lettish Rumanian Russian Ukrainian etc East2 Czech Hungarian Lettish Polish Rumanian etc Ireland only 106 ...

Page 107: ... Tuning Menu and press OK to access DVB Tuning Menu Analogue Tuning Menu The menu name varies depending on the TV mode 4 Select one of the functions and press OK to access Channel List Editor Favourites Editor Auto Setup Channel Sorting by Region Manual Tuning Update Channel List New Channel Message Signal Condition Add TV Signal The function items vary depending on the TV mode and country you sel...

Page 108: ...B Analogue Channels To swap the channel position number logical channel number 1 Press green to edit 2 Enter the new position number with Numeric buttons and press green to store To retune each channel Manual Tuning red Only for the revealed channels To rename the channel name Analogue 1 Press blue to edit 2 Enter characters maximum 5 characters with Cursor buttons or Numeric buttons and press OK ...

Page 109: ...elect a channel to list from all DVB channels appears when the channel is encrypted To display other favourites green 3 Press OK to add it to favourites list To add all channels to the list if available 1 Press yellow 2 Press green to add all 4 Press BACK RETURN and OK to store Edit DVB favourites list You can edit the favourites list while the cursor is on the channel in the favourites list To mo...

Page 110: ...characters maximum 10 characters with Cursor buttons or Numeric buttons and press OK to set 3 Press BACK RETURN to store Note Channel position numbers known as logical channel numbers can be swapped in Channel List Watching Tuning and editing channels Channel List Editor The hidden channels cannot be displayed in the favourite list Live TV 110 ...

Page 111: ...DVB Analogue 1 Select Auto Setup and press OK to access 2 A confirmation screen is displayed and press OK to start Auto Setup Settings are made automatically When the operation is completed the channel at the lowest position will be displayed Auto Setup using the buttons on the TV 1 Press and hold INPUT OK HOLD for MENU button for 3 seconds to display the menu 2 Set Auto Setup with following contr...

Page 112: ...1 Select the region and press OK to access 2 Select repeatedly until you reach the available region Normally you should select Best signal quality All Regions If you choose to select your preferred region you could find channels with a weaker signal appear nearer the top of your channel list If you have any image or sound problems select Best signal quality All Regions instead 112 ...

Page 113: ...nd only 1 Select a channel and adjust frequency for each channel Set where the level of Signal Quality becomes the maximum 2 Press OK to search Analogue Set Analogue channel manually after Auto Setup 1 Select the channel position with Numeric buttons 2 Select the channel with Channel Up Down 3 Set Manual Tuning 4 Select Store and press OK to set Use Fine Tuning to make small adjustments to the tun...

Page 114: ...w channels delete removed channels or change channel names and positions automatically The channel list is updated while keeping your settings in Channel List Editor Favourites Editor Child Lock etc Depending on the signal condition the update may not work properly 114 ...

Page 115: ...and checks the signal condition with indicators A good Signal Strength is not an indication of suitable signal reception Vertical lines show the maximum signal value of the selected channel To change the channel Not valid in Analogue 115 ...

Page 116: ...ve a notification message when a new DVB channel is found or not When a notification message appears you can perform Update Channel List pressing OK Add TV Signal Adds the TV mode Allows you to add any TV mode which was skipped during initial Auto Setup 116 ...

Page 117: ...t Be sure to connect the USB HDD to the mains socket To remove the USB HDD safely from the TV perform Safely remove USB in USB Device Setup Recording USB HDD setup Setting for USB HDD Check the terminal type and cable plugs are correct for connection USB port USB cable USB HDD Mains socket Caution All data in the USB HDD will be erased in the following cases When formatting the USB HDD with this T...

Page 118: ...ns plug or remove the USB HDD during operation formatting recording etc Doing so may cause malfunction of the device or damage the recorded data An electric outage may also be a cause of malfunction Note Analogue TV programme cannot be recorded on the USB HDD The data broadcasting MHEG etc radio broadcasting are not recorded and also the recording function does not work during the period without a...

Page 119: ...D may not be displayed To display information of the highlighted device 4 When the caution and confirmation screen for using USB HDD is displayed select Yes and press OK to proceed 5 When a confirmation screen of USB HDD name is displayed select Yes and press OK to set The name for the USB HDD is created automatically If you want to edit the name select Yes 1 Enter characters with Cursor buttons o...

Page 120: ...ble for recording The USB HDD is available for playing back To change the mode OK To edit USB HDD name green To format red To remove the USB HDD safely from the TV yellow Note You can only select one USB HDD for recording at a time You cannot change the settings for the USB HDD while recording is in progress 120 ...

Page 121: ...tart One Touch Recording Press to start Other channels cannot be selected while recording is in progress To stop recording in progress Press to stop To play back or delete the recorded content Recorded TV programmes can be played back in Media Player 1 Display Home Screen with HOME 2 Select Devices and press OK to access 3 Select USB HDD for recording and press OK to access Media Player Recorded T...

Page 122: ... 3 Select Auto to start Rewind LIVE TV When you select Auto recording will start automatically This recording may not start if another recording is in progress TV signal condition is bad or there are no images displayed To operate Rewind LIVE TV To pause To search backward up to 90 minutes After pausing or searching backward the following buttons are available for operation Search backward Search ...

Page 123: ...is deleted automatically in the following conditions Even if Rewind LIVE TV stops for the following conditions as long as the setting is Auto a new recording starts automatically in a condition that makes the recording available Other channels selected Locked channel selected Invalid channel selected No TV signal External input selected When the full screen application TV Guide Media Player eHELP ...

Page 124: ...DD Not valid in Analogue 1 Select DVB with TV 2 Display the menu with MENU 3 Select Timer Timer Programming and press OK to access 4 Press OK to start making the settings USB HDD Rec Records the programme to the USB HDD 5 Select and set the item channel date start time end time and can also be entered with Numeric buttons 124 ...

Page 125: ...day Daily Mon Fri Monday to Friday Weekly Sun Mon Tue Wed Thu Fri Sat Same time on the same day every week Start time End time Duration automatic display 6 Store with OK Guide link programming Guide link programming Programmes according to the TV Guide signal Watching TV Guide Guide link programming UK only Guide link programming is Timer Programming which is controlled by information from the TV ...

Page 126: ...ary Recording Timer Programming Setting Timer Programming To delete a timer event 1 Press red 2 Press OK to delete To play back or delete the recorded content Recorded TV programmes can be played back in Media Player 1 Display Home Screen with HOME 2 Select Devices and press OK to access 3 Select USB HDD for recording and press OK to access Media Player Recorded TV mode 126 ...

Page 127: ...et TV Anywhere to On to use this function Functions TV Anywhere To use TV Anywhere function you need to install the application for controlling VIERA on your smartphone Support FAQs Detailed information For the operations refer to the support information of the application Note This function is not available when the TV is turned off with Mains Power On Off switch Due to network conditions or cert...

Page 128: ...s can be selected while recording of Timer Programming is in progress Recording an encrypted copy protected programme may not be possible When the start time comes the channel will be switched automatically and the video and audio signals will be output 2 minutes before the start time a reminder message appears if you are watching TV To remove the message and start the programming press OK To canc...

Page 129: ... setup Setting for USB HDD Regarding performance not all USB HDDs are guaranteed Note Data modified with a PC may not be displayed Do not remove the device while the TV is accessing data Otherwise this can damage the device or TV Do not touch the pins on the device Do not subject the device to a high pressure or impact Insert the device in the correct direction Otherwise this can damage the device...

Page 130: ...h this TV are played back During the operation audio signal is output from DIGITAL AUDIO and HDMI2 ARC function terminals But no video signals are output To use HDMI2 with ARC function connect an amplifier that has ARC function and set to use theatre speakers Functions VIERA Link HDAVI Control Pictures may not appear correctly on this TV depending on the recording equipment used Displaying may tak...

Page 131: ...the USB Flash Memory safely from the TV perform Safely remove USB in USB Device Setup 1 Display the menu with MENU 2 Select Setup USB Device Setup and press OK to access 3 Select the device and press yellow to set Note To connect the USB HDD Recording USB HDD setup Check the terminal type and devices are correct for connection For details of the devices Media Player Connected device For details of...

Page 132: ...Select the device USB Flash Memory USB HDD network device and press OK to access When a confirmation screen about the network device is displayed enter User Password to access 5 Select Easy List View Mix Folder View Recorded TV and press OK to access Easy List View Media Player Easy List View Mix Folder View Media Player Mix Folder View Recorded TV Media Player Recorded TV mode 6 The thumbnail vie...

Page 133: ... You can use the following buttons during playback Confirm the remote control code is 73 Watching External equipment Operating with TV s remote control 133 ...

Page 134: ...ce List and press OK to access 3 Select the network device and press OK to access 4 Enter User Password with Cursor buttons or Numeric buttons and press OK to set Press BACK RETURN to store To register the new network device set Server Name Shared Folder For details read the manual of the equipment 5 Select Register and press OK to set To delete the registered device select Delete and press OK to ...

Page 135: ...f with Mains Power On Off switch You can share the files in Standby mode when DLNA Server is set to On Note Regarding performance not all PCs are guaranteed Do not turn the TV off pull out the mains plug or remove the device during operation reading copying etc Doing so may cause malfunction of the device or damage the recorded data All data in the USB HDD will be erased when you format the USB HD...

Page 136: ...eview To turn off the preview set Video Preview to Off 1 Display the option menu with OPTION 2 Select and press OK to access 3 Select Video Setup Video Preview and press OK to access 4 Select On Off and press OK to set Images may not be displayed for an instant in the thumbnail view Set the preview Off to solve this This function is available in the thumbnail view For details of supported file for...

Page 137: ...Repeat Folder File Repeat Off Playback repeat Folder Playback repeat within the selected folder File Repeat Playback repeat of the selected one file Shuffle On Off Files are played back at random 137 ...

Page 138: ...ontent type Photo Video 1 Display the option menu with OPTION 2 Select Filter and press OK to access 3 Select Photo Video and press OK to set 4 Select OK and press OK to change To select the music file Media Player Mix Folder View Filtering files 138 ...

Page 139: ... off the preview set Video Preview to Off 1 Display the option menu with OPTION 2 Select and press OK to access 3 Select Video Setup Video Preview and press OK to access 4 Select On Off and press OK to set Images may not be displayed for an instant in the thumbnail view Set the preview Off to solve this This function is available in the thumbnail view For details of supported file formats Media Pl...

Page 140: ... OK to access Play Select Repeat Shuffle 4 Set the item and press OK to store Play Select Settings for playback file selection Repeat Folder File Repeat Off Playback repeat Folder Playback repeat within the selected folder File Repeat Playback repeat of the selected one file Shuffle On Off Files are played back at random 140 ...

Page 141: ...can filter the files as the content type Photo Video Music 1 Display the option menu with OPTION 2 Select Filter and press OK to access 3 Select Photo Video Music and press OK to set 4 Select OK and press OK to change 141 ...

Page 142: ...files You can sort the files in alphabetical date order 1 Display the option menu with OPTION 2 Select Sort and press OK to access 3 Select Alphabet A Z Alphabet Z A Date 1 9 Date 9 1 and press OK to change 142 ...

Page 143: ...yback Playback Photo playback To the previous photo To the next photo Stop OK Switch the playback mode Single view Slideshow blue Rotate Display hide the operation guide BACK RETURN Return to thumbnail 143 ...

Page 144: ...ar is displayed Press Search approx 10 seconds Press and hold Search rapidly 3 Jump to the specified time point with OK red To the previous title scene track green To the next title scene track Display hide the operation guide BACK RETURN Return to thumbnail Note To set Repeat Shuffle for playback Media Player Easy List View Selecting file Media Player Mix Folder View Selecting file 144 ...

Page 145: ...creen e g portrait style picture Interval Long Normal Short Selects slideshow interval Back Ground Music Off Type1 Type2 Type3 Type4 Type5 User Auto Selects the background music during Photo mode Type1 5 Music files installed on this TV at the factory settings are played back Auto Music files stored in the current device are played back If there is no available music data no sound is played back U...

Page 146: ...he desired music file 2 Select File Folder and press OK to set File The selected music file is registered Folder All the music files in the folder which contains the selected music file are registered Note Picture quality may be degraded depending on the slideshow setting Picture setting may not work depending on the slideshow setting 146 ...

Page 147: ... sound tracks if available It may take several seconds to change the sound This function is available during playback Subtitle Settings Sets the subtitle setting This function is available during playback Subtitle Display hide subtitles if available Subtitle Text Selects the font type to display subtitles correctly if available Subtitle Text Size Selects the font size of subtitles Subtitle Text Co...

Page 148: ...o access 3 Select Auto PCM and press OK to set SPDIF Selection Auto PCM Selects the initial setting for digital audio output signal from DIGITAL AUDIO and HDMI2 ARC function terminals SPDIF is a standard audio transfer file format Auto Dolby Audio Dolby Digital Dolby Digital Plus and HE AAC multi channel are output as Dolby Digital Bitstream MPEG is output as PCM PCM Digital output signal is fixed...

Page 149: ...layed Content not played back yet Once you play back the content this icon will disappear Protected content cannot be deleted Currently recording You can play back this recording content Group of content 2 Select the content and press OK to start playback If you have stopped the last playback halfway a confirmation screen may be displayed to select whether to start from where you stopped last time...

Page 150: ...ress Search approx 10 seconds Press and hold Search rapidly 3 Jump to the specified time point with OK To display hide the operation guide and information banner To repeat between the starting point A and finishing point B blue Set A and B in order The points are reset by pressing again or by other operations To the previous next chapter red green A recorded content is automatically divided into c...

Page 151: ... To confirm or change the current status if available Watching Basic AV Options To return to list BACK RETURN 151 ...

Page 152: ... to release and then select Release Group To release several groups at once tick all the desired groups Exclude from Group Select the group and press OK to display the grouped content To exclude specific content from the group tick it and then select Exclude from Group To exclude some of the content at once tick all the desired content Change Protect Status Select the content to protect from delet...

Page 153: ...Deleting content 1 Select the content to edit and press blue to tick in the content list 2 Delete the content with red 3 When a confirmation screen is displayed select Yes and press OK to set 153 ...

Page 154: ...ect 1 Display the chapter list with yellow 2 Select the chapter and press OK to start playback Note The chapter list is not displayed while the selected content is being recorded Depending on the recorded programmes some playback operations may not work properly 154 ...

Page 155: ...o access 3 Select Auto PCM and press OK to set SPDIF Selection Auto PCM Selects the initial setting for digital audio output signal from DIGITAL AUDIO and HDMI2 ARC function terminals SPDIF is a standard audio transfer file format Auto Dolby Audio Dolby Digital Dolby Digital Plus and HE AAC multi channel are output as Dolby Digital Bitstream MPEG is output as PCM PCM Digital output signal is fixed...

Page 156: ...t subject the device to a high pressure or impact Insert the device in the correct direction Otherwise this can damage the device or TV Electrical interference static electricity or erroneous operation may damage the data or device Back up the recorded data at regular intervals to prevent data deterioration data damage or erratic operation of the TV Panasonic is not liable for any deterioration or...

Page 157: ...Flash Memory format FAT16 FAT32 or exFAT USB HDDs formatted on a PC are not guaranteed to work in Media Player USB HDD The capacity of USB HDD that works with this TV is from 160 GB to 6 TB Connect the USB HDD to the mains socket to record and play back properly with this TV Use the USB HDD formatted with this TV Recording USB HDD setup Setting for USB HDD Regarding performance not all USB HDDs ar...

Page 158: ...andards Progressive JPEG is not supported Note Some files may not be played back even if they fulfil these conditions Some files may not be played back correctly depending on the resolution etc Do not use multi byte characters or other special codes for file names Connected devices may become unusable with this TV if the file or folder names are changed 158 ...

Page 159: ...y Audio Dolby Digital Dolby Digital Plus HE AAC MP3 This TV supports this container recorded with Panasonic products For details read the manual of the products MKV mkv Video codec H 264 H 265 HEVC MPEG1 MPEG2 MPEG4 Audio codec AAC Dolby Audio Dolby Digital Dolby Digital Plus HE AAC MP3 Vorbis ASF asf wmv Video codec MPEG4 VC 1 WMV9 Audio codec AAC Dolby Audio Dolby Digital Dolby Digital Plus HE A...

Page 160: ... mpeg vob vro Video codec H 264 MPEG1 MPEG2 VC 1 Audio codec AAC Dolby Audio Dolby Digital Dolby Digital Plus HE AAC LPCM MP3 TS mts m2ts tp trp ts tts Video codec H 264 H 265 HEVC MPEG1 MPEG2 VC 1 Audio codec AAC Dolby Audio Dolby Digital Dolby Digital Plus HE AAC MP3 WebM webm Video codec VP9 Audio codec Vorbis 160 ...

Page 161: ...lowing order of priority srt sub txt Note Some files may not be played back even if they fulfil these conditions Some files may not be played back correctly depending on the resolution frame rate condition etc Some subtitles or chapter functions may not be available Do not use multi byte characters or other special codes for file names Connected devices may become unusable with this TV if the file...

Page 162: ...C flac WMA WMA Pro wma Copy protected files cannot be played back LPCM wav Note Some files may not be played back even if they fulfil these conditions Do not use multi byte characters or other special codes for file names Connected devices may become unusable with this TV if the file or folder names are changed 162 ...

Page 163: ... Panasonic and enjoy internet content such as videos games communication tools etc from Apps Example A broadband network environment is required to use this function Ensure the network connections and network settings are completed Network Network connections Network Network settings 163 ...

Page 164: ...s Depending on the usage conditions it may take a while to read all the data 2 Select the desired item and press OK to access Example To exit Apps EXIT You can connect a keyboard for character input in the applications You can also use the keyboard for TV operation Functions Keyboard 164 ...

Page 165: ... may not be able to use Apps You can update the software later manually Network Network settings Software Update The services through Apps are operated by their respective service providers and such service may be discontinued either temporarily or permanently without notice Therefore Panasonic will make no warranty for the content or the continuity of the services Content may not be available dep...

Page 166: ...can enjoy the content on this TV Example For details of watching and operating content on this TV Network DLNA Using DLNA For details of supported file formats Network Supported format Playback of sharing content on this TV with the DMC Digital Media Controller network equipment You can enjoy content stored in the media server by controlling with the DMC network equipment connected to your home ne...

Page 167: ...ons refer to the support information of the application To use this function with another DLNA Certified VIERA set Network Link Settings of this TV Network Network settings Network Link Settings Sharing the current programme may not be available when selecting radio channels encrypted copy protected programmes or when the broadcast prohibits the output of video and audio Display the TV full screen...

Page 168: ...hide information of the highlighted media server 1 Display the option menu with OPTION 2 Select Show Info and press OK to access 4 Select the file and press OK to access Example Depending on the condition of media server you may need to select the folder before selecting the file To display hide information of the highlighted file Note Non playable files are also listed but cannot be selected You ...

Page 169: ...e consult your retailer for assistance Dial up internet connections cannot be used Required speed effective at least 1 5 Mbps for SD Standard Definition and 6 Mbps for HD High Definition picture quality respectively If the transfer speed is not enough content may not be played back properly Wireless connection Built in wireless LAN Rear of the TV Access point Internet environment Wired connection ...

Page 170: ...to use internet services Network Network connections Internet connection Depending on the model it may be necessary to remove the terminal cover cable cover before connecting or disconnecting the LAN cable Wireless connection For DLNA and internet service Built in wireless LAN Rear of the TV Access point Hub Router Internet environment Smartphone etc DLNA Certified media server PC etc 170 ...

Page 171: ... Use Shielded Twist Pair STP LAN cable Hub Router Internet environment DLNA Certified media server PC etc Wireless connection For DLNA TV To use the TV as a wireless access point Network Network settings Custom Wireless Access Point DLNA Certified media server PC etc Smartphone etc 171 ...

Page 172: ... compatible only with 100BASE TX category 5 or later LAN cables are required Contact your Internet Service Provider ISP or telecommunications company for further assistance regarding the network equipment Confirm the terms and conditions of the contracts with your Internet Service Provider ISP or telecommunications company Depending on the contracts additional fees may be charged or multiple conne...

Page 173: ...are displayed automatically Encrypted access point For WPS Push button 1 Select Easy setup with Push button and press OK to access 2 Press the WPS button on the access point until the light flashes 3 Connect the TV with the access point with OK WPS Wi Fi Protected Setup If the connection fails check the settings and positions of your access point And then follow the on screen instructions It is re...

Page 174: ...p and press OK to access 4 Automatically setup is done and Network Status is displayed Network Network settings Network Status 5 Select Exit and press OK to set To set manually Network Network settings Custom Wired Note To deactivate wireless set Easy Mirroring to Off and confirm the network connection type is set to Wired 174 ...

Page 175: ... Push button 1 Press red 2 Press the WPS button on the access point until the light flashes 3 Connect the TV with the access point with OK WPS Wi Fi Protected Setup If the connection fails check the settings and positions of your access point And then follow the on screen instructions For WPS PIN 1 Press green 2 Enter the PIN code to the access point 3 Connect the TV with the access point with OK ...

Page 176: ... It is not required for normal household use Some internet services may not be available depending on the proxy setting Proxy This is the address of the relay server which is connected between the browser and the target server to send data to the browser 1 Select Proxy and press OK to access 2 Enter the address with Cursor buttons or Numeric buttons and press OK to set 3 Press BACK RETURN to store...

Page 177: ...6 Select Network Status and press OK to access Network Network settings Network Status 7 Select Exit and press OK to set 177 ...

Page 178: ... Gateway DNS Address Proxy Settings It is not required for normal household use Some internet services may not be available depending on the proxy setting Proxy This is the address of the relay server which is connected between the browser and the target server to send data to the browser 1 Select Proxy and press OK to access 2 Enter the address with Cursor buttons or Numeric buttons and press OK ...

Page 179: ... Status and press OK to access Network Network settings Network Status 5 Select Exit and press OK to set Note To deactivate wireless set Easy Mirroring to Off and confirm the network connection type is set to Wired 179 ...

Page 180: ...ead the manual of the equipment WPS PIN Enter the PIN code of the equipment If the connection fails check the settings and positions of the equipment And then follow the on screen instructions Change settings You can set up Network Name SSID Encryption key Wireless type and Channel setting method manually Follow the on screen instructions and set manually Set Reset settings to reset the items for ...

Page 181: ...rk Status and press OK to access 3 Automatically testing is done and Network Status is displayed Try Again Performs automatic testing of the network connection for the TV and displays the current status again Status Details Displays the detailed network status SSID security settings etc For information about the network connection select Help 181 ...

Page 182: ...my Home Cloud Settings Displays the terms of service 1 Display the menu with MENU 2 Select Network my Home Cloud Settings Notices and press OK to access 3 Follow the on screen instructions 182 ...

Page 183: ...ENU 2 Select Network VIERA Name and press OK to access 3 Enter characters and press OK to set This name is used as the name of this TV on the screen of the other network equipment When you use two or more TVs in your network environment set the names of the TVs for each 183 ...

Page 184: ...ent smartphone etc Powered On by Apps On Off Enables turning the TV on from the network equipment smartphone etc Depending on the network condition you may have to turn the TV on with Standby On Off switch of the TV s remote control Changing the default configuration may result in higher energy consumption of the product LED turns to orange in Standby mode when Powered On by Apps is set to On Netw...

Page 185: ...ad contents Selects device to upload content from the network equipment smartphone etc Note This function is not available when the TV is turned off with Mains Power On Off switch You need to install the application for controlling VIERA on your smartphone Support FAQs Detailed information For the operations refer to the support information of the application Depending on the network condition thi...

Page 186: ...read the manual of another VIERA To use this function with your smartphone you need to install the application for controlling VIERA on your smartphone Support FAQs Detailed information For the operations refer to the support information of the application Changing the default configuration may result in higher energy consumption of the product LED turns to orange in Standby mode when DLNA Server ...

Page 187: ... Note Depending on the area this function may not be available For details consult your local Panasonic dealer 187 ...

Page 188: ...TV Anywhere Settings Settings for watching TV or editing timer programming with the network equipment smartphone etc from outside the home network Functions TV Anywhere TV Anywhere Settings 188 ...

Page 189: ...to share the files between PC and devices connected to this TV Media Player Using Media Player Sharing file Network Device List Lists the accessible network devices to play back the content in Media Player Media Player Using Media Player Network device 189 ...

Page 190: ...Mirroring Settings Settings for the mirroring function Functions Mirroring Mirroring Settings 190 ...

Page 191: ...ntrol4 Discovery Send Identify and press OK to access 4 Set the item and press OK to store Control4 Discovery On Off Enables Control4 mode Send Identify Sends identifying message to Control4 controller This function is available when Control4 Discovery is set to On Note For details of the settings and operations consult your local Control4 dealer 191 ...

Page 192: ... to update the TV s software if any updates are available 1 Display the menu with MENU 2 Select Network Software Update and press OK to access 3 Follow the on screen instructions A broadband network environment is required to use this function 192 ...

Page 193: ...Selects whether to give a notification message when new software is found via network or not 1 Display the menu with MENU 2 Select Network New Software Message and press OK to access 3 Select On Off and press OK to set 193 ...

Page 194: ... OK to access 3 Select the media server and press OK to access To display hide information of the highlighted media server 1 Display the option menu with OPTION 2 Select Show Info and press OK to access 4 Select the file and press OK to access Depending on the condition of media server you may need to select the folder before selecting the file To display hide information of the highlighted file N...

Page 195: ...ewing photo Playback To operate Single view To the previous photo To the next photo Stop return to list OK Slideshow To display hide the operation guide To rotate 90 blue To return to list BACK RETURN 195 ...

Page 196: ...deshow Settings Set up the settings for photo file operations on this TV 1 Display the option menu with OPTION 2 Select Slideshow Settings and press OK to access 3 Select one of the following items and press OK to access Interval Repeat Back Ground Music 4 Set the item and press OK to store Interval Long Normal Short Selects slideshow interval Repeat On Off Slideshow repeat Back Ground Music Off T...

Page 197: ... OK to access 3 Select the media server and press OK to access To display hide information of the highlighted media server 1 Display the option menu with OPTION 2 Select Show Info and press OK to access 4 Select the file and press OK to access Depending on the condition of media server you may need to select the folder before selecting the file To display hide information of the highlighted file N...

Page 198: ...layback Playback To jump to the specified time point 1 Display the time seek bar with OK 2 While the time seek bar is displayed Press Search approx 10 seconds Press and hold Search rapidly 3 Jump to the specified time point with OK To display hide the operation guide and information banner To the previous content red To the next content green To change aspect 1 Display Aspect Selection with ASPECT...

Page 199: ... You can also change the mode pressing ASPECT Press repeatedly until you reach the desired mode Aspect cannot be changed depending on the content To return to list BACK RETURN 199 ...

Page 200: ...he title or scene in the thumbnail view Images may not be displayed for an instant in the thumbnail view Set the preview Off to solve this Multi Audio Monaural Audio Dual Mono Audio Selects for selectable sound tracks if available It may take several seconds to change the sound This function is available during playback Repeat On Off Playback repeat within the selected file Subtitle Settings Sets ...

Page 201: ...Subtitle Text Colour Selects the colour of subtitles Subtitle Text Position Adjusts the position of subtitles on the screen Subtitle Text Delay Adjusts the delay time for the subtitles 201 ...

Page 202: ...TAL AUDIO and HDMI2 ARC function terminals SPDIF is a standard audio transfer file format Auto Dolby Audio Dolby Digital Dolby Digital Plus and HE AAC multi channel are output as Dolby Digital Bitstream MPEG is output as PCM PCM Digital output signal is fixed to PCM ARC Audio Return Channel is a function of digital audio output using HDMI cable Note During the operation audio signal is output from...

Page 203: ... OK to access 3 Select the media server and press OK to access To display hide information of the highlighted media server 1 Display the option menu with OPTION 2 Select Show Info and press OK to access 4 Select the file and press OK to access Depending on the condition of media server you may need to select the folder before selecting the file To display hide information of the highlighted file N...

Page 204: ... the specified time point 1 Display the time seek bar with OK 2 While the time seek bar is displayed Press Search approx 10 seconds Press and hold Search rapidly 3 Jump to the specified time point with OK To display hide the operation guide To the previous track red To the next track green To return to list BACK RETURN 204 ...

Page 205: ...file operations on this TV 1 Display the option menu with OPTION 2 Select Music Setup Repeat with OK 3 Select Off Folder One and press OK to set Folder Playback repeat within the selected folder One Playback repeat of the selected one file 205 ...

Page 206: ...l 8 8 to 30 719 17 279 DCF and EXIF standards Progressive JPEG is not supported Note Some files may not be played back even if they fulfil these conditions Do not use multi byte characters or other special codes for file names Connected devices may become unusable with this TV if the file or folder names are changed 206 ...

Page 207: ...y Audio Dolby Digital Dolby Digital Plus HE AAC MP3 This TV supports this container recorded with Panasonic products For details read the manual of the products MKV mkv Video codec H 264 H 265 HEVC MPEG1 MPEG2 MPEG4 Audio codec AAC Dolby Audio Dolby Digital Dolby Digital Plus HE AAC MP3 Vorbis ASF asf wmv Video codec MPEG4 VC 1 WMV9 Audio codec AAC Dolby Audio Dolby Digital Dolby Digital Plus HE A...

Page 208: ...codec AAC HE AAC PS mod mpg mpeg vob vro Video codec MPEG1 MPEG2 Audio codec Dolby Audio Dolby Digital LPCM TS mts m2ts tp trp ts tts Video codec H 264 H 265 HEVC MPEG1 MPEG2 Audio codec AAC Dolby Audio Dolby Digital Dolby Digital Plus HE AAC WebM webm Video codec VP9 Audio codec Vorbis 208 ...

Page 209: ...de the same folder they are displayed in the following order of priority srt sub txt Note Some files may not be played back even if they fulfil these conditions Some subtitles or chapter functions may not be available Do not use multi byte characters or other special codes for file names Connected devices may become unusable with this TV if the file or folder names are changed Supported formats ar...

Page 210: ... FLAC flac WMA wma Copy protected files cannot be played back LPCM wav Note Some files may not be played back even if they fulfil these conditions Do not use multi byte characters or other special codes for file names Connected devices may become unusable with this TV if the file or folder names are changed 210 ...

Page 211: ...you relevant information of the programme being watched recommendations etc It is displayed on the edge of screen when you need it Example A broadband network environment is required to fully use this function Note Design and specifications are subject to change without notice 211 ...

Page 212: ...vant information weather forecast etc Notification message Recommended content TV programme internet content etc 2 Select one side of Info Frame with Cursor buttons or coloured buttons while Info Frame is displayed 3 Follow the on screen instructions To exit Info Frame BACK RETURN Note Info Frame is displayed for several seconds each time the TV is turned on Functions Info Frame Settings 212 ...

Page 213: ...Info Frame 1 Display the menu with MENU 2 Select Setup Display Settings Info Frame at Power on and press OK to access 3 Set the item and press OK to store Info Frame at Power on On Off Displays Info Frame when the TV is turned on 213 ...

Page 214: ...ork environment is required to fully use this function Ensure the network connections and network settings are completed Network Network connections Network Network settings To use this function with your smartphone you need to install the application for controlling VIERA on your smartphone Support FAQs Detailed information For the operations refer to the support information of the application 21...

Page 215: ...ol function Example 2 Say a key word e g my Home Screen to the microphone while the operation guide is displayed Example The operation guide turns to blue during processing The operation guide automatically disappears after a certain period of time Press again to start the Voice Control function To display voice command list To exit Voice Control function 215 ...

Page 216: ...following items and press OK to access Speech Detection Level Terms of Service Instructions for Voice Control 4 Set the item and press OK to store Speech Detection Level High Standard Adjusts the sensitivity to recognise your speech Terms of Service Displays the terms of service Instructions for Voice Control Displays details of Voice Control function in eHELP 216 ...

Page 217: ...icrophone of the smartphone Design and specifications are subject to change without notice A broadband network environment is required to fully use this function because this function accesses the speech recognition server with the internet connection Even if you have the internet environment this function may not be available depending on the proxy setting Please connect the internet without prox...

Page 218: ...Functions TV Anywhere TV Anywhere Settings 2 Connect the device smartphone etc to the home network and access to the TV You need to install the application for controlling VIERA on your smartphone Support FAQs Detailed information For the operations refer to the support information of the application Note This function is not available when the TV is turned off with Mains Power On Off switch Due t...

Page 219: ...from outside the home network Changing the default configuration may result in higher energy consumption of the product LED turns to orange in Standby mode when TV Anywhere is set to On Powered on by Swipe Share On Off Enables turning on the TV automatically when the Swipe Share function is activated from the other devices smartphone etc Set TV Anywhere to On to use this function Use the Swipe Sha...

Page 220: ...ce smartphone etc is registered once you use this function Easy Mirroring You can also start the mirroring function from the other devices smartphone etc when Easy Mirroring is set to On Functions Mirroring Mirroring Settings You cannot use Easy Mirroring function while the TV is set to Wireless Access Point Network Network settings Network Status Note This function is available with the other dev...

Page 221: ...e network connection type is set to Wired Network Network settings Network Status Not valid when the TV is set to Wireless Access Point Powered On by Easy Mirroring On Off Enables turning on the TV automatically when the mirroring function is activated from the other devices smartphone etc Changing the default configuration may result in higher energy consumption of the product Use the mirroring f...

Page 222: ...his TV supports HDAVI Control 5 function Some functions are not available depending on the equipment s version of HDAVI Control Confirm the connected equipment s version of HDAVI Control VIERA Link HDAVI Control is a unique function that we have developed and added based on the control functions provided by HDMI which is an industry standard known as HDMI CEC Consumer Electronics Control As such i...

Page 223: ...ad the manual of the equipment HDMI terminal HDMI cable Equipment with VIERA Link function DVD Recorder DVD Player Blu ray Disc Player HD Video Camera LUMIX Camera Available features HDMI connection DVD Recorder DVD Player Blu ray Disc Player Easy playback Power on Link Power off Link Standby Power Save Intelligent Auto Standby VIERA Link Control HD Video Camera LUMIX Camera Easy playback Power on...

Page 224: ...o cable for audio output from the TV HDMI terminal DIGITAL AUDIO HDMI cable DVD Recorder with VIERA Link function HDMI cable Optical digital audio cable Amplifier with VIERA Link function Speaker system Player theatre Blu ray Disc theatre with VIERA Link function HD Video Camera LUMIX Camera with VIERA Link function If the connected equipment has HDAVI Control 5 function you do not have to use thi...

Page 225: ...ray Disc theatre Easy playback Power on Link Power off Link Standby Power Save Intelligent Auto Standby VIERA Link Control Speaker Selection Amplifier Power off Link Intelligent Auto Standby Speaker Selection For equipment which has HDAVI Control 2 or later function For equipment which has HDAVI Control 4 or later function While playing a disc Except for watching a disc 225 ...

Page 226: ...he TV For example DVD Player connected to Amplifier which is connected to the TV via an HDMI cable Functions VIERA Link HDAVI Control VIERA Link Control Recorder Maximum 3 Player Maximum 3 DVD Player Blu ray Disc Player HD Video Camera LUMIX Camera Digital Camera Player theatre Blu ray Disc theatre etc Audio system Maximum 1 Player theatre Blu ray Disc theatre Amplifier etc Tuner Maximum 4 Set top...

Page 227: ...ected equipment Read the manual of the equipment Set VIERA Link to On in the Setup Menu Set up the TV After connection turn the equipment on and then switch the TV on Select the HDMI input from Input Selection with AV and make sure that an image is displayed correctly This setup should be done each time the following conditions occur First time operation Adding or reconnecting equipment Changing s...

Page 228: ...Easy playback Automatic input switching When the connected equipment is operated the input mode is switched automatically 228 ...

Page 229: ...Power on Link Set Power on Link to On in VIERA Link Settings to use this function When the connected equipment is operated the TV is automatically turned on Only when the TV is in Standby mode 229 ...

Page 230: ...VIERA Link Settings to use this function When the TV is set to Standby mode the connected equipment is also automatically set to Standby This function will work even if the TV enters Standby mode automatically by auto power standby function 230 ...

Page 231: ... mode the connected equipment is automatically set to Standby and the power consumption of the connected equipment is automatically minimised When the TV is turned on the connected equipment is still in Standby mode but the power consumption is increased to quickly start the connected equipment This function is effective if the connected equipment can change the power consumption in Standby mode a...

Page 232: ... non used connected equipment goes into Standby mode automatically to reduce the power consumption For example when the input mode is switched from HDMI or when Speaker Selection is changed to TV except for watching a disc This function may not work properly depending on the connected equipment In this case set to Off 232 ...

Page 233: ...menu of the equipment Confirm the remote control code is 73 Watching External equipment Operating with TV s remote control To display the operation guide OPTION If other manufacturers product is accessed Setup Contents Selection menu may be displayed Available TV s remote control buttons depend on the connected equipment If multiple recorders or players are connected Each recorder player is number...

Page 234: ... Functions VIERA Link HDAVI Control Summary of VIERA Link Some operations may not be available depending on the equipment In this case use the remote control of the connected equipment For details of the operations for the connected equipment read the manual of the equipment 234 ...

Page 235: ...t is turned off TV speakers will be activated You can use Volume Up Down and MUTE Multi channel sound If you want to enjoy the multi channel sound e g Dolby Audio Dolby Digital 5 1ch via an Amplifier connect it with an HDMI cable and Optical digital audio cable and then select Home Cinema If your Amplifier has the HDAVI Control 5 function you only need to connect it with an HDMI cable to the TV s ...

Page 236: ...not be delivered for the first few seconds when the input mode is switched HDAVI Control 5 is the newest standard for HDAVI Control compatible equipment This standard is compatible with conventional HDAVI equipment To confirm the HDAVI Control version of this TV Support Help menu Using Help menu 236 ...

Page 237: ...ttons Enter the PIN number twice at first setting Make a note of the PIN number in case you forget it 4 Select Child Lock List and press OK to access 5 Select the channel input and press OK to lock appears when the channel input is locked To cancel 1 Select the locked channel input 2 Press OK To lock all green To cancel all locks yellow To jump to the head of the next channel input group blue Show...

Page 238: ... Player PIN Control Applies access control for some Digital TV streaming services Note For DVB UK only 238 ...

Page 239: ...number You can change the PIN number 1 Select Change PIN and press OK to access 2 Enter a new PIN number twice with Numeric buttons Note Setting Shipping Condition erases the PIN number and all settings 239 ...

Page 240: ...n the selected age enter the PIN number depending on the broadcaster 1 Select Parental Rating and press OK to access 2 Select an age for the restriction of programmes and press OK to set Note Setting Shipping Condition erases the PIN number and all settings Ireland only 240 ...

Page 241: ...ly starts the application Manual Start Starts the application by pressing red To sort channel names in alphabetical order red To set Auto Start for all channels green To disable the service for all channels yellow To set Manual Start for all channels blue 4 Press BACK RETURN to store A notification message will appear when the application is available Follow the on screen instructions is displayed...

Page 242: ...ves into the TV in order to recognise to use it again Delete Cookie Deletes all of technical information left by a data service application Do Not Track Setting Mode1 Mode2 Mode3 Sets to notify websites and some applications about tracking your browsing activities Mode1 Notifies websites that you want to be tracked Mode2 Notifies websites that you do not want to be tracked Mode3 Sends no configura...

Page 243: ...e completed Network Network connections Network Network settings Not all the data services are available depending on the country area and broadcaster Depending on the connection environment the internet connection may be slow or may not be successful Operations may vary depending on the broadcaster Follow the on screen instructions On screen instructions may not correspond to the remote control b...

Page 244: ...minal cover cable cover before inserting or removing the CI module If a smart card and a CI module come as a set first insert the CI module then insert the smart card into the CI module Insert or remove the CI module completely in the correct direction as shown Remove the CI module from the TV when placing the TV facing upward This may cause damages to the CI module and CI slot Note There might be...

Page 245: ...th the viewing card to tune in the encrypted channels If encrypted channels do not appear perform the below to verify the card is recognised by the TV For details read the manual of the CI module or check with the content provider 1 Select DVB with TV 2 Display the menu with MENU 3 Select Setup System Menu Common Interface and press OK to access 4 Press OK and follow the on screen instructions On ...

Page 246: ...nd settings etc 1 Display the menu with MENU 2 Select Setup System Menu Shipping Condition and press OK to access 3 When a confirmation screen is displayed select Yes and press OK to set 4 Follow the on screen instructions Auto Setup automatically starts Note To retune TV channels only e g after moving house set Auto Setup Watching Tuning and editing channels Auto Setup 246 ...

Page 247: ...he performance or operations of the TV In DVB a notification banner will appear when one of the BBC channels is turned to if a new available software is found To install new software select Standby Now and press OK to set Standby Installs new software in standby condition Now Installs new software now 247 ...

Page 248: ... press OK to set Standby Installs new software in standby condition Now Installs new software now If System Update is performed the software will be updated TV functions may be changed If you do not want to do so set Auto Update Search in Standby to Off The automatic updating cannot be performed in the following conditions TV turned off with Mains Power On Off switch Recording is in progress Note ...

Page 249: ...u System Update System Update Search Now and press OK to access 3 Searches for an update for several minutes and displays a corresponding message if any 4 Download with OK Note Download may take a few hours During software download and update DO NOT perform any operations on the TV or switch Off the TV 249 ...

Page 250: ... the desired character 1 _ a b c 2 A B C d e f 3 D E F g h i 4 G H I j k l 5 J K L m n o 6 M N O p q r s 7 P Q R S t u v 8 T U V w x y z 9 W X Y Z Space 0 The character is set automatically if you leave for 1 second You can also set the character pressing OK or other Numeric buttons less than 1 second The characters may vary depending on the input item 250 ...

Page 251: ...uage and press OK to set Characters may not be displayed correctly on the TV screen depending on the connected keyboard or the keyboard layout setting Some of the keys of keyboards may correspond to the operation of the remote control Keyboard Remote Control Enter OK Backspace BACK RETURN Esc EXIT 0 9 Character Numeric buttons F1 HOME F2 APPS F3 MENU F4 AV F5 F6 Channel Down Up F7 F8 Volume Down U...

Page 252: ...om among alternatives with and press OK to set You can adjust using the slide bar with and press OK to set You can go to the next screen with OK You can enter names or numbers freely for some items 1 Enter characters one by one with Cursor buttons and press OK to set You can set characters using Numeric buttons Functions Setting characters Using Numeric buttons 2 Press BACK RETURN to store To rese...

Page 253: ...e TV is in Shop viewing environment To return to Home viewing environment initialise all settings by accessing Shipping Condition Functions Shipping Condition Using control panel buttons 1 Press and hold INPUT OK HOLD for MENU button for 3 seconds to display the menu 2 Select and set with following control panel buttons Move the cursor select from a range of options select the menu item adjust lev...

Page 254: ...Picture Viewing Mode Selects your favourite picture mode for each input Watching For best picture Viewing Mode 254 ...

Page 255: ...f backlight according to the images Watching For best picture Basic settings Resolution Remaster Enhances picture resolution to make the image sharper Watching For best picture Basic settings Dynamic Range Remaster Enhances bright areas of the image closer to the original luminance making improved picture impact Watching For best picture Basic settings Intelligent Frame Creation Automatically comp...

Page 256: ...Ambient Sensor Automatic Brightness Control function Adjusts picture settings automatically depending on ambient lighting condition Watching For best picture Ambient Sensor 256 ...

Page 257: ... Reduction Reduces unwanted picture noise Watching For best picture Noise reduction settings MPEG Remaster Reduces flicker noise in contoured parts of a picture and block noise Watching For best picture Noise reduction settings 257 ...

Page 258: ...Advanced Settings You can adjust and set up the detailed picture settings Watching For best picture Advanced Settings 258 ...

Page 259: ...re Option Settings 4K Pure Direct Reproduces the original image quality in detail for 4K HDMI input signal Watching For best picture Option Settings 1080p Pixel by 4pixels Displays like pixel by pixel to make the image sharper for 1080p signal Watching For best picture Option Settings HDMI Content Type Adjusts the picture settings of each HDMI input according to the selected content type Watching ...

Page 260: ...eral use Automatically switches to Auto for broadcast each time another input channel is selected Watching For best picture Option Settings HDMI RGB Range Adjusts the black level of the image for each HDMI input Watching For best picture Option Settings 3D COMB Makes still or slow moving pictures more vivid Watching For best picture Option Settings 260 ...

Page 261: ...16 9 aspect Watching For best picture Screen Settings Zoom Adjustments Adjusts the vertical position and size when aspect is set to Zoom Watching For best picture Screen Settings Screen Display Turns the screen off when you select Off Watching For best picture Screen Settings 261 ...

Page 262: ...Copy Adjustment Copies the picture settings of True Cinema or Custom to those of the other input mode or Viewing Mode Watching For best picture Copy Adjustment 262 ...

Page 263: ...Reset to Defaults Resets the current Picture Viewing Mode to the default settings 263 ...

Page 264: ...Sound Mode Selects your favourite sound mode for each input Watching For best audio Sound mode 264 ...

Page 265: ...or best audio Basic settings Equaliser Adjusts the frequency level to suit your favourite sound quality Watching For best audio Basic settings Balance Adjusts volume level of right and left speakers Watching For best audio Basic settings Surround Selects surround sound settings Watching For best audio Basic settings Bass Boost Enhances the effect of bass sounds Watching For best audio Basic settin...

Page 266: ... Volume Adjusts the volume of headphones Watching For best audio Volume settings Auto Gain Control Automatically regulates large sound level differences between channels and inputs Watching For best audio Volume settings Volume Correction Adjusts the volume of each individual channel or input mode Watching For best audio Volume settings Clear Sound Adjustment If the sound from TV speakers is uncle...

Page 267: ... for the voice guidance Watching For best audio Voice Guidance Settings Volume Selects the volume for the voice guidance Watching For best audio Voice Guidance Settings User Level Selects the level of verbosity for the voice guidance Watching For best audio Voice Guidance Settings Web Browser Set to On to enable voice guidance of the network content in web browser function Watching For best audio ...

Page 268: ...olume Adjusts the volume for Audio Description Watching For best audio Audio Description Speakers Set to Mix to activate the description sound track from TV speakers Watching For best audio Audio Description Headphones Set to Mix to activate the description sound track from headphones Watching For best audio Audio Description 268 ...

Page 269: ...nced settings HDMI Audio Format Selects the audio format for the HDMI input signal Watching For best audio Advanced settings PCM Optical Level Adjusts the audio level of PCM output from DIGITAL AUDIO and HDMI2 ARC function terminals to equalise with that of the other audio types Watching For best audio Advanced settings SPDIF Delay Adjusts the delay time of the sound output from DIGITAL AUDIO and ...

Page 270: ...Reset to Defaults Resets the current Sound Mode to the default settings 270 ...

Page 271: ...Network Network Connection Sets the network setting to use this TV in your network environment Network Network settings Network Connection 271 ...

Page 272: ...Network Status Displays and checks the network status MAC Address current network settings etc Network Network settings Network Status 272 ...

Page 273: ...my Home Cloud Settings Notices Displays the terms of service Network Network settings my Home Cloud Settings 273 ...

Page 274: ...VIERA Name Sets your favourite name for this TV Network Network settings VIERA Name 274 ...

Page 275: ...TV Remote App Settings Sets to control the TV from network equipment smartphone etc Network Network settings TV Remote App Settings 275 ...

Page 276: ...Network Link Settings Sets to control the TV with devices connected to the network Network Network settings Network Link Settings 276 ...

Page 277: ...TV Anywhere Settings You can set timer programming with the network equipment smartphone etc from outside the home network Functions TV Anywhere How to use 277 ...

Page 278: ...hare the files between PC and devices connected to this TV Media Player Using Media Player Sharing file Network Device List Lists the accessible network devices to play back the content in Media Player Media Player Using Media Player Network device 278 ...

Page 279: ...Mirroring Settings Settings for the mirroring function Functions Mirroring Mirroring Settings 279 ...

Page 280: ...Control4 Settings Settings for the Control4 function Network Network settings Control4 Settings 280 ...

Page 281: ...le software updates from the Panasonic website Network Network settings Software Update New Software Message Selects whether to give a notification message when new software is found via network or not Network Network settings New Software Message 281 ...

Page 282: ...Timer Off Timer Sets the duration of time until the TV automatically goes into Standby mode Watching Basic Off Timer 282 ...

Page 283: ...Timer Programming Sets a timer to record forthcoming programmes Recording Timer Programming Setting Timer Programming 283 ...

Page 284: ...Time Zone Adjusts the time data Watching Basic Adjusting time 284 ...

Page 285: ...Auto Standby Automatically turns the TV to Standby mode for energy saving when no operation is performed for 4 hours Watching Basic Energy saving functions 285 ...

Page 286: ...l Power off Automatically turns the TV to Standby mode to prevent unnecessary power consumption when no signal is received and no operation is performed for 10 minutes Watching Basic Energy saving functions 286 ...

Page 287: ...Setup Eco Navigation Automatically sets the TV to the most suitable energy saving mode Watching Basic Energy saving functions 287 ...

Page 288: ...Voice Control Settings Settings for Voice Control function Functions Voice Control Settings 288 ...

Page 289: ...TV Guide Settings TV Guide View Changes the layout of TV Guide Watching TV Guide TV Guide 289 ...

Page 290: ...USB Device Setup Formats the USB HDD or safely removes USB device Recording USB HDD setup Setting for USB HDD 290 ...

Page 291: ...Recording Setup Settings for the recording feature of the USB HDD Recording Recording current programme One Touch Recording Recording Recording current programme Rewind LIVE TV 291 ...

Page 292: ...Child Lock Applies access control for channels or inputs to prevent unwanted access Functions Child Lock Using Child Lock 292 ...

Page 293: ...tuned channels according to the available region Watching Tuning and editing channels Channel Sorting by Region Manual Tuning Searches for channels manually Watching Tuning and editing channels Manual Tuning Update Channel List Updates the channel list while keeping your settings Watching Tuning and editing channels Update Channel List New Channel Message Selects whether to give a notification mes...

Page 294: ...TV mode Watching Tuning and editing channels Other settings Note The settings in Tuning Menu are applicable only for the selected TV mode The menu name varies depending on the TV mode DVB Tuning Menu Analogue Tuning Menu 294 ...

Page 295: ...roadcaster Watching Basic Language Preferred Subtitles 1 2 Selects the first and second preferred language for digital channel subtitles depending on the broadcaster Watching Basic Language Preferred Subtitles Selects the preferred language for digital channel subtitles depending on the broadcaster Watching Basic Language Preferred Teletext Selects the preferred language for digital channel telete...

Page 296: ... unconnected improving identification and selection in the Input Selection banner Watching External equipment Watching external input Banner Display Timeout Sets how long the information banner stays on screen Watching Basic Freeview Play banner UK Watching Basic Information banner Smart Banner Displays the introduction banner for the internet service Watching Basic Information banner Playing Time...

Page 297: ... screen automatically when a radio channel is selected Watching Basic Energy saving functions Info Frame at Power on Displays Info Frame when the TV is turned on Functions Info Frame Settings Notification On Off Displays a notification message 297 ...

Page 298: ...HDMI Auto Setting Set to Mode1 when the image or sound in HDMI input is not played properly Watching 4K resolution HDMI Auto Setting 298 ...

Page 299: ...HDMI HDR Setting Set to On when the HDR device is connected to the TV Watching External equipment HDMI HDR Setting 299 ...

Page 300: ...k Sets to use Power off Link functions Functions VIERA Link HDAVI Control Power off Link Standby Power Save Controls the connected equipment to reduce power consumption in Standby Functions VIERA Link HDAVI Control Standby Power Save Intelligent Auto Standby Makes non watched or non used connected equipment go into Standby mode to reduce the power consumption Functions VIERA Link HDAVI Control Int...

Page 301: ... use Hybrid Broadcast Broadband TV application Functions Data Service Application Using Data Service Application Privacy Setting Settings for the privacy in the interactive data services Functions Data Service Application Privacy Setting 301 ...

Page 302: ...l settings to the original condition Functions Shipping Condition Shipping Condition Common Interface Sets to watch encrypted channels etc Functions Common Interface Using Common Interface System Update Downloads new software to this TV Functions Updating the TV Software Auto update Licence Menu Displays the software licence information 302 ...

Page 303: ... List Automatically selects all channels or favourites list in the information banner when the TV is turned on Watching Basic Selecting channel Power Save On Off Reduces brightness of the picture to economise on power consumption 303 ...

Page 304: ...System Information Device Information and press OK to access About Firefox OS Displays the information about Firefox OS TV Self Test Makes a diagnosis of picture or sound problems Follow the on screen instructions System Information Displays the system information of this TV Device Information Displays the device information of this TV 304 ...

Page 305: ...Aspect Black and white picture Check that the output of the external equipment matches the input of the TV Chaotic image noisy Set Noise Reduction and MPEG Remaster in the Picture Menu to remove noise Watching For best picture Noise reduction settings Check nearby electrical equipment car motorcycle fluorescent lamp No image is displayed Check the correct input mode is selected Check the setting o...

Page 306: ...ignal changes There may be red blue green and black spots on the screen This is a characteristic of liquid crystal panels and is not a problem The liquid crystal panel is built with very high precision technology giving you fine picture details Occasionally a few non active pixels may appear on the screen as a fixed point of red green blue or black Please note this does not affect the performance ...

Page 307: ... connection Weather conditions affect signal reception heavy rain snow etc in particular in poor reception areas Even during good weather the high pressure can cause poor reception of some channels Due to the digital reception technologies involved quality of the digital signals may be relatively low in some cases despite good reception of analogue channels Turn the TV off with Mains Power On Off ...

Page 308: ...viously watched The channel may broadcast for part of the day Check the channel in the TV Guide Watching TV Guide Channel position numbers may be changed by broadcasters Reset channels Watching Tuning and editing channels Auto Setup 308 ...

Page 309: ... channels cannot be tuned Check the position direction and connection of the aerial Weather conditions affect signal reception heavy rain snow etc in particular in poor reception areas Even during good weather the high pressure can cause poor reception of some channels Turn the TV off with Mains Power On Off switch then turn it on again If the problem persists consult your local dealer or service ...

Page 310: ... switch sound mute on or off Is the volume set to the minimum Check connections and setting of external equipment Watching External equipment Ensure that Speaker Selection is set to TV Watching For best audio Volume settings Functions VIERA Link HDAVI Control Speaker Selection Ensure that TV Speaker Setting is set to TV Speaker Watching For best audio Volume settings Sound level is low or sound is...

Page 311: ...al sound connection has a problem select analogue sound connection Watching External equipment HDMI features Set HDMI Auto Setting in the Setup Menu to Mode1 Watching 4K resolution HDMI Auto Setting Pictures from external equipment are unusual when the equipment is connected via HDMI Check the HDMI cable is connected properly Watching External equipment External connection Turn the TV and equipmen...

Page 312: ...ue IP address automatically If the network administrator prefers to allocate an IP address set an IP address manually Network Network settings The router may be using MAC address filtering security setting Confirm the MAC Address of this TV and set the router to use it Network Network settings Network Status If the problem persists consult your Internet Service Provider or telecommunications compa...

Page 313: ...Cannot operate internet content Check the connections and settings Network Network connections Internet connection Network Network settings The server or connected line may be busy now 313 ...

Page 314: ...n switch the TV on Functions VIERA Link HDAVI Control Parts of the TV become hot Parts of the TV may become hot These temperature rises do not pose any problems in terms of performance or quality Overcurrent error message appears The connected USB device may cause this error Remove the device and turn the TV off with Mains Power On Off switch then turn it on again Check foreign objects are not ins...

Page 315: ...ming is set DLNA Server is set to On Powered On by Apps is set to On Home Streaming is set to Always Powered On by Easy Mirroring is set to On TV Anywhere is set to On When pushed with a finger the display panel moves slightly and makes a noise There is a little gap around the panel to prevent damage to the panel This is not a malfunction 315 ...

Page 316: ...Detailed information Support information about the application optional devices operation etc may be found on the following website http panasonic jp support global cs tv English only 316 ...

Page 317: ...he stubborn dirt 5 Finally wipe away all the moisture Caution Do not use a hard cloth or rub the surface too hard otherwise this may cause scratches on the surface Take care not to subject the surfaces to insect repellent solvent thinner or other volatile substances This may degrade surface quality or cause peeling of the paint The surface of the display panel is specially treated and may be easil...

Page 318: ...v 3 100 ...

Reviews: