English
18
First time Auto Setup
When the TV is turned on for the first time, it will
automatically search for available TV channels and give
options to set up the TV.
These steps are not necessary if the setup has been
completed by your local dealer.
Please complete connections (p. 12 - 15) and settings
(if necessary) of the connected equipment before
starting Auto Setup. For information about the settings
for the connected equipment, read the manual of the
equipment.
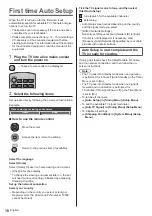
1
Plug the TV into a live mains socket
and turn the power on
Takes a few seconds to be displayed.
2
Select the following items
Set up each item by following the on-screen instructions.
Example:
Please select your viewing environment.
Home
Shop
How to use the remote control
Move the cursor
Access the item / store the setting
Return to the previous item (if available)
Select the language
Select [Home]
Select [Home] for use in a home viewing environment.
[Shop] is for shop display.
To change the viewing environment later on, the set
will need to have all settings initialised by accessing
Shipping Condition.
Set up the network connection
Select your country
Depending on the country you select, select your
Region or store the Child Lock-PIN number (“0000”
cannot be stored).
Tick the TV signal mode to tune, and then select
[Start Auto Setup]
: tune (search for the available channels)
: skip tuning
Auto Setup screen varies depending on the country
and the signal mode you select.
[DVB-C Network Settings]
Normally set [Frequency] and [Network ID] to [Auto].
If [Auto] is not displayed or if necessary, enter
[Frequency] and [Network ID] specified by your cable
provider with numeric buttons.
Auto Setup is now complete and the
TV is ready for viewing.
If tuning has failed check the Satellite cable, RF cable,
and the network connection, and then follow the on-
screen instructions.
Note
The TV goes into Standby mode when no operation
is performed for 4 hours if [Auto Standby] in the Timer
Menu is set to [On].
The TV goes into Standby mode when no signal is
received and no operation is performed for
10 minutes if [No signal Power off] in the Timer Menu
is set to [On].
To retune all channels
[Auto Setup] in [Tuning Menu] (Setup Menu)
To add the available TV signal mode later
[Add TV Signal] in [Tuning Menu] (Setup Menu)
To initialise all settings
[Shipping Condition] in [System Menu] (Setup
Menu)
Summary of Contents for TX-40FXX689
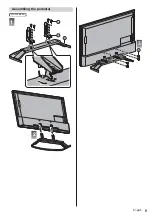
Page 9: ...English 9 Assembling the pedestal 40 inch model 1 A C D 2 3 B ...
Page 41: ... TX 40FXX689 TX 49FXX689 TX 55FXX689 TX 65FXX689 ...
Page 42: ... 2 J Z 3 7 11 12 21 22 23 27 27 ª 30 32 33 37 ª 37 µ ...
Page 43: ... 3 J _ _ _ º À À Á À À À Á À À Á À À ÀÂ ÀÂ µ ÀÂ Z Ã µ ...
Page 44: ... 4 Ä À À À À À µ À ÅÆÆÇ ÈÈÈ ÉÇ ÊË É Ä Ä ÂÂ ª J J Ä Ì Á Í Í ÁÁÍ ...
Page 45: ... 5 J J Ä J Î Ä J _ Z _ J Ï J ...
Page 46: ... 6 J J Á J Â ª Â Ì µ Á Á J µ Â ËÐ Æ ÆÅ ËÐ Æ ÆÅ J 10 10 10 10 _ J _ J Ä _ _ J Ä ...
Page 48: ... 8 Í Á Ü Ü Z Í ÁÁÍ ÁÍ ÁÁÍ Á Ü Á Í ÁÍ Á Ý Ü Z ...
Page 49: ... 9 Í 1 A C D 2 3 B ...
Page 50: ... Í ÁÁÍ ÁÍ 1 A C D 2 3 B 2 3 ...
Page 52: ... Î Â _ 4 2 1 3 5 6 7 8 9 J _ _ _ _ µ Þ Î Â Z Ì Á Ø Í Í ÁÁÍ J _ ª ª µ À ª ...
Page 53: ... Ä Â Â Â Â ª Â ª Â Ä µ Â µ Ã Â ª Â ËÐ Ó ß ª Â µ ª ...
Page 54: ... ª J ª Â Þ Û µ Þ Û Þ Î Â Þ Î Â Þ Þ Û ª _ Þ µ  µ Þ µ   µ Þ Â Àà àÑ Ñ ª _ Â à ª ...
Page 56: ... Z _ _ _ J _ J _ J _ Ñ Â µ µ _ µ J _ _ µ J µ J _ Ì À Â Ì µ Ã ...
Page 57: ... 23 24 _ 25 _ _ _ á Á Í 1 2 3 5 6 7 4 Í ÁÁÍ ÁÍ 1 2 3 5 6 7 4 _ J µ ä Z J J _ _ _ _ ...
Page 58: ... ª _ µ Ì Á µ µ 2 _ _ _ _ µ _ µ ÂÑ å Í Z _ J _ _ _ Ä À Â Â _ _ _ ª ª ª ª µ ª _ _ µ _ _ _ ...
Page 59: ... _ ª µ Ã 2 J _ ª µ 3 µ æ Î Z 2 _ _ _ _ J 3 ...
Page 60: ... 20 µ µ Ã ...
Page 64: ... 24 6 Z J J J_ _ J 2 Z _ 3 4 ª 5 Z J J J_ 6 7 8 9 J _ Â _ J µ J _ 2 Z _ 3 4 µ ...
Page 66: ... 26 µ ê 3 µ µ µ ê µ _ Z J _ Àà àÑ Ñ Â µ à Z J Â Ò È Ç µ ç ...
Page 70: ... 30 _ __ ª 2 µ __ _ __ µ J _ _ µ µ _ Î À µ Z _ ...
Page 73: ... 33 _ µ _ µ _ Î µ _ 2 Z 3 4 ª 5 Z J J _ _ µ _ åº Í ...
Page 75: ... 35 Z 2 _ 3 µ _ Ã åº Í _ _ _ _ À µ µ ...
Page 76: ... 36 _ µ J _ J à _ ò ò º J Àà àÑ Ñ Â à ä ç ò Z J J µ _ _ _ _ _ J _  _ J _ _ _ _ Ä Z ...
Page 79: ... 39 Ö Þ ÞÂ Ö Þ ÞÂ Ö 2 _ ËÐ Æ ÆÅ Ì ËÐ Æ ÆÅ Á _ µ µ ...
Page 80: ... Ä µ µ Z _ _ J _ Ä µ _ _ _ _ Web Site http www panasonic com Panasonic Corporation 2018 Ù º ...

