background image

English

   - 16 -

checkbox next to the selected option will be checked. 

To turn the search option off clear the checkbox by 

pressing 

OK

, Left or Right directional button after 

moving the focus on the desired broadcast type option.

Digital Aerial:

 If 

D. Aerial

 broadcast search option 

is turned on, the TV will search for digital terrestrial 

broadcasts after other initial settings are completed.

Digital Cable:

 If 

D. Cable

 broadcast search option 

is turned on, the TV will search for digital cable 

broadcasts after other initial settings are completed. A 

dialogue may be displayed depending on the country 

selection before starting to search asking whether you 

want to perform cable network search. If you select 

Yes


and press 

OK

 you can select 

Network

 or set values 

such as 

Frequency

Network ID

 and 

Search Step 

on 

the next screen. If you select 

No

 and press 

OK 

or the 

network search dialogue is not displayed you can set 

Start


Frequency

Stop


Frequency 

and 

Search Step 

on the next screen. When finished, highlight 

Next

 and 

press 

OK

 button to continue.

Note:

 Searching duration will change depending on the 

selected 

Search Step

.

Satellite:

 If 

Satellite

 broadcast search option is turned 

on, the TV will search for digital satellite broadcasts 

after other initial settings are completed. Before 

satellite search is performed some settings should 

be made. 
Depending on the model and the selected country 

the next step may be the selection of the installation 

type for satellite. You can select to start an operator 

installation or a standard installation at this point. If you 

want to perform an operator installation set the 

Install 

Type

 as 

Operator

 and then set the 

Satellite Operator


according to your operator preference. Some of the 

following steps may differ or be skipped depending on 

the selected operator in this step. If you set the 

Install 

Type

 as 

Standard

, you can continue with regular 

satellite installation and watch satellite channels. 

Press 

OK

 to proceed. 

Antenna


type selection screen may be displayed 

next. You can select 

Antenna type

 as 

Direct

Single 

Satellite Cable

 or 

DiSEqC switch

 by using Left or 

Right directional buttons. After selecting your antenna 

type press 

OK

 to see the options to proceed. 

Continue

Transponder list

 and 

Configure LNB

 options may be 

available. You can change the transponder and LNB 

settings using the related menu options.

• 

Direct: 

If you have a single receiver and a direct 

satellite dish, select this antenna type. Press 

OK

 to 

continue. Select an available satellite on the next 

screen and press 

OK

 to scan for services. 

• 

Single Satellite Cable:

 If you have multiple receivers 

and a single satellite cable system, select this anten-

na type. Press 

OK

 to continue. Configure settings 

by following instructions on the next screen. Press 

OK

 to scan for services.

• 

DiSEqC switch:

 If you have multiple satellite dishes 

and a DiSEqC switch, select this antenna type. Then 

set the DiSEqC version and press 

OK

 to continue. 

You can set up to four satellites (if available) for 

version v1.0 and sixteen satellites for version v1.1 

on the next screen. Press 

OK

 button to scan the first 

satellite in the list.

 Note:

 Depending on the model of your TV, DiSEqC version 

v1.1 may not be supported and therefore the DiSEqC version 

selection step may not be available.

Analogue: 

If 

Analogue

 broadcast search option is 

turned on, the TV will search for analogue broadcasts 

after other initial settings are completed.
After the initial settings are completed the TV will start 

to search for available broadcasts of the selected 

broadcast types.
While the search continues current scan results will be 

displayed at the bottom of the screen. You can press 

the 

Home

Back

 or 

Exit

 button to cancel the search. 

The channels that have already been found will be 

stored in the channel list.
After all the available stations are stored, 

Channels 

menu will be displayed. You can edit the channel 

list according to your preferences using the 

Edit

 tab 

options or press the 

Home

 button to quit and watch TV.

While the search continues a dialogue may appear, 

asking whether you want to sort channels according 

to the LCN

(*)

. Select 

Yes

 and press 

OK 

to confirm.

(*) 

LCN is the Logical Channel Number system that organises 

available broadcasts in accordance with a recognisable 

channel number sequence (if available).

Note:

 Do not turn off the TV while initialising first time 

installation. Note that, some options may not be available 

depending on the country selection.

Media Playback via USB Input

You can connect 2.5” and 3.5” inch (HDD with external power 

supply) external hard disk drives or USB memory stick to your 

TV by using the USB input(s) of the TV.

IMPORTANT!

 Back up the files on your storage devices 

before connecting them to the TV. Manufacturer will 

not be responsible for any file damage or data loss. 

Certain types of USB devices (e.g. MP3 Players) 

or USB hard disk drives/memory sticks may not be 

compatible with this TV. The TV supports FAT32 and 

NTFS disk formatting.
Wait a little while before each plugging and unplugging 

as the player may still be reading files. Failure to do 

so may cause physical damage to the USB player 

and the USB device itself. Do not pull out your drive 

while playing a file.
You can use USB hubs with your TV’s USB input(s). 

External power supplied USB hubs are recommended 

in such a case. 
It is recommended to use the TV’s USB input(s) 

directly, if you are going to connect a USB hard disk.

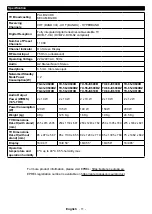
Summary of Contents for TX-43JX600B

Page 1: ...X 55JX600BZ TX 55JX610B TX 58JX600B TX 58JX600BZ TX 58JX610B TX 65JX600B TX 65JX600BZ TX 65JX610B LED TV You can find instructions for your TV s features in the E Manual To access the E Manual enter S...

Page 2: ...n 15 Media Playback via USB Input 16 Media Browser 17 CEC 17 Game Mode 18 E Manual 18 Settings Menu Content 19 General TV Operation 25 Using the Channel List 25 Configuring Parental Settings 25 Electr...

Page 3: ...th other cords When damaged it must be replaced this should only be done by qualified personnel Do not expose the TV to dripping or splashing of liquids and do not place objects filled with liquids su...

Page 4: ...retained and relocated the same considerations as above should be applied Apparatus connected to the protective earthing of the building installation through the MAINS connection or through other appa...

Page 5: ...by using a soft cloth to remove dirt or fingerprints For stubborn dirt 1 First clean the dust from the surface 2 Dampen a soft cloth with clean water or diluted neutral detergent 1 part detergent to...

Page 6: ...hours Sleep timer Child lock Automatic sound mute when no transmission NTSC playback AVL Automatic Volume Limiting PLL Frequency Search Game Mode Optional Picture off function Ethernet LAN for Intern...

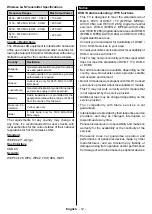
Page 7: ...nu or from the Sources Source Settings menu in order to watch Dolby Vision content if the Dolby Vision content is received through an HDMI input The source device should also be at least HDMI 2 0a com...

Page 8: ...directional buttons on the remote To select an item or see the sub menu options of the highlighted menu press OK button When you highlight a menu option some of the sub menu items of this menu may app...

Page 9: ...isplayed You can also access the application market from within the More Apps menu 3 8 Reset Apps You can reset your customisations on the Home menu to defaults using this option availability depends...

Page 10: ...Laboratories Licensing Corporation Manufactured under licence from Dolby Laboratories Confidential unpublished works Copyright 2012 2020 Dolby Laboratories All rights reserved YouTube and the YouTube...

Page 11: ...compliance with the essential requi rements and other relevant provisions of the Directive 2014 53 EU and Radio Equipment Regulations 2017 If you want to get a copy of the original DoC of this TV plea...

Page 12: ...600BZ TX 55JX610B TX 58JX600B TX 58JX600BZ TX 58JX610B TX 65JX600B TX 65JX600BZ TX 65JX610B Audio Output Power WRMS 10 THD 2 x 10 W 2 x 10 W 2 x 10 W 2 x 10 W 2 x 12 W Power Consumption W 120 W 135 W...

Page 13: ...nctions This TV is designed to meet the standards as of March 2021 of DVB T T2 MPEG2 MPEG4 AVC H 264 and HEVC H 265 digital terrestrial services DVB C MPEG2 MPEG4 AVC H 264 and HEVC H 265 digital cabl...

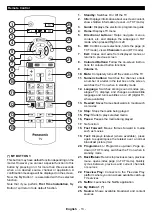
Page 14: ...tons Follow the on screen instruc tions for coloured button functions 9 Volume 10 Mute Completely turns off the volume of the TV 11 Numeric buttons Switches the channel enters a number or a letter in...

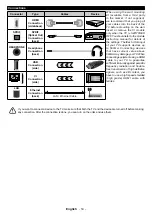
Page 15: ...TCHED OFF You should refer to the module instruction manual for details of the settings The Each USB input of your TV supports devices up to 500mA Connecting devices that have current value above 500m...

Page 16: ...ect Natural and press OK to continue If you select Dynamic and press OK a confirmation dialogue will be displayed Select Yes and press OK to proceed You can change your selection later using the Mode...

Page 17: ...ceivers and a single satellite cable system select this anten na type Press OK to continue Configure settings by following instructions on the next screen Press OK to scan for services DiSEqC switch I...

Page 18: ...pen them in the Media Browser Select USB input from the Sources menu and press OK You can also press the Source button on the remote and then select your USB storage device from the list of sources Wh...

Page 19: ...ll be set as Enabled automatically if it is not already set The TV speakers will be muted and the sound of the watched source will be provided from the connected sound system Note The audio device sho...

Page 20: ...mic contrast ratio to desired value Colour Temp Sets the desired colour temperature value Cool Normal Warm and Custom options are available White Point If the Colour Temp option is set as Custom this...

Page 21: ...dphone Only and Lineout options will be available There will be no sound output except through the selected option and the headphone jack Note that if this option is set as Headphone Only TV speakers...

Page 22: ...ning options D Aerial Searches and stores aerial DVB stations D Cable Searches and stores cable DVB stations Analogue Searches and stores analogue stations Satellite Searches and stores satellite stat...

Page 23: ...ght and down Minimap Minimap is enabled and deactivated by default It will be activated when Magnification feature is enabled With this option you can prevent magnification feature from displaying the...

Page 24: ...he selected country during the First Time Installation process the model of your TV and its features Device Settings CEC With this setting you can enable and disable CEC functionality completely Press...

Page 25: ...esired time for the TV to automatically go into standby mode when not being operated This option can be set from 1 to 8 hours in steps of 1 hour You can also disable this option by setting as Off Biss...

Page 26: ...d applications can be released by entering the right PIN Maturity Lock If this option is set the TV gets the maturity information from the broadcast and if this maturity level is disabled prohibits ac...

Page 27: ...atter and other requirements for Freeview Play services refer to the Connectivity and Freeview Play Platform sections Teletext Services where available Press the Text button to enter Press again to ac...

Page 28: ...rce input setting to Enhanced or Regular from the Source Settings option in the Sources menu or the Sources option in the Settings System menu If you are in doubt consult your dealer No sound Check if...

Page 29: ...AAC AC3 flv Sorenson Spark MPEG4 H 264 MPEG Layer 3 ADPCM AAC LC asf wmv MPEG4 WMV3 VC1 WMA AMR NB webm VP9 VP8 AV1 OPUS Vorbis Picture File Formats File Extension Format jpg jpeg JPEG PJPEG bmp BMP...

Page 30: ...s by using DVI converter cable DVI to HDMI cable not supplied you can refer to the following resolution information 56Hz 60Hz 66Hz 70Hz 72Hz 75Hz 640x480 x x 800x600 x x x 1024x768 x x x 1280x768 x x...

Page 31: ...one and press Left or Right button to change the setting from Automatic to Manual Now you can enter the IP and or DNS values manually Select the related item in the drop down menu and enter the new va...

Page 32: ...to the modem router without entering a password or adding the network first Highlight Press WPS on your wifi router option and press OK Go to your modem router device and press the WPS button on it to...

Page 33: ...nd content This feature provides the ability to use your TV as wireless display device Using with mobile devices There are different standards which enable sharing of screens including graphical video...

Page 34: ...playback If a problem occurs with the network switch your television off at the wall socket and back on again PC HDD Media Player or any other devices that are compatible should be used with a wired c...

Page 35: ...n in the submenu and press the OK button again Name and Address will be filled automatically according to the site you are visiting Highlight OK and press the OK button to add You can also use the Vew...

Page 36: ...Built in You can use your TV as an Alexa device In order to do this a Microphone Box will be required After connecting your Microphone Box to your TV the setup process should be completed The setup c...

Page 37: ...s media playback Alexa fast forward on FN Advances media in fast forward mode Alexa rewind on FN Rewinds media Alexa set the volume of FN to 50 Sets the volume to the specified level Alexa turn the vo...

Page 38: ...put_ name on FN The TV switches to the input source with the spec ified name e g HDMI 1 switch to input_name on FN change channel to chan nel_number on FN The TV switches to the channel with the speci...

Page 39: ...terminal which is marked with the letter E or by the earth symbol or coloured green or green and yellow The wire which is coloured blue or black must be connected to the terminal which is marked with...

Page 40: ......

Reviews: