background image

English

   - 30 -

Troubleshooting & Tips

TV does not switch on

•  Make sure the power cord is plugged in securely to 

the power outlet.

•  Disconnect the power cord from the power outlet. 

Wait for one minute then reconnect it.

•  Press the 

Standby/On

 button on the TV. 

TV does not respond to the remote control

•  The TV requires some time to start up. During this 

time, the TV does not respond to the remote control 

or TV controls. This is normal behaviour.

•  Check if the remote control is working by means of 

a mobile phone camera. Put the phone in camera 

mode and point the remote control to the camera 

lens. If you press any key on the remote control 

and you notice the infra red LED flicker through the 

camera, the remote control is working. The TV needs 

to be checked.

  If you do not notice the flickering, the batteries may 

be exhausted. Replace the batteries. If the remote is 

still not working, the remote control might be broken 

and needs to be checked.

This method of checking the remote control is not 

possible with remote controls which are wirelessly 

paired with the TV.

No Channels

•  Make sure that all cables are properly connected and 

that the correct network is selected.

•  Make sure that the correct channel list is selected.
•  Make sure that you have entered the correct channel 

frequency if you have done manual tuning. 

No picture / distorted picture

•  Make sure that the antenna is properly connected 

to the TV.

•  Make sure that the antenna cable is not damaged. 
•  Make sure that the correct device is selected as the 

input source.

•  Make sure that the external device or source is 

properly connected.

•  Make sure that the picture settings are set correctly.
•  Loud speakers, unearthed audio devices, neon 

lights, high buildings and other large objects can 

influence reception quality. If possible, try to improve 

the reception quality by changing the antenna 

direction or moving devices away from the TV.

• 

Change to a different picture format, if the picture 

does not fit the screen

•  Make sure that your PC uses the supported 

resolution and refresh rate.

No sound / poor sound

•  Make sure that the sound settings are correctly set.
•  Make sure that all cables are properly connected.
•  Make sure that the volume is not muted or set to 

zero, increase the volume to check.

•  Make sure that the TV audio output is connected to 

the audio input on the external sound system.

•  Sound may be coming from only one speaker. Check 

the balance settings from 

Sound

 menu.

Input sources - can not be selected

•  Make sure that the device is connected to the TV. 
•  Make sure that all cables are properly connected.
•  Make sure that you select the right input source which 

is dedicated to the connected device.

•  Make sure that the right input source is not hidden 

from the 

Inputs

 menu.

HDMI Signal Compatibility

Source

Supported Signals

HDMI

480i

60Hz

480p

60Hz

576i, 576p

50Hz

720p

50Hz,60Hz

1080i

50Hz,60Hz

1080p

24Hz, 25Hz, 30Hz, 

50Hz, 60Hz

3840x2160p 24Hz, 25Hz, 30Hz, 

50Hz, 60Hz

4096x2160p 24Hz, 25Hz, 30Hz, 

50Hz, 60Hz

In some cases a signal on the TV may not be displayed 

properly. The problem may be an inconsistency with 

standards from the source equipment (DVD, Set-top 

box, etc. ). If you do experience such a problem please 

contact your dealer and also the manufacturer of the 

source equipment.

Summary of Contents for TX-43LX650B

Page 1: ...X660B TX 55LX650B TX 55LX650BZ TX 55LX660B TX 65LX650B TX 65LX650BZ TX 65LX660B LED TV You can find instructions for your TV s features in the E Manual To access the E Manual enter Settings menu select Manuals and press OK For quick access press Home Menu button and then Info button e MANUAL ...

Page 2: ...ontent 14 Channels 14 TV Options 14 Settings 16 Network Internet 16 Channel 16 Accounts Sign In 19 Apps 19 Device Preferences 19 Remote Accessories 23 Channel List 23 Programme Guide 24 Connecting to the Internet 24 Multi Media Player 25 From USB Connection 27 CEC 27 Google Cast 28 HBBTV System 29 Freeview Play Platform 29 Quick Standby Search 29 Software Update 29 Troubleshooting Tips 30 HDMI Sig...

Page 3: ...d only be done by qualified personnel Do not expose the TV to dripping or splashing of liquids and do not place objects filled with liquids such as vases cups etc on or over the TV e g on shelves above the TV Do not expose the TV to direct sunlight or do not place open flames such as lit candles on the top of or near the TV Do not place any heat sources such as electric heaters radiators etc near ...

Page 4: ...located the same considerations as above should be applied Apparatus connected to the protective earthing of the building installation through the MAINS connection or through other apparatus with a connection to protective earthing and to a television distribution system using coaxial cable may in some circumstances create a fire hazard Connection to a television distribution system has therefore ...

Page 5: ...oft cloth to remove dirt or fingerprints For stubborn dirt 1 First clean the dust from the surface 2 Dampen a soft cloth with clean water or diluted neutral detergent 1 part detergent to 100 parts water 3 Wring out the cloth firmly Please note do not let liquid enter the TV inside as it may lead to product failure 4 Carefully wipe moisten and wipe away the stubborn dirt 5 Finally wipe away all the...

Page 6: ...e screws for fixing the TV onto the wall hanging bracket are not supplied with the TV 3 Insert the screws M4 x 12 provided and tighten them gently until the stand is properly fitted M6 x 20 mm 43 50 55 65 x6 M4 x 12 mm x4 M4 x 12 mm Removing the pedestal from the TV Be sure to remove the pedestal in the following way when using the wall hanging bracket or repacking the TV Put the TV onto a work ta...

Page 7: ...orted via native and market applications HDMI USB inputs and over DVB S broadcasts When the input source is set to the related HDMI input press the Menu button and set the HDMI EDID Version option in the TV Options Settings Device Preferences Inputs menu as EDID 2 0 or Auto EDID in order to watch HDR HLG content if the HDR HLG content is received through an HDMI input The source device should also...

Page 8: ... or satellite plug to the SATELLITE INPUT LNB socket located on the rear side of the TV Left side of the TV ANT Rear side of the TV LNB If you want to connect a device to the TV make sure that both the TV and the device are turned off before making any connection After the connection is done you can turn on the units and use them ...

Page 9: ...tact your dealer to purchase one if not supplied we recommend that you plug all your cables into the back of the TV before mounting on the wall Insert or remove the CI module only when the TV is SWITCHED OFF You should refer to the module instruction manual for details of the settings The USB inputs on the TV support devices up to 500mA Connecting devices that have current value above 500mA may da...

Page 10: ...ck may differ depending on the model To change volume With the front side of the TV facing you push the joystick right to increase the volume and push it left to decrease the volume To change channel in Live TV mode Scroll through the stored channels by pushing the joystick forwards or pulling it towards yourself To change source in Live TV mode Press the centre of the joystick in the TV options m...

Page 11: ...de 8 OK Confirms selections enters sub menus views channel list in Live TV mode 9 Back Return Returns to previous menu screen goes one step back closes open windows closes teletext in Live TV Teletext mode 10 Netflix Launches the Netflix application 11 Freeview Play Connects to the Freeview Play platform where you can access available catch up TV services 12 Menu Displays Live TV Settings menu in ...

Page 12: ... to continue with wired connection or change the network Highlight Change network and press OK if you want to use wireless connection instead of wired connection 6 Network Connection You will be directed to the next step automatically if you connect your TV to the Internet via Ethernet at this point If not available wireless networks will be searched and listed on the next screen Select your WLAN ...

Page 13: ...ents for Freeview Play services refer to the Freeview Play Platform section 12 Password Depending on the country selection you made in the earlier steps you may be asked to define a 4 digit password PIN at this point Press OK to proceed The selected PIN cannot be 0000 This PIN will be required in order to access some menus content or to release locked channels sources etc You will have to enter it...

Page 14: ...rk options will be available If you are going to perform a network scan make sure that you have adjusted the Frequency Symbol Rate Ksym s and Polarisation parameters under the Transponder option accurately Scan Type You can perform a scan for free or encrypted channels only If the Free option is selected encrypted channels will not be installed Select All to scan all channels Store Type You can se...

Page 15: ...tton on the remote to switch to Live TV mode If the source was set to an option other than Antenna Cable Satellite or ATV previously press the Source button and set one of these options to watch live TV channels Highlight Multi Media Player and press OK to browse the connected USB devices and play display the installed media content on the TV The audio can be played through the speakers of the TV ...

Page 16: ...is feature is useful in the UK and Ireland only MHEG PIN Protection Turn the MHEG PIN protection function on or off This setting enables or disables access some of the MHEG applications Disabled applications can be released by entering the right PIN This feature is useful in the UK and Ireland only HBBTV Settings HBBTV Support Turn the HBBTV function on or off Do Not Track Set your preference rega...

Page 17: ...gs Set a HTTP proxy for browser manu ally This proxy may not be used by other apps IP settings Configure your TV s IP settings Channel The content of this menu may change depending on the selected input source and whether the channel installation is completed Channels Options of this menu may change or become inactive depending on the input source and on the Channel Installation Mode selection Inp...

Page 18: ... buttons on the remote Highlight the desired channel s on the list and press OK to select unselect Channel Swap Replace the positions of the two selected channels in the channel list Highlight the desired channels on the list and press OK to select When the second channel is selected the position of this channel will be replaced with the position of the first selected channel You can press the Yel...

Page 19: ...annel you want to select Then highlight OK and press OK to go to that channel Channel Edit Edit channels in the channel list Edit the name and channel number of the selected channel and display Network Name Channel Type and Fre quency information related to that channel if available Depending on the channel other options may also be editable Press OK or the Yellow button to edit the highlighted ch...

Page 20: ...information refer to the Storage section in the Settings Device Preferences menu Permissions Manage the permissions and some other features of the apps App permissions The apps will be sorted by permission type categories You can enable disable permissions for the apps from within these categories Special app access Configure some app features and special permissions Security restrictions You can ...

Page 21: ...for Dolby Vision content When turned on Dolby Vision logo will be displayed on the screen when Dolby Vision content is detected Auto Backlight Set your auto backlight preference Off Low Middle and Eco options will be available Set as Off to disable Backlight Adjust the backlight level of the screen manually This item will not be available if the Auto Backlight is not set as Off Brightness Adjust t...

Page 22: ... display the MJC activity HDMI RGB Range This setting should be ad justed according to input RGB signal range on HDMI source It can be limited range 16 235 or full range 0 255 Set your HDMI RGB range preference Auto Full and Limit options will be available This item will not be available if the input source is not set as HDMI Low Blue Light Electronic device screens emit blue light that can cause ...

Page 23: ...e screen before proceeding Note Formatting the connected storage device will erase all data installed on it Back up the files that you want to keep before you proceed with formatting the device Erase format as removable storage If you did priorly format your USB storage device as device storage it will only be usable with your TV You can use this option to format it again in order to use it with o...

Page 24: ... audio commentary more clearly when it is available through broadcast Audio for the Visually Impaired Set the audio type for visually impaired Options will be available depending on the selected broadcast Fader Control Adjust the volume balance between the main TV audio Main and audio commentary AD Restart A confirmation message will be displayed select Restart to proceed with restarting The TV wi...

Page 25: ...nformation on the highlighted event Press Back Return button to go back to guide screen Press Blue button to search events Press Yellow button to see available on demand player applications Press Green button to see the recommendations and box sets You can also press Red button to open the schedule Using the schedule you can see events of the current day previous or next 7 days Highlight the day a...

Page 26: ...e radio wave conditions the line traffic and the products that you use The transmission may also be cut off or may get disconnected depending on the radio wave conditions DECT phones or any other WLAN 11b appliances The standard values of the transmission speed are the theoretical maximum values for the wireless standards They are not the actual speeds of data transmission The location where the t...

Page 27: ... the next file Pause Play Pause and resume the playback Rewind Press and hold to rewind Fast Forward Press and hold to fast forward Stop Stop the playback Programme Switch to next file Programme Switch to previous file Back Return Return to the media player screen If you press Back Return button without stopping the playback first the playback will continue while you are browsing in the multimedia...

Page 28: ...cture Settings Display the picture settings menu Sound Settings Display the sound settings menu Sound Tracks Set the soundtrack option if more then one available Last Memory Set to Time if you want to resume the playback from the position where it was stopped next time you open the same video file If set to Off the playback will start from the beginning Highlight an option and press OK to change t...

Page 29: ...io from the con nected audio device only The volume control buttons of the remote will be directed to the connected audio device and you will be able to control the volume of the connected device with your TV remote For eARC to function properly The connected audio device should also support eARC Some HDMI cables do not have enough bandwidth to carry high bit rate audio channels use an HDMI cable ...

Page 30: ...one and press the OK button Then select a content that you want to play back and press the OK button to watch Catch up content can also be accessed and played back directly from the TV Guide Refer to the section Programme Guide for more information Accessible TV Guide The Freeview Play Accessible TV Guide makes it simpler for you to find the shows you love that meet your accessibility needs Learn ...

Page 31: ...rce Make sure that the external device or source is properly connected Make sure that the picture settings are set correctly Loud speakers unearthed audio devices neon lights high buildings and other large objects can influence reception quality If possible try to improve the reception quality by changing the antenna direction or moving devices away from the TV Change to a different picture format...

Page 32: ...60fps 135Mbps Main High Profile Level 5 2 FLV flv MP4 mp4 mov 3GPP 3gpp 3gp MPEG transport stream ts trp tp ASF asf WMV wmv AVI avi MKV mkv OGM ogm MPEG program stream DAT VOB MPG MPEG H264 264 AVS 1920x1080 60fps 50Mbps Jizhun profile Level 6 0 1 08 60 MPEG transport stream ts trp tp MP4 mp4 mov AVS avs AVS 1920x1080 60fps 50Mbps Broadcasting Profile Level 6 0 1 08 60 MPEG transport stream ts trp...

Page 33: ... DivX divx 3GPP 3gpp 3gp MP4 mp4 mov m4a PEG transport stream ts trp tp MPEG program stream DAT VOB MPG MPEG WMV wmv ASF asf OGM ogm EAC3 DDP EAC3 DDP Up to 5 1 32Kbps 6Mbps EAC3 ec3 AVI avi MKV mkv mka DivX divx 3GPP 3gpp 3gp MP4 mp4 mov m4a MPEG transport stream ts trp tp MPEG program stream DAT VOB MPG MPEG WMV wmv ASF asf OGM ogm AAC LC HEAAC 8KHz 48KHz Up to 5 1 AAC LC 12kbps 576kbps V1 6kbps...

Page 34: ...Stereo 5 1 64Kbps 1 5Mbps WAV wav AVI avi MKV mkv mka 3GPP 3gpp 3gp MP4 mp4 mov m4a MPEG transport stream ts trp tp MPEG program stream DAT VOB MPG MPEG WMV wmv ASF asf FLV flv OGM ogm IMA ADPCM MS ADPCM 8KHz 48KHz Up to 2 32Kbps 384Kb ps WAV wav AVI avi MKV mkv mka OGM ogm G711 A mu law 8KHz 1 64Kbps WAV wav AVI avi MKV mkv mka FLV flv LBR cook 8KHz 11 025KHz 22 05KHz 44 1KHz Up to 5 1 6Kbps 128K...

Page 35: ...400 GIF 6400 x 4800 WebP 3840 x 2160 HEIF 4000 x 3000 Subtitle Internal File Extension Container Subtitle Codec ts trp tp TS DVB Subtitle Teletext CC EIA608 PGS mp4 MP4 VobSub PGS TX3G mkv MKV ASS SSA SRT VobSub PGS External File Extension Subtitle Parser Remark srt SubRip ssa ass SubStation Alpha Advanced SubStation Alpha smi SAMI sub MicroDVD SubIdx VobSub txt TMPlayer ...

Page 36: ...nectors by using a DVI converter cable DVI to HDMI cable not supplied you can refer to the following resolution information 56Hz 60Hz 66Hz 70Hz 72Hz 75Hz 640x480 x x 800x600 x x x 1024x768 x x x 1280x768 x x 1280x960 x 1360x768 x 1366x768 x 1280x1024 x x x 1400x1050 x 1600x900 x ...

Page 37: ...X 50LX650BZ TX 50LX660B TX 55LX650B TX 55LX650BZ TX 55LX660B TX 65LX650B TX 65LX650BZ TX 65LX660B Audio Output Power WRMS 10 THD 2 x 10 W 2 x 10 W 2 x 10 W 2 x 12 W Power Consumption W 120 W 135 W 140 W 200 W Weight kg 11 Kg 14 Kg 17 Kg 24 5 Kg TV Dimensions DxLxH with stand mm 221 x 964 x 614 221 x 1119 x 704 221 x 1233 x 769 251 x 1452 x 890 TV Dimensions DxLxH without stand mm 68 x 964 x 560 68...

Page 38: ...unctions This TV is designed to meet the standards as of March 2021 of DVB T T2 MPEG2 MPEG4 AVC H 264 and HEVC H 265 digital terrestrial services DVB C MPEG2 MPEG4 AVC H 264 and HEVC H 265 digital cable services and DVB S MPEG2 MPEG4 AVC H 264 and HEVC H 265 digital satellite services Consult your local dealer for availability of DVB T T2 or DVB S services in your area Consult your cable service p...

Page 39: ...intellectual property rights of Microsoft Corporation Use or distribution of such technology outside of this product is prohibited without a licence from Microsoft or an authorised Microsoft subsidiary Disposal of Old Equipment and Batteries Only for European Union and countries with recycling systems These symbols on the products packaging and or accompanying documents mean that used electrical a...

Page 40: ...umable items for your product with ease and confidence by phoning our Customer Comminications Centre Monday Friday 9 00am 5 00pm Excluding public holidays Or go on line through our InternetAccessory ordering application at www pas europe com Most major credit and debit cards accepted All enquiries transactions and distribution facilities are provided directly by Panasonic UK It couldn t be simpler...

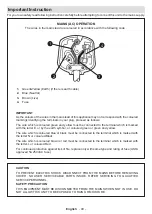
Page 41: ...e terminal which is marked with the letter E or by the earth symbol or coloured green or green and yellow The wire which is coloured blue or black must be connected to the terminal which is marked with the letter N or coloured Black The wire which is coloured brown or red must be connected to the terminal which is marked with the letter L or coloured Red For continued protection against risk of fi...

Page 42: ......
Reviews: