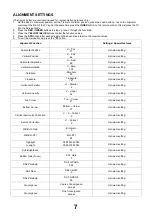
ALIGNMENT SETTINGS
(The figures below are nominal and used for representative purposes only.)
1. Set the Bass to maximum position, set the Treble to minimum position, press the down button (- / v) on the customer
controls at the front of the TV and at the same time press the INDEX button on the remote control, this will place the TV
into the Service Mode.
2. Press
the
RED / GREEN buttons to step up / down through the functions.
3. Press
the
YELLOW / BLUE buttons to alter the function values.
4. Press
the
STR button after each adjustment has been made to store the required values.
5. To exit the Service Mode, press the "N" button.
Alignment Function
Settings / Special features
Horizontal Position
H – Pos
77
Optimum setting.
Vertical Position
V – Pos
92
Optimum setting.
Horizontal Amplitude
H – Amp
69
Optimum setting.
Vertical Amplitude
V – Amp
102
Optimum setting.
Parabola
Parabola
30
Optimum setting.
Trapezoid
Trapezoid
127
Optimum setting.
Horizontal Parallel
H – Parallel
8
Optimum setting.
Vertical Linearity
V – Linear
35
Optimum setting.
Top Corner
Top – Corner
21
Optimum setting.
Bottom Corner
Bottom – Corner
21
Optimum setting.
Vertical Symmetry Correction
V – S – Correct
9
Optimum setting.
Center Correction
C – Correct
6
Optimum setting.
WB-B-G- Gain
B-G-Gain
0
Optimum setting.
WB-B-G-ST1
B-G-ST1
89
Optimum setting.
Highlight
Lowlight
0084 0128 0092
0066 0128 0042
Optimum setting.
Sub-Brightness
57
Optimum setting.
Splitter Gain (Tuner)
SPL. Gain
0
Optimum setting.
DAF Parabola
DAF H-PARA
292
Optimum setting.
DAF Saw
DAF V-SAW
0
Optimum setting.
DAF Parabola
DAF V-PARA
26
Optimum setting.
Convergence
Coarse Convergence
Access
Optimum setting.
Convergence
Fine Convergence
Access
Optimum setting.
7
Summary of Contents for TX-47PT10
Page 33: ......
Page 34: ......
Page 35: ......
Page 36: ......
Page 37: ......
Page 38: ......
Page 39: ......
Page 40: ......
Page 41: ......
Page 42: ......
Page 43: ......
Page 44: ......
Page 46: ...DIODES D1050 A2 D1051 A2 A 1 2 TNPA1341 K PCB ...


