background image

English

   - 10 -

Switching On/Off

To Switch the TV On

Connect the power cord to a power source such as a 

wall socket (220-240V AC, 50 Hz). 
To switch on the TV from standby mode either:

• 

Press the 

Standby

 button, 

Pro/-

 or a 

numeric button on the remote control.

• 

Press the 

Standby

 button or 

Pro/-

 on 

the TV.

The TV will then switch on.

To Switch the TV Off

Press the 

Standby 

button on the remote control or 

press the 

Standby 

button on the TV, then the TV 

switches into standby mode.

To power down the TV completely, unplug the 

power cord from the mains socket.

Note:  When  the  TV  is  switched  into  standby  mode,  the 

standby  LED  can  blink  to  indicate  that  features  such  as 

Standby Search, Over Air Download or Timer is active. The 

LED can also blink when you switch on the TV from standby 

mode.

First Time Installation

When turned on for the first time, the language 

selection screen is displayed. Select the desired 

language and press 

OK

.

On the next screen, set your preferences using the 

directional buttons.

Note:

 Depending on the Country selection you may be asked 

to set and confirm a PIN at this point. The selected PIN cannot 

be 0000. You have to enter it if you are asked to enter a PIN 

for any menu operation later.

About Selecting Broadcast Type

Aerial:

 If 

Aerial

 broadcast search option is turned on, 

the TV will search for digital terrestrial broadcasts after 

other initial settings are completed.

Cable:

 If 

Cable

 broadcast search option is turned on, 

the TV will search for digital cable broadcasts after 

other initial settings are completed. According to your 

other preferences a confirmation message may be 

displayed before starting to search. Select 

YES

 and 

press 

OK

 to proceed. To cancel operation, select 

NO


and press 

OK

. You can select 

Network

 or set values 

such as 

Frequency

Network ID

 and 

Search Step

When finished, press 

OK

 button. 

Note:

 Searching duration will change depending on the 

selected 

Search Step

.

Analogue: 

If 

Analogue

 broadcast search option is 

turned on, the TV will search for analogue broadcasts 

after other initial settings are completed.
Additionally you can set a broadcast type as your 

favourite one. Priority will be given to the selected 

broadcast type during the search process and the 

channels of it will be listed on the top of the Channel 

List. When finished, press 

OK

 to continue.

You can activate 

Store Mode

 option at this point. 

This option will configure your TV’s settings for store 

environment. This option is intended only for store use. 

It is recommended to select 

Home Mode

 for home 

use. This option will be available in 

Setup>More

 menu 

and can be turned off/on later. 
Press 

OK

 button on the remote control to continue 

and the 

Network Settings

 menu will be displayed. 

Please refer to 

Connectivity

 section to configure a 

wired or a wireless connection. After the settings are 

completed press 

OK

 button to continue. To skip to 

the next step without doing anything press the 

Rapid 

advance

 button on the remote. 

After the initial settings are completed TV will start 

to search for available broadcasts of the selected 

broadcast types.
After all the available stations are stored, scan results 

will be displayed. Press 

OK

 to continue. The 

Edit 

Channel List

 menu will be displayed next. You can 

edit the channel list according to your preferences or 

press the 

Menu

 button to quit and watch TV.

While the search continues a message may appear, 

asking whether you want to sort channels according 

to the LCN

(*)

. Select 

Yes

 and press 

OK 

to confirm

.

(*) LCN is the Logical Channel Number system that organizes 

available  broadcasts  in  accordance  with  a  recognizable 

channel number sequence (if available).

Note: Do  not  turn  off  the  TV  while  initializing  first  time 

installation. Note that, some options may not be available 

depending on the country selection.

Media Playback via USB Input

You can connect 2.5” and 3.5” inch (hdd with external power 

supply) external hard disk drives or USB memory stick to your 

TV by using the USB inputs of the TV.

IMPORTANT!

 Back up the files on your storage devices 

before connecting them to the TV. Manufacturer will 

not be responsible for any file damage or data loss. 

Certain types of USB devices (e.g. MP3 Players) 

or USB hard disk drives/memory sticks may not be 

compatible with this TV. The TV supports FAT32 and 

NTFS disk formatting.
While formatting USB hard drives which have 

more than 1TB (Tera Byte) storage space you may 

experience some problems in the formatting process.  
Wait a little while before each plugging and unplugging 

as the player may still be reading files. Failure to do 

so may cause physical damage to the USB player 

and the USB device itself. Do not pull out your drive 

while playing a file.

You can use USB hubs with your TV’s USB inputs. 

External power supplied USB hubs are recommended 

in such a case. 

Summary of Contents for TX-48CX400B

Page 1: ...OPERATING INSTRUCTIONS TX 55CR430B COLOUR TELEVISION WITH REMOTE CONTROL ...

Page 2: ...Time Installation 10 Media Playback via USB Input 10 Media Browser Menu 11 CEC and CEC RC Passthrough 11 TV Menu Contents 12 General TV Operation 16 Using the Channel List 16 Configuring Parental Settings 16 Electronic Programme Guide EPG 16 Teletext Services 17 Software Upgrade 17 Troubleshooting Tips 18 PC Input Typical Display Modes 18 AV and HDMI Signal Compatibility 19 Supported Video File Fo...

Page 3: ...r cord plug can cause fire or give you an electric shock Handle the power cord by the plug do not unplug the TV by pulling the power cord Never touch the power cord plug with wet hands as this could cause a short circuit or electric shock Never make a knot in the power cord or tie it with other cords When damaged it must be replaced this should only be done by qualified personnel Do not use this T...

Page 4: ...scratch the surface with your fingernail or other hard objects Do not allow the cabinet and pedestal to make contact with a rubber or PVC substance for a long time This may degrade surface quality Mains plug Wipe the mains plug with a dry cloth at regular intervals Moisture and dust may cause fire or electrical shock Assembling Removing the pedestal Preparations Take out the pedestal s and the TV ...

Page 5: ... immediately If you don t press any button the screen will be off in 15 seconds Press any button on the remote or on the TV to turn the screen on again Note Screen Off option is not available if the Mode is set to Game When the TV is not in use please switch off or disconnect the TV from the mains plug This will also reduce energy consumption Features TV supports Ultra HD Ultra High Definition als...

Page 6: ...rectional buttons again to select or set an item Press Return Back or Menu button to quit a menu screen Input Selection Once you have connected external systems to your TV you can switch to different input sources Press the Source button on your remote control consecutively to select the different sources Changing Channels and Volume You can change the channel and adjust the volume by using the Vo...

Page 7: ...this case it complies with the requirement set by the Directive for the chemical involved Authorized Representative Panasonic Testing Centre Panasonic Marketing Europe GmbH Winsbergring 15 22525 Hamburg Germany Web Site http www panasonic com Sales and Support Information Customer Communication Centre For customers within the UK 0344 844 3899 For customers within Ireland 01289 8333 Monday Friday 9...

Page 8: ...ard IEEE 802 11 a b g n Host Interface USB 2 0 Security WEP 64 128 WPA WPA2 TKIP AES WAPI Notice for DVB Data broadcasting IPTV functions This TV is designed to meet the standards as of August 2013 of DVB T T2 MPEG2 and MPEG4 AVC H 264 digital terrestrial services and DVB C MPEG2 and MPEG4 AVC H 264 digital cable services Consult your local dealer for availability of DVB T T2 services in your area...

Page 9: ...each many web based applications 12 My button 13 Coloured Buttons Follow the on screen instructions for coloured button functions 14 Language Switches between sound modes analogue TV displays and changes audio subtitle language digital TV where available 15 Subtitles Turns subtitles on and off where available 16 Rapid reverse Moves frames backwards in media such as movies 17 No function 18 Play St...

Page 10: ...e TV will automatically switch to AV mode When receiving DTV channels Mpeg4 H 264 or while in Media Player mode output will not be available via the scart socket When using the wall mounting kit available from third party in the market if not supplied we recommend that you plug all your cables into the back of the TV before mounting on the wall Insert or remove the CI module only when the TV is SW...

Page 11: ...nished press OK to continue You can activate Store Mode option at this point This option will configure your TV s settings for store environment This option is intended only for store use It is recommended to select Home Mode for home use This option will be available in Setup More menu and can be turned off on later Press OK button on the remote control to continue and the Network Settings menu w...

Page 12: ...s List menu When new CEC source device is connected it will be listed in source menu with its own name instead of the connected HDMI ports name such as DVD Player Recorder 1 etc The TV remote is automatically able to perform the main functions after the connected HDMI source has been selected To terminate this operation and control the TV via the remote again press Quick Menu button on the remote ...

Page 13: ... video settings for motional images to acquire a better quality and readability When Movie Sense option is set to Low Medium or High Movie Sense demo option will be available If one of these options is selected and if you press OK button then the demo mode starts While demo mode is active the screen will be divided into two sections one displaying the movie sense activity the other displaying the ...

Page 14: ...s AVL Automatic Volume Limiting Sets the sound to obtain fixed output level between programmes Headphone Lineout When you connect an external amplifier to your TV using the headphone jack you can select this option as Lineout If you have connected headphones to the TV set this option as Headphone Please ensure before using headphones that this menu item is set to Headphone If it is set to Lineout ...

Page 15: ...aring Enables any special feature sent from the broadcaster Audio Description A narration track will be played for the blind or visually impaired audience Press OK to see all available Audio Description menu options This feature is available only if the broadcaster supports it Netflix If this feature is supported by your TV you can view your ESN number and deactivate Netflix ESN number is an uniqu...

Page 16: ...VB stations Analogue Searches and stores analogue stations Manual channel scan This feature can be used for direct broadcast entry Network channel scan Searches for the linked channels in the broadcast system Digital Aerial Searches for aerial network channels Digital Cable Searches for cable network channels Analogue fine tune You can use this setting for fine tuning analogue channels This featur...

Page 17: ...ation is set as France Italy or Austria Maturity Lock s value will be set to 18 as default Child Lock If this option is set to ON the TV can only be controlled by the remote control In this case the control buttons on the TV will not work Set PIN Defines a new PIN number Default CICAM PIN This option will appear as greyed out if no CI module is inserted into the CI slot of the TV You can change th...

Page 18: ...iew digital teletext information Operate it with the coloured buttons cursor buttons and the OK button The operation method may differ depending on the contents of the digital teletext Follow the instructions displayed on the digital teletext screen When the Text button is pressed again the TV returns to television broadcast BBC Connected Red Button CRB While watching BBC channels press the Red bu...

Page 19: ... Sound may be coming from only one speaker Check the balance settings from Sound menu Remote control no operation The batteries may be exhausted Replace the batteries Input sources can not be selected If you cannot select an input source it is possible that no device is connected If not Check the AV cables and connections if you are trying to switch to the input source dedicated to the connected d...

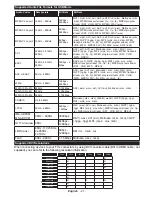
Page 20: ...480p 60Hz O 576i 576p 50Hz O 720p 50Hz 60Hz O 1080i 50Hz 60Hz O 1080p 24Hz 25Hz 30Hz 50Hz 60Hz O 3840x2160p 24Hz 25Hz 30Hz 50Hz 60Hz O 4096x2160p 24Hz 25Hz 30Hz 50Hz 60Hz O X Not Available O Available In some cases a signal on the TV may not be displayed properly The problem may be an inconsistency with standards from the source equipment DVD Set top box etc If you do experience such a problem ple...

Page 21: ...rp tp AVS 1080Px2 30fps 1080P 60fps 40Mbps AVS 1080P 60fps 50Mbps WMV3 1080Px2 30fps 1080P 60fps 40Mbps ASF asf AVI avi MKV mkv WMV wmv VC1 MPEG program stream MPG MPEG MPEG transport stream ts trp tp ASF asf WMV wmv AVI avi MKV mkv Motion JPEG 720P 30fps 10Mbps AVI avi 3GPP 3gpp 3gp MP4 mp4 mov MKV mkv ASF asf VP8 1080P 30fps 20Mbps MKV mkv WebM webm RV30 RV40 1080Px2 30fps 1080P 60fps 40Mbps RM ...

Page 22: ... MPEG AAC HEAAC 8KHz 48KHz AAC aac AVI avi Matroska mkv mka DivX divx 3GPP 3gpp 3gp MP4 mp4 mov m4a MPEG transport stream ts trp tp MPEG program stream DAT VOB MPG MPEG FLV flv RM rm rmvb ra WMA 8KHz 48KHz 128bps 320Kbps ASF wma wmv asf AVI avi Matroska mkv mka WMA 10 Pro M0 48KHz 192kbps WMA 10 Pro M1 48KHz 384kbps WMA 10 Pro M2 96KHz 768kbps VORBIS Up to 48KHz Matroska mkv mka WebM webm 3GPP 3gp...

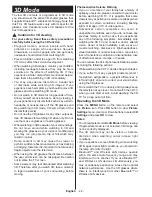
Page 23: ... 3D take a moment to regain awareness of your surrounding before moving Photosensitive Seizure Warning If you or a member of your family has a history of epilepsy or seizure please consult with your doctor before watching 3D TV It is possible that some viewers may experience a seizure or epilepsy when exposed to certain conditions including flashing lights or images in TV or video games Sometimes ...

Page 24: ... Option Menu Press the Quick Menu button on the remote to open the Option Menu Select 3D Mode option and set as you want Watching 3D images in 2D format First off all the TV should be in 3D mode Select 2D Only option in the 3D Settings menu using the Up or Down buttons Press Left or Right buttons to set 2D mode as Left Right or Off Watching 2D images in 3D format Select Virtual 3D option in the 3D...

Page 25: ...0p FC SBS TB SBS TB SBS TB SBS TB 1080i FC SBS TB SBS TB SBS TB SBS TB OTHER SBS TB SBS TB C1 SBS TB ATV PORTAL YOUTUBE OTHER 1080p 24 FP Not Supported Not Supported Not Supported Not Supported 720p 50 FP Not Supported Not Supported Not Supported Not Supported 720p 60 FP Not Supported Not Supported Not Supported Not Supported 1080p FC Not Supported SBS TB SBS TB SBS TB 720p FC Not Supported SBS TB...

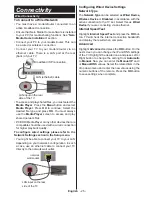
Page 26: ...ngs please refer to the Network Settings section in the Setup menu You might be able to connect your TV to your LAN depending on your network s configuration In such a case use an ethernet cable to connect your TV directly to the network wall outlet LAN input on the rear side of the TV network wall socket Configuring Wired Device Settings Network Type The Network Type can be selected as Wired Devi...

Page 27: ...iguring Wireless Device Settings Open the Network Settings menu and select Network Type as Wireless Device to start connection process The TV will scan the wireless networks automatically A list of available networks will be displayed Please select your desired network from the list Note If the modem supports N mode you should set N mode settings If the selected network is protected with a passwor...

Page 28: ...ring any files in your media server program on your PC If the domain is invalid this might cause problems while browsing files in media sharing mode Using Media Sharing Network Service Media sharing feature uses a standard that eases the viewing process of digital electronics and makes them more convenient to use on a home network This standard allows you to view and play photos music and videos s...

Page 29: ...ogress bar will indicate the state of the installation process 9 Click the Finish button The installation is completed You will be directed to the web site of the nero software 10 A shortcut is now placed on your desktop Congratulations You successfully installed Nero MediaHome on your PC Run Nero MediaHome by double clicking on the shortcut icon Internet Portal HINT A broadband internet connectio...

Page 30: ...d press the OK button to add Whilst you are on the site you wish to add to the Speed Dial list highlight the Opera button and press the OK button Then highlight Add to Speed Dial option in the submenu and press the OK button again Name and Address will be filled automatically according to the site you are visiting Highlight OK and press the OK button to add You can also use the Opera menu options ...

Page 31: ...al which is marked with the letter E or by the earth symbol or coloured green or green and yellow The wire which is coloured blue or black must be connected to the terminal which is marked with the letter N or coloured Black The wire which is coloured brown or red must be connected to the terminal which is marked with the letter L or coloured Red For continued protection against risk of fire repla...

Page 32: ...2 0 5 W Off mode power consumption NA Screen resolution 3840 x 2160 1 Energy consumption XYZ kWh per year based on the power consumption of the television operating 4 hours per day for 365 days The actual energy consumption will depend on how the television is used 2 when the TV is turned off with the remote control and no function is active For the information of rated power consumption refer to ...

Page 33: ...sore ce du modèle G Consommation d énergie annuelle d efficacité énergétique H Consommation électrique en mode veille I Consommation électrique en mode arrêt ode marche J Résolution de l écran Z kWh par an sur la base de la consommation électrique atre heures par jour pendant trois cent soixante cinq jours La es conditions d utilisation du téléviseur l aide de la télécommande et qu aucune fonction...

Page 34: ...na nalepnici na poleđini televizora English 20 Português A Ficha de produto C Identificador de modelo G Consumo de energia anual B Fornecedor D Classe de eficiência energética H Consumo em termos de potência em estado de vigília E Diagonal visível do ecrã I Consumo em termos de potência em estado de desactivação F Consumo em termos de potência no estado activo J Resolução do ecrã K Consumo de ener...

Page 35: ......

Reviews: