English
34
5
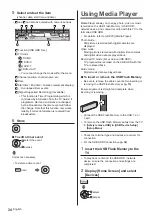
Select and set the item
(channel, date, start time, end time)
●
and can also be entered with numeric buttons.
18:00
20:00
3 ITV1
21:30
22:30
Red Cap
BBC ONE
1
Guide
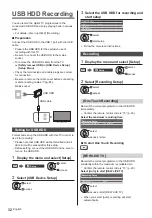
Timer Programming
Function
No.
Date
Start
End
Channel Name
Wed 21.10.2015 10:46
USB HDD Rec.
USB HDD Rec.
Wed 21.10.2015
(60 min.)
(120 min.)
Thu 22.10.2015
<TIMER>
Function [USB HDD Rec.]
TV mode
[ ]: DVB-S
[ ]: DVB-C
[ ]: DVB-T
[ ]: DVB-via-IP
●
You cannot change the mode within the menu.
Channel position, channel name, etc.
Date
Start time / End time / Duration (automatic display)
: Overlapped timer events
[Signal Supported Recording] (if available)
●
This function is Timer Programming which is
controlled by information from the TV Guide; if
programme start and end times are changed
by the broadcaster, the timer event will follow
the change. Note that this function only works
reliably if correct information is received from
broadcasters.
6
Store
■
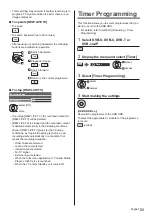
To edit a timer event
select the event
access
Correct as necessary
●
To delete a timer event
(red)
Using Media Player
Media Player allows you to enjoy photo, video or music
recorded on the USB Flash Memory / USB HDD /
network device, and content recorded with this TV to the
formatted USB HDD.
●
For details, refer to [eHELP] (Media Player).
Photo mode:
Still pictures recorded with digital cameras are
displayed.
Video mode:
Moving pictures recorded with digital video cameras
and digital video data are played back.
Recorded TV mode (For exclusive USB HDD):
TV programmes recorded on the USB HDD with this
TV are played back.
Music mode:
Digital music data are played back.
■
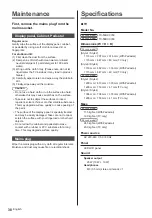
To insert or remove the USB Flash Memory
●
Be sure to remove the cable cover before inserting or
removing the USB Flash Memory
(p. 13)
Ensure alignment is straight and complete when
inserting or removing.
●
Connect the USB Flash Memory to the USB 1, 2 or
3 port.
●
To remove the USB Flash Memory safely from the TV
[Safely remove USB] in [USB Device Setup]
(Setup Menu)
●
Check the terminal type and devices are correct for
connection.
●
For the USB HDD Connection
(p. 32)
1
Insert the USB Flash Memory to the
TV
●
To play back content in the USB HDD / network
device, ensure the connection and settings are
completed.
2
Display [Home Screen] and select
[Devices]
select
access
Summary of Contents for TX-50DXX789
Page 9: ...English 9 Style1 1 A D A C F E 2 3 B 4 G ...
Page 10: ...English 10 Style2 1 A D A C F E 2 B 3 G 4 ...
Page 11: ...English 11 Style3 1 A C A D F E 2 B 3 G 4 ...
Page 41: ......
Page 52: ...Русский 10 Вид 1 1 A D A C F E 2 3 B 4 G ...
Page 53: ...Русский 11 Вид 2 1 A D A C F E 2 B 3 G 4 ...
Page 54: ...Русский 12 Вид 3 1 A C A D F E 2 B 3 G 4 ...
Page 87: ......

