background image

English

   - 17 -

General TV Operation
Using the Channel List

The TV sorts all stored stations in the 

Channel List

You can edit this channel list, set favourites or set 

active stations to be listed by using the 

Channel List


options. Press the 

OK

/

TV

 button to open the 

Channel 

List

. You can filter the listed channels by pressing the 

Blue

 button or open the 

Edit Channel List

 menu by 

pressing the 

Green

 button in order to make advanced 

changes in the current list.

Managing the Favourite Lists

You can create four different lists of your favourite 

channels. Enter the 

Channel List

 in the main menu 

or press the 

Green

 button while the 

Channel List


is displayed on the screen in order to open the 

Edit 

Channel List

 menu. Select the desired channel on 

the list. You can make multiple choices by pressing 

the 

Yellow

 button. Then press the 

OK

 button to open 

the 

Channel Edit Options

 menu and select 

Add/

Remove Favourites

 option. Press the 

OK

 button 

again. Set the desired list option to 

On

. The selected 

channel/s will be added to the list. In order to remove  

a channel or channels from a favourite list follow the 

same steps and set the desired list option to 

Off

.

You can use the 

Filter

 function in the 

Edit Channel 

List

 menu to filter the channels in the 

Channel list 

permanently according to your preferences. Using this 

Filter

 option, you can set one of your four favourite 

lists to be displayed everytime the 

Channel list

 is 

opened. The  filtering  function  in  the 

Channel list


menu will only filter the currently displayed 

Channel 

list

 in order to find a channel and tune in to it. This 

changes will not remain the next time the 

Channel 

list

 is opened.

Configuring Parental Settings

The 

Parental Settings

 menu options can be used to 

prohibit users from viewing of certain programmes, 

channels and using of menus. These settings are 

located in the 

Setup>Parental

 menu.

To display parental lock menu options, a PIN number 

should be entered. After coding the correct PIN 

number, 

Parental Settings

 menu will be displayed.

Menu Lock:

 This setting enables or disables access 

to all menus or installation menus of the TV. 

Maturity Lock:

 If this option is set, TV gets the 

maturity information from the broadcast and if this 

maturity level is disabled, disables access to the 

broadcast.

Note:

 If the country option in the 

First Time Installation

 is 

set as France, Italy or Austria, 

Maturity Lock

’s value will be 

set to 18 as default.

Child Lock:

 If this option is set to 

ON

, the TV can only 

be controlled by the remote control. In this case the 

control buttons on the TV will not work.

Set PIN:

 Defines a new PIN number. 

Default CICAM PIN:

 This option will appear as greyed 

out if no CI module is inserted into the CI slot of the 

TV. You can change the default PIN of the CI CAM 

using this option. 
The open browser application in the portal, may 

become disabled due to changes made in the 

parental settings. This can be done in 2 different 

ways according to the country selection made in the 

first time installation. 

If the selected country is France; adjusting the maturity 

lock for users aged 15 and younger will disable open 

browser.
If another country is selected except France; turning 

any of the maturity lock settings on will disable open 

browser.

Note: 

Default PIN can be set to 

0000

 or 

1234

. If you have 

defined  the  PIN(is  requested  depending  on  the  country 

selection) during the 

First


Time


Installation

 use the PIN that 

you have defined.

Some options may not be available depending on the country 

selection in the 

First Time Installation

.

Electronic Programme Guide (EPG)

Some channels send information about their 

broadcast schedules. Press the 

Epg

 button to view 

the 

Programme Guide

 menu.

There are 3 different types of schedule layouts 

available, 

Timeline Schedule

List Schedule

 and 

Now/Next Schedule

. To switch between them follow 

the instructions on the bottom of the screen.

Timeline Schedule

Zoom (Yellow button):

 Press the 

Yellow

 button to 

see events in a wider time interval.

Filter (Blue button): 

Views filtering options.

Select Genre (Subtitles button): 

Displays 

Select 

Genre

 menu. Using this feature, you can search the 

programme guide database in accordance with the 

genre. Info available in the programme guide will be 

searched and results matching your criteria will be 

highlighted.

Options (OK button):

 Displays event options.

Event Details (Info button):

 Displays detailed 

information about selected programmes.

Next/Prev Day (Pro/- buttons): 

Displays 

the programmes of previous or next day.

Search (Text button):

 Displays 

Guide Search

 menu.

Now (Swap button):

 Displays current event of the 

highlighted channel.

List Schedule(*)

(*) 

In this layout option, only the events of the highlighted 

channel will be listed.

Prev. Time Slice (Red button):

 Displays the 

programmes of previous time slice.

Next/Prev Day (Pro/- buttons): 

Displays 

the programmes of previous or next day.

Summary of Contents for TX-55CX400B

Page 1: ...OPERATING INSTRUCTIONS TX 55CX400B COLOUR TELEVISION WITH REMOTE CONTROL ...

Page 2: ...trol 9 Connections 10 Switching On Off 11 First Time Installation 11 Media Playback via USB Input 11 Media Browser Menu 12 CEC and CEC RC Passthrough 12 TV Menu Contents 13 General TV Operation 17 Using the Channel List 17 Configuring Parental Settings 17 Electronic Programme Guide EPG 17 Teletext Services 18 Software Upgrade 18 Troubleshooting Tips 18 PC Input Typical Display Modes 19 AV and HDMI...

Page 3: ...by qualified personnel before operating it any further Do not expose the TV to direct sunlight open flames or place it near intense heat sources such as electric heaters Listening in excessive volumes from earphones and headphones may cause hearing loss Ensure that no open flame sources such as lit candles are placed on top of the TV To prevent injuries this TV must be securely attached to a wall ...

Page 4: ...evision set or its controls If your existing television set is being retained and relocated the same considerations as above should be applied Maintenance First remove the mains plug from the mains socket Display panel Cabinet Pedestal Regular care Gently wipe the surface of the display panel cabinet or pedestal by using a soft cloth to remove dirt or fingerprints For stubborn dirt 1 First clean t...

Page 5: ...ly fitted Removing the pedestal from the TV Be sure to remove the pedestal in the following way when using the wall hanging bracket or repacking the TV Put the TV onto a work table with the screen panel down on the clean and soft cloth Leave the stand s protruding over the edge of the surface Unsrew the screws that fixing the stand s Remove the stand s When using the wall hanging bracket Please co...

Page 6: ...ll also reduce energy consumption Features TV supports Ultra HD Ultra High Definition also known as 4K which provides resolution of 3840 x 2160 4K 2K It equals 4 times the resolution of Full HD TV by doubling the pixel count of the Full HD TV both horizontally and vertically Ultra HD contents are supported from HDMI USB inputs and over DVB T2 broadcasts 3D Viewing This product supports the viewing...

Page 7: ...ion Once you have connected external systems to your TV you can switch to different input sources Press the Source button on your remote control consecutively to select the different sources Changing Channels and Volume You can change the channel and adjust the volume by using the Volume and Programme buttons on the remote Inserting the Batteries into the Remote Remove the back cover to reveal the...

Page 8: ...this case it complies with the requirement set by the Directive for the chemical involved Authorized Representative Panasonic Testing Centre Panasonic Marketing Europe GmbH Winsbergring 15 22525 Hamburg Germany Web Site http www panasonic com Sales and Support Information Customer Communication Centre For customers within the UK 0344 844 3899 For customers within Ireland 01289 8333 Monday Friday 9...

Page 9: ...d IEEE 802 11 a b g n Host Interface USB 2 0 Security WEP 64 128 WPA WPA2 TKIP AES WAPI Notice for DVB Data broadcasting IPTV functions This TV is designed to meet the standards as of August 2013 of DVB T T2 MPEG2 and MPEG4 AVC H 264 digital terrestrial services and DVB C MPEG2 and MPEG4 AVC H 264 digital cable services Consult your local dealer for availability of DVB T T2 services in your area C...

Page 10: ...s to play selected media 19 Stop Stops the media being played 20 Rapid advance Moves frames forward in media such as movies 21 Pause Pauses the media being played 22 Screen Changes the aspect ratio of the screen 23 Text Displays teletext where available press again to superimpose the teletext over a normal broadcast picture mix 24 Source Shows all available broadcast and content sources 25 EPG Ele...

Page 11: ...e TV will automatically switch to AV mode When receiving DTV channels Mpeg4 H 264 or while in Media Player mode output will not be available via the scart socket When using the wall mounting kit available from third party in the market if not supplied we recommend that you plug all your cables into the back of the TV before mounting on the wall Insert or remove the CI module only when the TV is SW...

Page 12: ...nished press OK to continue You can activate Store Mode option at this point This option will configure your TV s settings for store environment This option is intended only for store use It is recommended to select Home Mode for home use This option will be available in Setup More menu and can be turned off on later Press OK button on the remote control to continue and the Network Settings menu w...

Page 13: ...s List menu When new CEC source device is connected it will be listed in source menu with its own name instead of the connected HDMI ports name such as DVD Player Recorder 1 etc The TV remote is automatically able to perform the main functions after the connected HDMI source has been selected To terminate this operation and control the TV via the remote again press Quick Menu button on the remote ...

Page 14: ...s to acquire a better quality and readability When Movie Sense option is set to Low Medium or High Movie Sense demo option will be available If one of these options is selected and if you press OK button then the demo mode starts While demo mode is active the screen will be divided into two sections one displaying the movie sense activity the other displaying the normal settings for TV screen Film...

Page 15: ...s AVL Automatic Volume Limiting Sets the sound to obtain fixed output level between programmes Headphone Lineout When you connect an external amplifier to your TV using the headphone jack you can select this option as Lineout If you have connected headphones to the TV set this option as Headphone Please ensure before using headphones that this menu item is set to Headphone If it is set to Lineout ...

Page 16: ...Displays accessibility options of the TV Hard of Hearing Enables any special feature sent from the broadcaster Audio Description A narration track will be played for the blind or visually impaired audience Press OK to see all available Audio Description menu options This feature is available only if the broadcaster supports it Netflix If this feature is supported by your TV you can view your ESN n...

Page 17: ...VB stations Analogue Searches and stores analogue stations Manual channel scan This feature can be used for direct broadcast entry Network channel scan Searches for the linked channels in the broadcast system Digital Aerial Searches for aerial network channels Digital Cable Searches for cable network channels Analogue fine tune You can use this setting for fine tuning analogue channels This featur...

Page 18: ...stallation is set as France Italy or Austria Maturity Lock s value will be set to 18 as default Child Lock If this option is set to ON the TV can only be controlled by the remote control In this case the control buttons on the TV will not work Set PIN Defines a new PIN number Default CICAM PIN This option will appear as greyed out if no CI module is inserted into the CI slot of the TV You can chan...

Page 19: ...d highlight Connected Red Button and press OK to start the service On the opening page you can access to BBC s main services such as BBC iPlayer BBC News BBC Sport and many others There are also links to the home pages of the related applications available Use the navigation buttons on the TV s remote control to move through the application Press Exit button to close and exit Software Upgrade Your...

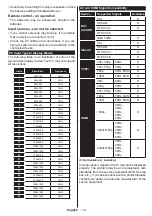
Page 20: ...z 15 1280x768 75Hz 16 1280x960 60Hz 17 1280x960 75Hz 18 1280x1024 60Hz 19 1280x1024 75Hz 20 1360x768 60Hz 21 1366x768 60Hz 22 1400x1050 59Hz 23 1400x1050 60Hz 24 1400x1050 75Hz 25 1440x900 60Hz 26 1440x900 75Hz 27 1600x1200 60Hz 28 1680x1050 59Hz 29 1680x1050 60Hz 30 1920x1080 60Hz AV and HDMI Signal Compatibility Source Supported Signals Available EXT SCART PAL O SECAM O NTSC4 43 O NTSC3 58 RGB 5...

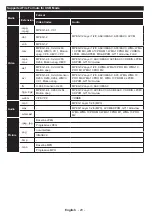
Page 21: ... law asf MPEG1 2 4 Xvid H264 Motion Jpeg MPEG1 2 Layer 1 2 3 AWMA WMA 10 PRO M0 WMA 10 PRO M1 WMA 10 PRO M2 avi MPEG1 2 4 Xvid Sorenson H263 H263 H264 WMV3 VC1 Motion Jpeg MPEG1 2 Layer 1 2 3 AAC HEAAC AC3 WMA WMA 10 PRO M0 WMA 10 PRO M1 WMA 10 PRO M2 LPCM ADPCM G711 A mu law flv H 264 Sorenson H 263 MPEG1 2 Layer 3 AAC HEAAC 3gp 3g2 MPEG1 2 4 H263 H264 Motion Jpeg MPEG1 2 Layer 3 AC3 EAC3 AAC HEA...

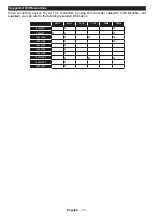
Page 22: ...nnectors by using DVI converter cable DVI to HDMI cable not supplied you can refer to the following resolution information 56Hz 60Hz 66Hz 70Hz 72Hz 75Hz 640x480 þ þ 800x600 þ þ þ 1024x768 þ þ þ 1280x768 þ þ 1280x960 þ 1360x768 þ 1366x768 þ 1280x1024 þ þ þ 1400x1050 þ 1600x900 þ ...

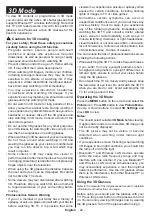
Page 23: ...epsy or seizure please consult with your doctor before watching 3D TV It is possible that some viewers may experience a seizure or epilepsy when exposed to certain conditions including flashing lights or images in TV or video games Sometimes certain symptoms can occur in unspecified conditions even if you do not have any previous history In such a case if you experience any of the following sympto...

Page 24: ...ld be in 3D mode Select 2D Only option in the 3D Settings menu using the Up or Down buttons Press Left or Right buttons to set 2D mode as Left Right or Off Watching 2D images in 3D format Select Virtual 3D option in the 3D Settings menu using the Up or Down buttons Press Left or Right buttons to set Switching left and right images The left and right eye shutter timing of the glasses can be swapped...

Page 25: ...idth C1 is supported SBS Side By Side TB Top Bottom MBP Media Browser Picture MBV Media Browser Video DTV Digital TV Source ATV Analog TV Source FC Frame Compatible FP Frame Packed Connectivity Wired Connectivity To Connect to a Wired Network You must have a modem router connected to an active broadband connection Ensure that Nero Media Home software is installed to your PC for Audio Video Sharing...

Page 26: ...onditions the line traffic and the products that you use The transmission may also be cut off or may get disconnected depending on the radio wave conditions DECT phones or any other WiFi 11b appliances The standard values of the transmission speed are the theoretical maximum values for the wireless standards They are not the actual speeds of data transmission The location where the transmission is...

Page 27: ...uter Internet Connection NotAvailable Audio Video Sharing Not Working If the MAC address a unique identifier number of your PC or modem has been permanently registered it is possible that your TV might not connect to the internet In such a case the MAC address is authenticated each time when you connect to the internet This is a precaution against unauthorized access Since your TV has its own MAC ...

Page 28: ...or and security settings such as business PC s For best home network streaming with this TV the Nero software should be installed Nero MediaHome Installation To install Nero MediaHome please proceed as follows Note To use Audio Video Sharing feature this software should be installed to your PC 1 Enter the link below completely in the adress bar of your web browser http www nero com mediahome tv 2 ...

Page 29: ... Add to Speed Dial options To navigate the web browser use the directional buttons on the remote or a connected mouse To see the browser options bar move the cursor to the top of the page or press the Back Return button History Tabs and Bookmarks options and the browser bar which contains previous next buttons the refresh button the adress search bar the Speed Dial and the Opera buttons are availa...

Page 30: ...al which is marked with the letter E or by the earth symbol or coloured green or green and yellow The wire which is coloured blue or black must be connected to the terminal which is marked with the letter N or coloured Black The wire which is coloured brown or red must be connected to the terminal which is marked with the letter L or coloured Red For continued protection against risk of fire repla...

Page 31: ... 0 50 W Off mode power consumption NA Screen resolution 3840 x 2160 1 Energy consumption XYZ kWh per year based on the power consumption of the television operating 4 hours per day for 365 days The actual energy consumption will depend on how the television is used 2 when the TV is turned off with the remote control and no function is active For the information of rated power consumption refer to ...

Page 32: ...e del consumo di un televisore in funzione per 4 nsumo effettivo di energia dipende dall utilizzo reale del televisore to con il telecomando e non sono attive funzioni ergia nominale fare riferimento all etichetta sul coperchio posteriore del televisore ce du modèle G Consommation d énergie annuelle d efficacité énergétique H Consommation électrique en mode veille I Consommation électrique en mode...

Page 33: ...ormacije o nazivnoj potrošnji struje potražite na nalepnici na poleđini televizora English 20 guês K Consumo de energia de XYZ kWh por ano baseado no consumo em termos de potência do televisor a funcionar 4 horas por dia durante 365 dias O consumo de energia real dependerá do modo como o televisor é utilizado L Quando o televisor é desligado com o telecomando e quando não está activada qualquer fu...

Page 34: ......

Reviews:

Related manuals for TX-55CX400B