background image

ƒ ª£

28

 ‹…”–"

‘@{`…”

‘@{`‹‹£

'^@œ<@•œ

'^‡<‡_‡‚

Œ‡'=š•<=š‰‚

Œ‡'=••<=œš–•<–•š‚

'^•<œ‡_‡‚

–^@œ•<@˜¡

Œ‡'=•<=•šˆ•<ˆ•š‚

Œ‡'=œ•<=—•#£‚

 ‹ƒ›

‘@{`ƒ›

'^ƒ•<ƒœ

'^ƒ™<ƒ‰

'^ƒ˜<ƒ•œ

–^@œ•<@˜¡

 ‹?'?†=^

ƒ#£=Œ*&
¥$ ~‡_$ * ‚

`%|‘{

ƒ$ *  ˆ=Œ
$ * ‚

|‘{!„$

ƒ$ *  =Œ
$ * ‚

"&ˆ

£´‰

:

¸œ

"

'^‹–^

{#

&

š¾Œ<™‰¾Œ

œš¿<›š¿–ƒ££* ‚

‹|Œ

{}~
}

*

•

@@@›šœ••‹

‰•›š<‰™œš‰‰šš<‰‰›š
‰˜˜š<‰´šš

@@@›šœ••#‹‹

œ—•œ<œ—´œ

‘

!~‡œ<~=~‹‡@=‚

!~‡<~=~‹‡@=‚

!@~˜—#¤‹•œ›#¤‚

Š}}…Š

*

œ

{}

  &™š

ƒ}

œ—šœ<œ—›š

*

•Š


^*$¤¦*£¥*¤¤£

*

œŠ


  $* #  &
 #**$ =  
‰ $**¤*  *
 *‚

ˆ

Œ  * *£&  ££
  &

\¦***  *££$
#\¦*
$  $

~ ¤$*
 ¤¦** ¤^¦

~ ¤$ <  *
* ¤}‡©–{ƒŒ££=* †‡*
¥†§†_*¤£‚

Summary of Contents for TX-65EZ1000E

Page 1: ...of this manual before use The images shown in this manual are for illustrative purposes only Please refer to Pan European Guarantee Card if you need to contact your local Panasonic dealer for assistance English Nederlands For more detailed instructions please refer to eHELP Built in Operating Instructions How to use eHELP p 23 Model No TX 65EZ1000E TX 77EZ1000E English Operating Instructions OLED ...

Page 2: ...ng your TV Watching TV 23 How to Use eHELP 23 Others FAQs 25 Maintenance 26 Specifications 27 When using the wall hanging bracket 29 For information about the trademarks refer to eHELP Search by Purpose Read first Before use Licence The illustration for TX 65EZ1000E is used in this manual unless otherwise mentioned Illustrations shown may be different depending on the model ...

Page 3: ...B S Not all the features are available depending on the country area broadcaster service provider satellite and network environment Not all CI modules work properly with this TV Consult your service provider about the available CI module This TV may not work correctly with CI module that is not approved by the service provider Additional fees may be charged depending on the service provider Compat...

Page 4: ... accessible and risk of electric shock when they are removed There are no user serviceable parts inside Do not expose the TV to rain or excessive moisture This TV must not be exposed to dripping or splashing water and objects filled with liquid such as vases must not be placed on top of or above the TV Do not insert foreign objects into the TV through the air vents If the TV is used in an area whe...

Page 5: ...occurs contact your nearest Panasonic dealer immediately During setup make sure that all screws are securely tightened Ensure that the TV does not suffer any impact during installation of the pedestal Ensure that children do not climb onto the pedestal Install or remove the TV from the pedestal with at least two people Install or remove the TV according to the specified procedure Radio waves Warni...

Page 6: ... the TV Transport only in upright position Transporting the TV with its display panel facing upwards or downwards may cause damage to the internal circuitry Do not hold the speaker in one hand Do not hold the speaker net part Support the speaker as shown below to prevent injury that may be caused by the falling of the speaker Be careful not to nip the fingers between the speaker and pedestal when ...

Page 7: ...wing countries Austria Belgium Bulgaria Czech Republic Denmark Estonia France Germany Iceland Italy Greece Spain Cyprus Latvia Liechtenstein Lithuania Luxembourg Hungary Malta Netherlands Norway Poland Portugal Romania Slovenia Slovakia Turkey Finland Sweden Switzerland Croatia Maximum radio frequency power transmitted in the frequency bands Type of wireless Frequency band Maximum EIRP Wireless LA...

Page 8: ...ng the pedestal speaker Assembly screw 4 M5 10 Assembly screw 5 M4 12 Assembly screw M3 5 Base FRONT Bracket L Bracket R Cable cover front Cable cover rear Cover Speaker Speaker cable Assembling the pedestal speaker R L 1 A E D F ...

Page 9: ...English 9 2 J 3 J 4 C 5 6 G 7 ...

Page 10: ...English 10 8 9 B When the TV is uneven horizontal loosen the assembly screws to set the TV horizontal ...

Page 11: ...e the cable cover rear from the pedestal 2 Remove the cover from the pedestal 3 Disconnect the speaker cable 4 Remove the assembly screws from the TV 5 Lift the TV from the pedestal 6 Remove the cable cover front from the pedestal 7 Remove the speaker cable from the pedestal 8 Remove the assembly screw from the pedestal 9 Remove the speaker from the pedestal 10 Remove the assembly screws from the ...

Page 12: ...e and cable plugs are correct for connection Use a fully wired HDMI compliant cable Keep the TV away from electronic equipment video equipment etc or equipment with an infrared sensor otherwise distortion of image sound may occur or operation of other equipment may be affected Please also read the manual of the equipment being connected Removing the terminal cover from the TV Be sure to remove the...

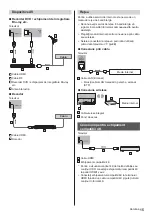
Page 13: ... DIGITAL AUDIO To connect the equipment to AV the terminal adaptor supplied is necessary To watch content in 4K format use HDMI terminal p 15 Basic connections Mains lead AC 220 240 V 50 60 Hz Mains lead Cable tie Bundled the mains lead To loosen Knob Keep pushing the knob To remove from the TV Keep pushing both side snaps Snaps Aerial TV Cable RF cable Terrestrial aerial For DVB C DVB T Analogue ...

Page 14: ...n watching or recording 2 programmes simultaneously etc is not available while using DVB via IP server function For details refer to eHELP Search by Purpose Functions DVB via IP DVB via IP client connection This TV has DVB via IP client function and can connect to DVB via IP server or SAT IP compatible servers to receive broadcast streaming It is recommended to connect to DVB via IP server with a ...

Page 15: ... wired connection or wireless connection Setup of the network connection will start when first using the TV p 22 Wired connection TV Internet environment LAN cable Shielded Use Shielded Twist Pair STP LAN cable Wireless connection Internet environment Built in wireless LAN Access point Connections for 4K compatible equipment TV HDMI cable 4K compatible equipment To watch high definition 4K more ac...

Page 16: ...uto Setting Other connections DVD Player COMPONENT equipment TV Listening Viewing AV2 COMPONENT VIDEO adaptor supplied DVD Player Camcorder Game equipment VIDEO equipment TV Listening Viewing AV2 COMPONENT VIDEO adaptor supplied Camcorder Game equipment Amplifier listening with external speakers Use HDMI2 to connect the TV to an amplifier which has ARC Audio Return Channel function If connecting t...

Page 17: ... this new CI v1 3 TV In this case please contact your content provider For details refer to eHELP Search by Purpose Functions Common Interface read the manual of the CI module or check with the content provider TV CI module USB HDD for recording Use USB 1 port for connecting the USB HDD For details refer to eHELP Search by Purpose Recording VIERA Link Use HDMI1 4 for VIERA Link connection For deta...

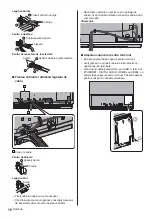
Page 18: ...en using the optional accessory follow the option s assembly manual to fix cables If all cables cannot pass the cable guide fix the cables using the cable tie as follows Example Attaching the terminal cover Do not apply load to the terminal cover Be careful not to nip the cables between the TV and the terminal cover When using USB 2 port USB 3 port ETHERNET terminal DIGITAL AUDIO HDMI3 terminal or...

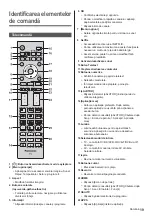
Page 19: ... button 11 Volume Up Down 12 Numeric buttons Changes channel and teletext pages Sets characters When in Standby mode switches TV on 13 eHELP Displays eHELP Built in Operating Instructions 14 My App Assigns a favourite application After setting starts the application easily by pressing this button For details refer to eHELP Search by Purpose Home Screen Apps My App 15 Light Lights the buttons for a...

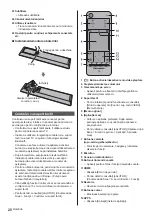
Page 20: ...te the switch without registration It is recommended to speak within approx 15 cm from the microphone of Touch Pad Controller when using the Voice Control function For details refer to eHELP Search by Purpose Functions Touch Pad Controller 1 Standby On Off switch 2 Volume Up Down 3 On screen remote control Press to display the remote control GUI Graphical User Interface 4 Touch pad For information...

Page 21: ... selection Press repeatedly until you reach the desired mode Main Menu Press and hold for about 3 seconds to display main menu OK when in the menu system 5 Channel Up Down Cursor Up Down when in the menu system 6 Volume Up Down Cursor Left Right when in the menu system 7 Mains power On Off switch Use to switch the mains power To turn Off the apparatus completely you must pull the mains plug out of...

Page 22: ...ter on the set will need to have all settings initialised by accessing Shipping Condition Set up the network connection Select your country Depending on the country you select select your Region or store the Child Lock PIN number 0000 cannot be stored Tick the TV signal mode to tune and then select Start Auto Setup tune search for the available channels skip tuning Auto Setup screen varies dependi...

Page 23: ...How to Use eHELP eHELP is the detailed operating instructions built into the TV and gives a more detailed explanation for a better understanding of the operation of each feature 1 Display eHELP or Help eHELP If the eHELP has been accessed previously since the TV was turned on the confirmation screen is displayed to select whether to go to the First page or to the Last viewed page 2 Select the menu...

Page 24: ...n if more than 1 page While the description is highlighted To open the reference screen To display the menu related to the description only for some descriptions red To check the features of this TV Search by Purpose Read first Features ...

Page 25: ...ss or Colour in the Picture Menu set to the minimum Check all required cables and connections are firmly in place An unusual image is displayed This TV has a built in Self Test Makes a diagnosis of picture or sound problems TV Self Test Help Menu Turn the TV off with Mains power On Off switch then turn it on again If the problem persists initialise all settings Shipping Condition in System Menu Se...

Page 26: ...repellent solvent thinner or other volatile substances This may degrade surface quality or cause peeling of the paint The surface of the display panel is specially treated and may be easily damaged Take care not to tap or scratch the surface with your fingernail or other hard objects Do not allow the cabinet and pedestal to make contact with a rubber or PVC substance for a long time This may degra...

Page 27: ... mini Jack 1 Connection terminals AV input COMPONENT VIDEO VIDEO RCA PIN Type 1 1 0 V p p 75 AUDIO L R RCA PIN Type 2 0 5 V rms Y 1 0 V p p including synchronisation PB CB PR CR 0 35 V p p HDMI 1 2 3 4 input TYPE A Connectors HDMI1 3 4 4K Content Type Deep Colour x v Colour HDMI2 4K Content Type Audio Return Channel Deep Colour x v Colour This TV supports HDAVI Control 5 function Card slot SD Card...

Page 28: ...80 GHz 5 320 GHz 5 500 GHz 5 580 GHz 5 660 GHz 5 700 GHz IEEE802 11b g n 2 412 GHz 2 472 GHz Security WPA2 PSK TKIP AES WPA PSK TKIP AES WEP 64 bit 128 bit Bluetooth wireless technology 2 Standard Compliance Bluetooth 3 0 Frequency Range 2 402 GHz 2 480 GHz 1 The frequency and channel differ depending on the country 2 Not all the Bluetooth compatible devices are available with this TV Up to 5 devi...

Page 29: ...ch damage will void your warranty Accessories wall hanging parts Speaker Speaker Attach the speaker after hanging the TV on the wall Speaker cable Accessories for pedestal The pedestal is used in step 1 to 7 to attach the speaker bracket and connect the speaker cable into the TV Assembly screw 4 M5 10 Base FRONT Bracket L Bracket R ACCESSORIES FOR SPEAKER WALL HANGING Assembly screw 8 M4 12 Speake...

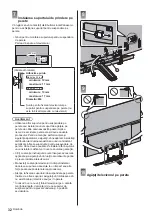
Page 30: ...English 30 Assembling procedure Please note the procedure to attach the speaker after hanging the TV on the wall You cannot attach the speaker before hanging the TV C E D F 1 2 ...

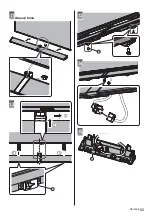
Page 31: ...English 31 3 G H 4 I G A 5 A J 6 To remove from the TV Keep pushing both side snaps Snaps To attach the cable clamp Insert the cable clamp in a hole Hole ...

Page 32: ... In order to maintain the unit s performance and safety be absolutely sure to ask your dealer or a licensed contractor to secure the wall hanging brackets Any damage caused by installing without a qualified installer will void your warranty Carefully read the instructions accompanying optional accessories and be absolutely sure to take steps to prevent the TV from falling off Handle the TV careful...

Page 33: ...English 33 11 Attach the speaker 12 I 13 G 14 15 K ...

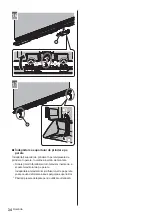
Page 34: ...anging bracket wall hanging parts in the reverse order of installing Before removing the TV from the wall remove the speaker from the TV first Removing the TV with speaker from the wall may cause deformation or breakage of the brackets Keep the removed parts for future use ...

Page 35: ......

Page 36: ... municipality Penalties may be applicable for incorrect disposal of this waste in accordance with national legislation Note for the battery symbol bottom symbol This symbol might be used in combination with a chemical symbol In this case it complies with the requirement set by the Directive for the chemical involved Customer s Record The model number and serial number of this product may be found ...

Page 37: ...eelte Veiligheidsmaatregelen in deze handleiding De afbeeldingen in deze handleiding dienen slechts als voorbeeld Zie uw Europese Garantie als u contact wilt opnemen met uw plaatselijke Panasonic dealer voor assistentie Nederlands Raadpleeg de eHELP ingebouwde bedieningsinstructies voor gedetailleerde instructies Gebruik van de eHELP p 23 Modelnr TX 65EZ1000E TX 77EZ1000E Nederlands Gebruiksaanwij...

Page 38: ...iken Tv kijken 23 Gebruik eHELP 23 Overige informatie Veelgestelde vragen 25 Onderhoud 26 Specificaties 27 Bij gebruik van de muurbevestigingssteun 29 Raadpleeg de eHELP Zoeken op doel Lees dit eerst Voordat u het product gebruikt Licentie voor informatie over de handelsmerken De afbeelding voor TX 65EZ1000E wordt tenzij anders gemeld in deze handleiding gebruikt Afhankelijk van het model kunnen d...

Page 39: ...oet aan de normen voor DVB T T2 DVB C of DVB S Afhankelijk van het land het gebied de zender de serviceprovider de satelliet en de netwerkomgeving zijn mogelijk niet alle functies beschikbaar Niet alle CI modules werken goed met deze tv Raadpleeg uw serviceprovider over de beschikbare CI module Deze tv werkt wellicht niet correct met een CI module die niet is goedgekeurd door de serviceprovider Af...

Page 40: ... de tv aan anders kunt u in contact komen met onderdelen die onder spanning staan en loopt u risico op een elektrische schok Er zijn geen door de gebruiker repareerbare onderdelen aan de binnenkant Stel de tv niet bloot aan regen of hoge vochtigheid De tv mag niet blootgesteld worden aan druppelend of spattend water Plaats geen voorwerpen gevuld met vloeistof zoals vazen op de tv of erboven Laat g...

Page 41: ...ken als deze verbogen gebarsten of anderszins beschadigd is Neem in dat geval zo spoedig mogelijk contact op met uw Panasonic dealer Let er tijdens de montage op dat alle schroeven goed zijn vastgedraaid Let op dat de tv geen schokken krijgt tijdens de installatie van de standaard Zorg dat kinderen niet op de standaard klimmen Gebruik minstens twee personen om de tv op de standaard te installeren ...

Page 42: ...v verplaatst Vervoer de TV alleen rechtop Wanneer u de TV vervoert met het beeldscherm omhoog of omlaag gericht kan dit schade veroorzaken aan de interne circuits Houd de luidspreker niet met één hand vast Houd de netcomponent van de luidspreker niet vast Ondersteun de luidspreker zoals hieronder wordt getoond om letsels te vermijden die kunnen worden veroorzaakt door het omvervallen van de luidsp...

Page 43: ...innenshuis Oostenrijk België Bulgarije Tsjechische Republiek Denemarken Estland Frankrijk Duitsland IJsland Italië Griekenland Spanje Cyprus Letland Liechtenstein Litouwen Luxemburg Hongarije Malta Nederland Noorwegen Polen Portugal Roemenië Slovenië Slowakije Turkije Finland Zweden Zwitserland Kroatië Maximaal radiofrequentievermogen dat wordt uitgezonden in de frequentiebanden Type draadloze ver...

Page 44: ...luidspreker Montageschroef 4 M5 10 Montageschroef 5 M4 12 Montageschroef M3 5 Steunplaat FRONT Steun L Steun R Kabelbescherming voorkant Kabelbescherming achterkant Deksel Luidspreker Luidsprekerkabel De standaard luidspreker monteren R L 1 A E D F ...

Page 45: ...Nederlands 9 2 J 3 J 4 C 5 6 G 7 ...

Page 46: ...Nederlands 10 8 9 B Wanneer de tv niet waterpas horizontaal staat draait u de montageschroeven los teneinde de tv waterpas te zetten ...

Page 47: ...erwijder het kabeldeksel achterkant van de standaard 2 Verwijder het deksel van de standaard 3 Maak de luidsprekerkabel los 4 Verwijder de montageschroeven van de tv 5 Til de tv van de standaard 6 Verwijder het kabeldeksel voorkant van de standaard 7 Verwijder de luidsprekerkabel van de standaard 8 Verwijder de montageschroeven van de standaard 9 Til de luidspreker van de standaard 10 Verwijder de...

Page 48: ...connectoren gebruikt voor de verbinding Gebruik een HDMI kabel met volledige bedrading Houd de tv uit de buurt van elektronische apparaten videoapparatuur enz of apparatuur met een infrarood sensor om vervormingen van het beeld geluid en invloed op de bediening van andere apparatuur te voorkomen Lees ook de handleiding van het apparaat dat moet worden aangesloten Het aansluitpaneel van de tv verwi...

Page 49: ... Om het toestel met AV te verbinden is de terminaladapter bijgeleverd nodig Gebruik de HDMI aansluiting om inhoud in 4K formaat te bekijken p 15 Basisaansluitingen Netsnoer 220 240 V wisselstroom 50 60 Hz Netsnoer Kabelbinder bundelt het netsnoer Losmaken Knop Houd de knop ingedrukt Van de tv verwijderen Houd beide ontgrendelknoppen ingedrukt Ontgrendelknoppen Antenne TV Kabel RF kabel Aardse ante...

Page 50: ...tegelijkertijd bekijken of opnemen enz is niet beschikbaar wanneer de DVB via IP serverfunctie gebruikt wordt Raadpleeg de eHELP Zoeken op doel Functies DVB via IP voor details DVB via IP clientverbinding Deze tv is voorzien van een DVB via IP clientfunctie en kan verbonden worden met een DVB via IP server of SAT IP compatibele servers om gestreamde inhoud te ontvangen Het wordt aanbevolen om een ...

Page 51: ...an de netwerkverbinding start bij het eerste gebruik van de tv p 22 Bekabelde verbinding TV Internetomgeving LAN kabel afgeschermd Gebruik een afgeschermde dubbeldraadse getwist paar STP LAN kabel Draadloze verbinding Internetomgeving Ingebouwde draadloze LAN adapter Toegangspunt Aansluitingen voor met 4K compatibele apparatuur TV HDMI kabel Met 4K compatibele apparatuur Om beelden in high definit...

Page 52: ... HDMI autom Instellen Andere verbindingen dvd speler COMPONENT apparatuur TV Luisteren Kijken AV2 COMPONENT VIDEO adapter meegeleverd DVD speler Camcorder Spelsysteem VIDEO apparatuur TV Luisteren Kijken AV2 COMPONENT VIDEO adapter meegeleverd Camcorder Spelsysteem Versterker luisteren met externe luidsprekers Gebruik HDMI2 om de tv aan te sluiten op een versterker met ARC Audio Return Channel fun...

Page 53: ...1 3 Neem in dat geval contact op met uw inhoudsprovider Raadpleeg de eHELP Zoeken op doel Functies Gemeensch interface voor details lees de handleiding van de CI module of controleer met de provider van de inhoud TV CI module USB HDD voor opname Gebruik de USB 1 poort voor aansluiting van de USB HDD Raadpleeg de eHELP Zoeken op doel Opnemen voor details VIERA Link Gebruik HDMI1 4 voor VIERA Link v...

Page 54: ...ptionele accessoires de handleiding bij de accessoire voor informatie over het bevestigen van kabels Indien niet alle kabels door de kabelgeleider passen zet u de kabels als volgt vast met behulp van de kabelbinder Voorbeeld Het aansluitpaneel bevestigen Leg niets op het aansluitpaneel Wees voorzichtig dat u de kabels niet knelt tussen de tv en het deksel van de terminal Bij gebruik van de USB 2 p...

Page 55: ...etsen rood groen geel blauw 5 Informatie 6 OK 7 Menu Opties 8 Netflix _ 9 Geluidsuitschakeling aan uit 10 Teletekst 11 Volume omhoog omlaag 12 Cijfertoetsen 13 eHELP _ 14 Mijn app _ 15 Licht 16 Selectie ingangsmodus 17 Afsluiten 18 Cursortoetsen 19 Terugkeren 20 HOME _ _ 21 Tv programmagids 22 APPS 23 Ondertitels ...

Page 56: ... batterijen plaatsen verwijderen Touchpad controller _ 1 Stand bytoets 2 Volume omhoog omlaag 3 Schermafstandsbediening 4 Touchpad 5 Menu Opties 6 Mijn app _ 7 gekleurde toetsen rood groen geel blauw 8 Microfoon 9 Kanaal omhoog omlaag 10 Knop voor stembediening 11 HOME _ _ 12 Terugkeren 13 Cursortoetsen 14 APPS ...

Page 57: ...cator Bedieningspaneel 1 2 3 5 6 7 4 1 Ontvanger voor afstandsbedieningssignalen 2 Sensor omgevingslicht 3 Voedingslampje Rood Groen Oranje 4 Selectie ingangsmodus Hoofdmenu OK 5 Kanaal omhoog omlaag 6 Volume omhoog omlaag 7 Hoofdschakelaar Beeldschermonderhoud _ _ ...

Page 58: ...ndsbediening gebruiken Selecteer uw taal Selecteer Thuis Stel de netwerkverbinding in Selecteer uw land Vink het tv signaal aan waarop u wilt afstellen en selecteer Start auto set up De automatische instelling is voltooid en de tv is klaar voor gebruik Opmerking Auto set up in Afstemmenu menu Instellingen Voeg TV signaal toe in Afstemmenu menu Instellingen Fabrieksinstellingen in Systeemmenu menu ...

Page 59: ... in _ _ 2 Selecteer de stand TV keuze DVB S DVB C DVB T DVB via IP Analoog 3 Selecteer een kanaal Gebruik eHELP _ 1 Geef eHELP weer Help eHELP _ _ 2 Selecteer het menu Zoeken op trefwoord _ Zoeken op doel _ Ondersteuning 3 Selecteer het item ...

Page 60: ...Nederlands 24 _ ...

Page 61: ...Helderheid of Kleur in het menu Beeld ingesteld op de minimale waarde Controleer of alle vereiste kabels goed zijn aangesloten Er wordt abnormaal beeld weergegeven De tv heeft een ingebouwde zelftestfunctie Stelt een diagnose van beeld of geluidsproblemen TV Zelfscan Test Help menu Zet de tv uit en weer aan met de hoofdschakelaar Als het probleem zich blijft voordoen initialiseert u alle instellin...

Page 62: ... tv in aanraking komen Hierdoor kan de kwaliteit van het oppervlak afnemen of kan de verf afbladderen Het scherm is behandeld en voorzien van een gevoelige oppervlaktelaag Tik en kras niet op het oppervlak met uw vingernagel of een hard voorwerp Zorg dat de behuizing en de standaard niet gedurende langere tijd in contact zijn met rubber of pvc Hierdoor kan de kwaliteit van het oppervlak afnemen Lu...

Page 63: ...tgang luidspreker 80 W 20 W 2 20 W 2 Hoofdtelefoon 3 5 mm M3 stereoministekker 1 Aansluitingen AV ingang COMPONENT VIDEO VIDEO RCA PIN type 1 1 0 V p p 75 AUDIO L R RCA PIN type 2 0 5 V rms Y 1 0 V p p inclusief synchronisatie PB CB PR CR 0 35 V p p HDMI 1 2 3 4 ingang TYPE A aansluitingen HDMI1 3 4 4K Content type Deep Colour x v Colour HDMI2 4K Content type Audio Return Channel Deep Colour x v C...

Page 64: ... GHz 5 660 GHz 5 700 GHz IEEE802 11b g n 2 412 GHz 2 472 GHz Beveiliging WPA2 PSK TKIP AES WPA PSK TKIP AES WEP 64 bit 128 bit Bluetooth draadloze technologie 2 Standaardcompliantie Bluetooth 3 0 Frequentiebereik 2 402 GHz 2 480 GHz 1 Frequenties en kanalen verschillen naargelang het land 2 Niet alle Bluetooth compatibele apparaten kunnen met deze tv gebruikt worden Maximaal 5 apparaten kunnen teg...

Page 65: ...g maken Accessoires de componenten die aan de muur hangen Luidspreker Luidspreker Bevestig de luidspreker nadat u de tv aan de muur heeft opgehangen Luidsprekerkabel Accessoires voor de standaard De standaard wordt gebruikt in stappen 1 tot 7 om de luidsprekersteun te bevestigen en de luidsprekerkabel op de tv aan te sluiten Montageschroef 4 M5 10 Steunplaat FRONT Steun L Steun R ACCESSOIRES VOOR ...

Page 66: ...eprocedure Gelieve rekening te houden met de procedure de luidspreker te bevestigen nadat u de tv aan de muur heeft opgehangen U kunt de luidspreker niet bevestigen voordat u de tv aan de muur heeft opgehangen C E D F 1 2 ...

Page 67: ...Nederlands 31 3 G H 4 I G A 5 A J 6 Van de tv verwijderen Houd beide ontgrendelknoppen ingedrukt Ontgrendelknoppen Bevestig de kabelklem Steek de kabelklem in een opening Gat ...

Page 68: ...le schade Om de veiligheid en goede prestaties te garanderen dient u de muurbevestigingssteunen te laten monteren door uw dealer of een erkende installateur Elke schade die is veroorzaakt door het installeren door een onbevoegde installateur zal uw garantie teniet doen Lees de instructies die bij de optionele accessoires zijn geleverd aandachtig door en zorg dat u deze stappen volgt om te voorkome...

Page 69: ...Nederlands 33 11 Bevestig de luidspreker 12 I 13 G 14 15 K ...

Page 70: ...in omgekeerde volgorde ten opzicht van de montage Alvorens de tv van de muur af te halen verwijdert u eerst de luidspreker van de tv Het verwijderen van de tv van de muur terwijl de luidspreker er nog aan hangt kan een vervorming of breuk van de steunen teweegbrengen Bewaar de verwijderde onderdelen voor toekomstig gebruik ...

Page 71: ......

Page 72: ...ke gemeente Afhankelijk van uw nationale wetgeving kunnen er boetes worden opgelegd bij het onjuist weggooien van dit soort afval Let op het batterij symbool Onderstaand symbool Dit symbool kan in combinatie met een chemisch symbool gebruikt worden In dit geval volstaan de eisen die zijn vastgesteld in de richtlijnen van de desbetreffende chemische stof In te vullen door de eigenaar Het modelnumme...

Page 73: ... J __ J ª _ _ ...

Page 74: ... ª 2 Cuprins 3 4 7 12 19 22 Utilizarea televizorului dvs 23 23 Altele 25 26 27 ª 29 _ ...

Page 75: ... ª 3 _ ª ª _ _ _ panoului p 21 ª ª _ __ ...

Page 76: ... ª 4 ª ª ª ª ª ª ª ª ...

Page 77: ... ª 5 ª ª ª ª ª ª ª ª ª ª ª _ _ _ _ _ ª ...

Page 78: ... ª 6 ª _ _ ª ª ª ª ª ª ª ª ...

Page 79: ... ª 7 ª _ _ _ _ _ ª _ p 19 µ p 20 µ p 8 p 8 J p 29 p 17 p 16 Manual de utilizare ...

Page 80: ... ª 8 FRONT Suport L Suport R R L 1 A E D F ...

Page 81: ... ª 9 2 J 3 J 4 C 5 6 G 7 ...

Page 82: ... ª 10 8 9 B ...

Page 83: ... ª 11 10 K I 11 12 H 13 ª ª 1 2 3 4 5 6 7 8 9 10 ...

Page 84: ... ª 12 din televizor ª p 18 ...

Page 85: ... ª 13 2 3 4 5 6 7 1 8 9 10 11 12 13 p 17 p 13 _ p 13 p 16 p 16 10 11 12 p 15 13 p 15 ª ...

Page 86: ... ª 14 _ _ _ _ _ _ ...

Page 87: ... ª 15 ª p 22 _ _ _ ...

Page 88: ... ª 16 ª ª _ ...

Page 89: ... ª 17 ª ª Modul CI _ _ º _ ...

Page 90: ... ª 18 ª ª ª ª ª ª _ ...

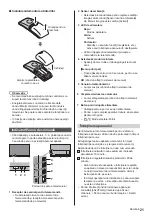
Page 91: ...carea elementelor 1 4 Butoane colorate 6 OK _ 8 Netflix _ 9 Activare dezactivare sunet 10 Buton Teletext 11 12 Butoane numerice 13 eAJUTOR 14 15 Lumina _ 16 17 18 Butoane cursor 19 Revenire 20 HOME 21 Ghid TV 22 APPS ...

Page 92: ... ª 20 23 24 25 Ultima vizualizare 26 etc ª ª 1 7 Butoane colorate 8 Microfon 11 HOME 12 Revenire 13 Butoane cursor 14 APPS ...

Page 93: ... ª 21 ª ª ª ª ª 1 2 3 5 6 7 4 ª 3 LED de alimentare Verde Portocaliu _ ª ª OK ª ª ª ª _ _ ª ...

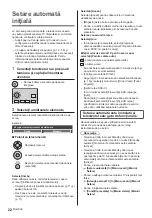
Page 94: ... ª 22 _ 1 acestuia ª ª 2 ª Folosirea telecomenzii ª ª ª ª ª ...

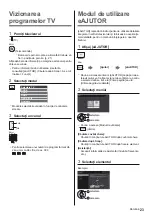
Page 95: ... ª 23 Vizionarea 1 ª 2 Selectare TV 3 Modul de utilizare eAJUTOR 1 eAJUTOR 2 ª 3 ...

Page 96: ... ª 24 ª ...

Page 97: ... ª 25 _ Bateriile sunt introduse corect ª _ _ ª ...

Page 98: ... ª ª ª ª ª ª _ ª ª ª ª ª ª ª ª ª ª ª ª ª ...

Page 99: ... ª 27 Model de 65 inci Model de 77 inci Model de 65 inci ª _ Model de 77 inci ª _ Model de 65 inci Model de 77 inci _ Y ª PB B º º ª ...

Page 100: ... ª 28 _ _ _ _ ...

Page 101: ... ª 29 ª ª ª 7 FRONT J ...

Page 102: ... ª C E D F 1 2 ...

Page 103: ... ª 3 G H 4 I G A 5 A J 6 ...

Page 104: ... ª 7 Model de 65 inci _ Model de 77 inci _ 8 B 9 10 ...

Page 105: ... ª 11 12 I 13 G 14 15 K ...

Page 106: ... ª 16 K 17 L ª ...

Page 107: ......

Page 108: ... Web Site http www panasonic com Panasonic Corporation 2017 ª TQB0E2741N 3 ...

Reviews: