background image

English

15

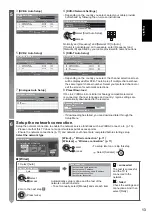
6

[WPS(Push button)]

1.  Press the WPS button on the access point until the light flashes
2.  Connect the TV with the access point

1) Please press the ‘WPS’ button on the wireless 
access point until its light flashes.

2) When the light is flashing select ‘Connect’ on 
TV.

If you are unsure, please check the instruction 
manual of the wireless access point.

WPS(Push button)

Connect

Ensure that your access point supports WPS for this setup.

WPS: Wi-Fi Protected Setup™

If the connection has failed, check the settings and positions of 
your access point. And then, follow the on-screen instructions.

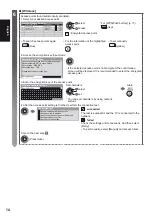
3.  After the access point setting is finished, perform the connection test

Check wireless network connection.
Check acquired IP address.
Check for devices using same IP address.
Check gateway connection.
Check server connection.

Connection Test

 :  succeeded

The test is successful and the TV is connected to the 
network.

 :  failed

Check the settings and connections. And then select 
[Retry].

To set manually, select [Manual] and set each item.

4.  Go to the next step 

(Press twice)

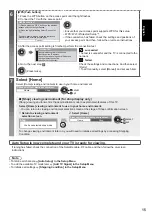
7

Select [Home]

Select [Home] viewing environment to use in your home environment.

Please select your viewing environment.

Home

Shop

 select
 set


[Shop] viewing environment (for shop display only)

[Shop] viewing environment is the demonstration mode to explain main features of this TV.

Select [Home] viewing environment to use in your home environment.

You can return to viewing environment selection screen at the stage of Shop confirmation screen.

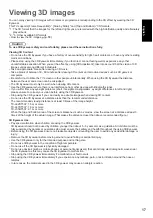
1

  Return to viewing environment 

selection screen

2

  Select [Home]

Please select your viewing environment.

Home

Shop

 select
 set

Shop

You have selected shop mode

To change viewing environment later on, you will need to initialise all settings by accessing Shipping 
Condition.

Auto Setup is now complete and your TV is ready for viewing.

If tuning has failed, check the connection of the Satellite cable, RF cable, and then, follow the on-screen 
instructions.

Note

To retune all channels 

 [Auto Setup] in the Setup Menu

To add the available TV mode later 

  [Add TV Signal] in the Setup Menu

To initialise all settings 

 [Shipping Condition] in the Setup Menu

Summary of Contents for TX-L42DT50Y

Page 1: ...e Operating Instructions on the CD ROM To view the Operating Instructions on the CD ROM you need a computer equipped with a CD ROM drive and Adobe Reader Version 8 0 or later is recommended installed...

Page 2: ...ired at your local Panasonic dealer Do not expose the TV to direct sunlight and other sources of heat Avoid exposing the TV to direct sunlight and other sources of heat To prevent the spread of fire k...

Page 3: ...destal keep the space between the bottom of the TV and the surface where the TV is set If pedestal is not used ensure the vents in the bottom of the TV are not blocked Minimum distance 10 10 10 10 cm...

Page 4: ...burn or break up batteries Do not expose batteries to excessive heat such as sunshine fire or the like Make sure you dispose of batteries correctly Ensure batteries are replaced correctly there is da...

Page 5: ...BL5ZX0219 TX L42DT50Y TBL5ZX0249 TX L47DT50Y TBL5ZX0248 TX L55DT50Y Preparations Take out the pedestal and the TV from the packing case and put the TV onto a work table with the screen panel down on t...

Page 6: ...assembly screws from the cover 3 Remove the assembly screws from the TV 4 Remove the pedestal from the TV 5 Remove the assembly screws from the bracket Adjusting the panel to your desired angle Do no...

Page 7: ...ellow blue Used for the selection navigation and operation of various functions 10 Sound Mute Switches sound mute on or off 11 Teletext Switches to teletext mode 12 Volume Up Down 13 Numeric buttons C...

Page 8: ...s function does not affect the recording of Timer Programming Direct TV Recording and One Touch Recording 1 Power and Timer LED Red Standby Green On Orange Timer Programming On Orange flash Recording...

Page 9: ...inal 8 Terrestrial cable terminal 9 DIGITAL AUDIO OUT 10 PC terminal 11 AV1 SCART 12 AV2 COMPONENT VIDEO Connections Mains lead satellite dish and aerial Cable DVB C DVB T Analogue AC 220 240 V 50 60...

Page 10: ...er VCR Terrestrial aerial RF cable RF Cable Supplied with this TV Note Connect to the TV s AV1 for a DVD Recorder VCR supporting Q Link Please also read the manual of the equipment being connected Kee...

Page 11: ...n TV Internet environment LAN cable Shielded Use the Shielded Twist Pair STP LAN cable Wireless connection Internet environment Access point Built in wireless LAN Using clamper Clamper Standard access...

Page 12: ...gal Belgium Croatia Switzerland Netherlands Estonia Malta Turkey Lithuania Andorra Greece Others select set Depending on the country you select select your Region or store the Child Lock PIN number 00...

Page 13: ...xit the screen for automatic selections 7 Analogue Auto Setup 8 Preset Download If Q Link VIERA Link or similar technology compatible recorder is connected channel language and country region settings...

Page 14: ...d access point is not encrypted the confirmation screen will be displayed It is recommended to select the encrypted access point 3 Enter the encryption key of the access point A B C D E F G H I J K L...

Page 15: ...Retry To set manually select Manual and set each item 4 Go to the next step Press twice 7 Select Home Select Home viewing environment to use in your home environment Please select your viewing environ...

Page 16: ...e TV VIERA Connect introduction banner appears The banner is subject to change Enjoy selected internet content with VIERA Connect Simply press the OK INTERNET button 2 Access VIERA Connect While the b...

Page 17: ...lease ensure to correct your vision before using the 3D Eyewear Stop using the 3D Eyewear if you can clearly see double images when viewing 3D content Do not use the 3D Eyewear at a distance less than...

Page 18: ...supported 3D format Playing back 3D compatible Blu ray disc Frame Sequential format Connect the 3D compatible player via a fully wired HDMI compliant cable If input mode is not switched automatically...

Page 19: ...lect the mode red 2D 3D 3D Mode Selection Manual Top and Bottom 2D Top and Bottom 3D Side by Side 2D Side by Side 3D Frame Sequential 2D Frame Sequential 3D Original select set Table of images that ca...

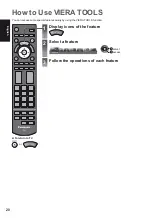
Page 20: ...IERA TOOLS You can access some special features easily by using the VIERA TOOLS function 1 Display icons of the feature 2 Select a feature VIERA Link select access 3 Follow the operations of each feat...

Page 21: ...ct store Adjust using the slide bar 5 Sharpness Moved change store Go to the next screen Child Lock Access Displays the next screen access To return to TV at any time To return to the previous screen...

Page 22: ...may cause scratches on the surface Take care not to subject the TV s surfaces to water or detergent Liquid inside the TV could lead to product failure Take care not to subject the surfaces to insect r...

Page 23: ...be used inside buildings This equipment complies with the EMC standards listed below EN55013 EN61000 3 2 EN61000 3 3 EN55020 EN55022 EN55024 Product fiche Manufacturer Panasonic Corporation Model No...

Page 24: ...uropean Union These symbols are only valid in the European Union If you wish to discard these items please contact your local authorities or dealer and ask for the correct method of disposal Note for...

Page 25: ...rlige oplysninger For at se brugsanvisningen p CD ROM en skal du anvende en computer som er udstyret med et CD ROM drev og Adobe Reader version 8 0 eller nyere anbefales installeret p din computer Af...

Page 26: ...illet eller repareret hos den lokale Panasonic forhandler Uds t ikke fjernsynet for direkte sollys og andre varmekilder Undg at uds tte TV apparatet for direkte sollys og andre varmekilder For at forh...

Page 27: ...mellem bunden af fjernsynet og gulvets overflade bevares Hvis der ikke anvendes sokkel skal du s rge for at ventilerne i bunden af fjernsynet ikke er blokerede Mindste afstand 10 10 10 10 cm Indbygge...

Page 28: ...ydes op Uds t ikke batterierne for ekstrem varme som direkte sollys ild eller lignende S rg for at bortskaffe batterier p den korrekte m de S rg for at batterierne is ttes rigtigt Der er eksplosions o...

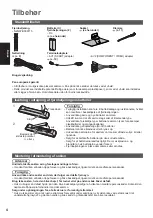
Page 29: ...0091 D ksel TBL5ZB30092 Fod TBL5ZX0219 TX L42DT50Y TBL5ZX0249 TX L47DT50Y TBL5ZX0248 TX L55DT50Y Forberedelser Udpak soklen og fjernsynet af emballagen og anbring fjernsynet p et arbejdsbord med sk rm...

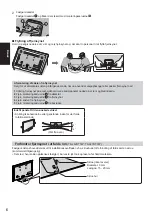
Page 30: ...l de 2 Fjern monteringsskruerne fra d kslet 3 Fjern monteringsskruerne fra fjernsynet 4 Fjern soklen fra fjernsynet 5 Fjern monteringsskruerne fra beslaget Indstil panelet til den nskede vinkel Anbrin...

Page 31: ...valg navigation og anvendelse af forskellige funktioner 10 Lyd mute Sl r lyden til eller fra 11 Tekst TV Skifter til tekst tv tilstand 12 Lydstyrke op ned 13 Taltaster Skifter kanal og tekst tv sider...

Page 32: ...lpanelets guide vises i h jre side af sk rmen i 3 sekunder for at markere den trykkede knap 2 3 7 5 8 6 4 1 Bagside p fjernsynet 8 Anvendelse af sk rmvisninger Betjeningsvejledning Der kan f s adgang...

Page 33: ...nal 8 Terrestrisk kabel terminal 9 DIGITAL AUDIO OUT 10 PC terminal 11 AV1 SCART 12 AV2 COMPONENT VIDEO Forbindelser Netledning parabolantenne og antenne Kabel DVB C DVB T Analog Vekselstr m 220 240 V...

Page 34: ...abel skal den fuldt ledningsf rte udgave bruges Kontroller at terminaltypen og kabelstikkene er korrekte ved tilslutning AV enheder Afspiller 3D kompatibel afspiller Fjernsyn Afspiller 3D kompatibel a...

Page 35: ...lse Fjernsyn Internetmilj LAN kabel Afsk rmet Anvend Shielded Twist Pair STP LAN kablet Tr dl s forbindelse Internetmilj Access point Indbygget tr dl st LAN Brug af klemme Klemme Standardtilbeh r Mont...

Page 36: ...lgien Kroatien Schweiz Nederlandene Estland Malta Tyrkiet Litauen Andorra Gr kenland Andre v lg indstil Afh ngigt af det valgte land b r du v lge din region eller lagre den b rnel ste PIN kode 0000 ka...

Page 37: ...Forindstillet download CH 29 CH 33 BBC1 CH 2 78 41 CC 1 S ger Kanal Kanalnavn Analog 2 Autos gning analog S g Dette tager cirka 3 minutter Hvis Q Link VIERA Link eller lignende kompatibel optagertekno...

Page 38: ...er krypteret vil bekr ftelsessk rmen blive vist Det anbefales at v lge det krypterede access point 3 Indtast krypteringskoden for access point A B C D E F G H I J K L M N O P Q R S T U V W X Y Z 0 1 2...

Page 39: ...v igen For manuel indstilling skal du v lge Manuel og indstille hvert punkt 4 G videre til n ste trin Tryk to gange 7 V lg Hjemme V lg visningsmilj et Hjemme for at anvende det hjemme hos dig selv V l...

Page 40: ...for fjernsynet vises VIERA Connects introduktionsbanner Banneret kan muligvis ndres Nyd eksklusivt Internet indhold med VIERA Connect Tryk blot p OK INTERNET knappen 2 bn VIERA Connect Mens banneret...

Page 41: ...D brillerne Hold op med at bruge 3D brillerne hvis du tydeligt kan se dobbeltbilleder n r der vises 3D indhold 3D brillerne m ikke bruges p en afstand der er mindre end den anbefalede afstand Den anbe...

Page 42: ...format Tilslut den 3D kompatible afspiller vha et fuldt monteret HDMI kompatibelt kabel Hvis der ikke skiftes indgangsindstilling automatisk skal du v lge indgangsindstillingen der er sluttet til afs...

Page 43: ...dling V lg tilstanden R d 2D 3D Valg af 3D tilstand Manuel Top og bund 2D Top og bund 3D Side om side 2D Side om side 3D Frame Sequential 2D Frame Sequential 3D Original v lg indstil Tabel over billed...

Page 44: ...OOLS Du kan nemt f adgang til nogle specielle egenskaber ved at anvende funktionen VIERA TOOLS 1 Viser funktionens ikoner 2 V lg en egenskab VIERA Link v lg adgang 3 F lg handlingerne for hver egenska...

Page 45: ...debj lken 5 Skarphed Flyttet ndr gem G til den n ste sk rm B rnel s For adgang Viser den n ste sk rm adgang For til enhver tid at g tilbage til fjernsynet For at g tilbage til den foreg ende sk rm For...

Page 46: ...V r p passelig med ikke at uds tte fjernsynets overflader for vand eller reng ringsmiddel V ske indeni fjernsynet kan f re til fejlfunktion af apparatet V r p passelig med ikke at uds tte overfladerne...

Page 47: ...udelukkende anvendes inde i bygninger Dette udstyr er i overensstemmelse med de herunder angivne EMC standarder EN55013 EN61000 3 2 EN61000 3 3 EN55020 EN55022 EN55024 Datablad Producent Panasonic Cor...

Page 48: ...re s danne produkter bedes du forh re dig hos din forhandler eller kommune med henblik p en hensigtsm ssig bortskaffelse Information om batterisymbol to eksempler nedenfor Dette symbol kan optr de sam...

Reviews: