background image

Main

tenanc

e  |  Lic

enc

e

77

Maintenance

First, remove the mains plug from the socket outlet.

Display panel, Cabinet, Pedestal

Regular care: 

Gently wipe the surface of the display panel, cabinet, or 
pedestal by using a soft cloth to clean the dirt or fingerprints.

For stubborn dirt:

Dampen a soft cloth with clean water or diluted neutral 
detergent (1 part detergent to 100 parts water). Then wring 
the cloth and wipe the surface. Finally, wipe away all the 
moisture.

Caution

• 

Do not use a hard cloth or rub the surface too hard. This may cause scratches on the surface.

• 

Take care not to subject the TV’s surfaces to water or detergent more than requires. A liquid inside the TV could lead to 
product failure.

• 

Take care not to subject the surfaces to insect repellent, solvent, thinner or other volatile substances. This may degrade 
surface quality or cause peeling of the paint.

• 

Take care not to tap or scratch the surface with your fingernail or other hard objects.

• 

Do not allow the cabinet or pedestal to make contact with a rubber or PVC substance for a long time. This may degrade 
surface quality.

Mains plug

Wipe the mains plug with a dry cloth at regular intervals. Moisture and dust may lead to fire or electrical shock.

Licence

Even if no special notation has been made of company or product trademarks, these trademarks have been fully respected.

• 

DVB and the DVB logos are trademarks of the DVB Project.

• 

SDXC Logo is a trademark of SD-3C, LLC.

• 

HDMI, the HDMI Logo, and High-Definition Multimedia Interface are trademarks or registered trademarks of HDMI Licensing 
LLC in the United States and other countries.

• 

HDAVI Control™ is a trademark of Panasonic Corporation.

• 

“AVCHD” and the “AVCHD” logo are trademarks of Panasonic Corporation and Sony Corporation.

• 

x.v.Colour™ is a trademark.

• 

Manufactured under license from Dolby Laboratories.
Dolby and the double-D symbol are trademarks of Dolby Laboratories.

• 

Manufactured under license under U.S. Patent #: 5,451,942 & other U.S. and worldwide patents issued & pending. DTS and 
the Symbol are registered trademarks and DTS Digital Out and the DTS logos are trademarks of DTS, Inc. Product includes 
software. © DTS, Inc. All Rights Reserved.

• 

QuickTime and the QuickTime logo are trademarks or registered trademarks of Apple Inc., used under license therefrom.

• 

GUIDE Plus+ is (1) a registered trademark or trademark of, (2) manufactured under license from and (3) subject of various 
international patents and patent applications owned by, or licensed to, Rovi Corporation and/or its related affiliates.

Summary of Contents for TX-P42C3B

Page 1: ...ead these instructions carefully before operating this product and retain them for future reference The images shown in this manual are for illustrative purposes only English UK and Ireland model Model No TX P42U30B TX P50U30B Operating Instructions Plasma Television ...

Page 2: ... an HDMI cable This TV supports HDMI Version 1 4 with Audio Return Channel Deep Colour x v Colour Timer Programming p 19 41 Timer Programming enables you to use functions such as programme reminder and programme recording to the external recorder VIERA IMAGE VIEWER SD Card viewer in Media Player p 51 Enjoy your photos or videos recorded on an SD Card on the TV screen SDXC Card This TV supports SDX...

Page 3: ...st is lowered automatically after a few minutes if no signals are sent or no operations are performed p 72 This product is licensed under the AVC patent portfolio license for the personal and non commercial use of a consumer to i encode video in compliance with the AVC Standard AVC Video and or ii decode AVC Video that was encoded by a consumer engaged in a personal and non commercial activity and...

Page 4: ...truction shall be connected to a mains socket outlet with a protective earthing connection IMPORTANT THE MOULDED MAINS PLUG FOR YOUR SAFETY PLEASE READ THE FOLLOWING TEXT CAREFULLY This TV is supplied with a moulded three pin mains plug for your safety and convenience A 10 amp fuse is fitted in this mains plug Shall the fuse need to be replaced please ensure that the replacement fuse has a rating ...

Page 5: ...n accidentally Keep the dangerous parts out of reach of young children Do not allow children to handle SD Card As with any small object the SD Card could be swallowed by young children Please remove SD Card immediately after use and store out of reach of young children Caution Ventilation Allow sufficient space around the TV in order to help prevent excessive heat which could lead to early failure...

Page 6: ...n order to maintain the unit s performance and safety be absolutely sure to ask your dealer or a licensed contractor to secure the wall hanging brackets Any damage caused by installing without a qualified installer will void your warranty Carefully read the instructions accompanying optional accessories and be absolutely sure to take steps to prevent the TV from falling off Handle the TV carefully...

Page 7: ...L088N TX P42U30B THEL087N TX P50U30B C Pole TBL5ZA3028 TX P42U30B TBL5ZA3066 TX P50U30B D Base TBL5ZX0030 TX P42U30B TBL5ZX0033 TX P50U30B M5 20 M5 25 1 Assembling the pedestal Use the assembly screws A to fasten the pole C to the base D securely Make sure that the screws are securely tightened Forcing the assembly screws the wrong way will strip the threads A D C Front 2 Securing the TV Use the a...

Page 8: ...ets characters When in Standby mode switches TV On Press for about 1 second 13 Sound Mute Switches sound mute On or Off 14 Volume Up Down 15 Input mode selection TV switches between DVB and Analogue modes p 14 AV switches to AV input mode from Input Selection list p 24 16 Direct TV Recording p 60 62 Records programme immediately in DVD Recorder VCR with Q Link or VIERA Link connection 17 Normalise...

Page 9: ...irect TV Recording in progress Red with orange flash Standby with Timer Programming On or Direct TV Recording The LED blinks when the TV receives a command from the remote control Using the On Screen Displays Operation guide Many features available on this TV can be accessed via the On Screen Display menu Operation guide Operation guide will help you to operate by using the remote control Example ...

Page 10: ...r VCR RF OUT RF IN HDMI AV Rear of the TV Terrestrial aerial AC 220 240 V 50 60 Hz Mains lead supplied RF cable Fully wired HDMI compliant cable Aerial input terminal RF cable DVD Recorder or VCR Fully wired SCART cable Note Connect to the TV s AV1 for a DVD Recorder VCR supporting Q Link p 60 For HDMI compatible equipment it is possible to connect to HDMI terminals HDMI1 HDMI2 by using HDMI cable...

Page 11: ...pplied AC 220 240 V 50 60 Hz Fully wired HDMI compliant cable Fully wired HDMI compliant cable Fully wired SCART cable Fully wired SCART cable Satellite receiver DVD Recorder or VCR RF cable RF cable RF cable Mains Lead Push until both side tabs click Make sure that the mains lead is securely fixed To remove from the TV tabs Press both tabs and pull on mains connector to release Aerial input termi...

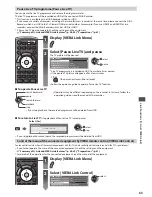
Page 12: ...tore them in the numbered order as specified by the broadcasters Actual number of channels may differ due to channel duplication Example Searching CH 62 62 62 62 29 33 Channel Name CBBC Channel BBC Radio Wales E4 Cartoon Nwk BBC1 Type Free TV Free TV Free TV Free TV Analogue Analogue Quality 10 10 10 10 Free TV 8 Pay TV 0 Radio 0 Analogue 2 Auto Setup DVB and Analogue DVB Scan This will take about...

Page 13: ...ing environment Home Shop set select Shop viewing environment for shop display only Shop viewing environment is the demonstration mode to explain main features of this TV Select Home viewing environment to use in your home environment You can return to viewing environment selection screen at the stage of Shop confirmation screen and Automatic Demo Off On selection screen 1 Return to viewing enviro...

Page 14: ... onwards Analogue channel position numbers run in the ranges 0 99 To select a two or three digit channel position number e g 399 def wxyz wxyz Select a channel using Information banner p 15 It is possible to confirm the channel name and programme information by using the Information banner before changing channels 1 Display Information banner if it is not displayed 2While the banner is displayed s...

Page 15: ...vice available Multi Audio Multiple audio available Bad signal Poor TV signal quality Stereo Mono NICAM Audio mode 1 90 Off Timer remaining time For settings p 16 Encrypted Scrambled programme STLL Subtitle service available To confirm another tuned channel name To watch the channel listed in the banner Information on the next programme DVB To hide Extra information DVB To set display timeout EXIT...

Page 16: ...lect the language in which subtitles should appear if available This setting is not memorized and it will return to the default setting once you exit the current programme Teletext Character Set Sets the teletext language font Setup Menu p 31 Teletext Language DVB mode Allows you to select between alternative language for teletext if available NICAM Analogue mode Switches NICAM sound if available ...

Page 17: ...distortion anamorphic Displays a 16 9 letterbox or 4 3 image without distortion 14 9 Zoom2 Displays the image at the standard 14 9 without distortion Displays a 16 9 letterbox anamorphic image full screen without distortion 4 3 Zoom3 Displays the image at the standard 4 3 without distortion Displays a 2 35 1 letterbox anamorphic image full screen without distortion At 16 9 displays the image at it...

Page 18: ...di 719 19 30 20 00 20 30 21 00 Wed 27 Oct Search All Channels Select channel Timer Programming EXIT Select programme RETURN 24 hours 24 hours Search Category Info RETURN Select Advert Page up Page down 3 1 4 7 8 9 6 2 5 Example 1 Current date and time 2 TV Guide time 3 Advertisement 4 D DVB A Analogue 5 Channel position and name 6 TV Guide date 7 Some programmes may also be broadcast in HD You can...

Page 19: ...et Orange LED will flash if the recording of Timer Programming is in progress Ext Rec to record the programme to the external recorder Ext Rec When the start time comes the channel will be switched automatically and the video and audio signals will be output 2 minutes before the starting time a reminder message appears if you are watching TV LED Reminder to remind you to watch the programme When y...

Page 20: ...reet The Bill 10 O clock News BBC Pepsi Char Good bye Panorama Spring watch Coast I m A Celebrity Pop Idol News Rugby 15 To 1 Sports D BBC ONE 1 D BBC THREE 7 D E4 14 D BBC FOUR 70 D BBC 2W 72 D BBCi 105 D BBC Radi 719 19 30 20 00 20 30 21 00 Wed 27 Oct Search All Channels or will be displayed in the TV Guide if Timer Programming is set as the Guide link programming Note If you edit the start time...

Page 21: ...B programmes have digital teletext services MHEG 2 Switch to Teletext TEXT 17 51 28 Feb Example How to operate services In all cases it is possible to navigate the pages using buttons on the remote control but because the commands available must apply to all manufacturers of digital equipment some on screen commands may not correspond exactly to the remote control buttons Select go Symbol Back key...

Page 22: ...nge mode Teletext p 31 DIRECT TV REC N ASPECT AV SD CARD OPTION LAST VIEW EXIT INDEX HOLD STTL jkl ghi mno tuv pqrs wxyz abc def TEXT INPUT TV RETURN MENU To return to TV EXIT 1 Select Analogue TV 2 Switch to Teletext TEXT Displays the index page content varies depending on the broadcasters 01 02 03 04 05 06 07 TELETEXT INFORMATION 17 51 28 Feb Time date Sub page number Colour bar Current page num...

Page 23: ...loured button you want to change Enter new page number press and hold jkl ghi mno tuv pqrs wxyz abc def View sub page View sub page Only when teletext is more than one page Appears at top of the screen The number of sub pages varies depending on the broadcasters up to 79 pages It may take some time for searching during which time you can watch TV To view specific sub page MENU blue Enter the 4 dig...

Page 24: ...nput selection menu AV 3 Select the input mode connected to the equipment Input Selection AV1 AV2 COMPONENT HDMI1 HDMI2 TV SD Card select watch You can also select the input using the AV button on the remote control or the side panel of the TV except SD Card Press the button repeatedly until the desired input is selected SD Card Switches to Media Player Using Media Player p 51 You can label or ski...

Page 25: ...l REC Record Start recording How to change the code for the type of the equipment Each type of the Panasonic equipment has its own remote control code Please change the code according to the equipment you want to operate If you operate in Video mode of Media Player p 55 or operate the connected equipment in VIERA Link p 63 select the code 73 Press and hold during the following operations Enter the...

Page 26: ...RETURN jkl ghi mno tuv pqrs wxyz abc def DIRECT TV REC MENU N ASPECT INPUT TV AV SD CARD OPTION INDEX HOLD STTL TEXT LAST VIEW PROGRAMME REC TV EXIT To return to TV EXIT or VIERATOOLS 1 Display icons of the feature VIERATOOLS 2 Select a feature VIERA Link Control access select 3 Follow the operations of each feature VIERA Link Control VIERA Link Control p 63 When two or more compatible equipment a...

Page 27: ...ff Dynamic Choose from among alternatives To reset the settings To reset the picture settings only Reset to Defaults in the Picture Menu p 29 To reset the sound settings only Reset to Defaults in the Sound Menu p 30 To reset the picture and sound settings together Colour Balance Normal Number and positions of alternatives Changed Adjust using the slide bar Sharpness Moved Also volume level and asp...

Page 28: ...ically dependent on ambient lighting conditions Off On Set to On to make the suitable contrast setting automatically The default setting is On when Viewing Mode is set to Normal P NR Picture Noise Reduction Automatically reduces unwanted picture noise and flicker noise in the contoured parts of a picture Off Min Mid Max 3D COMB Makes still or slow moving pictures look more vivid Off On Occasionall...

Page 29: ... adjust the frequency Equaliser see below Bass Increases or decreases level to enhance or minimise lower deeper sound output Treble Increases or decreases level to enhance or minimise sharper higher sound output Equaliser Adjusts the frequency level to suit your favourite sound quality This function is available when Mode is set to User Select the frequency and change the frequency level by using ...

Page 30: ...io description sound track is indicated by AD in the information banner p 15 DVB mode only Volume Adjusts the volume for Audio Description DVB mode only Speakers Set to On to activate the description sound track from TV speakers Off On DVB mode only Headphones Set to On to activate the description sound track from headphones Off On DVB mode only Reset to Defaults Press the OK button to reset the p...

Page 31: ... channels or edits DVB channels p 39 Auto Setup Automatically sets the DVB channels received in the area p 36 Channel Sorting by Region Automatically sorts tuned channels according to the available region p 37 Manual Tuning Sets the DVB channels manually p 37 Update Channel List Updates DVB Channel List while keeping your settings p 39 New Channel Message Selects whether to give a notification mes...

Page 32: ...D p 48 Common Interface Uses include to watch encrypted channels p 49 System Update Downloads new software to this TV p 50 Software Licence Displays the software licence information System Information Displays the system information of this TV Other Settings Power on Preference Automatically selects the input when the TV is turned on TV AV Set to TV to view picture from TV tuner Set to AV to view ...

Page 33: ...lour C A T S Warm Off Off Picture Menu 2 2 P NR Off 3D COMB Off Advanced Settings Access Reset to Defaults Reset Screen Display On p 28 29 Side Panel Off 16 9 Overscan On DVI Input Setting Normal Pixel Orbiter Auto Scrolling Bar Start Advanced Settings Resolution Enhancer Off p 28 29 Equaliser 150 250 500 1k 2k 4k 8k 12k Hz Reset to Defaults Available when Mode is set to User Sound Menu 1 2 Mode M...

Page 34: ...uning Menu Display Settings TV Guide Settings Timer Programming Eco Navigation Setup Menu 2 2 Access Access Other Settings System Menu p 30 32 All tuning data will be erased Are you sure Are you sure Shipping Condition p 47 Common Interface Slot 1 Module inserted Available in DVB p 49 Owner ID Please enter PIN for access PIN p 48 System Update Auto Update Search in Standby On System Update Search ...

Page 35: ...e TV 10 62 Cartoon Nwk Free TV 10 Free TV 4 Pay TV 0 Radio 0 Data 0 Searching p 36 All DVB Channels 70 72 105 719 720 1 7 CBBC Channel Cartoon Nwk BBCi BBC Radio Wales BBC Radio Cymru BBC ONE Wales BBC THREE p 39 DVB Manual Tuning Frequency No Channel Name Type New Free TV 0 Pay TV 0 Radio 0 Data 0 Stopped Signal Strength 0 10 Signal Quality 0 10 MHz 474 CH21 p 37 Link Settings VIERA Link On AV1 o...

Page 36: ...yed item depends on the selected mode 5 Select Auto Setup Example DVB Tuning Menu Auto Setup Access access select 6 Start Auto Setup Settings are made automatically Example DVB All DVB tuning data will be erased DVB Auto Setup DVB Auto Setup This will take about 3 minutes Progress CH 21 68 62 CH Channel Name Type Quality CBBC Channel Free TV 10 62 BBC Radio Wales Free TV 10 62 E4 Free TV 10 62 Car...

Page 37: ...ity or those for your preferred region appear nearer the top of your Channel List Normally you should select Best signal quality All Regions Channel Sorting by Region GBR Best signal quality All Regions England Regions Region choice available access select region select repeatedly until you reach the available region If you choose to select your preferred region you could find channels with a weak...

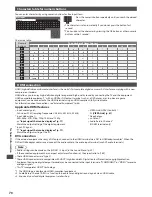
Page 38: ...ers maximum ten characters Store User input Name A B C D E F G H I J K L M N U V W X Y Z 0 1 2 3 4 5 6 a b c d e f g h i j k l m n u v w x y z _ O P Q R S T 7 8 9 o p q r s t 1 2 abc 3 def 4 ghi 5 jkl 6 mno 7 pqrs 8 tuv 9 wxyz 0 select set RETURN To use numeric buttons Characters table for numeric buttons p 70 3 Store RETURN Note Channel position numbers known as logical channel numbers can be swa...

Page 39: ...automatically Update Channel List You can add new channels delete removed channels update channel name and position automatically to Channel List Example DVB Update Channel List CH Channel Name Type Quality Searching Analogue Scan 21 68 Progress CH 21 68 This will take about 3 minutes Free TV 0 Pay TV 0 Radio 0 Data 0 Channel List is updated while keeping your settings in Favourites Edit Channel L...

Page 40: ...I J K L M N U V W X Y Z 0 1 2 3 4 5 6 a b c d e f g h i j k l m n u v w x y z _ O P Q R S T 7 8 9 o p q r s t 1 2 abc 3 def 4 ghi 5 jkl 6 mno 7 pqrs 8 tuv 9 wxyz 0 select set RETURN To use numeric buttons Characters table for numeric buttons p 70 3 ITV 23 35 itv All Analogue Channels CH23 Channel position Channel name Note If a VCR is connected only with the RF cable edit VCR Set Analogue channel ...

Page 41: ... REC N ASPECT AV SD CARD OPTION INDEX HOLD STTL TEXT EXIT MENU INPUT TV To return to TV EXIT To unlock the tuner and stop recording EXIT 1 Select the tuner you want to use DVB or Analogue TV 2 Display the menu MENU 3 Select Setup Main Menu Picture Sound Setup access select 4 Select Timer Programming Setup Menu 1 2 Off Timer Off Link Settings Child Lock DVB Tuning Menu Access Display Settings Netwo...

Page 42: ...controlled by information from the TV Guide if programme start and end times are changed by the broadcaster the timer programming event will follow the change A Split Programme programming is a Guide link programming which is interrupted by one or more other programmes Note that Guide link programming including Split Programme programming only works reliably if correct information is received from...

Page 43: ...Child Lock List Child Lock Change PIN Child Lock List Access access select 3 Select the channel input to be locked VCR Lock Name BBC 1 Wales BBC THREE E4C BBC1 AV1 AV2 Input DVB Free TV DVB Free TV DVB Free TV Analogue Analogue Analogue Analogue Analogue Analogue External AV External AV Type 101 7 14 1 2 Child Lock List TV and AV Appears when the channel input is locked lock select To cancel Selec...

Page 44: ... access select 4 Select Input Labels Access Input Labels Display Settings access select 5 Select an input terminal Input Labels AV1 DVD AV2 COMPONENT HDMI1 DVB Analogue AV2 COMPONENT HDMI1 DVB HDMI2 HDMI2 Analogue set select The labels you set will be displayed in the Input Selection menu p 24 TV Selection menu or banner If Skip is selected the input will not be displayed in the Input Selection me...

Page 45: ...ure are different Ensure that you use the network equipment that are authorized by your ISP and telecommunications company You cannot make settings for the network equipment on this TV You may be required to make settings on your computer Depending on the terms and conditions of the contracts with your ISP or telecommunications company additional fees may be charged or multiple connections to the ...

Page 46: ...pecified by the provider 1 Select Proxy 2 Enter the address 3 Store Proxy Settings Proxy Proxy Port 0 Proxy Host A B C D E F G H I J K L M N U V W X Y Z 0 1 2 3 4 5 6 a b c d e f g h i j k l m n u v w x y z _ O P Q R S T 7 8 9 o p q r s t 1 2 abc 3 def 4 ghi 5 jkl 6 mno 7 pqrs 8 tuv 9 wxyz 0 select set RETURN access select To use numeric buttons Characters table for numeric buttons p 70 To set Pro...

Page 47: ...Menu Picture Sound Setup access select 3 Select System Menu Setup Menu 2 2 Access Other Settings System Menu access select 4 Select Shipping Condition System Menu Shipping Condition System Update Software Licence System Information Common Interface Owner ID Access access select Restore Settings Shipping Condition 1 Check the message and initialise 2 Follow the on screen instructions Shipping Condi...

Page 48: ...wxyz abc def Enter the PIN number twice at first setting Make a note of the PIN number in case you forget it The PIN number cannot be reset 2 Select the item NAME HOUSE NO POSTCODE and set characters Owner ID Data Entry PIN NAME HOUSE NO POSTCODE A B C D E F G H I J K L M N U V W X Y Z 0 1 2 3 4 5 6 a b c d e f g h i j k l m n u v w x y z _ O P Q R S T 7 8 9 o p q r s t 1 2 abc 3 def 4 ghi 5 jkl 6...

Page 49: ...the viewing card to tune in the encrypted channels If encrypted channels do not appear perform the below to verify the card is recognised by the TV For more details see the manual of the CI module or check with the broadcaster RETURN jkl ghi mno tuv pqrs wxyz abc def DIRECT TV REC N ASPECT AV SD CARD OPTION INDEX HOLD STTL TEXT LAST VIEW PROGRAMME EXIT MENU INPUT TV To return to TV EXIT 1 Select D...

Page 50: ...te To update automatically Select Auto Update Search in Standby and set to On System Update Auto Update Search in Standby On System Update Search Now set select Automatically performs a search in standby and downloads an update if any software updates are available The automatic updating is performed at night under the following conditions Standby TV turned Off with the remote control Recording of...

Page 51: ...lay may take some time when there are many files and folders Partly degraded files might be displayed at a reduced resolution The folder and file names may be different depending on the digital camera or digital video camera used To insert or remove the SD Card SD Card To insert the SD Card To remove the SD Card Gently insert the SD Card label surface facing front Cutout Push until a click is hear...

Page 52: ...t by Month access select Folder view Displays the thumbnail grouped by folder The files which are not into a folder will be collected to the folder named Sort by Date Displays the thumbnail grouped by the same date The group of the photos without recorded date is shown as Unknown Sort by Month Displays the thumbnail grouped by the same month The group of the photos without recorded date is shown a...

Page 53: ...t Aspect Interval Repeat Back Ground Music 5 seconds On Off Fade Original Off Burst Playback Off access set or select access Back Ground Music Note Picture quality may become lower depending on the slideshow settings Picture setting may not work depending on the slideshow settings Menu Item Adjustments Configurations alternatives Slideshow Settings Frame Selects the frame type of the slideshow Off...

Page 54: ...ransition Effect is set to Motion Interval Selects slideshow interval 5 10 15 30 60 90 120 seconds This function is not available when Transition Effect is set to Motion Repeat Slideshow repeat Off On Back Ground Music Selects the back ground music during Photo mode Off Type1 Type2 Type3 User Auto Type1 Type2 and Type3 are the fixed music each installed in this TV User Music data in the SD Card re...

Page 55: ...rip1_3 Trip1_4 Trip1_5 Trip1_6 Trip1_7 Media Player Video Title view Trip1 SD Card EXIT Select RETURN Contents Select Info Play Play Option Menu The preview will start when the scene is highlighted if it supports a preview To turn off the preview Video Setup p 56 To display the information of the highlighted scene 1 8 Trip1_1 00h04m12s Scene Duration Date Time 19 02 2010 11 21 Scene number Total s...

Page 56: ...djustments Configurations alternatives Video Setup Multi Audio Allows you to select between selectable sound tracks if available It may take several seconds to change the sound Aspect Change Aspect1 Displays the content full screen Aspect2 Displays the content square Original Displays the content original size You can also change the aspect using the ASPECT button Aspect change may not work depend...

Page 57: ...access OPTION Media Player Music Folder view My Music_1 My Song_1 My Song_2 My Song_3 My Song_8 My Song_9 My Song_10 My Song_4 My Song_11 My Song_5 My Song_6 My Song_7 SD Card EXIT Select RETURN Contents Select Info Play Play Folder Option Menu select To display the information of the highlighted file 1 11 My Song_1 My Favourite Title Artist Album Track No Duration My Music_1 1 00h03m29s File numb...

Page 58: ... function HD Video Camera LUMIX Camera with VIERA Link function Analogue channel download Easy playback Power on link Power off link Reduce unnecessary power consumption in standby 3 3 Auto standby for unnecessary equipment 3 3 Pause Live TV programme 3 4 Direct TV Recording 3 Control the menu of the connected equipment by VIERA remote control 1 1 1 Speaker control Connection DIGA Recorder DVD Pla...

Page 59: ...orting VIERA Link to the TV s AV1 terminal and set AV1 out to Monitor in the Setup Menu p 31 Use the optical digital audio cable RCA cable or SCART cable for audio output from the TV 1 Available with the equipment which has HDAVI Control 2 or later function 2 Available with the equipment which has HDAVI Control 3 or later function 3 Available with the equipment which has HDAVI Control 4 or later f...

Page 60: ...T EXIT DIRECT TV REC DIRECTTVREC Available conditions Picture source Mode Recording from Analogue TV TV monitor out AV Recorder s tuner DVB TV TV monitor out AV watching recorder s tuner AV Recorder s tuner AV watching recorder s external input AV Recorder s external input AV watching TV s external input AV TV monitor out When Direct TV Recording is performed the recorder is automatically turned o...

Page 61: ... the equipment For optimal recording the settings of the recorder may need to be changed For details read the manual of the recorder Download Analogue channel setting Analogue channel download see below Set VIERA Link On in the Setup Menu VIERA Link p 31 Set up the TV After connection turn the equipment on and then switch the TV on Select the input mode to HDMI1 or HDMI2 p 24 and make sure that an...

Page 62: ...function may not work properly depending on the connected equipment If required set to Off Direct TV Recording What you see is What you record Direct TV Rec Recording the current programme on a DIGA Recorder immediately If you connect a variety of recorders including other manufacturers recorders at the same time please connect the DIGA Recorder to the TV s lower HDMI terminal number For example i...

Page 63: ...s after a few minutes OPTION the paused picture will be restored Follow the operation guide to operate Pause Live TV function To operate Pause Live TV search backward pause search forward playback stop If you stop playback the recorded programme will be deleted from HDD Operations may be different depending on the recorder In this case follow the operation guide or read the manual of the recorder ...

Page 64: ...w to change the code for the type of the equipment p 25 2 Follow the operation guide To display the operation guide OPTION If other manufacturers equipment is accessed Setup Contents Selection menu may be displayed When the key words are displayed on colour bar red green yellow blue Note Some operations may not be available depending on the equipment In this case use its own remote control to oper...

Page 65: ...equipment is turned off the TV speakers will be activated TV TV speakers are active Multi channel sound If you wish to enjoy multi channel sound e g Dolby Digital 5 1ch via an Amplifier connect the Amplifier to the TV with an HDMI cable and an Optical digital audio cable p 59 and then select Home Cinema If your Amplifier has HDAVI Control 5 function you only need to connect with an HDMI cable In t...

Page 66: ...CR DVD Recorder To watch satellite broadcasts Set top box 1 To watch DVDs DVD Player To watch camcorder images Video camera To play games Game equipment To use amplifier with speaker system 2 Q Link VIERA Link with HDMI Direct TV Recording Recommended Connection 1 Use HDMI1 for automatic input switching 2 Use HDMI2 for connecting an amplifier This connection is applicable when using an amplifier t...

Page 67: ...ipment Viewing Listening Camcorder Game equipment To listen with speakers Optical digital audio cable Amplifier with speaker system RCA cable or To enjoy the sound from the external equipment in multi channel sound e g Dolby Digital 5 1ch connect the equipment to the amplifier For the connections read the manuals of the equipment and amplifier Headphones M3 stereo mini plug To adjust volume Headph...

Page 68: ...25 480 60i 60p 625 576 50i 50p 750 720 60p 50p 1 125 1 080 60i 50i 1 125 1 080 60p 50p 24p Auto mode Auto mode determines the best aspect ratio to fill the screen It does this using a four step process WSS Control signal through SCART HDMI terminal Letterbox detection or Justify to fill the screen This process may take several minutes depending on the darkness of the image Letterbox detection If b...

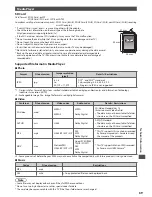
Page 69: ...2 standards Sub sampling 4 4 4 4 2 2 4 2 0 Progressive JPEG is not supported 1 Design rule for Camera File system unified standard established by Japan Electronics and Information Technology Industries Association JEITA 2 Exchangeable Image File image file format used by digital cameras Video Container File extension Video codec Audio codec Details Restrictions SD Video mod MPEG1 MPEG SD Video Sta...

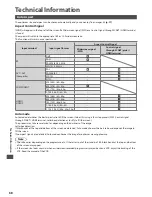
Page 70: ...inal using an HDMI compliant fully wired cable For information about connections see External Equipment p 66 Applicable HDMI features Input audio signal 2ch Linear PCM sampling frequencies 48 kHz 44 1 kHz 32 kHz Input video signal 480i 480p 576i 576p 720p 1080i and 1080p Input signal that can be displayed p 71 Match the output setting of the digital equipment Input PC signal Input signal that can ...

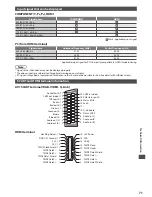
Page 71: ...ewing on your display PC signal is magnified or compressed for display so that it may not be possible to show fine detail with sufficient clarity SCART and HDMI terminal information AV1 SCART terminal RGB VIDEO Q Link Socket Earth 21 CVBS out video 19 CVBS earth 17 Red in 15 Red earth 13 Green in 11 Green earth 9 Blue in 7 Blue earth 5 Audio out L 3 Audio out R 1 20 CVBS in video 18 RGB status ear...

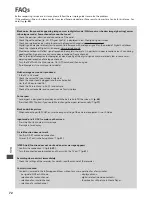
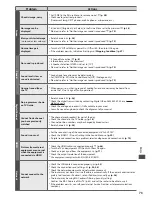
Page 72: ...gain If problem persists consult your local dealer Neither image nor sound is produced Is the TV in AV mode Check the correct AV input mode is selected Check the mains lead is plugged into the socket outlet Has the TV been turned On Check the Picture Menu p 28 29 and volume Check all required cables and connections are firmly in place Auto aspect Auto aspect is designed to provide you with the bes...

Page 73: ...g Digital UK on 08456 50 50 50 or at www digitaluk co uk Check the analogue broadcast if still available in your area Consult an aerial engineer to check the alignment of your aerial Cannot find a channel you have previously watched The channel may broadcast for part of the day Check the channel in the TV Guide p 18 Channel position numbers may be changed by broadcasters Reset channels p 36 HDMI S...

Page 74: ...his timer Press OK to delete timer Press RETURN to return Confirm correct operation Bad signal The signal is weak Check the aerial is plugged in properly It may be necessary to have an aerial installer check the signal and aerial alignment Reset channels p 36 Child Lock is active Press OK to enter PIN The selected channel is locked in Child Lock p 43 You must enter the PIN number before the channe...

Page 75: ...e switch off TV Auto Setup will automatically start when Mains power On Off switch is next turned On p 12 Sending Preset Data Q Link or VIERA Link channel download is in progress Software successfully updated Press EXIT to continue The software updating is finished Software update failed Please try again later Press EXIT to continue Perform System Update Search Now in System Update p 50 If this is...

Page 76: ...h Definition Multimedia Interface A digital audio and video interface for transmitting uncompressed digital signals on a single cable LAN Local Area Network MAC Address Media Access Control Address NICAM Near Instantaneous Companded Audio Multiplex A format for digital sound over television NTSC National Television System Committee One of the television signals used in USA etc RF Radio Frequency S...

Page 77: ...vals Moisture and dust may lead to fire or electrical shock Licence Even if no special notation has been made of company or product trademarks these trademarks have been fully respected DVB and the DVB logos are trademarks of the DVB Project SDXC Logo is a trademark of SD 3C LLC HDMI the HDMI Logo and High Definition Multimedia Interface are trademarks or registered trademarks of HDMI Licensing LL...

Page 78: ...uning 37 40 Media Player 51 57 Menu Functions 27 32 Mode 29 Monaural Audio 16 Multi Audio 16 Music mode 57 N Network connections 45 Network Setup 45 New Channel Message 38 NICAM 29 Normalise 27 NTSC 28 79 O Off Timer 16 30 Optional accessories 6 Owner ID 13 48 P PAL 79 Pedestal 7 Photo mode 52 PIN number 12 13 43 48 Pixel Orbiter 29 Playing Time Display 32 P NR 28 Power and Timer LED 9 19 41 Q Q L...

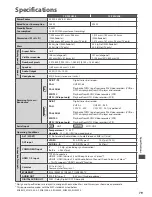
Page 79: ...l services PAL I VHF A J UHF E21 E69 CATV S1 S20 CATV S21 S41 Hyperband PAL 525 60 Playback of NTSC tape from some PAL Video recorders VCR or NTSC disc playback from DVD player and recorder M NTSC Playback from M NTSC Video recorders VCR NTSC AV input only Playback from NTSC Video recorders VCR Aerial input UHF VHF UHF Operating Conditions Temperature 0 C 35 C Humidity 20 80 RH non condensing Conn...

Page 80: ...mples This symbol might be used in combination with a chemical symbol In this case it complies with the requirement set by the Directive for the chemical involved Sales and Support Information Customer Care Centre For customers within the UK 0844 844 3852 For customers within Ireland 01 289 8333 Visit our website for product information www panasonic co uk E mail customer care panasonic co uk Dire...

Reviews: