25
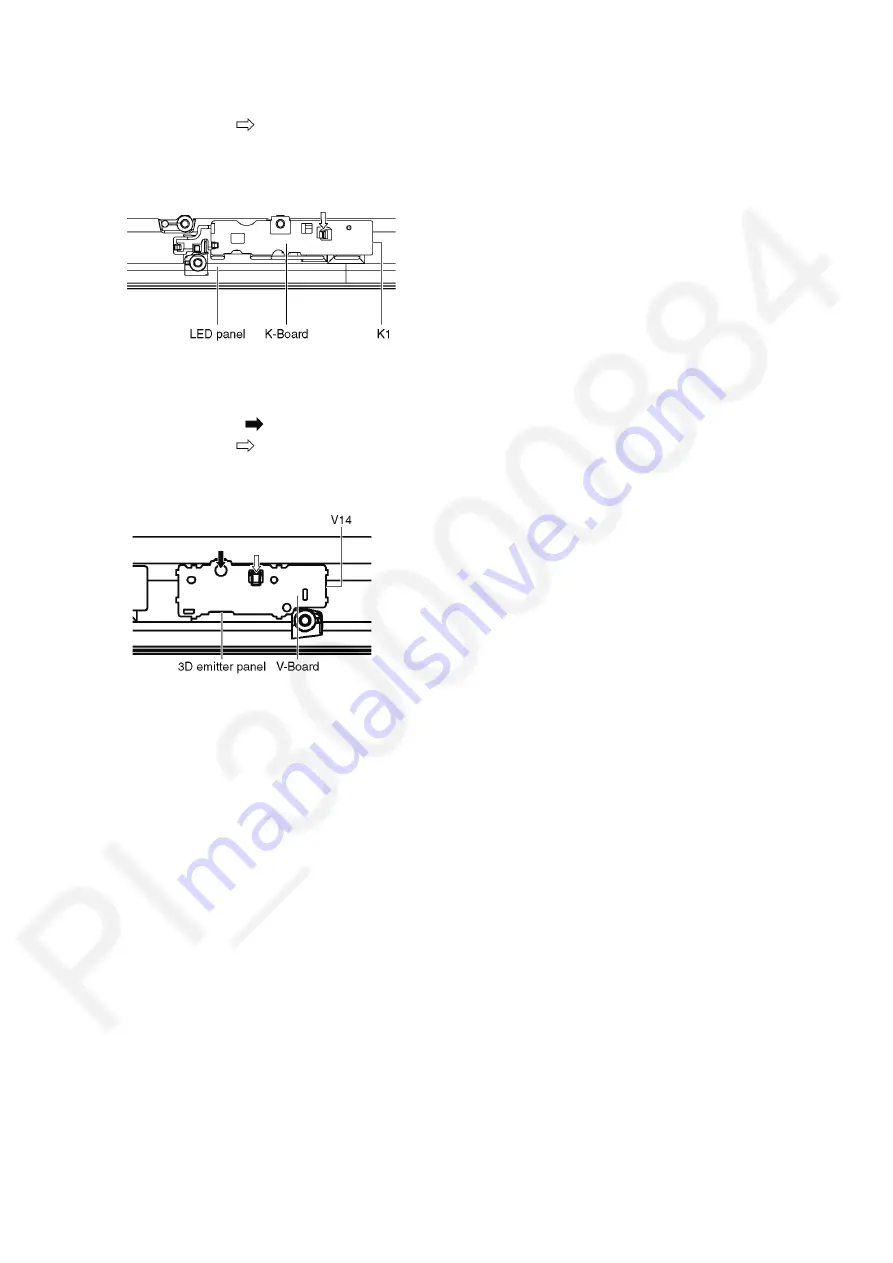
8.18. Remove the K-Board
1. Remove the Glass holder bottom. (See section 8.17.)
2. Remove the claw (
×
1 ).
3. Disconnect the connector (K1) and Remove the K-Board
from LED Panel.
8.19. Remove the V-Board
1. Remove the Glass holder bottom. (See section 8.17.)
2. Remove the screw (
×
1 ).
3. Remove the claw (
×
1 ).
4. Disconnect the connector (V14) and remove the V-Board
from the 3D emitter panel.
8.20. Replace the Plasma panel
Caution:
A new Plasma panel itself without Hanger metals is
fragile.
To avoid the damage to new Plasma panel, carry a new
Plasma panel taking hold of the Hanger metals after
assembling the Hanger metals and the Stand bracket.
1. Place a carton box packed a new Plasma panel on the
flat surface of the work bench.
2. Open a box and without taking a new Plasma panel;
Attach the C1-Board and the C2-Board, connect the flexi-
ble cables from the Plasma panel to the C1-Board and
the C2-Board, and fit the Flexible cable holders.
3. Attach the Hanger metals and the Stand bracket to the
new Plasma panel.
4. Place the Plasma panel on the servicing stand taking hold
of the Hanger metals.
5. Attach the Cabinet assy and each P.C.Board and so on,
to the new Plasma panel.
*When fitting the Cabinet assy, be careful not to allow any
debris, dust or handling residue to remain between the
Front glass and Plasma panel.
Summary of Contents for TX-PR42UT30
Page 19: ...19 7 4 No Picture ...
Page 31: ...31 ...
Page 32: ...32 ...
Page 38: ...38 ...
Page 40: ...40 11 3 Wiring 2 11 4 Wiring 3 ...
Page 41: ...41 11 5 Wiring 4 11 6 Wiring 5 ...
Page 42: ...Model No TX PR42UT30 Schematic Diagram Note S 1 ...
Page 43: ...Model No TX PR42UT30 Replacement Parts List Note S 2 ...
Page 44: ...Model No TX PR42UT30 A Board 1 16 S 3 ...
Page 45: ...Model No TX PR42UT30 A Board 2 16 S 4 ...
Page 46: ...Model No TX PR42UT30 A Board 3 16 S 5 ...
Page 47: ...Model No TX PR42UT30 A Board 4 16 S 6 ...
Page 48: ...Model No TX PR42UT30 A Board 5 16 S 7 ...
Page 49: ...Model No TX PR42UT30 A Board 6 16 S 8 ...
Page 50: ...Model No TX PR42UT30 A Board 7 16 S 9 ...
Page 51: ...Model No TX PR42UT30 A Board 8 16 S 10 ...
Page 52: ...Model No TX PR42UT30 A Board 9 16 S 11 ...
Page 53: ...Model No TX PR42UT30 A Board 10 16 S 12 ...
Page 54: ...Model No TX PR42UT30 A Board 11 16 S 13 ...
Page 55: ...Model No TX PR42UT30 A Board 12 16 K and V Board S 14 ...
Page 56: ...Model No TX PR42UT30 A Board 13 16 S 15 ...
Page 57: ...Model No TX PR42UT30 A Board 14 16 S 16 ...
Page 58: ...Model No TX PR42UT30 A Board 15 16 S 17 ...
Page 59: ...Model No TX PR42UT30 A Board 16 16 S 18 ...
Page 60: ...Model No TX PR42UT30 C1 Board 1 2 S 19 ...
Page 61: ...Model No TX PR42UT30 C1 Board 2 2 S 20 ...
Page 62: ...Model No TX PR42UT30 C2 Board 1 2 S 21 ...
Page 63: ...Model No TX PR42UT30 C2 Board 2 2 S 22 ...
Page 64: ...Model No TX PR42UT30 SN Board 1 6 S 23 ...
Page 65: ...Model No TX PR42UT30 SN Board 2 6 S 24 ...
Page 66: ...Model No TX PR42UT30 SN Board 3 6 S 25 ...
Page 67: ...Model No TX PR42UT30 SN Board 4 6 S 26 ...
Page 68: ...Model No TX PR42UT30 SN Board 5 6 S 27 ...
Page 69: ...Model No TX PR42UT30 SN Board 6 6 S 28 ...
Page 70: ...Model No TX PR42UT30 SS Board 1 2 S 29 ...
Page 71: ...Model No TX PR42UT30 SS Board 2 2 S 30 ...
Page 72: ...Model No TX PR42UT30 A Board Foil side S 31 ...
Page 73: ...Model No TX PR42UT30 A Board Component side S 32 ...
Page 74: ...Model No TX PR42UT30 K and V Board S 33 ...
Page 75: ...Model No TX PR42UT30 C1 Board S 34 ...
Page 76: ...Model No TX PR42UT30 C2 Board S 35 ...
Page 77: ...Model No TX PR42UT30 SN Board Foil side S 36 ...
Page 78: ...Model No TX PR42UT30 SN Board Component side S 37 ...
Page 79: ...Model No TX PR42UT30 SS Board S 38 ...
Page 109: ...Model No TX PR42UT30 Exploded View 1 S 68 ...
Page 110: ...Model No TX PR42UT30 Exploded View 2 S 69 ...
Page 111: ...Model No TX PR42UT30 Packing 1 S 70 ...


