background image

Operating Instructions

LCD Television

English

Thank you for purchasing this Panasonic product.
Please read these instructions carefully before operating this product and retain them for future reference. 
The images shown in this manual are for illustrative purposes only.
Please refer to Pan European Guarantee Card if you need to contact your local Panasonic dealer 
for assistance.

Contents

Be Sure to Read

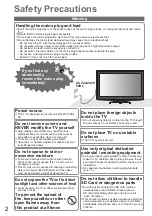
Safety Precautions (Warning / Caution)


 ························· 2

Maintenance


 ··································································· 3

Quick Start Guide

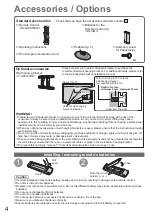
Accessories / Options


 ··································· 4

Identifying Controls


 ······································· 6

Basic Connection


 ········································· 8

Auto Setup


 ·················································· 10

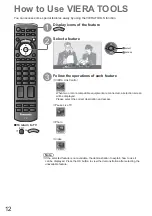
How to Use VIERA TOOLS


 ························ 12

How to Use Menu Functions


 ······················ 13

For more detailed instructions, refer to the Operating 
Instructions on the CD-ROM.
To view the Operating Instructions on the CD-ROM, you 
need a computer equipped with a CD-ROM drive, and 
Adobe® Reader® (Version 7.0 or later is recommended) 
installed on your computer.

Depending on the operating system or settings on your computer, 
the Operating Instructions may not start automatically.
In this case, open the PDF file under the “MANUAL” folder 
manually to view the instructions.

Model No.

TX-L32S20E TX-L32S20ES
TX-L37S20E TX-L37S20ES
TX-L42S20E

Summary of Contents for TXL32S20ES

Page 1: ...uide Accessories Options 4 Identifying Controls 6 Basic Connection 8 Auto Setup 10 How to Use VIERA TOOLS 12 How to Use Menu Functions 13 For more detailed instructions refer to the Operating Instructions on the CD ROM To view the Operating Instructions on the CD ROM you need a computer equipped with a CD ROM drive and Adobe Reader Version 7 0 or later is recommended installed on your computer Dep...

Page 2: ... Do not expose to rain or excessive moisture To prevent damage which might result in electric shock or fire do not expose this TV set to rain or excessive moisture This TV must not be exposed to dripping or splashing water and objects filled with liquid such as vases must not be placed on top of or above the TV Do not expose the TV set to direct sunlight and other sources of heat Avoid exposing th...

Page 3: ...versible damage can be caused Auto power standby function If no signal is received and no operation is performed in analogue TV mode for 30 minutes the TV will automatically go to standby mode Transport TV set in upright position Maintenance First remove the mains plug from the socket outlet Display panel Cabinet Pedestal Regular care Gently wipe the surface of the display panel cabinet or pedesta...

Page 4: ...ly Do not mount the unit directly below ceiling lights such as spotlights or halogen lights which typically give off high heat Doing so may warp or damage plastic cabinet parts Take care when fixing wall brackets to the wall Wall mounted equipment shall not be grounded by metal within the wall Always ensure that there are no electrical cables or pipes in the wall before hanging bracket To prevent ...

Page 5: ... and personal injury may result Ensure that the TV does not fall over If the TV is knocked or children climb onto the pedestal with the TV installed the TV may fall over and personal injury may result Two or more people are required to install and remove TV If two or more people are not present the TV may be dropped and personal injury may result Assembly screw 4 XSS4 16FNK Assembly screw 4 XYN4 F...

Page 6: ...e selection navigation and operation of various functions Exit Returns to the normal viewing screen Numeric buttons Changes channel and teletext pages Sets characters When in Standby mode switches TV On Press for about 1 second VIERA Link Menu Accesses VIERA Link Menu TV Guide Displays TV Guide Option Menu Easy setting for viewing and sound options Main Menu Press to access Picture Sound and Setup...

Page 7: ...ast Automatic Tracking System sensor Senses brightness to adjust picture quality when Eco Mode in the Picture Menu is set to On p 14 Mains power On Off switch Switch On to turn on the TV or turn the TV to Standby mode by the remote control Increases or decreases the channel position by one When a function is already displayed press to increase or decrease the selected function When in Standby mode...

Page 8: ...IN AUDIO OUT PC Y PB PR L R L R 2 1 RF OUT RF IN Cable Cable External equipment and cables shown are not supplied with this TV Please ensure that the unit is disconnected from the mains socket before attaching or disconnecting any leads Example 1 Connecting aerial Example 2 Connecting DVD Recorder VCR TV only TV DVD Recorder or VCR Mains lead Mains lead Fully wired SCART cable DVD Recorder or VCR ...

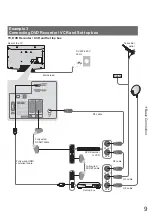
Page 9: ...RF IN PC Cable Example 3 Connecting DVD Recorder VCR and Set top box TV DVD Recorder VCR and Set top box DVD Recorder or VCR Terrestrial aerial Mains lead Rear of the TV AC 220 240 V 50 Hz RF cable Fully wired SCART cable Fully wired SCART cable Fully wired HDMI compliant cable RF cable RF cable Set top box RF cable ...

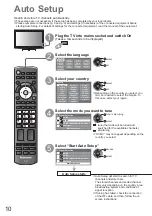
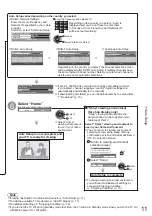
Page 10: ...weden Czech France Norway Hungary Italy Finland Slovakia Spain Luxembourg Slovenia Portugal Switzerland Malta Andorra Belgium Estonia Netherlands Lithuania Turkey Greece Others select set Depending on the country you select you may be required to select the Region In this case select your region 4 Select the mode you want to tune D A D HD TV Signal Selection DVB C DVB T Analogue Start Auto Setup D...

Page 11: ... provider And then select Start Auto Setup enter the frequency and network ID jkl ghi mno tuv pqrs wxyz abc def Depending on the country you select Auto is displayed and you do not have to enter them In this case Home Frequency and Network ID will be set automatically select Start Auto Setup access DVB C Network Settings Frequency Network ID 41001 Start Auto Setup 362 MHz DVB C Auto Setup DVB T Au...

Page 12: ...OOLS 2 Select a feature VIERA Link Control access select 3 Follow the operations of each feature VIERA Link Control When two or more compatible equipment are connected a selection screen will be displayed Please select the correct description and access Pause Live TV Photo Video Note If the selected feature is not available the demonstration to explain how to use it can be displayed Press the OK b...

Page 13: ...store or access Required by some functions To return to TV at any time EXIT To return to the previous screen RETURN To change menu pages up down Choose from among alternatives To reset the settings To reset the picture settings only Reset to Defaults in the Picture Menu p 14 To reset the sound settings only Reset to Defaults in the Sound Menu p 15 To reset the picture and sound settings together N...

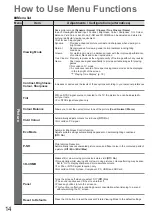
Page 14: ...rding to your personal preference Tint With an NTSC signal source connected to the TV the picture hue can be adjusted to suit your taste For NTSC signal reception only Colour Balance Allows you to set the overall colour tone of the picture Cool Normal Warm Vivid Colour Automatically adjusts colours to vivid ones Off On Not valid on PC signal Eco Mode Automatic Brightness Control function Adjusts p...

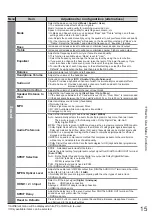
Page 15: ...within 30 cm Up to 30cm is recommended MPX Selects multiplex sound mode if available Normally Stereo Stereo signal cannot be received Mono M1 M2 Available while mono signal is transmitted Analogue mode only Audio Preference Selects the initial setting for audio tracks Auto MPEG Auto Automatically selects the audio tracks if programme has more than two tracks The priority is given in the following ...

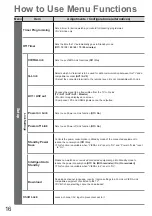
Page 16: ...mage displayed on screen Component PC and HDMI signals cannot be outputted Power on Link Sets to use Power on Link function Off On Power off Link Sets to use Power off Link function Off On Standby Power Save Controls the power consumption in Standby mode of the connected equipment to reduce the consumption Off On This function is available when VIERA Link is set to On and Power off Link is set to ...

Page 17: ...channels Auto Setup Automatically sets the DVB T channels received in the area Manual Tuning Sets the DVB T channels manually Update Channel List Updates DVB T Channel List with keeping your settings Favourite Network Selects your favourite network for each broadcasters only available in some countries New Channel Message Selects whether to give a notification message when a new DVB T channel is f...

Page 18: ...sh Turkish etc East1 Czech English Estonian Lettish Rumanian Russian Ukrainian etc East2 Czech Hungarian Lettish Polish Rumanian etc Default Guide Selects the default TV Guide type when the GUIDE button is pressed TV Guide Channel List TV Guide Electronic Programme Guide EPG is available Channel List EPG is not available and the channel list will appear instead of it Input Labels Labels or skips e...

Page 19: ...peration is performed for the selected times Off 2 4 hours Starting Timer Programming automatically does not affect this function Automatic input switching with the connected equipment affects this function and time count will be reset The notification message will appear 3 minutes before going to Standby mode Power Save Reduces brightness of picture to economise on power consumption Off On 16 9 O...

Page 20: ...ord The model number and serial number of this product may be found on its rear panel You should note this serial number in the space provided below and retain this book plus your purchase receipt as a permanent record of your purchase to aid in identification in the event of theft or loss and for Warranty Service purposes Model Number Serial Number Web Site http www panasonic net Panasonic Corpor...

Reviews: