background image

13

English

Replicating the settings - CLONE BOX

The Clone Box (separately purchased) replicates the settings of the master TV into other TVs.

1

Select the settings of the master TV (see pages 9-12).

 You can replicate the following settings.

2

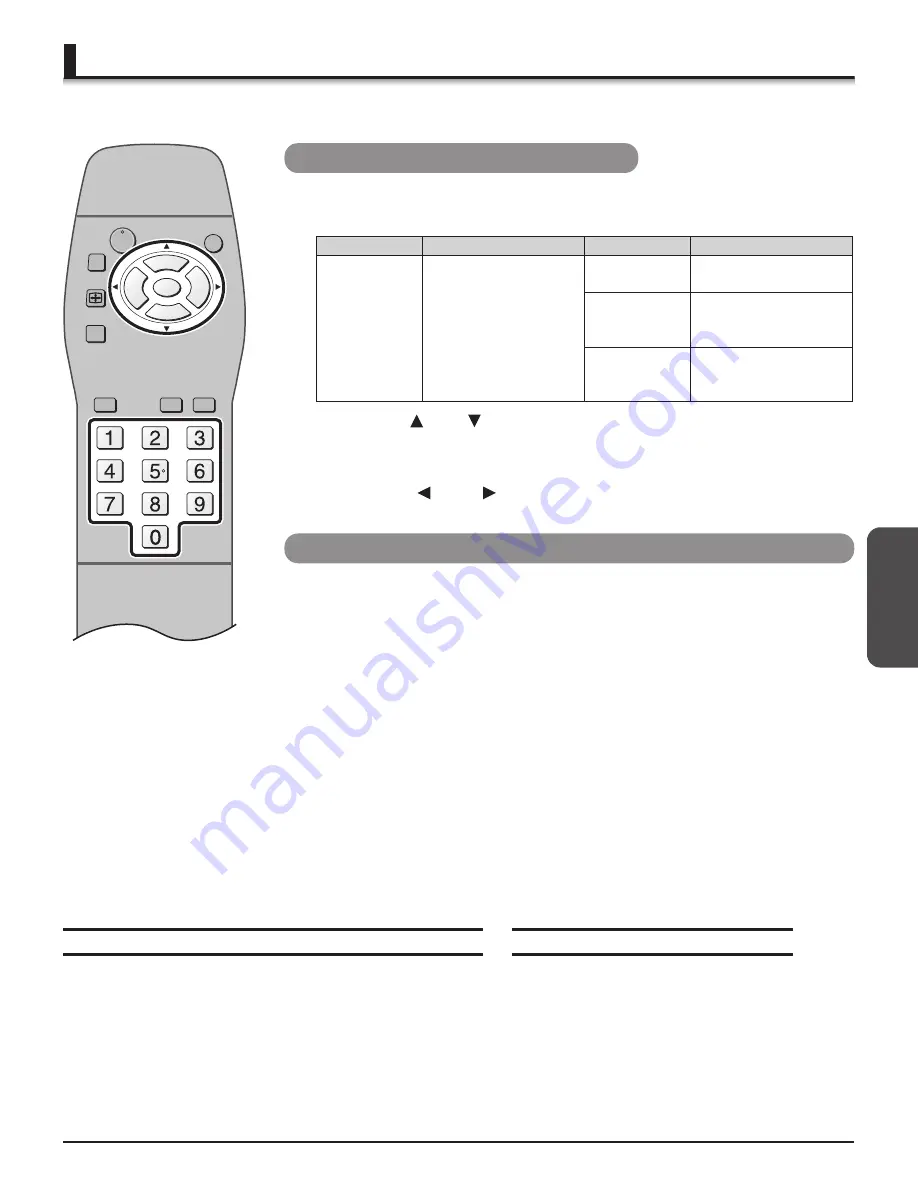
Press [ CH   , CH   ] or the numbered buttons to select the initial
channel you would like to display at power ON (ex. self-advertising
channel).

3

Press [ VOL   , VOL   ]  to select the volume level which will be the
maximum volume in the HOTEL mode (see page 14).

Be sure to set the TV to the normal TV mode before uploading. If not in the normal TV
mode, change the mode referring to “Switching between the normal TV mode and the
HOTEL mode” (see page 14).

Preparation

• Connect the master TV display to the AC outlet.
• Connect the Clone Box to the MATE terminal on the tuner board.

1

Turn the master TV display on.

2

Turn the Clone Box on.

The red and green LEDs on the Clone Box flash.

3

Hold down [ALT] button and press [LEARN] button on the Clone Box.

• The red LED flashes during uploading.
• The green LED lights for approx. 2 seconds when uploading is completed.
• After uploading, the master will be automatically switched into the HOTEL mode.

4

Turn the main power of the display and the Clone Box off.

Selecting the master TV settings

Uploading the master TV’s settings into the Clone Box (LEARN)

POWER

ASPECT

R-TUNE

RECALL

ACTION

CH

CH

VOL

VOL

INPUT

TV/VIDEO

MUTE

SAP


Menu Submenu 

Menu Submenu

 PICTURE 

PIC MODE 

AUDIO 

BASS


 COLOR  TREBLE


TINT 

CHANNELS 

PRESET CAPTION


 BRIGHTNESS 

 MANUAL 

CAPTION


 PICTURE 

 INPUT 

LABEL


SHARPNESS 

SET UP 

AUTO PROGRAM


 COLOR 

TEMP 

 MANUAL 

PROGRAM


 ENERGY 

MGMT

1. Insert a slender tool about 3/4 inch (ex. a paper clip) into

[AMS] hole on the Clone Box to switch the TV to the normal
TV mode.

The green LED lights for approx. 2 seconds.

2. Press [TEST] button on the Clone Box.

• The red and green LED flash alternately during checking.
• The green LED lights for approx. 2 seconds when the settings

replicated in the Clone Box correspond to the master TV settings.
If the red LED does not light, upload the settings again.

1. Turn the Clone Box on.
2. Hold down [ALT] button and press [TEST]

button on the Clone Box.

• The red and green LEDs flash alternately during

checking.

• The green LED lights for approx. 2 seconds when

the battery has enough remaining power. If the
LEDs do not light, replace the battery to new one
(use a 9-volt battery).

To check the settings uploaded into the Clone Box

To check the Clone Box’s battery

Summary of Contents for TY-42TM6MA

Page 1: ... VHF avec interface complémentaire Manuel d utilisation Avant de connecter d utiliser ou de paramétrer cet appareil lire attentivement ces instructions Conserver ce manuel pour consultation ultérieure Español Tarjeta de sintonizador U V con MATE I F Manual de instrucciones Antes de conectar utilizar o ajustar este producto lea completamente este manual de instrucciones y guárdelo para consultarlo ...

Page 2: ... 15 Can receive terrestrial analog broadcasting You can install the U V Tuner Board with MATE I F TY 42TM6MA in the slot of the display and receive terrestrial analog broadcasting Can connect various kinds of video equipment The option board can be installed in the PWD PHD and LHD Series plasma displays and liquid crystal displays FCC STATEMENT FCC STATEMENT This device is verified to comply with ...

Page 3: ...id malfunction or failure do not use parts other than those recommended Accessories Please check and identify the supplied accessories Remote control N2QAFB000003 Terminal function label 1 sheet Affix this label to the applicable slot of the rear panel of the display F type antenna adapter Screw 4 For 5C 1 For 4C 1 1 Open the cover 2 Insert batteries Note the correct polarity and AA size Remote Co...

Page 4: ...ws in the order 1 4 3 Affix the terminal function label included To install 75 Ω VHF UHF Remove the slot cover Grip the handle of the terminal board and slowly pull out in the direction of the arrow To remove Make sure that the Board does not ride on the two lower claws Be sure to fasten all screws tightly Have the customer keep the removed Terminal Board for future servicing needs Mixer Securing ...

Page 5: ...nitor VHF Antenna UHF Antenna Connection of external equipment F type antenna adapter included VCR DVD player To avoid noise in the video hold the antenna cable correctly Route away from the display Do not route close to the display Do not pass around the front of the display Mixer Handling the antenna cable Back Back Front Mate Box Clone Box Digital interface port 1 2 Attaching the ferrite core P...

Page 6: ... only You can select INPUT 3 only when a terminal board is set to SLOT 3 Numbered buttons SAP button Select the audio mode see page 7 R TUNE button Return to previously viewed channel or video mode PC input INPUT 1 INPUT 3 Control reference of Tuner board and Display Note For the common features be sure to use the remote control of Tuner board Watching TV programs Tuning TV channels Adjusting the ...

Page 7: ...emote control when the indicator lights Green or Red 3 Select the menu language in SET UP menu see page 11 1 Press INPUT to select INPUT 1 tuner board 2 Press TV VIDEO to select the TV mode 3 Press CH CH or the numbered buttons to select the channel 4 Press VOL VOL to adjust the volume For your reference Press RECALL to display the channel the audio mode the remaining time of SLEEP timer etc Note ...

Page 8: ...terally stretches a 4 3 image to fill the screen The video is enlarged in the horizontal direction to fill the screen The original aspect ratio is maintained near the center while the video is stretched out more as it approaches either side of the screen The result is an image with less incongruity Mode Picture Explanation 4 3 FULL JUST ZOOM Note You can adjust the picture position and size only w...

Page 9: ...NPUT TV VIDEO PICTURE PIC MODE COLOR TINT BRIGHTNESS PICTURE SHARPNESS NORMAL OTHER ADJ VIVID EXIT SUB MENU SET Submenu Menu icon Option menu AUDIO menu MODE see page 7 BASS TREBLE BALANCE NORMAL STEREO SAP MONO Adjust the bass response Adjust the treble response Adjust the left right speaker volume balance Reset BASS TREBLE and BALANCE adjustments to factory preset PICTURE menu PIC MODE COLOR TIN...

Page 10: ...el press Set channel captions manually up to 8 charactors You have to delete the previously set PRESET CAPTION to replace it by MANUAL CAPTION 1 Press to enter the menu and press or the numbered buttons to enter the channel 2 Press to select ENTER CAPTION 3 Press to select the character Press to move the cursor Give the label up to 8 characters to VIDEO1 input 1 Press to enter the menu 2 Press to ...

Page 11: ...d blanks out a large portion of the picture on the television screen TEXT T4 Another mode which displays information and blanks out a large portion of the picture on the television screen CLOSED CAPTIONS CHART Note Set cc MODE to OFF to activate cc ON MUTE Some programs do not include closed captions Closed captions are not displayed when ASPECT mode is ZOOM see page 8 SET UP menu IDIOMA LANGUE cc...

Page 12: ...ences only This program may contain mature themes profane language graphic violence and explicit sexual content FV FANTASY CARTOON VIOLENCE V VIOLENCE S SEX L OFFENSIVE LANGUAGE D DIALOGUE WITH SEXUAL CONTENT U S TV PROGRAMS RATINGS CHART NR CONTAINS NO RATING NOT RATED AND NA NOT APPLICABLE PROGRAMS G GENERAL AUDIENCES All ages admitted PG PARENTAL GUIDANCE SUGGESTED Material not be suitable for ...

Page 13: ...cally switched into the HOTEL mode 4 Turn the main power of the display and the Clone Box off Selecting the master TV settings Uploading the master TV s settings into the Clone Box LEARN POWER ASPECT R TUNE RECALL ACTION CH CH VOL VOL INPUT TV VIDEO MUTE SAP Menu Submenu Menu Submenu PICTURE PIC MODE AUDIO BASS COLOR TREBLE TINT CHANNELS PRESET CAPTION BRIGHTNESS MANUAL CAPTION PICTURE INPUT LABEL...

Page 14: ...ee page 11 MODE V CHIP SET Does not appear in the initial setting To display press SAP ASPECT and then press and hold RECALL for approx 3 seconds LOCK menu To display press while highlighting V CHIP SET in SET UP menu see left CREATE CODE FIRST ENTER CODE see page 10 V CHIP SET see pages 10 12 CODE see page 10 HOW LONG 12HOURS Fixed The settings selected in HOTEL mode returns to the initial settin...

Page 15: ...n away from Electrical Appliances Lights Vehicles and Medical Equipment Increase Volume Check Mute Change Channel Set TV or Cable Mode Properly Check Antenna Cables Check Power Cord is Plugged into Active Outlet Adjust Brightness and Audio Controls Change Channel Check Cable Connections Check Second Video Source Operation Adjust Color Settings Change Channel Check Audio is set to stereo or Mono no...

Page 16: ...aramètres du téléviseur maître 27 Téléchargement des paramètres du téléviseur maître sur l unité de clonage LEARN 27 Téléchargement des paramètres sur un autre téléviseur TEACH 28 Commutation entre les modes TV normal et HÔTEL 28 Rétablissement des paramètres par défaut 28 Guide de dépannage 29 Spécifications 29 Réception du signal de télédiffusion analogique terrestre Il est possible d installer ...

Page 17: ...niseur Piles pour télécommande 2 piles AA Précautions à prendre Un traitement inapproprié des piles peut entraîner une fuite de l électrolyte susceptible d endommager les objets avec lesquels elle entrerait en contact et de provoquer un incendie Ne pas utiliser ensemble des piles neuves et usées Ne pas utiliser ensemble des piles de types différents ex zinc carbone et alcaline Ne pas exposer les p...

Page 18: ...tte d identification des bornes et prises fournie Installation 75 Ω VHF UHF Retirer le couvercle de la fente Agripper la poignée du syntoniseur puis le tirer doucement dans le sens de la flèche Retrait S assurer que le syntoniseur ne bascule pas sur les deux griffes inférieures Serrer toutes les vis à fond Demander au client de conserver le syntoniseur pour permettre la récupération des composante...

Page 19: ...xion d équipement externe Adaptateur d antenne de type F fourni Magnétoscope Lecteur DVD Afin de prévenir que du bruit n affecte le signal vidéo faire cheminer et fixer adéquatement le câble d antenne Faire cheminer le câble loin de l écran Ne pas faire passer le câble près de l écran Ne pas faire passer le câble devant l écran Mélangeur Manipulation du câble d antenne Arrière Arrière Avant Unité ...

Page 20: ...C IN à l entrée PC Modèle à 2 fentes seulement La borne INPUT3 ne peut être sélectionnée que lorsqu un syntoniseur est dans la fente 3 SLOT3 Touches numériques Touche SAP Pour la sélection du mode audio voir page 21 Touche R TUNE Pour retourner au canal ou au mode vidéo précédemment visualisé Entrée PC INPUT 1 INPUT 3 Tableau de référence des commandes du syntoniseur et de l écran Nota Pour les fo...

Page 21: ...orsque le voyant est rouge ou vert 3 Sélectionner la langue d affichage des menus dans le menu RÉGLAGE voir page 25 1 Appuyer sur INPUT pour sélectionner INPUT1 syntoniseur 2 Appuyer sur TV VIDEO pour sélectionner le mode TV 3 Appuyer sur CH CH ou sur les touches numériques pour sélectionner un canal 4 Appuyer sur VOL VOL pour régler le volume Renseignement utile Appuyer sur RECALL pour afficher l...

Page 22: ...remplir tout l écran Étire horizontalement l image 4 3 de manière à remplir l écran L image vidéo est agrandie horizontalement de manière à remplir l écran Le format d origine est maintenu près du centre tandis que l étirement de l image se fait progressivement plus grand vers chaque côté de l écran Il est résulte une image moins incongrue Mode Image Signification 4 3 TOUT ÉCRAN CADRAGE ZOOM Nota ...

Page 23: ...UNE RECALL ACTION CH CH VOL VOL INPUT TV VIDEO Sous menu Icône du menu Menu des options Menu AUDIO MODE voir page 21 GRAVES AIGUS ÉQUILIBRE NORM STÉRÉO SAP MONO Réglage de la réponse en basse fréquence Réglage de la réponse en haute fréquence Réglage de l équilibre du volume des haut parleurs gauche droit Rétablissement des paramètres par défaut pour GRAVES AIGUS et ÉQUILIBRE Menu IMAGE MODE COULE...

Page 24: ...supprimer le SIGLE PRÉRÉGLÉ précédemment entré pour le remplacer par un SIGLE MANUEL 1 Appuyer sur pour accéder au menu puis appuyer sur pour sélectionner le sigle 2 Appuyer sur pour sélectionner ENTRER SIGLE 3 Appuyer sur pour sélectionner le caractère Appuyer sur pour déplacer le curseur Assignation d une étiquette maximum de 8 caractères à l entrée VIDÉO1 1 Appuyer sur pour accéder au menu 2 Ap...

Page 25: ...r T4 Autre mode donnant lieu à l affichage d informations et au masquage d une grande partie de l image sur l écran du téléviseur Tableau des sous titres Nota Régler cc MODE sur NON pour activer cc EF MUET Certaines émissions ne comportent pas de sous titres Les sous titres ne sont pas affichés lorsque le mode ASPECT est réglé sur ZOOM voir page 22 Menu RÉGLAGE IDIOMA LANGUE cc EF MUET cc MODE AUT...

Page 26: ...els suggestives TV 14 Mise en garde importante des parents Ce programme peut contenir des thèmes sophistiqués des scènes sexuelles un langage grossier et des scènes d intense violence TV MA Public adulte uniquement Ce programme peut contenir des thèmes pour adulte un langage blasphématoire de la violence et des scènes sexuelles explicites FV VIOLENCE FANTASTIQUE DESSIN ANIMÉ V VIOLENCE S SEX L LAN...

Page 27: ... le téléviseur passe automatiquement dans le mode HÔTEL 4 Couper le contact sur l écran et sur l unité de clonage Sélection des paramètres du téléviseur maître Téléchargementdesparamètresdutéléviseur maître surl unitédeclonage LEARN POWER ASPECT R TUNE RECALL ACTION CH CH VOL VOL INPUT TV VIDEO MUTE SAP 1 Introduire un objet mince d environ 3 4 po un trombone par exemple dans le trou AMS de l unit...

Page 28: ...la touche RECALL enfoncée pendant environ 3 secondes Menu BLOCAGE Pour afficher ce menu appuyer sur après avoir mis PUCE RÉGL en surbrillance dans le menu RÉGLAGE voir ci contre CRÉER CODE D ABORD ENTRER CODE page 24 PUCE RÉGL page 24 26 CODE page 24 NBRE D HEURES 12 HEURES Fixe Les paramètres sélectionnés dans le mode HÔTEL sont remplacés par les paramètres par défaut après une période de 12 heur...

Page 29: ...use Multiples images Interférence Vidéo normale Pas d image mais de la neige Pas d image Pas d image dans l image Pas de couleur Vidéo normale Cadre noir sur l écran Vidéo normale Commande intermittente par télécommande Ajustez l emplacement et la connexion de l antenne Ajustez l emplacement et la connexion de l antenne Vérifiez le câble d entrée de l antenne Éloignez le téléviseur des appareils é...

Page 30: ... Selección de los ajustes del TV maestro 41 Descarga de los ajustes del TV maestro en la caja de clonación APRENDER 41 Descarga de los ajustes a otro TV ENSEÑAR 42 Cambio entre el modo de TV normal y el modo HOTEL 42 Reposición de todos los ajustes a los ajustes de fábrica 42 Guía para la solución de problemas 43 Especificaciones 43 Puede recibir emisiones analógicas terrestres Puede instalar la t...

Page 31: ...artes especificadas para hacer la interconexión Para evitar fallos del funcionamiento y otros problemas no utilice otras partes diferentes de las recomendadas Accesorios Verifique e identifique los accesorios suministrados Control remoto N2QAFB000003 Etiqueta de funciones de terminales 1 hoja Fije esta etiqueta en el panel trasero de la pantalla Adaptador de antena tipo F Tornillo 4 para 5C 1 para...

Page 32: ...nes de terminales incluida Para instalar 75 ohmios VHF UHF Quite la tapa de la ranura Sujete el asa de la tarjeta de terminales y sáquela lentamente en el sentido de la flecha Para quitar Asegúrese de que la tarjeta no se monte en los dos ganchos inferiores Asegúrese de apretar bien todos los tornillos Pida al cliente que guarde la tarjeta de terminales retirada por si resulta necesarias para repa...

Page 33: ...34 Pantalla Monitor Antena VHF Antena UHF Conexión de un equipo externo Adaptador de antena tipo F incluida Videograbadora Reproductor DVD Para evitar ruido en el vídeo sujete bien el cable de la antena Alejándolo de la pantalla No lo ponga cerca de la pantalla No lo pase por delante de la pantalla Mezclador Manejo del cable de antena Detrás Detrás Delante Caja de acoplamiento Caja de clonación Pu...

Page 34: ...uando se ha configurado una tarjeta de terminales para SLOT 3 Botones numerados Botón SAP Selecciona el modo de audio vea la página 35 Botón R TUNE Para volver al canal o modo de vídeo anterior PC input INPUT 1 INPUT 3 Referencia de controles de la tarjeta de sintonizador y pantalla Nota Para las funciones comunes asegúrese de usar el control remoto de la tarjeta de sintonizador Para ver programas...

Page 35: ...moto cuando el indicador se enciende en Verde o Rojo 3 Seleccione el idioma de menú en el menú AJUSTE vea la página 39 1 Presione INPUT para seleccionar INPUT 1 tarjeta de sintonizador 2 Presione TV VIDEO para seleccionar el modo de TV 3 Presione CH CH o los botones numerados para seleccionar el canal 4 Presione VOL VOL para ajustar el volumen Para su referencia Presione RECALL para visualizar el ...

Page 36: ...inal Alarga lateralmente una imagen 4 3 para llenar la pantalla La imagen se expande en sentido horizontal para llenar la pantalla La relación de aspecto original se mantiene cerca del centro mientras la imagen se alarga más hacia el exterior según se aproxima a cada lado de la pantalla La imagen tiene así menos incongruencia Modo Imagen Explicación 4 3 COMP JUSTO ACERC Nota Puede ajustar la posic...

Page 37: ...L VOL INPUT TV VIDEO IMAGEN MODO COLOR TINTE BRILLO CONTRASTE NITIDEZ NORMAL OTROS AJ VIVIDO SALIR SUBMENU SI Submenú Icono de menú Menú de opciones Menú AUDIO MODO vea la página 35 BAJOS ALTOS BALANCE NORMAL ESTÉREO SPA MONO Ajusta la respuesta de los graves Ajusta la respuesta de los agudos Ajusta el equilibrio del volumen de los altavoces derecho izquierdo Repone los ajustes de BAJOS ALTOS y BA...

Page 38: ...lmente títulos a los canales hasta 8 caracteres Tiene que borrar el PREFIJADO puesto anteriormente para reemplazarlo por MANUAL 1 Presione para entrar en el menú y presione o los botones numerados para introducir el canal 2 Presione para seleccionar PONGA IDENTIDAD 3 Presione para seleccionar el carácter Presione para mover el cursor Ponga la etiqueta hasta 8 caracteres en la entrada VIDEO1 1 Pres...

Page 39: ...encendido el aparato cuando no se utilice ENGLISH NO C1 C2 C4 C3 NO C1 C2 T1 C4 T3 T4 C3 T2 1 2 NO 15 TÍTULOS NO TÍTULOS C1 TÍTULOS C2 TEXTO T1 TEXTO T2 TÍTULOS C3 TÍTULOS C4 TEXTO T3 TEXTO T4 Modo recomendado para cuando no se utilizan los títulos ocultos Para información relacionada con vídeo que puede ser visualizada hasta 4 líneas de texto colocadas estratégicamente en la pantalla del televiso...

Page 40: ...contener temas para adultos lenguaje profano violencia vívida y un contenido sexual explícito FV VIOLENCIA EN PROGRAMAS DE FANTASÍA DIBUJOS ANIMADOS V VIOLENCIA S SEXO L LENGUAJE OFENSIVO D DIÁLOGO CON CONTENIDO SEXUAL GRÁFICA DE CALIFICACIONES DE PROGRAMAS DE TV PARA LOS EEUU NR CONTIENE PROGRAMAS SIN RESTRICCIONES Y PROGRAMAS NA NO APLICABLES Las películas no tienen restricciones o las restricci...

Page 41: ...cte la alimentación principal de la pantalla y de la caja de clonación Selección de los ajustes del TV maestro Descarga de los ajustes del TV maestro en la caja de clonación APRENDER POWER ASPECT R TUNE RECALL ACTION CH CH VOL VOL INPUT TV VIDEO MUTE SAP 1 Inserte una herramienta delgada de unos 19 mm un clip de papel por ejemplo en el agujero AMS de la caja de clonación para poner el TV en el mod...

Page 42: ...c vea la página 39 MODO vea la página 37 VIDEO vea la página 39 MODO V CHIP No aparece en el ajuste inicial Para visualizarlo presione SAP ASPECT y luego mantenga presionado RECALL durante unos 3 segundos Menú BLOQUEO Para visualizarlo presione mientras resalta V CHIP en el menú AJUSTE vea a la izquierda CREAR CLAVE INGRESAR vea la página 38 V CHIP vea la página 38 40 CLAVE vea la página 38 TIEMPO...

Page 43: ...terferencia Vídeo normal No hay vídeo pero sí efecto de nieve No hay vídeo ni PIP No hay color Vídeo normal Recuadro negro en la pantalla Vídeo normal Audio con ruido Audio con ruido Audio con ruido No hay audio Audio con ruido No hay audio Audio normal Audio equivocado Audio normal Audio normal Ajuste la ubicación y la conexión de la antena Ajuste la ubicación y la conexión de la antena Verifique...

Page 44: ...uld note this serial number in the space provided below and retain this book plus your purchase receipt as a permanent record of your purchase to aid in identification in the event of theft or loss and for Warranty Service purposes Model Number Serial Number Anotación del cliente El modelo y el número de serie de este producto se encuentran en su panel posterior Deberá anotarlos en el espacio prov...

Reviews: