background image

22

English

Replicating the settings – Set Up Loader

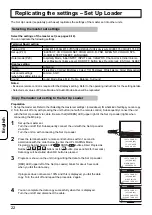
The Set Up Loader (separately purchased) replicates the settings of the master set into other units.

Selecting the master set settings

Select the settings of the master set (see pages 9-12).

You can replicate the following settings.

Terminal Board setting

Menu

Submenu

Tuning (P.9)

CH SELECT, SYS SELECT, AUTO TUNE or MANUAL TUNE tuning results, SOUND SYS, COLOUR SYS, SKIP

Set up (P.13)

TELETEXT, CH COLOUR SET, CHILD LOCK, D.PNR, MPEG NR, COLOUR SYS, 
3D-COMB, TEXT SELECT, LANGUAGE

Hotel mode (P.20)

Hospitality Mode, Initial INPUT, INPUT Lock, Initial POS, Channel lock, Initial Volume 
Level, Maximum Volume Level, OSD OFF, Button lock, Remote lock, ES Timer, SLEEP

Display setting

Menu

Submenu

Picture

Picture Mode, Contrast, Brightness, Colour, Tint, Sharpness, White balance, Colour Management

Advanced settings 
(when the setting turns on)

Gamma, AGC

Sound

Sound Mode, Bass, Mid, Treble, Balance, Surround

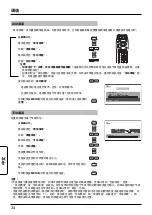
Copy the master set setting to the Set Up Loader

Preparation

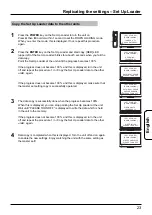
1.  Set up the master set. Refer to the <Selecting the master set settings> (noted above) for what kind of settings you can copy.
2.  Turn the unit off only with pressing the unit button (not with the remote control). Subsequently connect the unit 

with the Set Up Loader via cable. Be sure that [GREEN] LED (upper right of the Set Up Loader) lights when 
connecting the M3 plug.

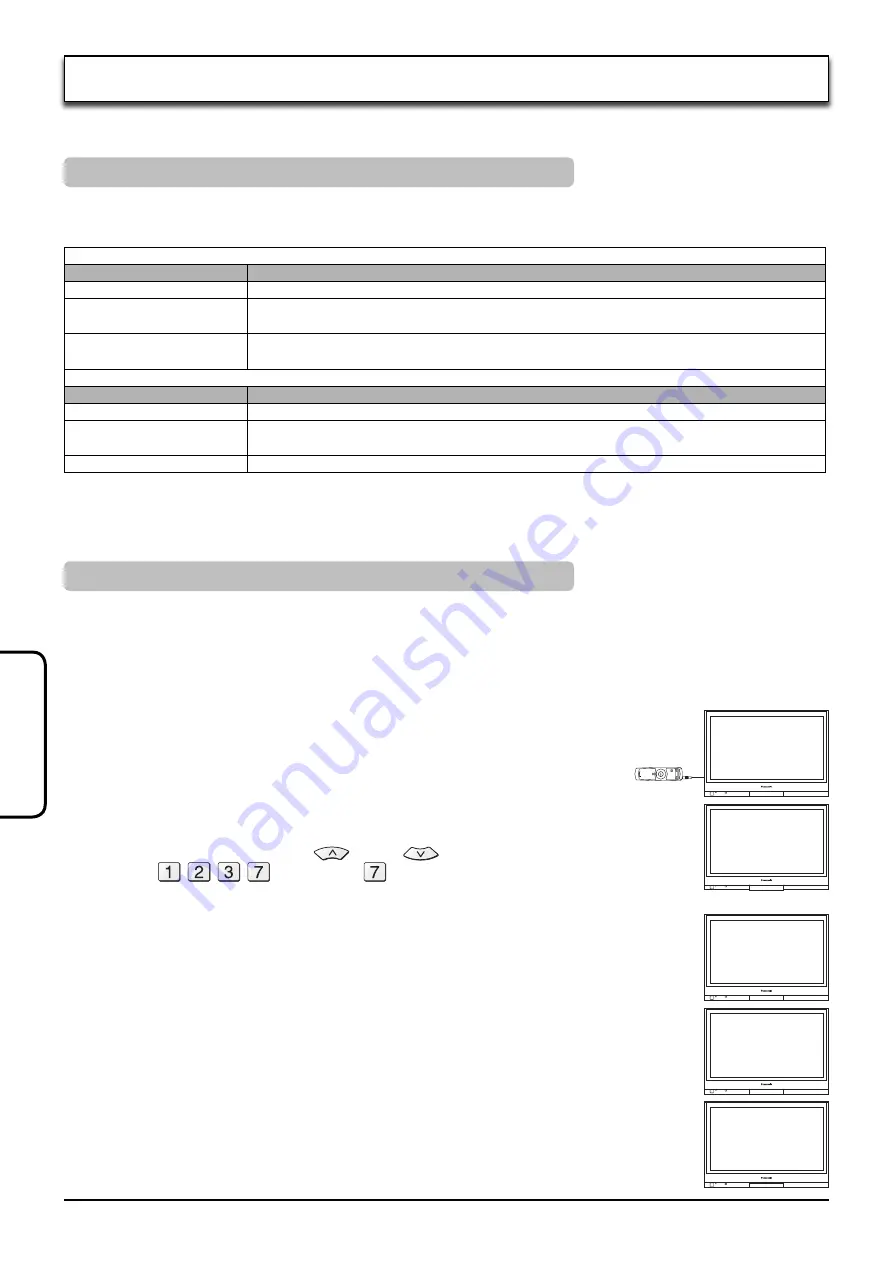
Set up the master set.
Turn the unit off first. Subsequently connect the unit with the Set Up Loader 
via cable.
Turn the unit on with connecting the Set Up Loader.

1

Press the terminal board’s remote control buttons within 1 second in 

accordance with the order below to enter the UP LOADING Mode.
Programme Number Selection UP 

, DOWN 

 buttons, Direct Programme 

Number 

 buttons (as for 

 button, press and hold for 3 seconds).

Data copy will be started when OK button is pressed.

<SET UP MODE> 

[UP LOADING]

TV -> LOADER
PUSH OK KEY

<SET UP MODE> 

[UP LOADING]

WRITING DATA ...

PROGRESS  5%

<SET UP MODE> 

[UP LOADING]

WRITE FAILED

PLEASE TURN OFF

<SET UP MODE> 

[UP LOADING]

WRITE COMPLETED

PLEASE TURN OFF

Progress is shown on the unit during writing the data to the Set Up Loader.

[RED] LED (upper left of the Set Up Loader) blinks for about 5 seconds 
when you fail the data copy.

If progress does not become 100% and this is displayed, you fail the data 
copy. Turn the unit off and repeat the procedure 2 again.

You can complete the data copy successfully when this is displayed.
Turn the unit off and disconnect the cable.

2

3

4

Notes:

• Exclusive remote control is required for the Display’s setting. Refer to the operating instructions for the setting details.
• Selected set values of Picture Mode and Audio Mode above will be replicated.

Summary of Contents for TY-FB8TA

Page 1: ...structions Before connecting operating or adjusting this product please read these instructions completely Please keep this manual for future reference ࡒ Hospitality ܿଁޤ U V ݲ ᄘධ ن ቂངಖ ޭׁٛ ᄵஏਾȂ غ Ꮾञ ݲ ፇ ˈขჱ੪ኡ ޚ ጝᄎངಖȃข ௗׁ ق ᇵֻਖ ହ ૣد ȃ Model No TY FB8TA English ၭ ...

Page 2: ... Set up 21 Display s setting 21 Replicating the settings 22 Selecting the master set settings 22 Copy the master set setting to the Set Up Loader 22 Copy the Set Up Loader data to the other units 23 Troubleshooting 24 Specifications 24 Features Contents Can receive terrestrial analog broadcasting You can install the U V Tuner Board with Hospitality Port TY FB8TA in the slot of the unit and receive...

Page 3: ...n or failure do not use parts other than those recommended Please check and identify the supplied accessories Remote Control Batteries Accessories Options Safety Precautions Remote control N2QAYB000020 Remote control batteries 2 R6 AA size Terminal function label 1 sheet Affix this label to the applicable slot of the rear panel of the unit Precautions Mishandling of batteries can cause electrolyte...

Page 4: ... customer keep the removed Terminal Board for future servicing needs Foam mat or thick soft cloth 2 slots model For TH 37PWD8WK S 3 slots model For TH 42PWD8WK S 3 slots model For TH 37PG9W TH 42PG9W For TH 42PS9WK S TH 42PH9WK S TH 50PH9WK S Singapore and India only SLOT1 SLOT2 SLOT1 SLOT2 SLOT1 SLOT2 SLOT3 SLOT3 1 2 3 4 Installation Procedure 1 Turn off the display and the connected equipment an...

Page 5: ... Your local Television Service Centre or Dealer may be able to assist you in obtaining the correct Aerial system for your particular area and the accessories required Any matters regarding Aerial installation upgrading of existing systems or accessories required and the costs incurred are the responsibility of you the Customer Handling the antenna cable Back Route away from the unit Back Do not ro...

Page 6: ...O OUT is available only when AV is selected as the input source for TV AV INPUT1 for PWD8 series see page 5 16 Before the Hospitality Port connection be sure to set the Hospitality Mode ON in Hotel mode see page 20 Make sure to set OFF when not in use Then perform other slot settings Connect the S VIDEO or VIDEO terminal Example of input signal source S VIDEO VCR CAMCORDER VCR DVD PLAYER RCA BNC a...

Page 7: ...ss to select the next higher or lower Programme number Press to select TV AV PC IN Input1 sequentially except PDP8 series see page 6 Text Hold Picture Still see page 15 17 Text Index see page 19 Direct Programme Number see page 10 CH SELECT POSITION You can select the numbers directly by pressing Programme Number button and the two digit Numbers by pressing Two Digit and Programme Number buttons P...

Page 8: ... to store settings after adjustments have been made or options have been set The MENU button is used to exit the menu system and return to the normal viewing screen Note The Help box is not shown in the menu pictures in this instruction book due to space limitations An On Screen Help box is displayed whenever a menu is displayed on the unit This Help box indicates which buttons on the remote contr...

Page 9: ...E Allows you to automatically retune the set Useful if you move house and wish to retune your set to the local stations See page 11 MANUAL TUNE Allows individual program positions to be tuned manually See page 11 SOUND SYS Sound System Allows you to change the sound system used for a programme channel Choose the required sound system 4 5MHz 5 5MHz 6 0MHz 6 5MHz COLOUR SYS Colour System Lets you se...

Page 10: ... button to view channel 6 During Position mode various reception channels can be viewed Example Programme Number Channel Display Received Channel 1 2 3 4 5 6 7 8 9 10 20 2 4 6 8 10 20 2 4 6 8 10 20 DIRECT When the CH SELECT is on DIRECT and AUTO TUNE is performed the unit memorises the Programme Number which is the same as the channel tuned This method allows you to select the desired channel by p...

Page 11: ...even when a Broadcast or AV signal is received refer to the COLOUR SYS selection on page 9 After the AUTO TUNE or MANUAL TUNE is finished press the Programme Number up button to confirm the tuning condition for each Programme Numbers If some Programme Numbers are unused it is possible to skip such Programme Numbers Please refer to the SKIP function on page 9 When using a VCR without video and audi...

Page 12: ... 10 11 12 S11 S44 20 21 21 62 63 69 21 62 63 69 62 63 69 62 63 62 C13 70 73 74 75 76 77 78 79 S 1 S 2 S 3 S 1 S 2 S 3 S 1 S 2 S 3 S 1 S 1 S 2 S 3 80 81 89 Z1 Z9 S1 S2 S10 S1 S2 S10 S1 S2 S10 S1 S2 S10 S1 S2 S10 90 91 92 93 94 95 96 97 98 99 Z10 Z11 Z12 Z13 Z14 Z15 Z16 Z17 Z18 Z19 S11 S12 S13 S14 S15 S16 S17 S18 S19 S20 S11 S12 S13 S14 S15 S16 S17 S18 S19 S20 S11 S12 S13 S14 S15 S16 S17 S18 S19 S20...

Page 13: ...43 NTSC 3 58 PAL SECAM and NTSC 3 58 are different colour signal broadcast transmission systems applicable to different countries NTSC 4 43 is a trick playback mode used in special VCR s to playback NTSC recorded video tapes through PAL television equipment 3D COMB Occasionally whilst viewing still or slow moving pictures colour patterning may be seen Set 3D COMB to ON to display sharper and more ...

Page 14: ...ersonal details into its memory so that in the unfortunate event of theft it will help the Police to trace the owner If you wish to check the personal details already entered into the set except your PIN number press the OK button and hold for 6 seconds The details already entered are displayed on screen and will disappear after a few seconds If OWNER ID information was not entered when you switch...

Page 15: ...ection of the picture 16 9 16 9 4 3 16 9 16 9 will display the picture at its maximum size but with slight elongation Just Just 4 3 9 16 Just mode will display a 4 3 picture at its maximum size but with aspect correction applied to the center of the screen so that elongation is only apparent at the left and right edges of the screen The size of the picture will depend on the original signal Still ...

Page 16: ...the sub pictures used for the picture in picture and picture out picture displays these sub pictures cannot be shown in detail Two computer screen pictures are displayed in a simplified format and it may not be possible to discern details on them satisfactorily When you want to display an input source in the sub screen display it in the main screen first and then press SWAP to change the display E...

Page 17: ...ignal the menu may be changed Teletext operation TV Teletext mode Press the TV TEXT button to switch between the current programme Page Selection Pages can be selected in two ways a Press the Up Down buttons to increase or decrease the page number by one b By entering the page number using 0 9 on the remote control Full Top Bottom Press the MENU button to display special functions followed by the ...

Page 18: ...eds one page it may take some time for the automatic changing of the sub pages to reach the sub page you require As each sub page is found its number is displayed at the top of the page so that you may select it as more sub pages are picked up the display at the top of the page changes so that you are always offered the most recently transmitted selection of sub pages In Teletext operation use the...

Page 19: ...ingual Sound Selection When you receive the stereo bilingual sound system sound output modes can be selected by pressing the Stereo Bilingual Sound Selection button Audio Signal STEREO MAIN㓫 SUB㓬 MONO Mode Indicator 㓫 㓬 NICAM Used in New Zealand Singapore Hong Kong etc Type of broadcast Regular broadcast Standard Audio Regular NICAM MONO㓫 MAIN㓫 NICAM STEREO NICAM DUAL MONO MAIN 㓫 SUB 㓬 Mode Indica...

Page 20: ... OFF 0 125 Note Valid only when TV is selected in Initial INPUT Channel lock Always select the POSITION which is set in Initial POS When OFF is selected in Initial POS always select the position which is set at the time OFF ON Initial Volume Level Set the volume when power on OFF 0 63 Maximum Volume Level Set the maximum volume OFF 0 63 OSD OFF Set the Recall display OFF when power on OFF ON Note ...

Page 21: ...ected with this terminal board If not no setting is required Press the buttons to enter the SYSTEM SETTING MODE within 1 second in accordance with the order below Programme Number Selection UP DOWN buttons Direct Programme Number buttons as for button press and hold for 3 seconds USE SLOT3 Select YES when SLOT3 is used if not select NO Turn the unit Off and On again to enable the new settings YES ...

Page 22: ...t with the Set Up Loader via cable Be sure that GREEN LED upper right of the Set Up Loader lights when connecting the M3 plug Set up the master set Turn the unit off first Subsequently connect the unit with the Set Up Loader via cable Turn the unit on with connecting the Set Up Loader 1 Press the terminal board s remote control buttons within 1 second in accordance with the order below to enter th...

Page 23: ...If the progress does not become 100 and this is displayed make sure that the master set setting copy is successfully operated The data copy is successfully done when the progress becomes 100 When this is displayed you can stop pointing the Set Up Loader at the unit Wait until PLEASE TURN OFF is displayed to write the data which is held in the unit to the memory If the progress does not become 100 ...

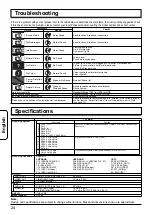
Page 24: ...isplayed Check to make sure the terminal board is installed in the correct slot and confirm that the Serial Slot Select item of the display to set to Slot2 see page 21 Specifications TY FB8TA Receiving System 17 Systems Function 1 2 3 4 5 6 7 PAL B G H PAL I PAL D K SECAM B G SECAM D K SECAM K1 NTSC M NTSC 3 58 4 5 MHz Reception of broadcast transmissions and Playback from Video Cassette Tape Reco...

Page 25: ... ड़ಅ 39 ק ൮ܻ 39 ק ಠ 39 ဇၭ غܠج Ꮾ 40 அ 0 ቮ ሕᅤዎ 42 Hotel mode ົ 43 SYSTEM SETTING MODE ົ 44 მ ධົ ށ 44 ࡉ ົ ށ 45 ᅤዎ ົ ܿົ ށ 45 ਖ ົ ܿົ ࡉށ ܸົ ධຢ 45 ਖົ ධܿ દࡉ ܸඝྊ ධຢ 46 ࢽጊഠ ڼ ፑೌ 47 ࣙࢆ 47 ݞ ɖ ᇵਾ ݓ ಅಠ ࣖ ਖࡒ ܿଁޤ U V ݲ ᄘධ ن TY FB8TA Ꭷܸ ධܿ ؼن ˈਾ ݓ ಅಠ ࣖ ȃ ɖ ᇵஏਾࢌ ൮ົֻ ᇵஏਾVCR ডDVD ᇵ צ ׁ ຢᄥຠ ܿ ൮ˈডጚਖ ൮ ۈ ཛྷܸஏਾܿ৭ ධຢᄥຠȃ ቂᄲख Ꮚმ ධ PG RႼள PS H9WႼள ᄧৠൻञሠ ޡ ቂ PWD8Ⴜள ஂ TH 42PG9W TH 42PH9WK TH 42PWD8WK S ቂܿᄲखˈข ׁૣد ܿ ቂངಖ ȃ ...

Page 26: ...ፇ ˈข ۂ ಝᎇ ܿܐ ࣤڶ ਜ਼༥႘ ເ ܿ ݢ ȃ ขႚ כ ቂཱུ ࡒ ݢܿܕ େডፑ ؠܿށ ᄵஏਾȃ ၓ ן ಁࢽጊড໘ௌˈข ᇋ ቂထਃ ؠ ᇵိܿඝྋ ؠ ȃ ข ي ฬไཱུ ࡒ ȃ ᇄ ධቂ ڗݢ ࡒ 0 ᅤჵ ภ ሃ ჵ ᇄ ධ N2QAYB000020 ᇄ ධቂ ڗݢ 2 R6 AA ख ޤ Ꮚ ˍ ጀ ਖۨ ׁ ܿॄಅ ຢܿ ി ࡒؼن ੧ȃ ሃ ჵ ڗݢ ቂ ܬ ঐዉ ݢڈ ᇛᄞ ˈ௪ᇛঐޭ႘ ዉ ڈ ཿ ෩ ঐሞߙটኳȃ ข႙ছቂᄧ ڗݢ ȃ ข႙ ቂ ᄲܿ ڗݢ ȃ ᄤྩ ڗݢ ञ ᄹ ڗݢ ข႙ৠ ড ඝ૦੧ಖটȃ ข႙ّᄛ ڗݢ ড ඝ ޥ ȃ ข႙ ဇޭቂࣰܿ ᄹ ڗݢ ড౫ ˈݢڣڗݢ ඝ ˈ ޥ ডޭඝ ᄵࠍ Ȃৠ ডัຨȃ ᇄ ධႇߟጸ٢ Ꮾˈข ४ ڗݢ ȃ ෧႙ࠐຨ ڗݢ ডਖඝ ȃ ޡࣰڗݢ ˈஂ ᆷࣕጐືȂট ȃ ૣد ᇋ٣ ৱ ቂᇄ ධˈข ...

Page 27: ...ਖହၕ ቂȃ സಪ ݡ ড ूܿ 2 ଁن ᄲख TH 37PWD8WK S 3 ଁن ᄲख TH 42PWD8WK S 3 ଁن ᄲख TH 37PG9W TH 42PG9W TH 42PS9WK S TH 42PH9WK S TH 50PH9WK S ᄧৠൻञሠ ޡ ቂ SLOT1 SLOT2 SLOT1 SLOT2 SLOT1 SLOT2 SLOT3 SLOT3 1 2 3 4 ถ ڵ ɖ Ꭷ ᎁ 1 ט მ ධञྈஏਾܿົֻܿ ݢ ኑˈ۰ ن Ᏸຢճ ݢ ኑ ن ဂȃި ஏਾፚმ ධܿྈ ݢ େȃ 2 ՙጐ ள ᎁਖ ݲ ᄘ Ꭷ მ ධຢȃ ቂUI 48QXE9XL0TডUI 53QXE9XL0T ႇᅍ ள ᎁȃ 3 ਖ ݢ ኑ ن ဂ ن ن Ᏸˈਾ მ ධܿ ݢ ኑȃ 4 ቂმ ධܿᇄ ධ ي Pqujpot ܠج ܿȐTfsjbm Tmpu Tfmfduȑჵ ࠨົၓȐTmpu...

Page 28: ...ݢ େञᎡਾධܿ ن ဂȃ ၓঠܾᏥ ܿဇჸञ ሕˈᅍᇋᇜ ቂጸฬ ݢ େ 86ഒ ञጸฬ ޤ ਾ ن ဂܿ ღȃ ቂࢥቂ ღႼ ˈ ᅍᇋු ם ღ ن Ᏸञ ݢ ፇৱܿጸฬܿஏਾ ݢ େञ ن ဂȃ ࣦ ݢܿݓ ၕᅃ ႚ ᄩড ᄁ ۃ ঐᄒ ঠܾࣦ ݓ ฏ ܿށ ጸฬ ღႼ ञࡒ ȃ ູঽ ღ ᎧȂო Ⴜ ໐ৃডྈᅍࡒ ܿ ใट ჵᇵঽࠈቂૂቈ Ꮛᄵ િȃ ღ ݢ େܿ ۃ ॄಅ ና ׁ ᄵ ഠღȃ ॄಅ ᇋ૦੧ׁ ᄵഠღȃ ಅ ᇋ۰ׁ ܿ ಅഠღȃ ၓ ፒ ൮ወሕˈขጸฬࢿ ށ ღ ݢ େȃ ݢ ኑܿ 0 Ꮃֻ ஏਾ ݢ ኑღȃ ՙׁ ຢܿ ݢ ȃ მ Owner IDົ ށ ड़ಅȃਈ ݕ 37ᇔȃ ᇋਖׁ ෧४ፚ ܚ ಠ ˈขՙᇄ ධຢܿ ഀȃ ׁ ෧४ፚ ܚ ಠ ˈ ࣰ ՙ ഀ ᇵਖׁ ȃ ݢ ኑፑ ܚ ऽ ᇄ ᄪख ࡥሥ ۍ ...

Page 29: ... Ꮚැ ಇႼ ܿࣕღැቍႾ ቪׁ ๒ȃ ܬ ᅤዎȐAVȑᏮၓTV AVܿ ኑ ˈVIDEO OUTߴ ቂȃPWD8Ⴜளܿ INPUT1 ਈ ݕ 28ˈ39ᇔ ቪHospitality Portஏਾ ˈႚ כ ᇋਖHotel modeܿHospitality ModeົၓȐONȑ ਈ ݕ 43ᇔ ȃ ቂ ˈႚ כ ᇋົၓȐOFFȑȃะॄ ᄵඝྊ ށົܿؼن ȃ ஏਾS VIDEO S ൮ ডVIDEO ൮ ޤ Ꮚȃ ᄪखኑፇஂ T ൮ ჸ ຶჸ ჸ EWE SDB CODᎡਾධ ن ဂ ৭ ධ ჸ ڵ ᄪखኑፇஂ ፚᆲ ධႼ ܿ ܐ ධ IrႼ ޤ Ꮚ ஏਾIrႼ K2ZZ02C00006 ˈਖ ᇄ ධፑჹׁ ᇵޭࡒ ৠܿ Panasonic ົֻ ᄵ غ Ꮾȃᇓ ᇵਖࡒৠܿ Panasonic ົֻܿᇄ ධ ፑჹׁ ᄵ ቂȃ ᇜ ܿࠍؠ ධ ᇵ ቂȃ S VIDEO S ൮ 4 ن ጦ ޤ...

Page 30: ...ᅤዎञ ݲ ȃ ՙࡘഀ ݲڿ ᄘ ܠج ञဇၭ ݢ ܿົ ށ ȃ ሕ 0 ሕ ዓ0ਂഀ खబᅤዎ ՙۨഀ ᅤዎ ᇜࢋ ܐ ড ᄆܿ ख బȃ ՙ ވ ହᇡ ᅤዎTVȂAVȂPC INȂ Input1ˈ ܦ ଭPDP8Ⴜளȃ ਈ ݕ 29ᇔ ၭᏍ ڕ 0ဇჸ ፒ ਈ ݕ 38Ȃ40ᇔ ဇၭ ሞ ਈ ݕ 42ᇔ ፊਾ खబ ਈ ݕ 33ᇔ ᅤྕߴ ኁ ށ ՙȐ खబȑഀፊਾᅤዎखబˈ ՙȐߗၤ ȑञȐ खబȑഀହᅤዎߗ ၤ ܿ Ꮝȃ खబ8 खబ12 ᅤྕߴ ፊਾ ՙყሥܿ खబഀହፊਾᅤዎࡘख బȃ ൮ܻखబ8 ൮ܻखబ36 ൮ܻखబ124 SWAP ෧४ ഀ ਈ ݕ 39ᇔ ՙഀ ՙഀ ܚ ჸ ȣ ଓ 0 ᅤ DVD ȣ ా 0 འᅳ ჸ 0 DVDᅤዎ ჸ ȣ ଓܴ 0 DVD ȣ ా 0 འᅳ ኺ 0 ፒ ፒ ჸ ȣ खబ໐ 0 ਠ DVD ȣ ࣰ VCR DVD ჸ 0DVD ഀ ᇄ...

Page 31: ...ج ȃ Ꮺቑࣕ ՙഀቂ ถ ܠج Ȃ ݢ ݲ ড ᇜ ܿށ ᅤჵ ၐ ᄵᅤዎȃ OKഀ ᄵᇜႼள ܿ ݲ ডᅤჵົ ॄށ ቂ ጝᄎົ ށ ȃ MENUഀቂ ဖ ܠجڵ Ⴜ ইፚ Ꮃ ຠड़ಅȃ ሃȣ ሓૼৱ ქˈׁངಖ ܿ ܠج ဇၝ װ ڵ ޭय़ଙȃ ׁ ຢ ڵ ო ܿܠج ঐ ڵ ოᇜࢋൺຢ ޭय़ଙȃۨ ޭय़ ଙ ಖᇄ ධຢܿುᄎഀ ቂ ྈ ܿ ܷܠج ऎˈࢌ ՙഀ ܿངಖਈຢ༧ȃ ဖ ڵ ק ४ ᅤዎ ဇၭ ܠج ൮ܻ ށົث ߒ బ బဇჸਂወ MPEG ਂወ ܠج 3D COMB Ꮛ ވ FASTEXT ၭᏍᅤዎ ሡቮ ൺຢ Ȑངಖȑޭय़ଙ ...

Page 32: ...ცࡰȂሡ మହႠᆊȂᄧৠൻȂྖ Ȃᆊ য়Ȃ૭၉ Ȃຆ Շଲ ȂՇ ฌȂ ބ য় ᄧႠୁȂሠ ޡ ೞႠᆊ թ ܐ ᆊ DJTȂ ୁ ೌ Ȃ ȂನႠࡼȂղೀమȂ Ȃ ఊ ȂྕူȂၘ ଲ ღ ݢ ׁ Ꮛ ݲވ ᄘ ᇵ ᄧ ݲ ᄘ ݢ ȃ ֆয় ডჲᇋ ᄧ ݲ ᄘ ݢ ᇵ צ ਾ ྕݢݓܬ ٢ ቂȃ ਈ ݕ 34ᇔȃ ݲވ ᄘ ݲވ ᄘರࢋ ܿኁ ށ ȃਈ ݕ 34ᇔȃ ሕႼ ኧᅒ ק ४ರࢋ ൮ܻྈ ቂܿ ሕႼ ȃ ᅤዎྈႪ၆ܿ ሕႼ ȣ 4 5MHz 5 5MHz 6 0MHz 6 5MHz ث Ⴜ ቂ ᅤዎጸ ਾ ۈ ᄪखܿጸฬ ۈ Ⴜ ȃਈ ݕ 36ᇔȃ Ꮛ ވ 0 PAL 0 SECAM 0 NTSC 4 43 0 NTSC 3 58 ݲ ቂ ޭರࢋࢋ ݲܿྕݢ ᄘ ᄵ ᄆ ஂ ݲ ܬ න ሯჳರࢋ ܿਾ ٢ ቂ ȃᇋถᄂȐ ݲ ȑ ˈቂȐ ݲވ ᄘȑ ݲ ᄘȃ ྕ ᇵ ኚࣰड़ಅຢၝ ݲ...

Page 33: ...ׁ ਖՙ۰ 2 ܿགᅗ ህྈ ݲ ᄘ ܿڵ ൮ܻȃ ՙՙഀ 2൮ܻȃ ՙՙഀ 4൮ܻȃ ՙՙഀ 6൮ܻȃ ኁ ށ ಠ ˈ ࢌ ਾ ൮ܻȃ ஂ खబ ൮ܻმ ਾ ܿ൮ܻ 1 2 3 4 5 6 7 8 9 10 20 2 4 6 8 10 20 2 4 6 8 10 20 ፊਾᅤዎ ܬ Ȑᅤྕߴ ȑၓȐፊਾȑ ˈਖ ᄵȐᏋ ݲވ ᄘȑˈׁ ਖ ህቪྈ ݲ ᄘ ܿڵ ൮ܻყ ܿ खబȃ ۨߴߟ ࣰፊਾՙᇄ ධຢܿ൮ܻმ खబᅤዎ ྕݢ ହ ᅤዎྈႪ၆ܿ൮ܻȃࢌࢋ ݓ ฏܿࣖ ܿྕݢ ൮ܻმ खబ ள ݕ 35ᇔȃ 25൮ܻ 27൮ܻ 29൮ܻ 31൮ܻ 23൮ܻ 21൮ܻ 9൮ܻ 7൮ܻ 5൮ܻ 3൮ܻ R STANDBY G POWER ON INPUT MENU ENTER VOL ݲ ᄘ ...

Page 34: ...Uഀૂ ইၓ ຠ ݢ ขኡ ޚ ຢ༧ ᎁܿ ሃ ȃ ᄧ ݲ ᄘ ڵ ರࢋ ኁ ށ ȣ ሃȣ ܬ ਾ ರࢋ ডሕჸᄪख ˈ ܾܸન ጸ٢ ܿث Ⴃဇჸˈਈ ݕ 32ᇔܿȐ ث Ⴜ ȑᅤዎȃ ȐᏋ ݲވ ᄘȑডȐ ݲވ ᄘȑဵ ˈॄڈ ՙ खబ໐ഀޭ ࢋ खబܿ ݲ ᄘᎫଝ ᄵฬไȃ ၝ ቂರᄎ खబܿय़ˈ ᇵ ኚࣰጝᄎ खబȃਈ ݕ 32ᇔܿȐ ྕȑ ȃ ܬ ቂႇ ൮ञ ൮ 0 ޤڵ Ꮚܿ ჸ ˈՙጐ ჸ ቂངಖ ྈ༧ܿೄᆼஏਾ ღ ݢ େ ˈצ ਖ൮ܻፑ ށ ၓ खబȐ1ȑȃۨ ˈข ົ ށ Ȑ ث Ⴜ ȑञȐ ሕႼ ȑॄ ᄵȐ ݲވ ᄘȑȃߑ ෩ˈ ቂ ჸ ˈਖፑ ܿށ ൮ܻົၓ ࢋ खబঐ ၓߴ צ ȃ ՙMENUഀȃ ᇧ ވ ହᅤ ށ Ȑ ݲ ᄘ ܠج ȑȃ ถȐ ݲ ᄘ ܠج ȑȃ ᇧ ވ ହᅤ ށ Ȑ ݲވ ᄘȑȃ ถȐ ݲވ ᄘȑȃ ᅤዎᇋ ݲ ᄘܿ ኁ ށ ȃ ࡉՙፊፚግܸྈ...

Page 35: ... 62 63 69 21 62 63 69 62 63 69 62 63 62 C13 70 73 74 75 76 77 78 79 S 1 S 2 S 3 S 1 S 2 S 3 S 1 S 2 S 3 S 1 S 1 S 2 S 3 80 81 89 Z1 Z9 S1 S2 S10 S1 S2 S10 S1 S2 S10 S1 S2 S10 S1 S2 S10 90 91 92 93 94 95 96 97 98 99 Z10 Z11 Z12 Z13 Z14 Z15 Z16 Z17 Z18 Z19 S11 S12 S13 S14 S15 S16 S17 S18 S19 S20 S11 S12 S13 S14 S15 S16 S17 S18 S19 S20 S11 S12 S13 S14 S15 S16 S17 S18 S19 S20 S11 S12 S13 S14 S15 S16 S...

Page 36: ...ሕჸᄪख ঠܾ ܬ ܿث Ⴃဇჸܿय़ˈ ቂۨ ȃ Ꮛ ވ PAL SECAM NTSC 4 43 NTSC 3 58 PALȂSECAMञNTSC 3 58 য় ቂܿ ث ᄪखࣖ ۈ Ⴜ ȃNTSC 4 43 ᇜ ቂ ჸܿ ಠ ˈ ቈPAL ݢ NTSC ܿ ჸ ܕ ȃ 3D COMB ഗߔ ፒডా ވ Ꮾဇჸ ܸ ث ဇᆼȃਖȐ3D COMBȑົၓȐ ȑ მ ႣȂ ጡܿ ث ȃ ܬ ਾ QBMডOUTDᄪख მ ȃT ൮ ಠ მ ȃ ၭᏍᅤዎ ࢎદ ݓ ฏܿ ˈರᄎ ݓ ฏ ౚ ۨჵ غ Ꮾȃ ᅤዎᏍ ົ ˈށ ᇵ צ ဇၭᇔಅܿၭᏍ ቂྈ ᅍᇋܿᏍ ȃ ሡቮ0߆ቮ0 ބ ഒ0PERSIAN ݲ ᄘ ܠج ถ ଭȐ ᅤዎȑञȐᏋ ݲވ ᄘȑ ܿᅒ ඝྊ ȃਈ ݕ 32ᇔȃAVಠ მ ȃ OWNER ID ᇵ ภ బञ ݓ ፐᄪႩȃਈ ݕ 37ᇔȃ ቮᆗ ᅤዎൺຢმ ቮᆗȃ ሡၭ0 ၭ A...

Page 37: ...ภ ؠ ȃ ՙOKഀ Ⴟ ȃ ڵܬ ოȐAre you sure ȑ Ȑ ࠨฬ ށ ȑ ՙᇜ OKഀȃ Owner ID ᇵਖ ภ బ Owner ID ञࢋเႿ ˈ ᇵ ໘ܼ ٍᎮᏐ ቂጚȃ ჲ ي ᇲ ݢ ܿࢋเႿ QJOబ ˈ ိڼ ขՙOKഀ7ಊ ȃᇲ ܿႿ მ ड़ಅ ˈ ಊ ॄ ᄂ໘ȃ ݕ ᇜ ౚ OWNER IDᄪႩˈডጚᅍᇋ ק ඝ ರᄎᄪႩˈ ࣰ ܠج ᇵ OWNER IDȃ PIN NUMBER NAME POSTCODE Owner ID HOUSE NO You now have the opportunity to enter your details and help the police crack crime see instruction book EXIT Change character Select character Store Owner ID 0...

Page 38: ...4 3 4 3 3 4 4 3მ ਖՙྋ Ꮃܿ4 3 ܐ ᄆହმ 4 3ܿဇჸȃ ภߴၤମ ܐ Zoom 4 3 16 9 Ȑภߴၤମ ܐ ȑಠ ਖဇჸܿ ᆮ ܐ ࠍؠ ȃ 16 9 16 9 4 3 16 9 16 9ਖᇵᏥ ܿܐ ڞ ହმ ڵ ሯჸˈ ܦ ঐ ວວଲ٣ᇜ ᄎȃ ע ኒମ ܐ Just 4 3 9 16 Ȑ ע ኒମ ܐ ȑಠ ਖᇵᏥ ܿܐ ڞ ହმ ڵ 4 3ܿሯჸˈ ܦ ޭ ൺಸܿ ᆮ ࠍؠ ᄵଔࡴ ᄈጸˈྈᇵፔ ൺಸܿᏪቑ ڵئف ოଲ٣ოჺȃሯჸܿ ڞ ถિ ኊହܿᄪखȃ ፒ ՙSTILLഀହ ੌތ ဇჸȃ ՙ ইၓ ܿ ܬ ȃ ۨՙഀ ܬ TV AVಠ ܠ ड़ಅმ ᄌȃ ...

Page 39: ... Ⴃ ޡ ঐక ُልȃࢎદ ड़ಅმ ܿᄪख ᄲञ ड़ಅმ ܿಠ ˈᇓ ঐዉ ࡆڈ ड़ಅဇჸ ُልȃ ቈ ቂ მ ड़ ड़ञड़ိड़ܿࡆड़ಅ ڞ ᄆˈጝ ࡆड़ಅ მ Ⴟ ࠍؠ ȃ ྕ ݢ ൺಸड़ಅ ቂ फ़ࢆ მ ˈ ჱႿ ߴ ש ಅ ঐ เ ሃȃ ܬ ᇋቂࡆड़ಅმ ರᇜ ᅹኑ ˈ ड़ಅຢਖඝმ ڵ ହˈะॄՙSWAPହ ק მ ȃ მ ˈ ܠډ ड़ಅმ ȃ ՙᇄ ධຢܿ खబഀȃ TVডAVმ ডࡆड़ಅຢܿय़ˈᄧᅤዎܿ൮ܻਖმ ጸმ TVডAV ᄪखܿड़ಅຢȃ TVডAVૂၝმ ডࡆड़ಅຢܿय़ˈᄧᅤዎܿ൮ܻਖმ ड़ಅຢȃ ק ൮ܻ ՙ ވ ହᅤዎTVȂAVȂPC INȂInputȃ მ TVञAV ᄪखȃ TVডAV ᄪखმ ࡆड़ಅຢܿय़ˈINPUT1ডPC IN ᄪखਖმ ड़ಅຢȃ TVডAVᇵိܿ ᄪखმ ࡆड़ಅຢܿय़ˈTVȂAVȂ INPUT1ডPC IN ঐმ ࡆड़ಅຢ ਖმ ड़ಅຢȃ ...

Page 40: ...ߺၳྈმ ܿᄪႩȃ ሃ ጸ ቂဇၭ ܠج ಠ ˈଔࡴ ਖ ົ ڈ 16 9ȃ ࢎદ ݓ ฏܿ ˈರᄎ ݓ ฏ ౚ ۨჵ غ Ꮾȃ ࢎદਾ ᄪखܿ ˈ ܠج ঐ ྈ ק फ़ȃ ဇၭ غܠج Ꮾ ݢ 0ဇၭ ܠج ಠ ՙTV TEXT ܬ ৱ ᄵ෧४ȃ ᇔಅᅤዎ ᇵቂ ߴߟᅤዎᇔಅ a ՙຢ0 ഀହ ዓৠডਂຬᇜࢋᇔబȃ b ቂᇄ ධຢܿ0 9ഀˈହ ᇔబȃ ภൺ0 ؠݾ 0 ؠݒ ՙMENUഀହმ ჵ ˈะॄՙ ഀȃ ՙ ഀହମዴ ؠݒ ᇜ ȃ ՙᇜ ই Ꮃ ภൺ ڞ ȃ ऽ მ ՙMENUഀᇵმ ჵ ȃะॄՙऽ ഀᇵმ ሟ ۧع ஂ ᄆ ك ᆬᇔಅܿ ȃ ՙᇜ ሟ ع ȃ ऽ0 0ॵ0 ഀ FASTEXTಠ ྋ౦ࠍ ޭ ሥ ᆘ ܿ ȃ ಠ ྋ౦ޭሥ ᆘ ܿᇔబȃ ڿ ಠ ནࢋᇔబ ᇵ ק ፔ ቂ ၤ 1 25 ȃᇋ ᄵ ˈק ՙནࢋ ث ഀ ᇜࢋะॄ ᄧܿᇔబȃ ՙ OKഀˈᇔబঐ ק ռ...

Page 41: ...UഀȂॵ ഀହ ࢿ ށ ᇔಅܿ ᄧᄪႩȃ ܬ ਾ ܸᇜࢋ ᄧˈᇔబਖঐმ ड़ಅܿᏪຢਲȃ ՙॵ ഀହ ࡘᇔಅȃ ՙTV TEXTഀ ইܸጸ٢ ݢ غ Ꮾȃ ॵ ߺၳᏊᇔಅ ܬ ဇၭ ܠج ᄪႩ ࣰᇜᇔ ˈᏋ ק ވ ᏊᇔಅܸೠᅍᇋܿᏊᇔಅ ᅍᇋॗᇜᄎ ৱȃ ࢋᏊᇔಅ ግܸॄˈྋܿᇔబ ޕ ঐმ ࡘᇔಅܿ ˈؠݾ ጝᆼ ખ ᇵᅤዎྋ ᅤዎ ம ࢋᏊᇔಅˈᇔಅ ܿؠݾ მ ঐ ˈק ᇵ צ Ꮣ ၓ ᏥᄧߙཛྷܿᏊᇔಅᅤዎȃ ဇၭ غܠج Ꮾ ˈՙጐ ಅܿ ᎁହߺၳᏊᇔಅ ჲߺၳܿᏊᇔಅ२ႇߟঠܾˈ ܚ Ꮚᇔಅ ߙ ო ˈՙMENUഀ მ ჵ ˈะॄՙॵ ഀହ ݢ ဇჸȃግܸܿᏊᇔಅঐ ड़ಅຢ ؠ მ ȃ ܬ ܿܚ Ꮚᇔಅ ᇵߺၳ ˈՙॵ ഀ ইܸ ဇၭ ܠج ᇔಅˈቂᏪቑࣕ ഀᅤዎ ྈᅤܿᏊᇔಅȃ ሃ ܚ ܬ Ꮚᇔಅ ߙ ო ˈ ჲ ݢ ဇჸຢმ ൺຢᅤዎධਉˈՙMENUഀ۰ड़ ಅຢ ڼ ጝᄎਉ...

Page 42: ...ՙINDEXഀ ইܸ ሞᇔಅȃ ࢎદᄪႩߙཛྷߴ ܿ ˈ ᅍᇋ ՙ ᇵ ইܸ ሞᇔಅȃ அ 0 ቮ ሕᅤዎ ਾ அ 0 ቮ ሕ ˈ ՙஅ 0 ቮ ሕᅤዎഀହᅤዎ ሕ ڵ ಠ ȃ ൮ᄪख அ ሕ㓫 ࡆ ሕ㓬 ܻ ܠ ಠ ፑ 㓫 㓬 ሕ NICAM ᄧႠୁȂᄧৠൻȂცࡰ ݓ ቂȃ ݢ ࣖ ᄲ Ꮃ ݢ ࣖ Ꮃ ൮ Ꮃ ሕ ܻ ܠ ሕ㓫 ሕஅ ሕ ܻ ܠ ሕ㓫0ࡆ ሕ㓬 ಠ ፑ ႇፑ 㓫 㓫 㓬 A2 ܽ թ ܐ ᆊȂమହႠᆊ ݓ ቂȃ ݢ ࣖ ᄲ Ꮃ ݢ ࣖ Ꮃ ൮ ቮড ܻ ܠ ሕ㓫0ࡆ ሕ㓬 அ ಠ ፑ ႇፑ 㓫 㓬 ሃ அ ᄪख ডਾ ˈডጚ ڵ ოஅ ȣ ܻ ܠ Ꮛ ވ ෧४ოჺܿ ଝˈਓሊਖஅ ෧४ၓ ܠ ܻȃ ੪ ਾ ᄪख ๒ ˈק ި ᅤዎܿಠ ਖ ק ڕ ȃ ܬ ਾ ߊफ़ ˈ ਖಠ ົ Ȑ ܻ ܠ ȑፇ ˈۃ ቂஅ 0 ቮ ሕᅤዎഀˈঐ ܾ ڽ ᇜᄎȃ Ȑ ܻȑˈᇓ څ ၓȐ ܻ ...

Page 43: ...k ႚ כ ᇋᅤዎ ȐInitial POSȑྈົ ܿށ Ȑኁ ށ ȑȃ ܬ ȐInitial POSȑᅤዎȐOFFȑ ˈႚ כ ᇋᅤዎ ܬ ྈົ ܿށ ၤ ȃ OFF ON Initial Volume Level ݢܬ ኑ ົ ށ ሕ ȃ OFF 0 63 Maximum Volume Level ົ ށ Ꮵ ܐ ሕ ȃ OFF 0 63 OSD OFF ݢܬ ኑ ਖȐॅ ڵ ȑმ ົ ށ ၓ ט ȃ OFF ON ু ਖۨົ ົށ ၓȐONȑˈ ঐმ ڵ INPUTᄪखञଔࡴ ȃ Button lock ੦ፒ ಅ ຢܿՙਉ غ Ꮾȃ ܬ ᅤዎȐAllȑ ˈ੦ፒ ಅ ຢܿྈ غ Ꮾȃ ܬ ᅤዎȐMENU and ENTERȑ ˈ੦ፒ ಅ ຢܿMenuञEnterܿՙਉ غ Ꮾȃ OFF MENU and ENTER All Remote lock ੦ፒᇄ ධຢܿNFOVՙਉܿਾ ȃ O...

Page 44: ...G MODEົ ܬ ਖPWD 8Ⴜள TH 37PWD8WK SȂTH 42PWD8WK S ቪۨ نޤ ஏਾ ˈႚ כ ᇋ ᄵۨົ ށ ȃࠨዏ ᅍᇋใ टົ ށ ȃ ࢎદ ༧གᅗՙ ވ ՙഀହ 2ಊ SYSTEM SETTING MODEȃ खబᅤዎ໐ Ȃਠ ՙഀˈፊਾ खబ Ȃ Ȃ Ȃ ՙഀ ՙഀˈ ڕ ᅝՙᅼ4ಊ ȃ USE SLOT3 ቂSLOT3 ᅤዎȐYESȑˈࠨዏᅤዎȐNOȑȃ ᇵ ᄧົ ށ ᄌȃ YES NO ႇጸฬົ ˈށ ࢽጊȃ SYSTEM SETTING MODE YES USE SLOT3 მ ධົ ށ ቂSlot 3 ົ ށ ፎȐYESȑȃ ၝ ቂSlot 3 ົ ށ ፎȐNOȑ ไົ ށ ȃ ቂTH 37PWD8WK S ႚ ށົכ ፎȐNOȑȃ ܬ ቂPS H9ࣰ ڋ ᅍᇋใटົ ށ ȃ SYSTEM SETTING MODE NO USE SLOT3 3 ...

Page 45: ...ৱȂࡴሕȂ ळȂ० ਖ ົ ܿົ ࡉށ ܸົ ධຢ Ꮃֻ 2 ົ ށ ົ ȃ ࢮࡉ ट ົ ށ ข د ኡȖᅤዎ ົ ົ ށ ȗ ຢ༧ ȃ 3 ࣰՙׁ ᇄ ධ ຢܿՙഀହ ȃะॄቂ ݢ େਖົ ධቪׁ ஏਾȃ ܬ ஏਾM3 ن ဂ ˈႚ כ ฬ GREEN ߙࣕߗস ፑ ົ ධܿቑຢߴ ݞ தȃ ົ ށ ົ ׁט ȃะॄቂ ݢ େਖົ ධቪׁ ஏਾȃ ቂྈஏਾܿົ ධ ׁ ȃ 1 ՙጐ ளགᅗ 2ಊ ՙ نޤ ܿᇄ ධՙഀହ UP LOADINGಠ ȃ खబᅤዎ໐ Ȃਠ ՙഀˈፊਾ खబ Ȃ Ȃ Ȃ ՙ ഀ ՙഀˈ ڕ ᅝՙᅼ4ಊ ȃ ՙOKՙഀ ু દࡉ ȃ SET UP MODE UP LOADING TV LOADER PUSH OK KEY SET UP MODE UP LOADING WRITING DATA PROGRESS 5 SET UP MODE UP LOADING W...

Page 46: ...N OFF SET UP MODE DOWN LOADING WRITE COMPLETED PLEASE TURN OFF 1 2 3 4 ՙົ ධຢܿENTERՙਉˈ ࡉ ȃ ܬ દࡉ ໘ցܿय़ˈ RED ߙ ࣕߗস ፑ ົ ධܿᏪຢߴ ਖດཇኙ5ಊ ȃ ਖົ ධޭᎳׁ ፊፚ ܸ ޡ 100 ၓፒȃ ޡ ܸ 100 ෩ᇜፊ ۨډ მ ܿय़ˈข ׁט ࡉȖਖົ ධ દࡉ ܸඝྊ ධຢȗ ᎁ1ܿ غ Ꮾȃ ޡ ܸ 100 ෩ᇜፊ ۨډ მ ܿय़ˈขႚ כ ฬไ ົ ܿົ ށ ࠨ ڈ ከᄵȃ ܬ קޡ ၓ100 װ દᇲ ࡉ ڈ ဵ ג ȃ ڵ ოۨმ ˈ ፒਖົ ධޭᎳፑჹׁ ȃ ृፊፚმ ڵ ȐPLEASE TURN OFFȑହਖׁ ܿ દᄙ ܸ ህ ȃ ޡ ܸ 100 ෩ᇜፊ ۨډ მ ܿय़ˈข ׁט ࡉȖਖົ ධ દࡉ ܸඝྊ ධຢȗ ᎁ2ܿ غ Ꮾȃ ՙົ ධຢܿPOWERՙਉହ ...

Page 47: ...K SECAM B G SECAM D K SECAM K1 NTSC M NTSC 3 58 4 5 MHz ਾ ݢ ࣖ ञହᏋ ჸ ܿ 8 9 10 11 12 13 14 NTSC 4 43 5 5 MHz NTSC 4 43 6 0 MHz NTSC 4 43 6 5 MHz NTSC 3 58 5 5 MHz NTSC 3 58 6 0 MHz NTSC 3 58 6 5 MHz SECAM I ହᏋ ށ ჸ ডDVDܿ 15 16 17 PAL 60 Hz 5 5 MHz PAL 60 Hz 6 0 MHz PAL 60 Hz 6 5 MHz ହᏋ ࣕށ ധ ञ ށ ჸ ডDVDܿ ਾ ൮ܻ Ꮃ ݢ VHF൮ ܕ 2 12 PAL SECAM BȂK1 0 12 PAL Bթ ܐ ᆊ 1 9 PAL BᄧႠୁ 1 12 PAL SECAM D 1 12 NTSC M ׁ 2 1...

Page 48: ...book plus your purchase receipt as a permanent record of your purchase to aid in identification in the event of theft or loss and for Warranty Service purposes Model Number Serial Number Web Site http panasonic net Panasonic Corporation 2006 Printed in Japan ׁሠ MBS0406A2098 ࢾ ᇵ ຢಅግׁܸٛ ܿᄲखञႼखȃ ਖۨႼख ᄙ ಅௗ ૼܿڵ ռ ˈۃ ਖׁ ቂངಖ ᇵঽࢭళ દᏮၓ ࢭళܿሿઌ औˈᇵֻွᇜ ܼ ড ރ ໘ᇵঽᅍᇋ ᄵ ᅃ Ꮾၓጽಖȃ ᄲख Ⴜख ...

Reviews: