80
Generator Replacement Procedure
4. Install the generator
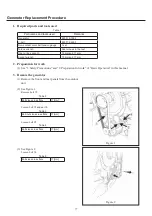
(1) See Figure 8.
While supporting the generator, install and hand-tighten
bolt
d
and spacer, washer and nut
e
in that order.
Install and hand-tighten the spacer, washer and bolt
f
in that order and mount the belt
j
on the engine.
(2) See Figure 9.
Install and hand-tighten bolts
g
and
c
. Install and
tighten bolt
h
and adjust the tension of the belt
j
.
Belt tension
400 to 450N (initially)
260 to 310N (after 8 hours)
Doctor Tension Settings
Span
295 [mm] tension measurement
position
Density
0.018 [kg/m, rib]
Number of ribs 5
Doctor Tension: Tester manufactured by Mitsuboshi
Belting Ltd. The tester measures
tension using the sound that a vibrating
belt produces.
Press your
¿
nger against the belt at the tension measurement position and measure the sound from strumming it
using the Doctor Tension microphone.
When tensioning the belt, tighten
h
to increase tension and then turn the pulley on the engine with a socket
wrench about one revolution; remeasure the tension and repeat as needed.
Figure 8
Figure 9
GHP̲Main̲Parts̲Replacement.indd 80
2012/07/31 17:54:44


