background image

30

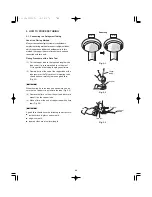
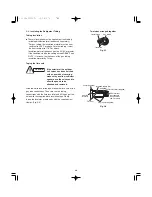
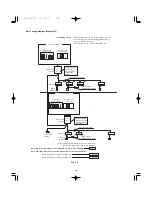
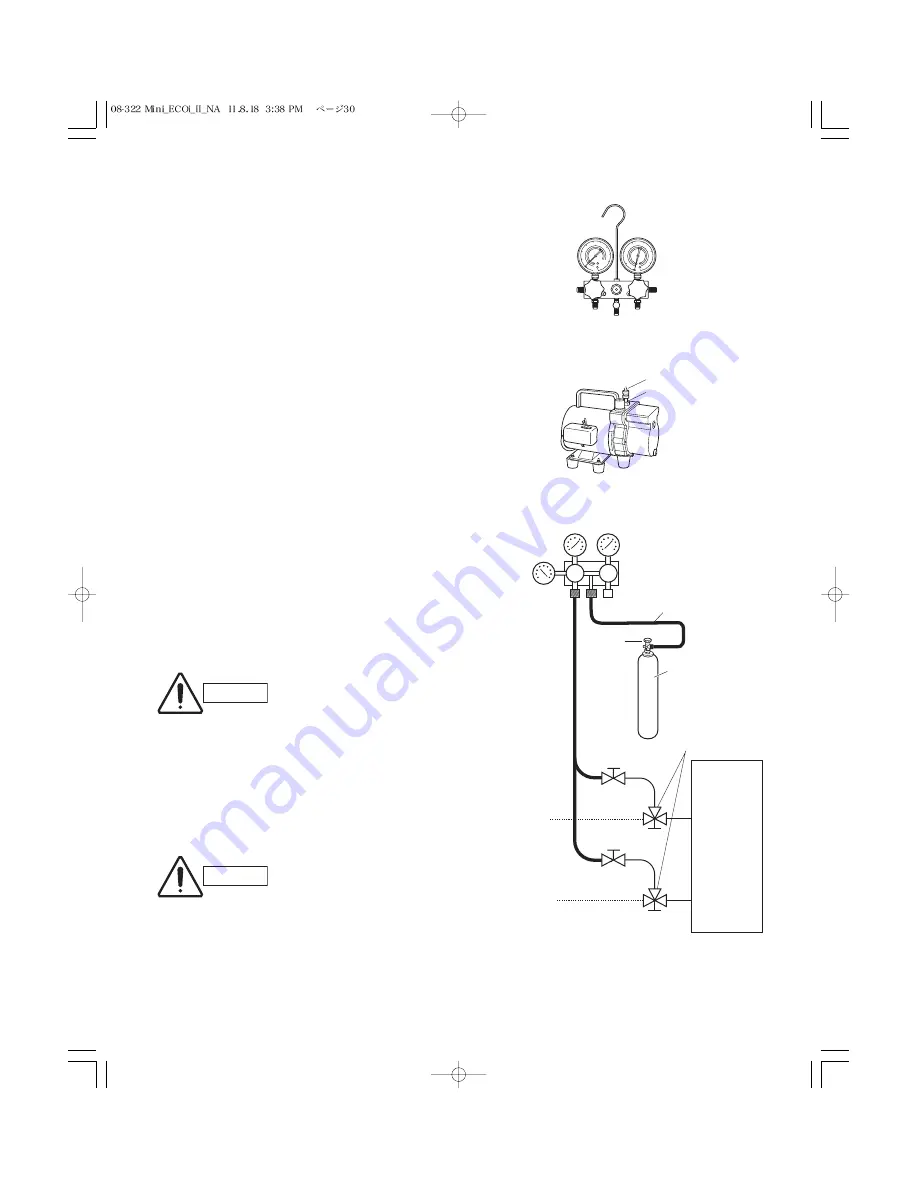
Fig. 6-1

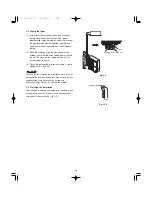
Fig. 6-2

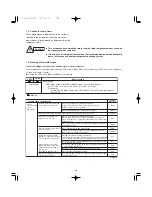
6. AIR PURGING

Air and moisture in the refrigerant system may have 
undesirable effects as indicated below.

pressure in the system rises

operating current rises

cooling (or heating) efficiency drops

moisture in the refrigerant circuit may freeze and block
capillary tubing

water may lead to corrosion of parts in the refrigerant
system

Therefore, the indoor unit and tubing between the indoor
and outdoor unit must be leak tested and evacuated to
remove any noncondensables and moisture from the 
system.

Air Purging with a Vacuum Pump (for Test Run)
Preparation

Check that each tube (both liquid and gas tubes) between

the indoor and outdoor units has been properly connected

and all wiring for the test run has been completed. Remove

the valve caps from both the gas tube and liquid tube 

service valves on the outdoor unit. Note that both liquid and

gas tube service valves on the outdoor unit are kept closed

at this stage.

Leak test 

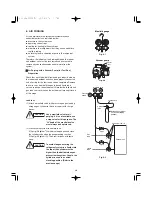
(1) Attach a manifold valve (with pressure gauges) and dry

nitrogen gas cylinder to this service port with charge

hoses.

(2) Pressurize the system to no more than 

512 psig (36 kgf/cm

2

G) with dry nitrogen gas and close

the cylinder valve when the gauge reading reaches 

512 psig (36 kgf/cm

2

G).Then, test for leaks with liquid

soap.

Manifold gauge

Outlet
Inlet

Vacuum pump

Manifold valve

Pressure
gauge

Lo

Hi

Charge hose

Outdoor unit

Liquid
tube

Gas
tube

Nitrogen gas cylinder
(In vertical standing
position)

Close

Open

Close

Open

Cylinder 
valve

Service port ø5/16"

CAUTION

CAUTION

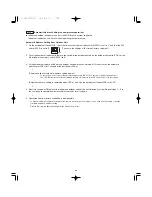
Fig. 6-3

Use a manifold valve for air 

purging. If it is not available, use 

a stop valve for this purpose. The

“Hi” knob of the manifold valve

must always be kept closed.

To avoid nitrogen entering the

refrigerant system in a liquid state,

the top of the cylinder must be

higher than the bottom when you

pressurize the system. Usually, the

cylinder is used in a vertical 

standing position. (Refer to the

previous page.)

Summary of Contents for U-36LE1U6

Page 1: ...l Mounted S 07MK1U6 S 09MK1U6 S 12MK1U6 S 18MK1U6 S 18MT1U6 S 12MT1U6 Ceiling T1 F1 Low Silhouette Ducted S 07MF1U6 S 09MF1U6 S 12MF1U6 S 15MF1U6 S 18MF1U6 S 07MM1U6 S 09MM1U6 S 12MM1U6 S 15MM1U6 S 18...

Page 2: ...ing Refrigerant Tubing Select an installation location which is rigid and strong enough to support or hold the unit and select a location for easy maintenance In a Room Properly insulate any tubing ru...

Page 3: ...ll of which define a Refrigerant Concentration Level RCL of 25 pounds per 1 000 cubic feet for R410A refrigerant For additional guidance and precautions related to refrigerant safety please refer to t...

Page 4: ...chase and attach a vacuum pump adapter Leak detector Yes No Leak detectors for CFC and HCFC that react to chlorine do not function because R410A contains no chlorine Leak detector for HFC134a can be u...

Page 5: ...he materials used for compressor parts are different 2 Existing tubing cannot be used especially R22 Completely cleaning out residual refrigerating machine oil is impossible even by flushing 3 Refrige...

Page 6: ...not supplied 1 2 Accessories Supplied 1 3 Type of Copper Tube and Insulation Material 1 4 Additional Materials Required for Installation 1 5 Tubing Size 1 6 Straight Equivalent Length of Joints 1 7 A...

Page 7: ...rce you will need 1 Deoxidized annealed copper tube for refrigerant tub ing 2 Foamed polyethylene insulation for copper tubes as required to precise length of tubing Wall thickness of the insulation s...

Page 8: ...ts Unit ft Material O Copper tube Outer diameter 1 4 6 35 3 8 9 52 1 2 12 7 5 8 15 88 3 4 19 05 Wall thickness 1 32 0 8 1 32 0 8 1 32 0 8 5 128 1 0 over 5 128 1 0 Table 1 4 Indoor Unit Tubing Connecti...

Page 9: ...ube Max length of main tubing at max diameter LA 98 1 2 n 1 Total max tubing length including length of 656 each distribution tube only narrow tubing H1 When outdoor unit is installed higher than indo...

Page 10: ...valve must be added to that distribution joint When adding the ball valve locate it within 1 3 ft of the distribution joint If a trap or ball valve is not added do not operate the system before repai...

Page 11: ...4 21 64 3 13 16 4 21 64 3 13 16 2 53 64 2 53 64 C C C E D DE Insulation Distribution Joint D Size Part A Part B Part C Part D Part E in mm 3 4 5 8 1 2 3 8 1 4 19 05 15 88 12 7 9 52 6 35 1 12 Optional...

Page 12: ...en position Charge with R410A refrigerant in liquid form With R410A refrigerant charge while adjusting the amount being fed a little at a time in order to prevent liquid refrigerant from backing up Af...

Page 13: ...Additional refrigerant charge amount is 147 oz Be sure to check the limit density for the room in which the indoor unit is installed CAUTION Example of each tubing length Main tubing Distribution join...

Page 14: ...t Heat source Hot air Exhaust fan Anchor bolts 4 pieces In case of multiple installations provide a solid base concrete block 4 16 in beams or equal a minimum of 6 in above ground level to reduce humi...

Page 15: ...utdoor fan may not run and damage to the unit may occur b There may be no air flow c The tubing may freeze and burst d The condenser pressure may drop because of strong wind and the indoor unit may fr...

Page 16: ...3 Unit right side air discharge chamber 4 Reinforcement brackets 4 locations 4 5 16 25 31 32 6 11 16 1 2 1 2 13 3 8 15 15 16 14 31 32 13 32 19 32 25 32 25 32 1 2 2 11 36 21 13 32 11 13 16 11 13 16 4...

Page 17: ...stallation in lateral rows 2 Multiple unit installation The top and both sides must remain open If there are obstacles to the front and rear of the outdoor unit the obstacle at either the front or rea...

Page 18: ...t 1 location also on reverse side Unit anchor hole 7 9 32 hole Unit in 1 Unit top snow proof vent 2 Unit left side 3 Unit right side 4 Unit reverse side 11 29 32 28 13 16 Wind direction Wind direction...

Page 19: ...G 5 29 32 5 29 32 7 7 8 11 13 16 11 13 16 5 29 32 7 7 8 H I J 19 11 16 11 13 16 39 3 8 K L 19 11 16 5 29 32 M N 39 3 8 39 3 8 Min C Min E Min F Min E Min E Min L Min B Min A Min D Min K Min G Obstacle...

Page 20: ...remain open Either the obstacle to the front or the obstacle to the rear must be no taller than the height of the outdoor unit Dimension Q The top and both sides must remain open Either the obstacle...

Page 21: ...bing and wiring can be extended out in 4 directions front rear right and down The service valves are housed inside the unit To access them remove the inspection panel To remove the inspection panel re...

Page 22: ...r LOCAL ELECTRICAL CODES before begin ning You must ensure that installation complies with all relevant rules and regulations 8 To prevent malfunction of the air conditioner caused by electrical noise...

Page 23: ...pe 2 1 B 1 3 Remote Controller CONNECTOR 2P WHT RC BLU WHT BLK WHT BLK WHT BLK WHT BLK Outdoor unit INV unit L1 L2 Ground Power supply 208 230V 60Hz 1 PH A 2 1 L2 L1 L1 1 2 L2 Power supply Outdoor Uni...

Page 24: ...s except any one of the outdoor units When shipping In shorted condition For a system without link no connection wiring between outdoor units do not remove the short plug 2 Do not install the inter un...

Page 25: ...How to connect wiring to the terminal and fasten the wire securely with the fixing screw of the terminal plate How to connect wiring to the terminal For stranded wiring 1 Cut the wire end with cutting...

Page 26: ...ing length you estimate 2 Remove burrs at the end of the copper tube with a tube reamer or file This process is important and should be done carefully to make a good flare Fig 5 1 When reaming hold th...

Page 27: ...or side tubing 2 To fasten the flare nuts apply specified torque as at right When removing the flare nuts from the tubing connections or when tightening them after connecting the tubing be sure to use...

Page 28: ...insulation tape around the flare nuts at the gas tube connections Then cover up the tubing connections with the flare insulator and fill the gap at the union with the supplied black insulation tape F...

Page 29: ...wall As you wrap the tubing overlap half of each previous tape turn 3 Clamp the tubing bundle to the wall using 1 clamp approx each ft Fig 5 9 Do not wind the armoring tape too tightly since this will...

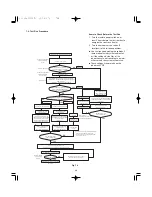
Page 30: ...nd gas tube service valves on the outdoor unit are kept closed at this stage Leak test 1 Attach a manifold valve with pressure gauges and dry nitrogen gas cylinder to this service port with charge hos...

Page 31: ...m pump The operation time for evacuation varies with the tubing length and capacity of the pump The following table shows the amount of time for evacuation The required time in the above table is calc...

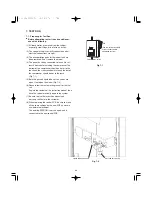
Page 32: ...valve 3 Loosen the charge hose connected to the gas tube service port for 5 16 tube slightly to release the pressure then remove the hose 4 Replace the service port cap on the gas tube service port an...

Page 33: ...heater around the feet of the compressor should be hot to the touch Fig 7 1 5 Both the gas and liquid tube service valves are open If not open them now Fig 7 2 6 Request that the customer be present...

Page 34: ...outdoor unit PCB OFF Are LEDs 1 and 2 on the outdoor unit PCB OFF Set the No of indoor units Set the system address When multiple outdoor units exist disconnect the terminals extended from the shorted...

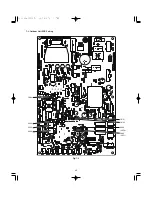
Page 35: ...35 7 3 Outdoor Unit PCB Setting CN51 CN50 D043 LED2 D042 LED1 S003 CN33 S002 S004 Fig 7 4...

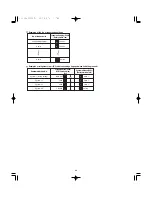
Page 36: ...No of indoor units settings No of indoor units System address No Indoor unit setting S004 Rotary switch red System address S003 2P DIP switch blue System address S002 Rotary switch black System 1 fact...

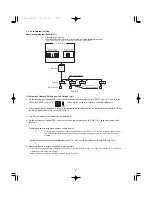
Page 37: ...r units that are connected to the outdoor unit to 8 on the outdoor unit control PCB set the No of indoor units rotary switch S004 to 8 3 Turn ON the power to the indoor and outdoor units 4 On the outd...

Page 38: ...or the cases listed below Refer to the instructions on the following pages Leave the socket that is used to open circuit the terminal plug CN33 6 S004 1 ON 1 2 ON OFF S003 S002 If link wiring is used...

Page 39: ...automatic address pin CN51 for 1 second or longer then pull it out Communication for automatic address setting begins Automatic address setting is completed when LEDs 1 and 2 on the outdoor unit cont...

Page 40: ...system at the same time Communication for automatic address setting begins the compressors turn ON and automatic address setting in heating mode begins All indoor units operate Automatic address setti...

Page 41: ...xt different system short circuit the automatic address pin CN51 for 1 second or longer then pull it out Repeat the same steps to complete automatic address setting for all units 5 Operation from the...

Page 42: ...utdoor unit PCB When automatic address setting has been successfully completed both LEDs 1 and 2 turn OFF LED 1 is D042 LED 2 is D043 If automatic address setting is not completed successfully refer t...

Page 43: ...emote control mode Remote Controller Test Run Settings 1 Press the remote controller button for 4 seconds or longer Then press the button TEST appears on the LCD display while the test run is in progr...

Page 44: ...cated Remote control address connector RCU ADR is duplicated Duplication of main remote controller Starting auto address setting is prohibited Error in auto address setting Number of connected indoor...

Page 45: ...it address setting in group control Duplication of outdoor R C address setting Group control wiring is connected to individual control indoor unit Indoor unit address is not set Capacity code of indoo...

Page 46: ...46...

Page 47: ...47...

Page 48: ...DC0811 0 Printed in Japan...

Reviews: