


Design of 3WAY VRF SYSTEM
2
- 36
8
7
6
5
4
3
2
1
4. Installation Instructions
Fig. 2-12
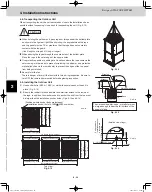
4-8. Transporting the Outdoor Unit
When transporting the unit, have it delivered as close to the installation site as
possible without unpacking. Use a hook for suspending the unit. (Fig. 2-12)
When hoisting the outdoor unit, pass ropes or straps under the bottom plate
as shown in the figure at right. When hoisting, the angle between the rope
and top panel must be 70° or greater so that the rope does not come into
contact with the fan guard.
(Use 2 lengths of rope 25 ft. long or longer.)
When passing the ropes through the square holes of the bottom plate:
Place the rope in the outer edge of the square holes.
Use protective panels or padding at all locations where the rope contacts the
outer casing or other parts to prevent scratching. In particular, use protective
material (such as cloth or cardboard) to prevent the edges of the top panel
from being scratched.
Be careful of the fan.
There is danger of injury if the fan starts to turn during inspection. Be sure to
turn OFF the remote power switch before beginning inspection.
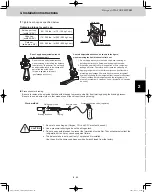
4-9. Installing the Outdoor Unit
be larger than the installation anchor holes. (Figs. 2-13 and 2-14)
Fig. 2-13
Fig. 2-14
(3-15/16)
(3-15/16)
3-15/32
25/32
1-31/32
Washer
Plate leg
Base
Anchor bolts
Vibration insulator
CAUTION
1-33/64
19/32
1-31/32
4 – 19/32
25/32 hole
(Detailed view of legs)
Surface where
installation anchor
brackets are
installed
Unit: in.
Unit: in.
The vibration insulator, base, or platform must
be large enough to bear the full surface of the
base plate legs.
Fig. 2-15
Top view
unit: in.
3
35
(Ceiling panel dimensions)
35
(Ceiling panel dimensions)
35
(Ceiling panel dimensions)
113 (Ceiling panel dimensions)
Installation anchor hole (4-19/32 25/32 oval holes)
(Positions where anchor bolts are fastened)
31-1/8
(Installation hole pitch)
31-1/8
(Installation hole pitch)
31-1/8
(Installation hole pitch)
109 (Installation hole pitch)
31-1/8
(Installation hole pitch)
35
(Ceiling panel dimensions)
35
(Ceiling panel dimensions)
36-1/4
(Installation hole pitch)
36-1/4
(Installation hole pitch)
37-1/2
(Maxim
um dimensions)
37-1/2
(Maxim
u
m dimensions)
35
(Ceiling panel dimensions)
(1)
place. (Fig. 2-13)
(2)
Use anchor bolts (M12 or 15/32") or similar to securely anchor the unit in
Be sure the rubber vibration insulator and platform extend to the inside of
the legs. In addition, the washers used to anchor the unit from the top must
TD831158-00̲3WAY̲VRF̲SYS.indb 36
TD831158-00̲3WAY̲VRF̲SYS.indb 36
2012/01/23 17:30:18
2012/01/23 17:30:18
Summary of Contents for U-72MF1U9
Page 118: ...Section 8 TENTATIVE ...


