background image

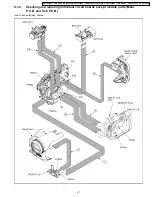
9.1.2. Checking and repairing individual circuit boards except module parts (Main

P.C.B. and Sub P.C.B.)

How to use extension cables.

41

VDR-D300EG / VDR-D300E / VDR-D300EB / VDR-D300EP / VDR-D300EE / VDR-D300GC / VDR-D300GN / VDR-D300SG / VDR-D300GCS / VDR-D308GK

Summary of Contents for VDR-D300SG

Page 1: ...ghts reserved Unauthorized copying and distribution is a violation of law VDR D300EG VDR D300E VDR D300EB VDR D300EP VDR D300EE VDR D300GC VDR D300GN VDR D300SG VDR D300GCS VDR D308GK VOL 1 Colour S Silver Type DVD Video Camcorder ORDER NO VM0603011CE ...

Page 2: ...res 44 10 Maintenance 47 10 1 Cleaning Lens Viewfinder and LCD Panel 47 10 2 Cleaning Disc 47 10 3 Cleaning optical pickup 47 11 Schematic Diagrams 49 11 1 OVERALL SCHEMATIC DIAGRAM 49 11 2 INTERCONNECTION SCHEMATIC DIAGRAM 50 11 3 FLASH SCHEMATIC DIAGRAM 52 11 4 FRONT SCHEMATIC DIAGRAM 53 11 5 SIDE R SCHEMATIC DIAGRAM 54 11 6 MONITOR SCHEMATIC DIAGRAM 55 11 7 JACK SCHEMATIC DIAGRAM 56 11 8 EVF SC...

Page 3: ...ed from the AC power line Use a transformer of adequate power rating as this protects the technician from accidents resulting in personal injury from electrical shocks It will also protect AC Adaptor from being damaged by accidental shorting that may occur during servicing 3 When servicing observe the original lead dress It a short circuit is found replace all parts which have been overheated or d...

Page 4: ...on to solder or unsolder ES devices 4 Use only an antistatic solder removal device Some solder removal devices not classified as antistatic ESD protected can generate electrical charge sufficient to damage ES devices 5 Do not use freon propelled chemicals These can generate electrical charges sufficient to damage ES devices 6 Do not remove a replacement ES device from its protective package until ...

Page 5: ...ed when repairing the equipment for which the lead free solder is used Definition The letter of PbF is printed on the PCB using the lead free solder To put lead free solder it should be well molten and mixed with the original lead free solder Remove the remaining lead free solder on the PCB cleanly for soldering of the new IC Since the melting point of the lead free solder is higher than that of t...

Page 6: ...d A replacement fuse cover can be purchased from your local Panasonic Dealer If the fitted moulded plug is unsuitable for the socket outlet in your home then the fuse should be removed and the plug cut off and disposed of safety There is a danger of severe electrical shock if the cut off plug is inserted into any 13 ampere socket If a new plug is to be fitted please observe the wiring code as show...

Page 7: ... It must never be subjected to excessive heat or discharge It must therefore only be fitted in equipment designed specifically for its use Replacement batteries must be of the same type and manufacture They must be fitted in the same manner and location as the original battery with the correct polarity contacts observed Do not attempt to re charge the old battery or re use it for any other purpose...

Page 8: ...P C B 2 Parts List for individual parts of Main P C B Sub P C B 2 The following category are recycle module part Please send them to Central Repair Center Main P C B LSEP8342P1FZ VDR D300EG E EB EP LSEP8342Q1FZ VDR D300EE GC GN SG GCS D308GK Sub P C B VEP23648C When a part replacement is required for repairing each Main P C B and or Sub P C B replace the assembly parts Main P C B and or Sub P C B ...

Page 9: ...ove the Flash P C B Refer to Disassembly Procedures 3 2 2 Precaution of Laser Light Please remove the AC adapter charger or battery at servicing that open the Disk Cover 9 VDR D300EG VDR D300E VDR D300EB VDR D300EP VDR D300EE VDR D300GC VDR D300GN VDR D300SG VDR D300GCS VDR D308GK ...

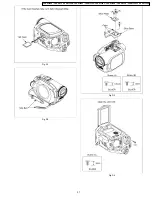
Page 10: ...it or blinking 3 3 2 Procedure for Removing the disc manually Please removing the disc by the following procedure when the disc cannot be removeing due to the breakdown of the electrical system etc 1 Remove the 3 Screws A and remove the Shoe Plate 2 Remove the 1 Screw B 3 Release the 3 Tabs and remove the Shoe Base 4 Slide the Lock Lever to open the Disc Cover 5 Remove the disc 10 VDR D300EG VDR D...

Page 11: ...4 Specifications 11 VDR D300EG VDR D300E VDR D300EB VDR D300EP VDR D300EE VDR D300GC VDR D300GN VDR D300SG VDR D300GCS VDR D308GK ...

Page 12: ...5 Location of Controls and Components 12 VDR D300EG VDR D300E VDR D300EB VDR D300EP VDR D300EE VDR D300GC VDR D300GN VDR D300SG VDR D300GCS VDR D308GK ...

Page 13: ...13 VDR D300EG VDR D300E VDR D300EB VDR D300EP VDR D300EE VDR D300GC VDR D300GN VDR D300SG VDR D300GCS VDR D308GK ...

Page 14: ...14 VDR D300EG VDR D300E VDR D300EB VDR D300EP VDR D300EE VDR D300GC VDR D300GN VDR D300SG VDR D300GCS VDR D308GK ...

Page 15: ...15 VDR D300EG VDR D300E VDR D300EB VDR D300EP VDR D300EE VDR D300GC VDR D300GN VDR D300SG VDR D300GCS VDR D308GK ...

Page 16: ...16 VDR D300EG VDR D300E VDR D300EB VDR D300EP VDR D300EE VDR D300GC VDR D300GN VDR D300SG VDR D300GCS VDR D308GK ...

Page 17: ...17 VDR D300EG VDR D300E VDR D300EB VDR D300EP VDR D300EE VDR D300GC VDR D300GN VDR D300SG VDR D300GCS VDR D308GK ...

Page 18: ...18 VDR D300EG VDR D300E VDR D300EB VDR D300EP VDR D300EE VDR D300GC VDR D300GN VDR D300SG VDR D300GCS VDR D308GK ...

Page 19: ...19 VDR D300EG VDR D300E VDR D300EB VDR D300EP VDR D300EE VDR D300GC VDR D300GN VDR D300SG VDR D300GCS VDR D308GK ...

Page 20: ...20 VDR D300EG VDR D300E VDR D300EB VDR D300EP VDR D300EE VDR D300GC VDR D300GN VDR D300SG VDR D300GCS VDR D308GK ...

Page 21: ...21 VDR D300EG VDR D300E VDR D300EB VDR D300EP VDR D300EE VDR D300GC VDR D300GN VDR D300SG VDR D300GCS VDR D308GK ...

Page 22: ...22 VDR D300EG VDR D300E VDR D300EB VDR D300EP VDR D300EE VDR D300GC VDR D300GN VDR D300SG VDR D300GCS VDR D308GK ...

Page 23: ... PUSH THE RESET SWITCH is displayed automatically on the EVF or the LCD Monitor when an undesirable condition has occured 23 VDR D300EG VDR D300E VDR D300EB VDR D300EP VDR D300EE VDR D300GC VDR D300GN VDR D300SG VDR D300GCS VDR D308GK ...

Page 24: ... START STOP button simmultaneously for 3 seconds 3 To select the Item 1 Press the JOYSTICK CONTROL UP DOWN to select item 2 or 5 2 Press the JOYSTICK CONTROL RIGHT to display YES NO screen 3 Press the JOYSTICK CONTROL UP DOWN to select YES 4 Press the JOYSTICK CONTROL CENTER 4 To exit the Service Menu 1 Unplug the AC Cord Fig S1 NOTE Do not operate items except for 2 and 5 in the Service Menu Self...

Page 25: ...ed take out it before Service Mode operation Turn on power and set the Mode Dial to DISC RECORDING MODE Pushed DELEATE button JOYSTICK CONTROL RIGHT and RECORDING START STOP button simmultaneously for 3 seconds 25 VDR D300EG VDR D300E VDR D300EB VDR D300EP VDR D300EE VDR D300GC VDR D300GN VDR D300SG VDR D300GCS VDR D308GK ...

Page 26: ...wer and set the Mode Dial to DISC PLAYBACK MODE 2 Push the DELETE button JOYSTICK CONTROL LEFT and RECORDING START STOP button simmultaneously for few seconds 3 Confirm ARM Firmware and DVD Drive Firmware 4 Push the MENU button to release the service menu Note When it is the newest same version it is not necessary already to update it 26 VDR D300EG VDR D300E VDR D300EB VDR D300EP VDR D300EE VDR D3...

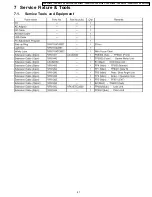
Page 27: ...7 Service Fixture Tools 7 1 Service Tools and Equipment 27 VDR D300EG VDR D300E VDR D300EB VDR D300EP VDR D300EE VDR D300GC VDR D300GN VDR D300SG VDR D300GCS VDR D308GK ...

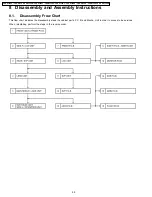
Page 28: ...hart indicates the disassembly steps the cabinet parts P C B and Mecha Unit in order to access to be serviced When reinstalling perform the steps in the reverse order 28 VDR D300EG VDR D300E VDR D300EB VDR D300EP VDR D300EE VDR D300GC VDR D300GN VDR D300SG VDR D300GCS VDR D308GK ...

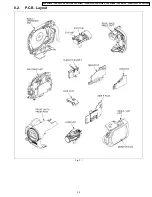
Page 29: ...8 2 P C B Layout Fig F1 29 VDR D300EG VDR D300E VDR D300EB VDR D300EP VDR D300EE VDR D300GC VDR D300GN VDR D300SG VDR D300GCS VDR D308GK ...

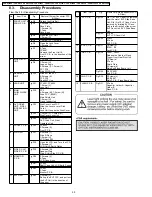
Page 30: ... Screw U LCD Open SW Fig D18 Open the LCD and Turn the LCD 2 Screws V LCD Unit 2 Earth Plates 9 SIDE R UNIT SIDE R P C B Fig D19 5 Screws W Speaker Plate Side R Unit Side R P C B 10 MONITOR P C B Fig D20 2 Screws X 6 Tabs LCD Case A unit Fig D21 FP902 Shaft Case Unit LCD Earth Spring Fig D22 FP903 3 Tabs Monitor P C B 11 EVF UNIT Fig D23 1 Screw Y Roll up the EVF FPC and pull out the EVF Unit in t...

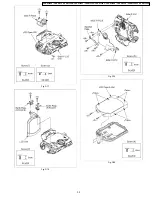
Page 31: ...Fig D1 Fig D2 Fig D3 Fig D4 31 VDR D300EG VDR D300E VDR D300EB VDR D300EP VDR D300EE VDR D300GC VDR D300GN VDR D300SG VDR D300GCS VDR D308GK ...

Page 32: ...Fig D5 Fig D6 Fig D7 Fig D8 32 VDR D300EG VDR D300E VDR D300EB VDR D300EP VDR D300EE VDR D300GC VDR D300GN VDR D300SG VDR D300GCS VDR D308GK ...

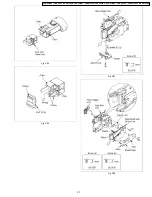
Page 33: ...Fig D9 Fig D10 Fig D11 Fig D12 33 VDR D300EG VDR D300E VDR D300EB VDR D300EP VDR D300EE VDR D300GC VDR D300GN VDR D300SG VDR D300GCS VDR D308GK ...

Page 34: ...Fig D13 Fig D14 Fig D15 Fig D16 34 VDR D300EG VDR D300E VDR D300EB VDR D300EP VDR D300EE VDR D300GC VDR D300GN VDR D300SG VDR D300GCS VDR D308GK ...

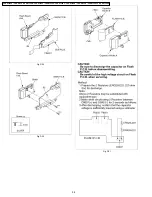
Page 35: ...Fig D17 Fig D18 Fig D19 Fig D20 35 VDR D300EG VDR D300E VDR D300EB VDR D300EP VDR D300EE VDR D300GC VDR D300GN VDR D300SG VDR D300GCS VDR D308GK ...

Page 36: ...Fig D21 Fig D22 Fig D23 Fig D24 36 VDR D300EG VDR D300E VDR D300EB VDR D300EP VDR D300EE VDR D300GC VDR D300GN VDR D300SG VDR D300GCS VDR D308GK ...

Page 37: ...Fig D25 Fig D26 Fig D27 Fig D28 37 VDR D300EG VDR D300E VDR D300EB VDR D300EP VDR D300EE VDR D300GC VDR D300GN VDR D300SG VDR D300GCS VDR D308GK ...

Page 38: ...Fig D29 Fig D30 Fig D31 38 VDR D300EG VDR D300E VDR D300EB VDR D300EP VDR D300EE VDR D300GC VDR D300GN VDR D300SG VDR D300GCS VDR D308GK ...

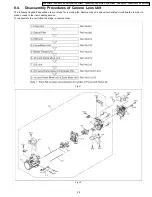
Page 39: ... removing the Camera lens unit and certain printed circuit boards in order to make access to the item needing service To reassemble the unit follow the steps in reverse order Fig L1 Fig L2 39 VDR D300EG VDR D300E VDR D300EB VDR D300EP VDR D300EE VDR D300GC VDR D300GN VDR D300SG VDR D300GCS VDR D308GK ...

Page 40: ... the extension cables Use the following extension cables when checking or adjusting individual circuit boards except module Parts Main P C B and Sub P C B 40 VDR D300EG VDR D300E VDR D300EB VDR D300EP VDR D300EE VDR D300GC VDR D300GN VDR D300SG VDR D300GCS VDR D308GK ...

Page 41: ...repairing individual circuit boards except module parts Main P C B and Sub P C B How to use extension cables 41 VDR D300EG VDR D300E VDR D300EB VDR D300EP VDR D300EE VDR D300GC VDR D300GN VDR D300SG VDR D300GCS VDR D308GK ...

Page 42: ...65 FP3 K1MN26AA0018 FP2 K1MN16A00077 FP4 K1MN26AA0018 FP1 K1MN24AA0018 B4 K1KBF0A00003 B3 K1KA30A00191 B2 K1KA20BA0052 B1 K1KB60AA0021 B5 K1KA14AA0503 FOIL SIDE COMPONENT SIDE 42 VDR D300EG VDR D300E VDR D300EB VDR D300EP VDR D300EE VDR D300GC VDR D300GN VDR D300SG VDR D300GCS VDR D308GK ...

Page 43: ...C2007 EEPROM 1 4 8 5 PS6002 K1KB20A00129 FP6002 K1MN33B00029 PS6003 K1MN20BA0197 PS6001 K1KAF0A00003 FOIL SIDE COMPONENT SIDE 43 VDR D300EG VDR D300E VDR D300EB VDR D300EP VDR D300EE VDR D300GC VDR D300GN VDR D300SG VDR D300GCS VDR D308GK ...

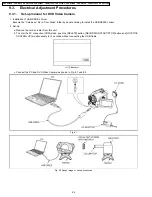
Page 44: ...the card and disc from this unit b To enter the PC connection COM mode push the DELETE button RECORDING START STOP button and JOYSTICK CONTROL UP simultaneously for 3 seconds without connecting the USB Cable c Connect the PC and DVD Video Camera as shown in Fig E1 and E2 Fig E1 Fig E2 Rough image of set up connection 44 VDR D300EG VDR D300E VDR D300EB VDR D300EP VDR D300EE VDR D300GC VDR D300GN VD...

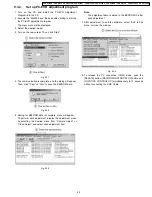
Page 45: ...orm each adjustment display the adjustment menu by selecting the desired menu from Camera Adjust or Video Adjust and select each adjustment item Fig E3 3 Note The adjustment data is stored to the EEPROM IC after each adjustment 7 After adjustment to end the software select Exit in File menu or close the window Fig E3 4 8 To release the PC connection COM mode push the DELETE button RECORDING START ...

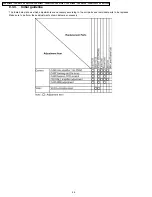
Page 46: ...ments are necessary according to the unit parts and individual parts to be replaced Make sure to perform these adjustments shown below as necessary 46 VDR D300EG VDR D300E VDR D300EB VDR D300EP VDR D300EE VDR D300GC VDR D300GN VDR D300SG VDR D300GCS VDR D308GK ...

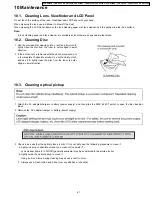
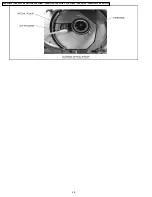
Page 47: ...leaning paper and lens cleaner are available at local camera shops and market place 10 2 Cleaning Disc 10 3 Cleaning optical pickup 1 Attach the AC adapter charger or battery power supply and then slide the DISC EJECT switch to open the disc insertion block 2 Remove the AC adapter charger or battery power supply 3 Check to see whether the optical pickup is dirty If it is not dirty use the followin...

Page 48: ...48 VDR D300EG VDR D300E VDR D300EB VDR D300EP VDR D300EE VDR D300GC VDR D300GN VDR D300SG VDR D300GCS VDR D308GK ...

Page 49: ...IRIS FOCUS LENS DRIVE OIS LENS UNIT IC702 IRIS DRIVE USB TERMINAL IC2004 RTC POWER CONTROL IC2005 RESET IC2007 EEPROM POWER SUPPLY CONTROL CIRCUIT SUB POWER DVD DRIVE UNIT IC1001 IC1002 POWER SUPPLY IC601 CONTROLLER SIGNAL PROCESSOR FLASH P C B IC3201 FLASH MEMORY IC3202 SDRAM MEMORY T6601 C6607 Q6601 Q6607 FLASH DRIVE EVF P C B MONITOR P C B IC6502 IC6503 GYRO IC3001 VIDEO SIGNAL PROCESS AUDIO SI...

Page 50: ...DSTB MEGA PIX UPDATE WINKEND ARM REQ HOST REQ XRST ARM ARM TMOUT MEMOEND M REQUEST CAM IRQ XREADY UNI CS XRE RW ALE ADM 0 ADM 1 ADM 2 ADM 3 ADM 4 ADM 5 ADM 6 ADM 7 ADM 8 ADM 9 ADM 10 ADM 11 ADM 12 ADM 13 ADM 14 ADM 15 GND GND GND GND GND GND GND GND GND GND 2 1 A M OUT L REG A5V REG A5V A M OUT R MIC GND MIC GND 20 19 18 17 16 15 FP6501 1 2 3 4 5 6 7 8 9 10 11 12 13 14 XREF YREF SHTR M SHTR CLOSE ...

Page 51: ...3 3V 3 3V 3 3V M GND M GND DASP M5V M5V M5V INTRQ DA1 DA0 TOROY DB1 GND DB3 DB5 DB7 DOOR OPEN SW2 DIOW DB0 DB2 DB4 DB6 RESET DOOR OPEN SW1 14 13 12 11 10 9 8 7 6 5 4 3 2 1 B2401 CARD D2 GND GND DSC 3 3V CARD D1 CARD PRO POWER LCD SW AUTO MNL SP LCD OPEN GND CARD D3 CARD CMD GND CARD CLK CARD D0 CARD DET RESET SW ACCESS LED VDD AVREF SP LI BATT 24 23 22 21 20 19 18 17 16 15 14 13 12 11 10 9 8 7 6 5...

Page 52: ...040 5 2 1 3 4 F2AZZ6500005 C6607 B6601 1 2 3 4 5 6 7 8 9 10 11 12 13 14 P6601 2 GND 1 TRIG KCENON K 2 1 KCENON A XP4601 Q6602 POWER CONTROL CHAEND REGA5V TRIGGER SW GND REGD2 8V CHARGE START SW REGA5V CHARGE GND REGD2 8V TRIGEND ST_NOREG ST_NOREG ST_NOREG GND CHARGE CONTROL OSC CHARGE CAPACITOR TRIGGER CONTROL FLASH DRIVE TO MAIN CONNECTION TO FLASH UNIT P6602 TO FLASH UNIT 1 A B C D E 2 3 4 5 6 7...

Page 53: ...NT FPC A_M_OUT_L A_M_OUT_R IR REMOCON IR_DET SHTR_CLOSE SHTR_OPEN CL_SHTR_LED OP_SHTR_LED M_GND NC MOTER_M MOTER_M MOTER_P MOTER_P REG D2 8V X_SENS XREF SHTR_M TALLY SHTR_P SHTR_CLOSE SHTR_OPEN TALLY D_GND D_GND MIC_GND REG A5V MIC_GND REG A5V YREF Y_SENS IR GND VCC R FILTER MIC AMP GYROY SENSOR GYRO X SENSOR AMP AMP REG 3V VIN VOUT EXT VSS ON OFF POWER CONTROL IR RECEIVER SWITCHING SWITCHING SENS...

Page 54: ... 12 8 7 6 5 4 3 2 1 9 13 GND CARD D2 CARD D3 CARD CMD GND GND GND CARD CLK DSC 3 3V CARD D0 CARD D1 CARD DET CARD PRO RESET SW POWER LCD SW ACCESS LED AUTO MNL VDD SP SP LI BATT 1 2 3 4 5 6 7 8 9 10 11 12 13 14 15 16 17 18 19 20 21 22 7 6 5 4 3 2 1 E D C B A SIDE R P C B NOTE DO NOT USE ANY PART NUMBER SHOWN ON THIS SCHEMATIC DIAGRAM FOR ORDERING WHEN YOU ORDER A PART PLEASE REFER TO PARTS LIST NO...

Page 55: ...HST REF HCK2 HCK1 PSIG GREEN RED BLUE RGT COM1 LCD_VST LCD_VCK LCD_EN LCD_HST LCD_HCK2 LCD_HCK1 LCD_PCG LCD_XSTBY LCD_OECE_0LUX LCD_RGT LCD_DWN LCD_PSIG LCD_VCOM LCD_RED LCD_GREEN LCD_BLUE LCD_VDD D_GND LCD_BL_5V D_GND D_GND BL_CONT LCD_WIDE NRM2 BACKLIGHT DRIVE BACKLIGHT DRIVE BACKLIGHT DRIVE BACKLIGHT DRIVE BACKLIGHT DRIVE BACKLIGHT DRIVE BACKLIGHT ON OFF CONTROL VREF NR TO MONITOR FPC TO MONITO...

Page 56: ...17 16 15 14 13 12 11 10 9 8 7 6 5 4 3 2 1 FP951 1 2 3 4 5 6 7 8 9 10 11 12 13 14 15 16 17 18 PCG VDD EVF_HCK2 PSIG EVF_G XSTB B EVF_HST COM EVF_R VST EVF_VCK R EVF_VSS EVF_BL_5V EVF_B SCAN EVF_WIDE HCK2 VCK EVF_VST G EVF_VSS EVF_COM VSSG EVF_PCG WIDE HCK1 LCD EVF_2 8V ENB EVF_HCK1 CS LCD EVF_8 5V EVF_PSIG HST VSS EVF_ENB REF BACKLIGHT DRIVE TO EVF FPC TO EVF LCD PANEL EVF BACKLIGHT 1 A B C 2 3 4 E...

Page 57: ...D DIOW DB2 DIOR M_GND GND DOOR_OPEN_SW1 3 3V TO B1 1 A B C D E 2 3 4 DVD DRIVE FPC FOR REFERENCE ONLY VDR D300 D308 DVD DRIVE FPC SCHEMATIC DIAGRAM 11 11 DISK COVER LOCK UNIT SCHEMATIC DIAGRAM MOTOR PIN MOTOR MOTOR 1 2 LOCK MECHANISM OPEN SW1 OPEN SW2 K0C111B00006 K0C111B00006 K0L1BA000119 TO DVD DRIVE UNIT MECHA LOCK DGND MOTOR MOTOR MOTOR MOTOR OPEN1 OPEN2 DGND DGND 10 9 8 7 6 5 4 3 2 1 4 3 2 1 ...

Page 58: ... RESET_SW AUTO MNL DSC3 3V SP CARD_D3 VDD AVREF SP GND CARD_LED SP GND GND CARD_D2 CARD_D0 DSC3 3V CARD_D2 CARD_CLK CARD_D3 POWER_LCD_SW GND GND CARD_DET GND VDD AVREF CARD_D0 LCD_OPEN CARD_PRO CARD_CMD RESET_SW CARD_PRO GND CARD_DET CARD_D1 SP CARD_LED CARD_CMD CARD_CLK LI_BATT LI_BATT TO MAIN CONNECTION TO SIDE R LCD OPEN TO FP1 TO FP6301 1 A B 2 3 4 SIDE R FPC FOR REFERENCE ONLY VDR D300 D308 S...

Page 59: ...7 16 15 14 13 V3 V2 V4 H1 H2 SUB R PT PT 15V 15V A GND V1 A GND SIG A GND A GND SIG B A GND A GND SUB B H2 B H1 B V4 B V3 B V2 B V1 B 5V B 5V B PT PT SIG G 15V 15V R SUB G H2 G H1 G V4 G V3 G V2 G V1 G A GND A GND A GND A GND SUB R H2 R H1 R V4 R V3 R 39 38 37 36 35 34 33 32 31 30 29 28 27 26 25 24 23 22 21 20 19 18 17 16 15 14 13 12 11 10 9 8 7 6 3 2 1 4 5 SIG R V1 R 5V RG V2 R 5V RG 3 2 1 4 5 6 ...

Page 60: ...VDR D300EG VDR D300E VDR D300EB VDR D300EP VDR D300EE VDR D300GC VDR D300GN VDR D300SG VDR D300GCS VDR D308GK 60 ...

Page 61: ...oard 12 1 FLASH P C B LSEP8360A1 1 A B C D 2 3 4 5 6 7 8 9 VDR D300 D308 FLASH P C B FOIL SIDE COMPONENT SIDE VDR D300EG VDR D300E VDR D300EB VDR D300EP VDR D300EE VDR D300GC VDR D300GN VDR D300SG VDR D300GCS VDR D308GK 61 ...

Page 62: ...C B MIC UNIT LSEP8344A1 1 A B C D E 2 3 4 5 6 7 8 9 VDR D300 D308 FRONT P C B FOIL SIDE COMPONENT SIDE VDR D300EG VDR D300E VDR D300EB VDR D300EP VDR D300EE VDR D300GC VDR D300GN VDR D300SG VDR D300GCS VDR D308GK 62 ...

Page 63: ...D300 D308 JACK P C B FOIL SIDE COMPONENT SIDE 12 4 EVF P C B LSEP8349A1 1 A B C D E 2 3 4 F VDR D300 D308 EVF P C B FOIL SIDE COMPONENT SIDE VDR D300EG VDR D300E VDR D300EB VDR D300EP VDR D300EE VDR D300GC VDR D300GN VDR D300SG VDR D300GCS VDR D308GK 63 ...

Page 64: ...SIDE R P C B LSEP8347A1 1 A B C D E 2 3 4 5 6 7 8 F VDR D300 D308 SIDE R P C B COMPONENT SIDE VDR D300EG VDR D300E VDR D300EB VDR D300EP VDR D300EE VDR D300GC VDR D300GN VDR D300SG VDR D300GCS VDR D308GK 64 ...

Page 65: ... P C B LSEP8348A1 1 A B C D E 2 3 4 5 6 7 8 9 F VDR D300 D308 MONITOR P C B FOIL SIDE COMPONENT SIDE VDR D300EG VDR D300E VDR D300EB VDR D300EP VDR D300EE VDR D300GC VDR D300GN VDR D300SG VDR D300GCS VDR D308GK 65 ...

Page 66: ...VDR D300EG VDR D300E VDR D300EB VDR D300EP VDR D300EE VDR D300GC VDR D300GN VDR D300SG VDR D300GCS VDR D308GK 66 ...

Page 67: ...13 Parts and Exploded Views 13 1 EXPLODED VIEWS 13 1 1 FRAME CASING SECTION 67 VDR D300EG VDR D300E VDR D300EB VDR D300EP VDR D300EE VDR D300GC VDR D300GN VDR D300SG VDR D300GCS VDR D308GK ...

Page 68: ...68 VDR D300EG VDR D300E VDR D300EB VDR D300EP VDR D300EE VDR D300GC VDR D300GN VDR D300SG VDR D300GCS VDR D308GK ...

Page 69: ...13 1 2 LCD SECTION 69 VDR D300EG VDR D300E VDR D300EB VDR D300EP VDR D300EE VDR D300GC VDR D300GN VDR D300SG VDR D300GCS VDR D308GK ...

Page 70: ...13 1 3 CAMERA LENS SECTION 70 VDR D300EG VDR D300E VDR D300EB VDR D300EP VDR D300EE VDR D300GC VDR D300GN VDR D300SG VDR D300GCS VDR D308GK ...

Page 71: ...13 1 4 EVF SECTION 71 VDR D300EG VDR D300E VDR D300EB VDR D300EP VDR D300EE VDR D300GC VDR D300GN VDR D300SG VDR D300GCS VDR D308GK ...

Page 72: ...13 1 5 PACKING PARTS ACCESSORIES SECTION 72 VDR D300EG VDR D300E VDR D300EB VDR D300EP VDR D300EE VDR D300GC VDR D300GN VDR D300SG VDR D300GCS VDR D308GK ...

Page 73: ... letter E Example E10 E20 in the Ref No column are shown in the exploded views 8 Parts whose Ref Nos are the same are interchangeable as replacement parts Any of these parts may be ordered and used as a replacement part 13 2 1 2 Mechanical Replacement Notes 1 Abbreviation RTL Retention Time Limited This indicates that the retention time is limited for this item After the discontinuation of this it...

Page 74: ... Part No Part Name Description Remarks B5 XQN16 BF4FN SCREW STEEL B6 XQN16 BF4FN SCREW STEEL B7 XQN16 BF4FN SCREW STEEL B8 XQN16 BF4FN SCREW STEEL B9 XQN16 BF4FN SCREW STEEL B10 XQN16 BF4FN SCREW STEEL B11 XQN16 BF4FN SCREW STEEL B12 XQN16 BF4FN SCREW STEEL B13 XQN16 BF4FN SCREW STEEL B14 XQN16 BF4FN SCREW STEEL B15 XQN16 BF4FN SCREW STEEL B16 XQN16 BF4FN SCREW STEEL B17 XQN16 BF4FN SCREW STEEL B1...

Page 75: ... SPC B207 XQN16 CJ5FJ SCREW SPC B208 XQN16 CJ5FJ SCREW SPC Ref No Part No Part Name Description Remarks B209 XQN16 CJ5FJ SCREW SPC B210 XQN16 CJ5FJ SCREW SPC B211 XQN16 CJ5FJ SCREW SPC B212 XQN16 CJ5FJ SCREW SPC B213 XQN16 CJ5FJ SCREW SPC B214 XQN16 BJ4FN SCREW SPC 13 2 2 4 EVF SECTION PARTS LIST Ref No Part No Part Name Description Remarks 301 LSMD0840 EVF SLIDE BASE 302 LSEP8358A1 EVF FPC UNIT 3...

Page 76: ...0 GREASE LSUA0020 EXTENSION CABLE 20P LSUA0059 EXTENSION CABLE 60P VFK1461 EXTENSION CABLE 20P SPC VFK1440 EXTENSION CABLE 10P SPC VFK1492 EXTENSION CABLE 26P SPC VFK1284 EXTENSION CABLE 24P SPC VFK1286 EXTENSION CABLE 16P SPC VFK1492 EXTENSION CABLE 26P SPC VFK1282 EXTENSION CABLE 22P SPC VFK1992 EXTENSION CABLE 150P SPC VFK1950 EXTENSION CABLE 33P SPC VFK1575C3320 EXTENSION CABLE 33P SPC VFK1459...

Page 77: ...Remarks JK4001 K2HC107B0003 A V JACK SOCKET JK7001 K2HZ110E0002 AUDIO VIDEO S VIDEO JACK SOCKET JK7002 K2HZ105E0007 USB MINI JACK SOCKET 13 2 3 2 FLASH P C B TRANSISTORS Ref No Part No Part Name Description Remarks Q6601 UNR9214J08 TRANSISTOR SI NPN CHIP Q6602 XP0460100L TRANSISTOR COMPLX CMP SI NPN CHIP or Q6602 B1HFCFA00003 TRANSISTOR SI NPN CHIP Q6603 2SD2216J08 TRANSISTOR SI NPN CHIP or Q6603 ...

Page 78: ...0 01UF COILS Ref No Part No Part Name Description Remarks L6301 G1C100M00010 COIL CHIP 10UH CONNECTORS Ref No Part No Part Name Description Remarks P6301 K1KA02BA0014 CONNECTOR 2P FP6301 K1MN22BA0197 CONNECTOR 22P SWITCHES Ref No Part No Part Name Description Remarks SW6301 K0H1BA000436 SWITCH SW6302 K0H1BA000436 SWITCH SW6303 K0D113B00087 SWITCH SLIDE JACK Ref No Part No Part Name Description Rem...

Page 79: ...E RESISTORS Ref No Part No Part Name Description Remarks R901 ERJ3GEY0R00V MGF CHIP 1 16W 0 R902 ERJ6GEY0R00V MGF CHIP 1 10W 0 Ref No Part No Part Name Description Remarks R906 ERJ3RBD563V MGF CHIP 1 16W 56K R907 ERJ3RBD271V MGF CHIP 1 16W 270 R908 ERJ3RBD271V MGF CHIP 1 16W 270 R909 ERJ3RBD271V MGF CHIP 1 16W 270 R910 ERJ3RBD562V MGF CHIP 1 16W 5600 R915 ERJ3GEYJ102V MGF CHIP 1 16W 1K R916 ERJ3GE...

Page 80: ...040006 C CHIP 10V 0 1UF CONNECTORS Ref No Part No Part Name Description Remarks FP951 K1MN18A00064 CONNECTOR 18P FP952 K1MN21BA0058 CONNECTOR 21P 80 VDR D300EG VDR D300E VDR D300EB VDR D300EP VDR D300EE VDR D300GC VDR D300GN VDR D300SG VDR D300GCS VDR D308GK ...

Reviews: