background image

Before use

SQT0936

7

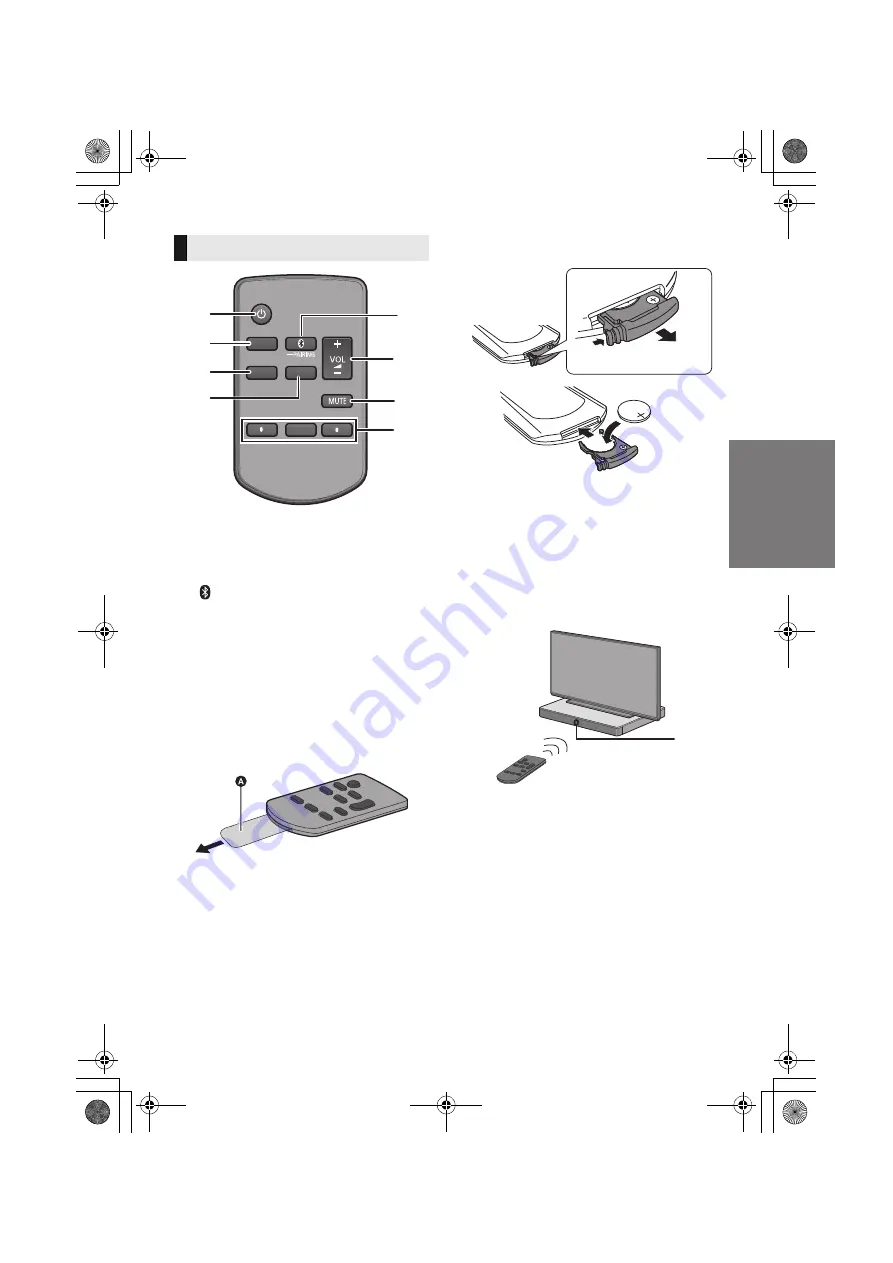
1

[

Í

] Turn the main unit on or off (

>

16)

2

[INPUT] Select the input source (

>

16)

3

[SETUP] Select the setup menu (

>

23)

4

[SOUND] Select the sound menu 
(

>

21, 22)

5

[

-PAIRING]

Select the Bluetooth

®

 device as the 

source (

>

16)

Bluetooth

®

 pairing (

>

19)

Disconnecting a Bluetooth

®

 device (

>

20)

6

[

j

VOL

i

] Adjust the volume of this system 

(

>

16)

7

[MUTE] Mute the sound (

>

16)

8

[

4

][OK][

3

] Select and confirm the option

Before using for the first time

Remove the insulation sheet 

A

.

Dispose of the insulation sheet responsibly 
after removing it.

To replace a button-type battery

Battery type: CR2025 (Lithium battery)

Set the button-type battery with its (

i

) mark 

facing upward.

About remote control signal sensor

The remote control signal sensor is located 
on the main unit.

Use the remote control within the correct 
operation range.
Distance: Within approx. 7 m directly in front
Angle: Approx. 30

o

left and right

B

Remote control signal sensor

Remote control

SOUND 

1

5

6

7

8

2

INPUT

SETUP

OK

3

4

SC-ALL30T-SQT0936.book  7 ページ  2015年4月28日 火曜日 午前10時0分

Summary of Contents for Viera Link SC-ALL30T

Page 1: ...Audio System Model No SC ALL30T Thank you for purchasing this product Please read these instructions carefully before using this product and save this manual for future use Model number suffix EB denotes UK model SC ALL30T SQT0936 book 1 ページ 2015年4月28日 火曜日 午前10時0分 ...

Page 2: ...h as lighted candles on this unit This unit may receive radio interference caused by mobile telephones during use If such interference occurs please increase separation between this unit and the mobile telephone This unit is intended for use in moderate climates Placement Place this unit on an even surface To reduce the risk of fire electric shock or product damage jDo not install or place this un...

Page 3: ...on of the fuse differ according to the type of AC mains plug figures A and B Confirm the AC mains plug fitted and follow the instructions below Illustrations may differ from actual AC mains plug 1 Open the fuse cover with a screwdriver 2 Replace the fuse and close or attach the fuse cover Figure A Figure B Fuse cover Figure A Figure B Fuse 10 ampere Fuse 10 ampere About descriptions in these opera...

Page 4: ...acement 11 Network settings 12 Operations Using this system 16 Streaming music over the network 17 Bluetooth operations 19 3D sound 21 Sound menu 21 Setup menu 23 Linked operations with the TV VIERA Link HDAVI ControlTM 26 Reference Troubleshooting 28 About Bluetooth 33 Unit care 33 Licenses 34 Specifications 35 SC ALL30T SQT0936 book 4 ページ 2015年4月28日 火曜日 午前10時0分 ...

Page 5: ...t to change The supplied AC mains lead is for use with this system only Do not use it with other equipment Also do not use cords from other equipment with this system This system SC ALL30T 1 Main unit speaker SC ALL30T Accessories 1 Remote control with a battery 1 AC mains lead For the United Kingdom and Ireland For Continental Europe N2QAYC000098 SFQ0018 SFQ0016 SC ALL30T SQT0936 book 5 ページ 2015年...

Page 6: ...ng 19 Disconnecting a Bluetooth device 20 6 Remote control signal sensor 7 7 Display 8 AC IN terminal 10 9 HDMI AV OUT TV ARC terminal ARC compatible 8 9 10 HDMI AV IN BD DVD terminal 9 11 LAN terminal 15 12 OPTICAL DIGITAL AUDIO IN TV terminal 9 13 AUX IN terminal 10 1 These switches work just by touching the marks Each time you touch the switch there will be a beep sound The beep sound can be se...

Page 7: ... the first time Remove the insulation sheet A Dispose of the insulation sheet responsibly after removing it To replace a button type battery Battery type CR2025 Lithium battery Set the button type battery with its i mark facing upward About remote control signal sensor The remote control signal sensor is located on the main unit Use the remote control within the correct operation range Distance Wi...

Page 8: ...player The main unit can pass through the 3D video signal from a 3D compatible Blu ray Disc player to a FULL HD 3D TV 4K 60p compatibility Compatible with 4K Ultra HD TV and Blu ray Disc player This system can pass through the 4K content of a 4K compatible equipment to a 4K Ultra HD TV When connecting to 4K compatible equipment and 4K Ultra HD TV use High Speed HDMI cables which support 18 Gbps ba...

Page 9: ... this system Preparation Connect the main unit to the TV 8 A HDMI cable HDMI IN OPTICAL OUT TV Connection from an HDMI compatible device Refer to the operating instructions of the connected HDMI compatible device for the necessary setting to output the video and audio signals When connecting to 4K compatible equipment and 4K Ultra HD TV use High Speed HDMI cables which support 18 Gbps bandwidth HD...

Page 10: ...en it is turned off In the interest of power conservation if you will not be using this system for a long time unplug it from the household mains socket Connection from an other device AUX L R AUDIO OUT A e g Set top box TV AC mains lead connection Saving energy The main unit is designed to conserve its power consumption and save energy The main unit will automatically switch to standby mode when ...

Page 11: ...ke care not to scratch the glass on the top of this unit with pointy or sharp objects Take care not to hit the glass on the top of this unit drop pointy objects on it or apply shocks to it If the toughened glass is used for a long time after it is scratched scratches may grow and eventually lead to the glass breaking In very rare cases the top glass of this unit may break naturally If the glass do...

Page 12: ...device an AndroidTM device or a PC etc to this system s speakers by using the Qualcomm AllPlayTM smart media platform or DLNA feature To use these features this system must join the same network as the compatible device Please update the system s firmware after the network settings are complete 25 Firmware update Choose a network setting method from the following Wireless LAN connection Method 1 U...

Page 13: ... page If the settings page is not displayed type http 172 19 42 1 into the URL address field 7 Type a device name and then select Next The device name will be displayed as this system s name on the network The guaranteed limit is 32 characters The device name is set when Next is selected You can also change the device name after the network connection is set up 15 To make network related settings ...

Page 14: ...he connection was not made within the set time limit Try the setting again If FAIL is still displayed try other methods 4 Press OK on the remote control to exit the setting Using the WPS PIN code 1 Turn this system on 2 Press SETUP on the remote control repeatedly to select NET SETUP 3 Press 4 3 on the remote control to select WPS PIN and then press OK Proceed to the next step after the display on...

Page 15: ...e same network as this system Check this system s IP address 24 NET INFO and note it down 1 Start an Internet browser on your device and then type this system s IP address into the address field to display the settings page It may take a few minutes until the settings page is displayed depending on the environment In that case reload the browser 2 Type a device name and then select Next Refer to t...

Page 16: ...cted to the HDMI AV IN terminal to switch audio video to the TV switch input to the TV tuner If VIERA Link HDMI 26 is not enabled also switch the input of this unit to TV When other Panasonic devices respond to this system s remote control change the remote control code on this system and the remote control Preparation Turn off all other Panasonic products Turn on the main unit Aim the remote cont...

Page 17: ...Music Network and then select the device containing music The added music source is numbered in order from 1 5 Select a song NETWORK will be indicated on the main unit s display This system will be displayed as Panasonic ALL30T if the device name is not set When playing back music from the DLNA server PC with Windows 7 or later installed smartphone Network Attached Storage NAS device etc add the c...

Page 18: ... select this system as the output speakers Spotify will be indicated on the main unit s display To enjoy synchronized sound from the multiple AllPlay speakers you need to group the speakers using the app Panasonic Music Streaming 17 Using online music services other than Spotify After step 2 3 From select this system as the output speakers NETWORK will be indicated on the main unit s display Depen...

Page 19: ...ound of the Bluetooth audio device from this system wirelessly Refer to the operating instructions of the Bluetooth device for further instruction on how to connect a Bluetooth device Preparation Turn on the Bluetooth feature of the device and place the device near the main unit 1 Press PAIRING to select BLUETOOTH If PAIRING is indicated on the display go to step 3 2 Press and hold PAIRING until P...

Page 20: ...g 2 Start the app Panasonic Music Streaming on the device Follow on screen instructions on your device Always use the latest version of the app 1 Press PAIRING to select BLUETOOTH 2 Touch and hold your device on the NFC touch area of the main unit 6 Do not move the Bluetooth device until it beeps displays a message or reacts in some way Once the Bluetooth device has reacted move the device away fr...

Page 21: ...es from TV dramas are heard as if the sound is coming from the TV giving the feeling that the sound and the image are one Also the dialogue will stand out from the other sounds during normal volume playback and when the volume is lowered for night time viewing e g Image of 3D sound field SOUND MODE Select the sound mode to suit the TV programme or connected equipment STANDARD Best suited for drama...

Page 22: ...nel mode when there are two audio modes received by this system M1 Main M2 Secondary M1 M2 Main Secondary This effect only works if the audio output of the TV or player is set to Bitstream and Dolby Dual Mono is available in the sound source AGC Auto gain control prevents sudden loud sound by reducing the sound level automatically when the input is too high This function is suitable for TV broadca...

Page 23: ... volume limit to 50 when you turn on the main unit although the volume is set to above 50 before it is turned off ON OFF BLUETOOTH STANDBY This function allows you to connect a paired Bluetooth device when the main unit is in standby mode ON OFF The main unit will be turned on automatically when you connect a paired Bluetooth device If this function is set to ON the standby power consumption will ...

Page 24: ...u press OK while SIGNAL LEVEL is being displayed Press OK again to stop the display It is recommended to have a signal strength of LEVEL 3 Change the position or angle of your wireless network router or this system if the indication is LEVEL 2 or LEVEL 1 and see if the connection improves If LEVEL 0 is displayed this system cannot establish a link with the wireless network router WIRED LAN is disp...

Page 25: ...s unit while updating the firmware To view the TV during update change the settings on the TV to have the sound output from the TV s speakers Refer to the operating instructions of the TV for details You can add two Panasonic SC ALL2 sold separately as rear surround speakers to enjoy 4 1 ch surround sound This product is set to be released in June 2015 Firmware update You can also update the firmw...

Page 26: ...om the beginning When you do so REAR PAIRING is displayed during pairing and PAIRED is displayed when pairing is successful You can adjust the output level of the rear surround speakers 24 REAR LEVEL Linked operations with the TV VIERA Link HDAVI ControlTM Preparation 1 Confirm that the HDMI connection has been made 8 9 2 Set the HDAVI Control operations on the connected equipment e g TV 3 For the...

Page 27: ...will automatically be output from this system if the TV is compatible to VIERA Link HDAVI Control 4 or later TV TV speakers are active The volume of this system is set to its minimum Automatic input switching When the following operations are performed the main unit will automatically change the input to the corresponding source j When play starts on an HDMI connected device 3 j When the TV input ...

Page 28: ...s for the TV for details about its power save feature 26 The switches on the main unit do not work Í I VOL j VOL i INPUT and PAIRING on the main unit are touch keys Touch the switches with your finger They may not work if operated with your fingernails or hands wearing gloves Colour irregularities on a CRT TV If colour irregularities appear on the TV turn off the TV for about 30 minutes and move t...

Page 29: ...er The images from this system do not appear on the TV When outputting in 60p 4K images may be distorted depending on the HDMI cable Use High Speed HDMI cables which support 18 Gbps bandwidth Pairing cannot be done Check the Bluetooth device condition The device cannot be connected The pairing of the device was unsuccessful or the registration has been replaced Try pairing the device again 19 This...

Page 30: ...m has a function to make the dialogue stand out when the volume is low 22 The sound lags behind the image Depending on the TV when this unit is connected to it via Bluetooth the sound output from this unit may lag behind the TV image Connect this unit and the TV with an HDMI cable optical digital audio cable 8 9 Sound stops The power of the main unit turns off automatically When the main unit dete...

Page 31: ...t the devices to the network Turn off and then on the wireless router Try a wired LAN connection 15 Restart the app F61 There is a problem with the amplifier of the system Disconnect the AC mains lead and consult the dealer F70 HDMI U701 U703 Check HDMI connection Turn off the main unit and then switch it on again Disconnect the HDMI cable F703 F704 Turn off the main unit and then switch it on aga...

Page 32: ...tands for a number The remote control and this system are using different codes Change the code on the remote control 16 WIRED LAN Connection to the network is via a wired LAN connection When setting up wireless connection disconnect the LAN cable from this system WIRELESS LAN OFF The wireless LAN function on this system is disabled When setting up wireless connection set the WIRELESS LAN setting ...

Page 33: ...e main unit is located too close to other Bluetooth devices or the devices that use the 2 4 GHz band This system may not function properly if radio waves from a nearby broadcasting station etc are too strong Intended usage This system is for normal general use only Do not use this system near equipment or in an environment that is sensitive to radio frequency interference example airports hospital...

Page 34: ...rk of Wi Fi Alliance Wi Fi is a registered trademark of Wi Fi Alliance Wi Fi Protected SetupTM WPATM and WPA2TM are trademarks of Wi Fi Alliance Windows is a trademark or a registered trademark of Microsoft Corporation in the United States and other countries MPEG Layer 3 audio coding technology licensed from Fraunhofer IIS and Thomson FLAC Decoder Copyright C 2000 2001 2002 2003 2004 2005 2006 20...

Page 35: ... For service use only LAN Port 10 Base T 100 Base TX Analog audio input Audio input Terminal type Pin jack 1 system GENERAL Power consumption 58 W In standby condition When Network Standby 1 is OFF Approx 0 5 W When Network Standby 1 is ON Approx 4 2 W Power supply AC 220 V to 240 V 50 Hz Dimensions WkHkD 600 mmk63 mmk365 mm Mass Approx 6 0 kg Operating temperature range 0 o C to i40 o C Operating...

Page 36: ...ize 16 bit Channel count 2 ch Bit rate 8 320 kbps FLAC ALAC WAV Sampling frequency 32 44 1 48 88 2 96 176 4 192 kHz Audio word size 16 bit 24 bit Channel count 2 ch Audio support format DLNA MP3 Sampling frequency 32 44 1 48 kHz Audio word size 16 bit Channel count 2 ch Bit rate 8 320 kbps FLAC WAV Sampling frequency 32 44 1 48 88 2 96 176 4 192 kHz Audio word size 16 bit 24 bit Channel count 2 ch...

Page 37: ...l Categoria 3 A característica WLAN deste produto pode ser usada exclusivamente na estrutura interna Este produto deve ser ligado somente a conexões 2 4 GHz ou 5 GHz WLAN Hrvatski Deklaracija o podobnosti DoC Ovime Panasonic Corporation izjavljuje da je ovaj proizvod udovoljava osnovnim zahtjevima i ostalim relevantnim uvjetima Smjernice 1999 5 EC Kupci mogu preuzeti kopiju originalne DoC za naše ...

Page 38: ... достъп от 2 4 GHz или 5 GHz WLAN Român Declaraţie de Conformitate DoC Prin prezenta societatea Panasonic Corporation declară că produsul este conform cu cerinţele esenţiale şi cu alte norme corespunzătoare Directivei 1999 5 EC Clienţii pot descărca o copie a DoC ului original al produselor noastre R TTE de la adressa noastră DoC din Internet http www doc panasonic de Contact la Reprezentanţa auto...

Page 39: ...lity Penalties may be applicable for incorrect disposal of this waste in accordance with national legislation Note for the battery symbol bottom symbol This symbol might be used in combination with a chemical symbol In this case it complies with the requirement set by the Directive for the chemical involved This product incorporates the following software 1 the software developed independently by ...

Page 40: ...further support on your product please visit our website www panasonic co uk Direct Sales at Panasonic UK Order accessory and consumable items for your product with ease and confidence by phoning our Customer Communications Centre Monday Friday 9 00 am 5 00 pm Excluding public holidays Or go on line through our Internet Accessory ordering application at www pas europe com Most major credit and deb...

Reviews: