background image

39

Advanced

 Using Network services

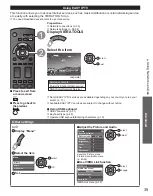
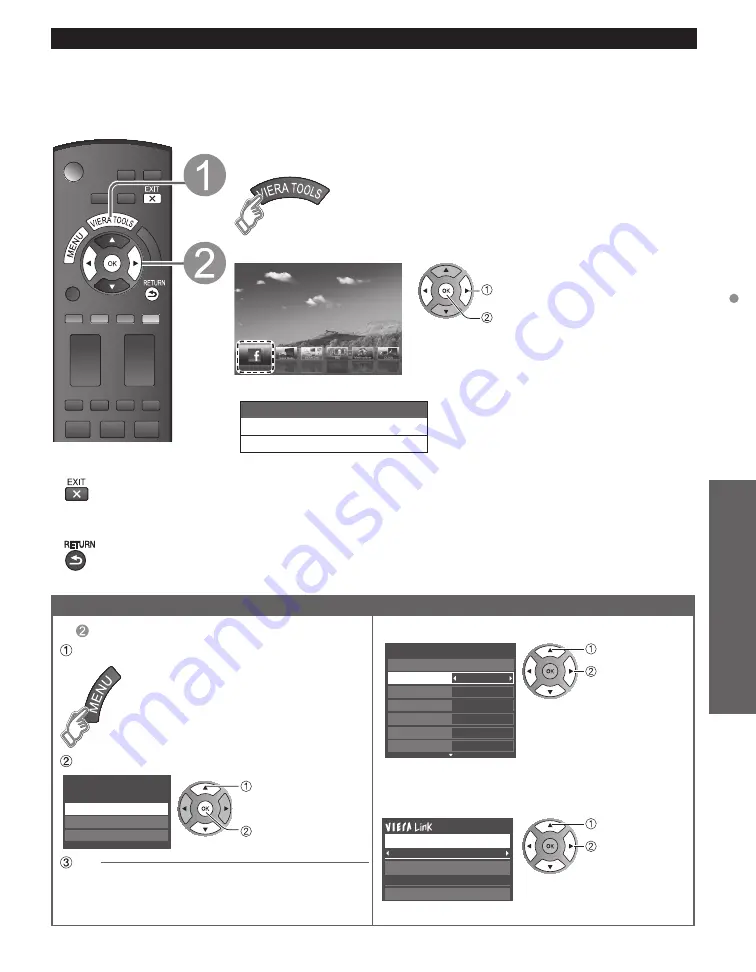
Using  EASY IPTV

This function allows you to access Internet services, such as music distribution or social networking service 

etc, easily with selecting the VIERA TOOLS icon.


You need broadband environment to use this service.


Press to exit from 
a menu screen


Press to go back to 
the previous 

Preparations


Network connections (p. 35)


Network settings (p. 36-38)

Display VIERA TOOLS

Select the item

(example)

 select

 next

Services contents

Music distribution/Radio service
SNS (Social Network Service)


Not all EASY IPTV services are available depending on your country or area your 
select. (p. 13)


Available EASY IPTV services are subject to change without notice.


Using USB keyboard


USB connections (p. 51)


Keyboard type (p. 48)


Operate USB keyboard/Entering characters (p. 19)

Other settings

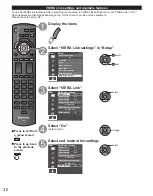
In 


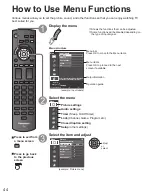
Display “Menu”


Select the item

 select

 OK

Menu

Picture

Audio
VIERA Link

 Set 


Adjust the Picture and Audio

 select

 adjust

0
0
0
0
0

Vivid

Picture

1/2

Brightness
Color
Tint
Sharpness

Picture mode

Contrast

Reset to defaults

example: Picture menu

Picture menu/Audio menu 

(p. 45-46)


Use VIERA Link function

 select

 change

Recorder

TV

VIERA Link control

Speaker output

Back to TV

VIERA Link menu (p. 32)

Summary of Contents for Viera TC-42PX34X

Page 1: ...erial number in the space provided below and retain this book plus your purchase receipt as a permanent record of your purchase to aid in identification in the event of theft or loss and for Warranty Service purposes Model Number Serial Number Web Site http panasonic net Panasonic Corporation 2011 Printed in U S A M0111 0 ...

Page 2: ... diagonally Model No TC 42PX34X TC 50PX34X English Thank you for purchasing this Panasonic product Please read these instructions before operating your set and retain them for future reference The images shown in this manual are for illustrative purposes only TQB2AC0035 ...

Page 3: ...ention This is not considered a malfunction and is not covered by the warranty 4 3 12 To prevent the Image retention the screen saver is automatically activated after a few minutes if no signals are sent or no operations are performed Typical still images Channel number and other logos Image displayed in 4 3 mode SD Card photo Video game Computer image Set up Do not place the unit where it s expos...

Page 4: ...ecode AVC Video that was encoded by a consumer engaged in a personal and non commercial activity and or was obtained from a video provider licensed to provide AVC Video No license is granted or shall be implied for any other use Additional information may be obtained from MPEG LA LLC See http www mpegla com Watching TV 17 Using VIERA TOOLS 20 Watching content from external devices 21 Using Media p...

Page 5: ...to qualified service personnel Servicing is required when the apparatus has been damaged in any way such as power supply cord or plug is damaged liquid has been spilled or objects have fallen into the apparatus the apparatus has been exposed to rain or moisture does not operate normally or has been dropped 15 To prevent electric shock ensure the grounding pin on the AC cord power plug is securely ...

Page 6: ...gged in the socket outlet Do not place a heavy object on the cord or place the cord near a high temperature object Do not twist the cord bend it excessively or stretch it Do not pull on the cord Hold onto the power plug body when disconnecting cord Do not use a damaged power plug or socket outlet If a problem occurs such as no picture or no sound or if smoke or an abnormal odor is detected from th...

Page 7: ...etween the equipment and receiver Connect the equipment into an outlet on a circuit different from that to which the receiver is connected Consult the dealer or an experienced radio TV technician for help This device complies with Part 15 of the FCC Rules Operation is subject to the following two conditions 1 This device may not cause harmful interference and 2 this device must accept any interfer...

Page 8: ...supplied with the TV Depth of screw minimum 0 59 15 0 mm maximum 1 18 30 0 mm View from the side a b Warning In order to maintain the TV s performance and safety be absolutely sure to ask your dealer or a licensed contractor to secure the wall hanging brackets Carefully read the instructions accompanying optional accessories and be absolutely sure to take steps to prevent the TV from tipping over ...

Page 9: ... not disassemble or modify the pedestal Otherwise the TV may fall over and become damaged and personal injury may result Caution Do not use any pedestal other than that provided with this TV Otherwise the TV may fall over and become damaged and personal injury may result Do not use the pedestal if it becomes warped or physically damaged If you use the pedestal when it is physically damaged persona...

Page 10: ...nd corrosion resulting in damage to the remote control Do not mix old and new batteries Do not mix different battery types such as alkaline and manganese batteries Do not use rechargeable Ni Cd batteries Do not burn or break batteries Power cord connection To attach To remove Insert it firmly until the tabs on both sides click into place Keep pushing both sides until they snap and pull ...

Page 11: ...s and terminals Insert firmly Insert firmly Connection references Antenna or Cable connection Cable You need to subscribe to a cable TV service to enjoy viewing their programming You may need to subscribe to a high definition HD cable service to enjoy HD programming The connection for high definition can be done with the use of an HDMI or Component Video cable p 11 Note When using a Cable box exte...

Page 12: ...PB PR AUDIO OUT COMPONENT VIDEO OUT white red green blue red white red green blue red white red green blue red e g Blu ray Disc player AV Equipment To use COMPOSITE terminals L R COMPOSITE OUT yellow white red yellow white red yellow white red or e g DVD Recorder AV Equipment e g VCR DIGITAL AUDIO IN e g Amplifier Audio equipment For HDMI ARC Audio Return Channel connection see p 28 Optical cable ...

Page 13: ...cts Secondary Audio Programming p 17 Exits from menu screen VIERA Link menu p 32 33 Display VIERA TOOLS Menu p 20 Viewing from SD Card p 22 27 Selects OK Change Go back to previous menu Channel up down when viewing from ANT Cable source Displays or removes the channel banner p 17 Operates the Favorite channel list function p 18 Numeric keypad to select any channel or press to enter alphanumeric in...

Page 14: ...y reset to Vivid and a Picture Refresh message will be displayed on the screen Yes select OK Select No and return to previous screen If you select Yes Screen enters the store demonstration mode To display the Set viewing mode screen again as shown above and select Home Use do one of the following Press and hold down the side POWER button for at least five seconds Unplug power cord for 30 seconds a...

Page 15: ...uto program completed Press OK to continue Number of analog channels Number of digital channels 10 0 OK RETURN Auto program Progress Number of analog channels Number of digital channels Press RETURN to quit This may take some time to complete 1 0 RETURN Label the inputs for easy identification Label inputs To name each input follow the instructions on screen When done select NEXT and press OK to g...

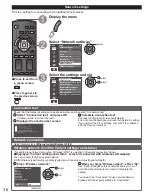
Page 16: ...ess Default gateway DNS DNS setting mode Connect test Proxy address Proxy port Automatic 255 255 255 0 192 168 0 4 192 168 0 1 192 168 0 1 Automatic 00 00 aa cc 33 ab RETURN Change Select Mac address Configure settings of the network connection Network settings Connection test Step 5 of 6 Check Ethernet cable connection Validate IP address Check for IP address duplication Check connection to the I...

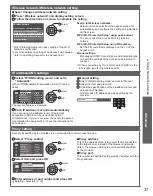
Page 17: ...e details on setting of Access point please refer to operating manual for the Access point We recommend using 11n 5 GHz for the wireless system between the wireless LAN adapter and Access point Communication is also possible with 11a 11b and 11g 2 4 GHz but the communication speed may be slower If the wireless system of the Access point is changed devices that could connect by wireless LAN may no ...

Page 18: ... if available when receiving a digital channel Audio track 1 of 2 English Analog mode Press SAP to select the desired Audio mode Each press of SAP will change the Audio mode Stereo SAP Mono SAP is not available when watching TV with a Cable or Satellite box connected via HDMI Contact your Cable or Satellite operator for instructions on enabling SAP with their box Closed Caption Switches the Closed...

Page 19: ...vorites or type of channels to view when pressing the channel up down button Set favorite channel below Edit the channel identifier p 43 Check the signal strength p 43 All Setup SUB MENU Edit CH caption Signal meter Set favorite Channel surf mode Call up a favorite channel FAVORITE Channel numbers registered in Favorite are displayed on the favorite tune screen Select the desired broadcast station...

Page 20: ...g the password enter the password twice in order to register it Make a note of your password Do not forget it If you have forgotten your password consult your local dealer When you select a locked channel a message will be displayed that allows you to view the channel after you input your password Change password p 47 Operate USB keyboard You can operate non character keys as remote control keys K...

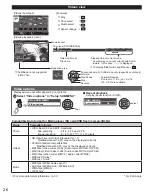
Page 21: ...m Using EASY IPTV p 39 Part of Icons on VIERA TOOLS screen above provide you usable Internet service such as Music distributer or social networking service etc Game mode Change to Game mode Picture mode p 45 VIERA Link VIERA Link p 32 33 Eco mode ECO energy saving p 48 Media player Media player p 22 27 DLNA Using DLNA feature p 40 VIERA TOOLS is the easy way to access the TV s special features The...

Page 22: ...on repeatedly to cycle through the available inputs set unused input to Not used below for quick skipping Select the input of your choice then press OK HDMI 1 GAME Terminal example Label During the selection if no action is taken for several seconds the Input select menu disappears The terminal and label names of the connected equipment are displayed Note The input label will be displayed on the I...

Page 23: ...lect Slideshow Media select Info SD memory card OK Select RETURN Sort SUB MENU Photos Videos Music Media Select SD memory card OK RETURN Select Information panel s o t o h p l l A Photos r e y a l p a i d e M Media select Slideshow Drive select Info SD memory card OK Select RETURN Sort SUB MENU 1 70 File name 100 0001 jpg Date 15 04 2011 Size 640x480 Option menu s o t o h p l l A o t o h P r e y a...

Page 24: ...rs depending on data storage conditions Select Title Folder Sort by Date 24 11 2009 01 12 2009 03 12 2009 20 12 2009 22 12 2009 23 10 2009 25 10 2009 01 11 2009 05 11 2009 10 11 2009 22 11 2009 23 11 2009 Media player Photos Media select Slideshow Drive select Info SD memory card OK Select RETURN Sort SUB MENU select OK e g Photos Select file s o t o h p l l A Photos r e y a l p a i d e M Media se...

Page 25: ...elect item select OK Folders Sort by date Sort by month Displayed each view Sort by Date 24 11 2009 01 12 2009 03 12 2009 20 12 2009 22 12 2009 23 10 2009 25 10 2009 01 11 2009 05 11 2009 10 11 2009 22 11 2009 23 11 2009 Media player Photos Media select Slideshow Drive select Info SD memory card OK Select RETURN Sort SUB MENU e g Sort by date Folders ascending order of numeric alphabetical Sort by...

Page 26: ...om Burst playback Continuously plays photos that were shot continuously On Off Display interval Set Display interval each image is displayed in the Slideshow mode Short Fast Normal Slow Very slow Repeat playback Turn the Slideshow Repeat cycle function on or off Off On Soundtrack settings Select the music Off Music 1 Music 2 Music 3 Music 4 Music 5 User selected Auto User selected Plays the soundt...

Page 27: ...Subtitles are not supported in MKV file Video options Displayed menu will differ depending on contents Select Video options in Setup SUB MENU next SUB MENU Setup SUB MENU Video options Repeat playback Set play repeat function On Off select On Video options Repeat playback Compatible Data format for Media player SD card USB flash memory DLNA Media Compatible format Photo JPEG files DCF and EXIF sta...

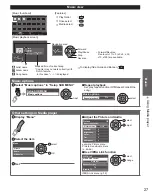
Page 28: ... to 5 x2 x5 x 30 x70 x100 are available To display hide Guide and Banner Play Pause Stop Reverse Music options Select Music options in Setup SUB MENU next Setup SUB MENU Music options SUB MENU Repeat playback Set play repeat function Off Repeat Folder One song select On Music options Repeat playback Other settings in Media player Display Menu Select the item select OK Menu Picture Audio VIERA Link...

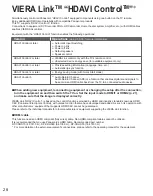
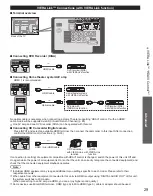
Page 29: ...nel Audio Return Channel ARC is a function that enables digital sound signals to be sent via an HDMI cable back from the TV to a connected audio device When adding new equipment reconnecting equipment or changing the setup after the connection turn the equipment on and then switch the TV on Set the input mode to HDMI1 or HDMI2 p 21 and make sure that the image is displayed correctly VIERA Link HDA...

Page 30: ...inal then connect the camcorder to this input After connection confirm the HDAVI control functions p 30 33 HD Camcorder with VIERA Link function HDMI mini HDMI cable LUMIX with VIERA Link function If connection or setting of equipment compatible with HDAVI control is changed switch the power of this unit Off and On again while the power of all equipment is On so that the unit can correctly recogni...

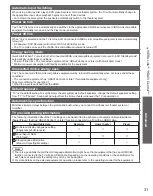
Page 31: ...n Setup Menu Setup 1 2 ANT Cable setup Input labels Anti image retention Network settings VIERA Link settings Channel surf mode Language Clock All select next Select VIERA Link On No Yes TV Quick start No stay on Menu VIERA Link settings VIERA Link Power on link Power off link Default speakers Energy saving mode Unselected device energy save select Select On default is On change Select and make ot...

Page 32: ... be turned off automatically when not in use under these conditions The connected equipment has HDAVI Control 2 or later for available equipment only Example of timing for operation When the input is switched from the HDMI Default speakers TV is the default setting To set the Home theater system as Default speakers change the Default speakers setting from TV to Theater Sound will be output from th...

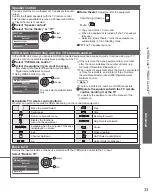
Page 33: ...depending on your country or area you select p 13 Select the item Recorder TV VIERA Link control Speaker output Back to TV select Items in the VIERA Link menu may be grayed out if no compatible equipment is connected must be HDAVI Control 2 or later or if the equipment has not initiated a connection with the TV In that case switch the equipment s power Off and On while the TV is On For further det...

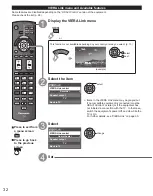
Page 34: ...ERA TOOLS p 20 select change You can select available items only Recorder TV VIERA Link control Speaker output Back to TV If there is more than one equipment item a number after the name indicates the number of items e g Recorder 1 Recorder 2 Recorder 3 The number of equipment items that can be connected is three for recorders and a total of three for Home theater Player Camcorder LUMIX Digital ca...

Page 35: ... Ensure the connected equipment has a DLNA Certified media server Store photos videos or music into the media server and then you can watch them on the TV Windows 7 is the server software that has been tested for the performance with this TV current as of January 2011 For installing read the manual of the server software The DLNA control function of Windows 7 is not supported with this TV When a s...

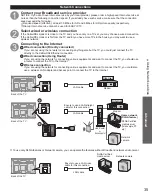
Page 36: ...If you are not using the network for connecting anything else but the TV you could just connect the TV directly to the Cable DSL Ethernet connection Wired connection Using Router If you are using the network for connecting various equipments and want to connect the TV you should use a router to connect the TV to the Internet Wireless connection If you are using the network for connecting various e...

Page 37: ... communication with EASY IPTV server Test in progress Complete Connection test Success Completion screen is displayed Error Follow the directions on screen to complete the setting If you perform the Proxy settings check the Proxy address and the Proxy port number Network connection Select Network type Ethernet cable Wireless WiFi Wireless network Confirm Current settings and status This setting is...

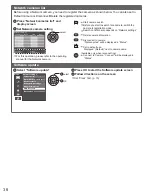
Page 38: ...ed Menu IP address DNS settings IP setting mode IP address 192 168 0 5 Subnet mask 255 255 255 0 Default gateway 192 168 0 254 DNS setting mode Automatic DNS 192 168 0 20 Automatic The acquired address is displayed select OK Each IP address is acquired automatically If you are using a broadband router IP automatic acquisition in DHCP can be used under normal circumstances If you are not sure check...

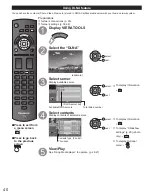
Page 39: ...ra search Before you start to search for a camera switch the camera to registration mode Search condition also depends on Network settings Delete camera information Disconnect to camera Disconnected will be displayed in Status Set to default use Displayed Default next to camera name Available only when reconnecting Connect to Camera Connect will be displayed in Status Software update Select Softwa...

Page 40: ...e SNS Social Network Service Not all EASY IPTV services are available depending on your country or area your select p 13 Available EASY IPTV services are subject to change without notice Using USB keyboard USB connections p 51 Keyboard type p 48 Operate USB keyboard Entering characters p 19 Other settings In Display Menu Select the item select OK Menu Picture Audio VIERA Link Set Adjust the Pictur...

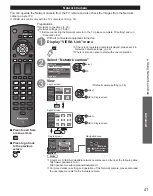
Page 41: ...server list select next To display Information Select contents Display contents of selected server Size Screen format 3648x2736 JPEG DLNA server SERVER1 Photos All photos w o h s e d i l S P000102 2008 10 05 09 54 P000135 2008 11 20 13 18 P000180 2008 12 07 11 31 P000214 2008 12 10 15 20 P000251 2008 12 19 12 39 P000276 2008 12 25 14 06 P000293 2009 01 06 13 52 M10025 2009 01 12 15 56 M10042 2009 ...

Page 42: ...screen 1 9 9 split screen select OK to Single screen Preset position Home position 1 9 0 Pan Tilt RETURN Single screen Camera name Camera 1 Model BL C210A Single screen Preset position Home position 1 9 0 Pan Tilt RETURN Navigation area Select OK RETURN 4 cam 8 cam Camera name Camera 1 Model BL C210A Multi screen 1 4 4 split screen select OK to Single screen Default camera setting p 38 Note A numb...

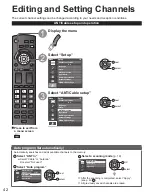
Page 43: ... scanning is completed select Apply see p 43 All previously saved channels are erased Press to exit from a menu screen Display the menu Select Setup Menu Setup 1 2 ANT Cable setup Input labels Anti image retention Network settings VIERA Link settings Channel surf mode Language Clock All next select Select ANT Cable setup Menu Setup 1 2 ANT Cable setup Input labels Anti image retention Network sett...

Page 44: ...N Delete ABC abc D A Select or change set Caption Select or edit the station identifier maximum 7 characters available Favorite Set favorite 1 3 26 1 1 2 3 select set Set favorite Select the number Add Press OK to select Yes add or No skip Move the cursor to a channel number Manual program Edit Cancel Apply Caption Favorite Add 2 Yes 3 Yes Channel select press OK to tune to the channel Select Appl...

Page 45: ...e of the device connected to the HDMI 1 terminal Input labels Component Video HDMI 2 HDMI 1 PC Change Select Menu structure Menu bar Press OK to move to the Menu items Menu items Press OK to proceed to the next screen if available Help information Operation guide example Input labels Select the menu Menu Picture settings Audio settings Timer Sleep On Off timer Lock Channel Game Program etc Closed ...

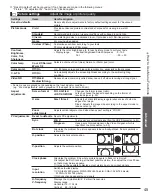
Page 46: ...epending on the input signal or condition e g Zoom adjustments will be grayed out if the aspect is not set to Zoom Aspect adjustments Screen format FULL H FILL JUST 4 3 ZOOM Changes the format aspect ratio Lets you choose the aspect depending on the format of received signal p 50 H size Size 1 Size 2 Adjusts the horizontal display range to reduce noise of both side edges of an image Size 2 Adjusts...

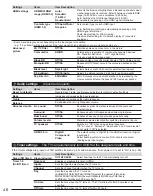
Page 47: ...ems Item Description Reset to defaults Resets Bass Treble and Balance adjustments to factory default settings Bass Increases or decreases the bass response Treble Increases or decreases the treble response Balance Emphasizes the left right speaker volume Advanced audio A I sound Off On Equalizes overall volume levels across all channels and external inputs Surround Off On Enhances audio L R respon...

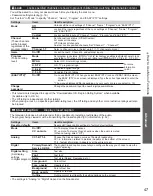
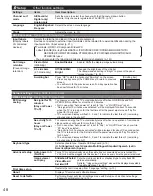
Page 48: ... the screen The menus displayed differ depending on your county or area you select p 13 Change password Change the password Input the new 4 digit password twice This television is designed to support the Downloadable U S Region Rating System when available Available only in U S A The Off rating is independent of other ratings When placing a lock on a specific age based rating level the Off rating ...

Page 49: ... SIGNAL and NO OPERATION continue for more than 10 minutes Not in use when Auto power on is set to Yes or On Off Timer is set No signal for 10 minutes was activated will be displayed for about 10 seconds when the TV is turned on for the first time after the power was turned off by No signal for 10 minutes The on screen display will flash 3 2 and 1 to indicate the last three 3 remaining minutes pri...

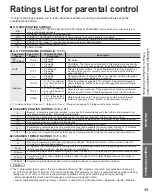
Page 50: ...Language D Dialogue with sexual content CANADIAN ENGLISH RATINGS C E L R E Exempt Exempt programming includes news sports documentaries and other information programming talk shows music videos and variety programming C Programming intended for children under age 8 No offensive language nudity or sexual content C8 Programming generally considered acceptable for children 8 years and over No profani...

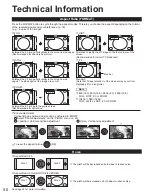
Page 51: ...e image are cut off Standard Note that Image retention of the side bar may occur from displaying it for a long time ZOOM ZOOM Note 480i 4 3 480i 16 9 480p 4 3 480p 16 9 FULL JUST 4 3 or ZOOM 1080p 1080i 720p FULL H FILL JUST 4 3 or ZOOM Enlarges the 4 3 image to the entire screen Recommended for Letter Box Zoom adjustments Vertical image position and size can be adjusted in ZOOM Select Zoom adjust...

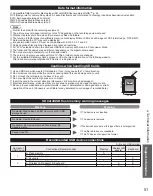
Page 52: ...website http panasonic jp support global cs This site is in English only Cautions when handling SD Cards 2 1 mm 32 mm 24 mm Use an SD Card which meets SD standards If not it may cause the TV to malfunction Do not remove the card while the unit is accessing data this can damage card or unit Do not touch the terminals on the back of the card Do not subject the card to high pressure or impact Insert ...

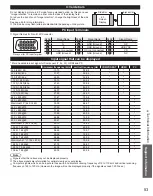
Page 53: ...are reformatted before being displayed on the screen If the connected device has an aspect adjustment function set the aspect ratio to 16 9 These HDMI connectors are type A These HDMI connectors are compatible with HDCP High Bandwidth Digital Content Protection copyright protection A device having no digital output terminal may be connected to the input terminal of either COMPONENT or VIDEO to rec...

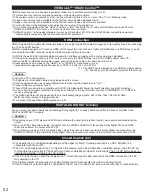
Page 54: ...equency kHz vertical frequency Hz COMPONENT HDMI PC 525 480 60i 15 73 59 94 525 480 60p 31 47 59 94 750 720 60p 45 00 59 94 1 125 1 080 60i 33 75 59 94 1 125 1 080 60p 67 43 59 94 1 125 1 080 60p 67 50 60 00 1 125 1 080 24p 26 97 23 98 1 125 1 080 24p 27 00 24 00 640 400 70 31 47 70 08 640 480 60 31 47 59 94 Macintosh13 640 480 35 00 66 67 640 480 75 37 50 75 00 852 480 60 31 44 59 89 800 600 60 3...

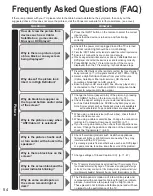
Page 55: ...ge the format aspect ratio of the picture by pressing the FORMAT button on the remote control p 18 Check the aspect settings on your external video source such as Cable Satellite box DVD Blu ray Disc player etc Note Some content such as film based movies are available in extra wide format Top and bottom bars are unavoidable Why is the picture snowy when ANT Cable in is selected When using a cable ...

Page 56: ...a High Definition Cable or Satellite box to the TV Use an HDMI cable It carries both digital video and audio signal in HD HDMI cable is the only cable needed to connect an HD device to the TV Why does the CC button not display Closed Caption When viewing TV via an HDMI connected device such as a Cable or Satellite box CC must be enabled at the device Closed Caption is available only at supported T...

Page 57: ... a soft lint free cloth If the surface is particularly dirty soak a soft lint free cloth in diluted mild liquid dish soap 1 part mild liquid dish soap diluted by 100 times the amount of water and then wring the cloth to remove excess liquid Use this cloth to wipe the surface of the display panel then wipe it evenly with a dry cloth of the same type until the surface is dry Do not scratch or hit th...

Page 58: ...s COMPONENT IN Y 1 0 V p p including synchronization PB PR 0 35 V p p AUDIO L R RCA PIN Type 2 0 5 V rms HDMI 1 2 TYPE A Connector 2 This TV supports HDAVI Control 5 function PC D SUB 15PIN R G B 0 7 V p p 75 Ω HD VD 1 0 5 0 V p p high impedance USB 1 2 USB 2 0 Type A connector x 2 DC5V MAX500mA LAN for IPTV RJ45 10BASE T 100BASE TX Card slot SD CARD slot 1 DIGITAL AUDIO OUT PCM Dolby Digital Fibe...

Page 59: ...trol 28 HDMI 11 52 57 Home Use 13 I Image Viewer Auto 48 Info 17 Input 21 48 L Language 13 48 Last 12 Lock Parental contorol 47 49 M Media player 20 22 27 Menu 44 Movies Video 26 Music 27 Mute 12 N Network camera 33 35 38 41 Network services 15 34 38 48 P Pedestal 7 8 Photo 24 25 Picture Advanced 46 Picture settings 45 Power 12 R Remote Control 12 Reset 48 S Safety 4 SAP 17 Scan 14 42 SD Card 22 5...

Page 60: ...59 Support Information Index ...

Reviews: