23
8.5.
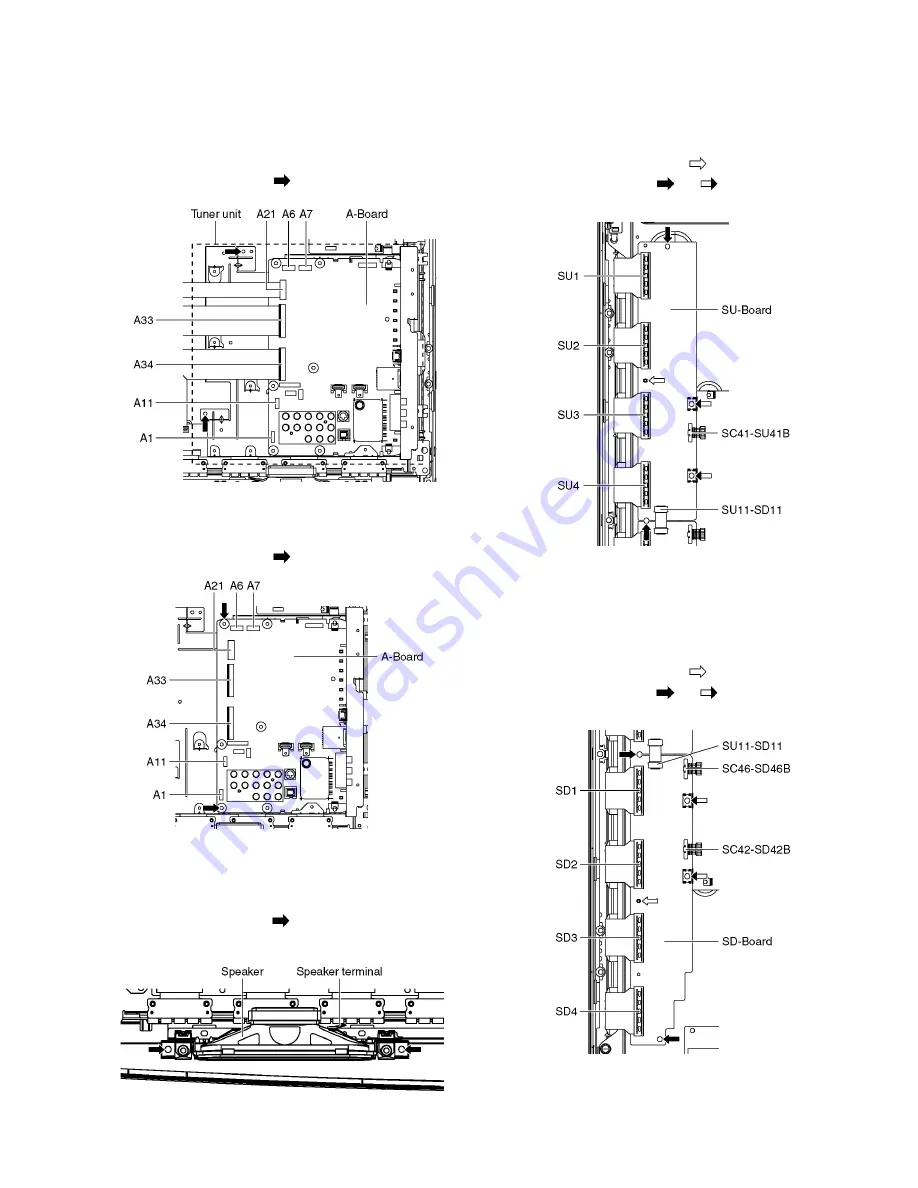
Remove the Tuner unit
1. Remove the Side terminal cover and the Side shield
metal. (See section 8.4.)
2. Unlock the cable clampers to free the cable.
3. Disconnect the connectors (A1, A6, A7 and A11).
4. Disconnect the flexible cables (A21, A33 and A34).
5. Remove the screws (
×
2
) and remove the Tuner unit.
8.6.
Remove the A-Board
1. Remove the Tuner unit. (See section 8.5.)
2. Remove the screws (
×
2
) and remove the A-Board.
8.7.
Remove the Speakers
1. Unlock the cable clampers to free the cable.
2. Disconnect the Speaker terminal.
3. Remove the screws (
×
2
each) and remove the Speak-
ers (L, R).
8.8.
Remove the SU-Board
1. Remove the flexible cables (SU1, SU2, SU3 and SU4)
connected to the SU-Board.
2. Remove the flexible cable (SU11-SD11) and the bridge
connector (SC41-SU41B).
3. Remove the molding prop (
×
1 ).
4. Remove the screws (
×
2 ,
×
2
) and remove the SU-
Board.
8.9.
Remove the SD-Board
1. Remove the flexible cables (SD1, SD2, SD3 and SD4)
connected to the SD-Board.
2. Remove the flexible cable (SU11-SD11) and the bridge
connectors (SC42-SD42B and SC46-SD46B).
3. Remove the molding prop (
×
1 ).
4. Remove the screws (
×
2 ,
×
2
) and remove the SD-
Board.
Summary of Contents for Viera TC-50PX24
Page 28: ...19 6 4 No Picture ...
Page 39: ...30 ...
Page 40: ...31 ...
Page 41: ...32 ...
Page 47: ...38 ...
Page 49: ...40 11 3 Wiring 2 ...
Page 50: ...41 11 4 Wiring 3 ...
Page 51: ...42 ...
Page 52: ...43 12 Schematic Diagram 12 1 Schematic Diagram Note ...
Page 85: ...76 14 1 2 Exploded View 2 ...
Page 86: ...77 14 1 3 Accessories ...
Page 87: ...78 14 1 4 Mechanical Replacement Parts List ...
Page 90: ...81 14 2 Electrical Replacement Parts List 14 2 1 Replacement Parts List Notes ...


