14
Press to exit from
a menu screen
Press to go back to
the previous screen
Note
About broadcasting
systems
Analog
(NTSC):
Conventional
broadcasting
Digital
(ATSC):
New
programming
that allows
you to view
more channels
featuring
high-quality video
and sound
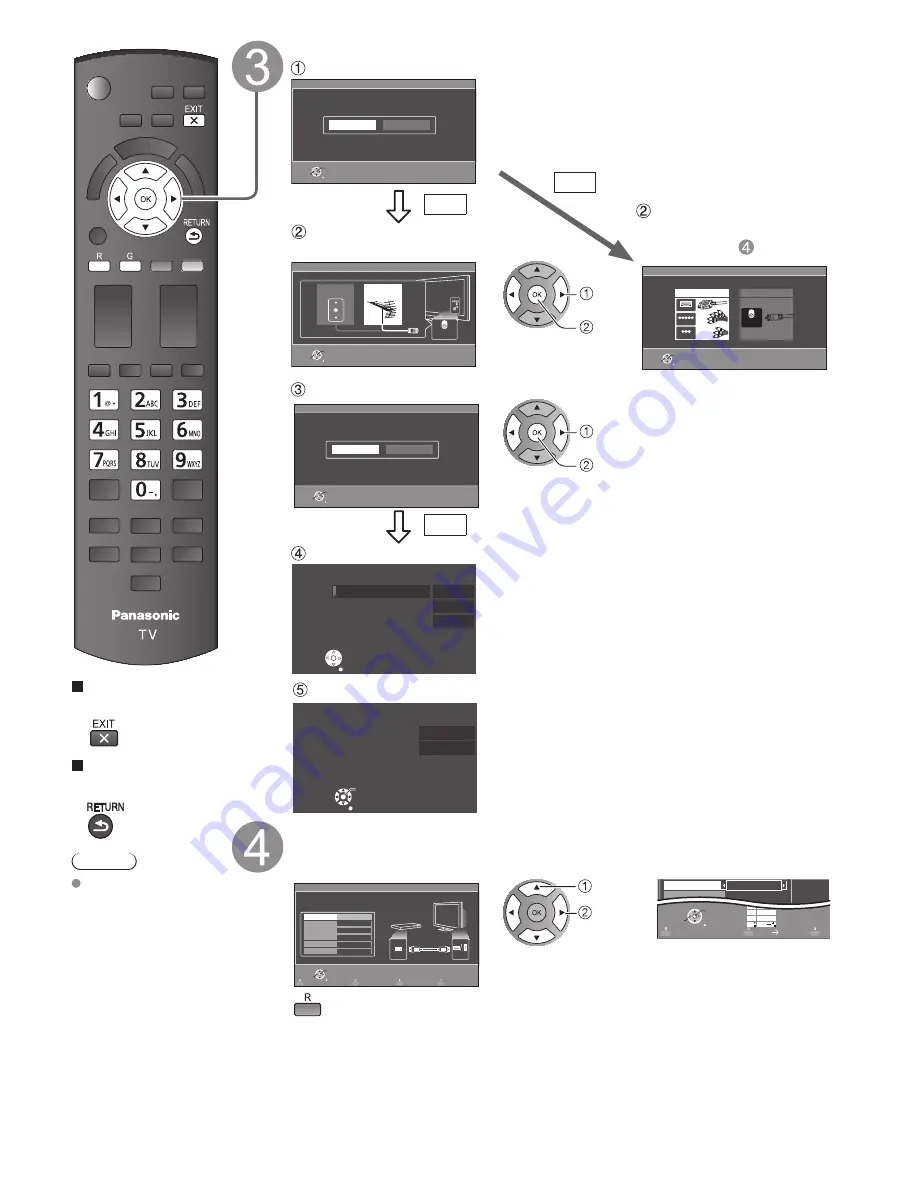
ANT/Cable setup
Do you use a Cable, Satellite or Fiber Optic box with this TV?
a
Select signal type
(Cable/Antenna)
Select scan type
b
Select connection type
for Cable or Satellite box
and go to (Input labels)
ANT/Cable setup
Step 4 of 7
Return
OK
Select
Yes
No
Do you use a Cable, Satellite or Fiber Optic box with this TV?
No
Yes
Yes
ANT/Cable setup
Step 4 of 7
Cable service
(No box)
Over-the-Air Antenna
How does the TV receive its programming content?
Antenna
Cable In
Return
OK
Select
Auto program
Step 4 of 7
Return
OK
Select
Yes
No
Start scanning for available channels in your area?
ANT/Cable setup
Step 4 of 7
Antenna/Cable in
AV IN
Antenna
Cable In
Which wiring method is used to connect your box to the TV?
HDMI
Component
Composite
Return
OK
Select
select
OK
select
OK
Start scanning
Complete scanning
Auto program
Auto program completed.
Press OK to continue.
Number of analog channels
Number of digital channels
10
0
OK
RETURN
Auto program
Progress
Number of analog channels
Number of digital channels
Press RETURN to quit
This may take some time to complete.
1%
0
RETURN
Label the inputs for easy identification (Label inputs)
To name each input, follow the instructions on screen.
When done, select NEXT and press OK to go to the next step.
Label inputs
Step 5 of 7
What is connected to HDMI 1 ?
For your convenience, you may name each input for easy identification.
The labels will be shown in the “Input select” menu.
HDMI
Video
Next
HDMI 1
HDMI 2
HDMI 3
Component
Customize label
Return
OK
Select
RETURN
OK
Select
1
@.
4
GHI
7
PQRS
2
ABC
5
JKL
8
TUV
3
DEF
6
MNO
9
WXYZ
0 - ,
LAST
ABC
abc
GAME
Video
Next
GAME
select
set
or
Follow the instructions on
screen to complete the
following operations.
--> To edit the labels to match your connected devices.
Label: [BLANK] Blu-ray/CABLE/SATELLITE/DVD/DVD REC/DVR/GAME/HOME
THTR/RECEIVER/COMPUTER/MEDIA CTR/MEDIA EXT/VCR/CAMERA/
MONITOR/AUX/OTHER/Not used
• Select “Not used” for any back-panel input that has no device connected to it.
Afterward, the input will be skipped when pressing INPUT, for your convenience.
• The input labels can be changed at any time from the TV’s setup menu
tc̲p42̲46̲50̲S30̲eng̲0604.indb 14
tc̲p42̲46̲50̲S30̲eng̲0604.indb 14
2011/01/19 15:27:07
2011/01/19 15:27:07
Summary of Contents for VIERA TC-P42S30
Page 62: ...Note ...
Page 63: ...Note ...
Page 64: ...Note ...
Page 65: ...Note ...
Page 125: ...59 Información de soporte Índice Nota ...
Page 126: ...Nota ...
Page 127: ...Nota ...
Page 128: ...Nota ...
Page 129: ...Nota ...
Page 130: ...Nota ...
Page 190: ...Nota ...
Page 191: ...Nota ...
Page 192: ...Nota ...
Page 193: ...Nota ...
Page 194: ...Nota ...
Page 195: ...Nota ...


