23
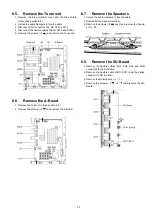
8.5.
Remove the Tuner unit
1. Remove the Side terminal cover and the Side shield
metal. (See section 8.4.)
2. Unlock the cable clampers to free the cable.
3. Disconnect the connectors (A1, A6, A7 and A11).
4. Disconnect the flexible cables (A20A, A31A and A32A).
5. Remove the screws (
×
2
) and remove the Tuner unit.
8.6.
Remove the A-Board
1. Remove the Tuner unit. (See section 8.5.)
2. Remove the screws (
×
2
) and remove the A-Board.
8.7.
Remove the Speakers
1. Unlock the cable clampers to free the cable.
2. Disconnect the Speaker terminal.
3. Remove the screws (
×
2
each) and remove the Speak-
ers (L, R).
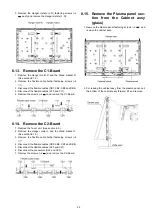
8.8.
Remove the SU-Board
1. Remove the flexible cables (SU1, SU2, SU3 and SU4)
connected to the SU-Board.
2. Remove the flexible cable (SU11-SD11) and the bridge
connector (SC41-SU41B).
3. Remove the molding prop (
×
1 ).
4. Remove the screws (
×
2 ,
×
2
) and remove the SU-
Board.
Summary of Contents for Viera TC-P50X20P
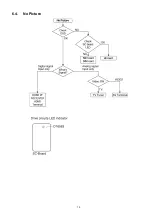
Page 19: ...19 6 4 No Picture ...
Page 36: ...36 ...
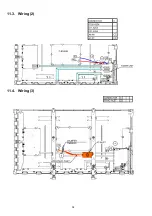
Page 38: ...38 11 3 Wiring 2 11 4 Wiring 3 ...
Page 39: ...39 11 5 Wiring 4 ...
Page 40: ...40 ...
Page 41: ...41 12 Schematic Diagram 12 1 Schematic Diagram Note ...
Page 78: ...78 ...
Page 80: ...80 14 1 2 Exploded View 2 ...
Page 81: ...81 14 1 3 Packing 1 ...
Page 82: ...82 14 1 4 Packing 2 ...
Page 83: ...83 14 1 5 Mechanical Replacement Parts List ...
Page 86: ...86 14 2 Electrical Replacement Parts List 14 2 1 Replacement Parts List Notes ...


