background image

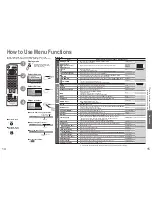
Advanced

M a i n   m e n u

P i c t u r e   m e n u

S o u n d   m e n u

S e t u p   m e n u

Q-Link

Control with HDMI

Off timer

Tuning menu
OSD language

Setup menu

AV2

On

AV2 out

TV

Off

Text language

West

Side panel

Off

Power save

Off

Access

Teletext

TOP

Programme edit
Auto setup
Manual tuning
Fine tuning
Colour system
Volume correc.
Decoder (AV2)

Tuning menu

Auto

Access

Off

TV

EXIT

MENU

OK

Programme edit

Prog.

Chan.

Name

Lock

Sys

1

    :

2    :

3

    :

4    :
5    :

CH44

CH51

CH41

CH47
CH37

Off

Off

Off

Off
Off

SC1

SC1

SC1

SC1
SC1

ABC

XYZ

FTP

123
456

3  FTP

MENU

OK

16

17

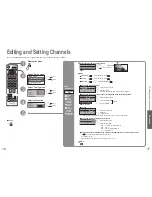
Editing and Setting Channels

Select "Setup menu"

Select "Tuning menu"

3

1

2

Select the function

4

Display the menu

5

Set

Edit 

channels


Delete


Add


Move


Change

channel

number


Change

name


Lock


Change

sound

system


Download to

equipment

Programme

edit

The current channel settings can be changed according to your needs and reception conditions.


To exit


EXIT

select

ABCDEFGHIJKLMNOPQRST
-.   0123456789

Programme edit

Prog.

Chan.

Name

Lock

Sys

1    :
2    :
3    :
4    :
5    :

CH44
CH51
CH41
CH47
CH37

Off
Off
Off
Off
Off

SC1
SC1
SC1
SC1
SC1

 
XYZ
FTP
123
456

Cursor


To change the name of the broadcaster displayed when selecting channels

Usable characters

Select the "Name" 

fi

 eld

Select the character

To next character

Repeat

 Select the programme number to edit

Programme

number

Name

 Edit

Programme edit

Prog.

Chan.

Name

Lock

Sys

1    :
2    :
3    :
4    :
5    :

CH44
CH51
CH41
CH47
CH37

ABC
XYZ
FTP
123
456

Off
Off
Off
Off
Off

SC1
SC1
SC1
SC1
SC1


To lock

Select the "Lock" 

fi

 eld

Select "On"

("Off" to unlock)

• 

You cannot select the channel with number buttons or the "C" button when locked.

 Store

Editing and Setting Channels

 next

 select

 next

 select

 next

 select

Programme edit

Prog.

Chan.

Name

Lock

Sys

1    :
2    :
3    :
4    :
5    :

CH44
CH51
CH41
CH47
CH37

ABC
XYZ
FTP
123
456

Off
Off
Off
Off
Off

SC1
SC1
SC1
SC1
SC1


To change channel number

Select the "Chan." 

fi

 eld

Change number

(Can also be changed with "C" and number buttons)


To download channel information to a Q-Link compatible equipment connected to the unit


blue

   Automatically transmitted (for a few sec.)

For details (p. 20)

Not available if "Q-Link" is "Off" in the Setup menu. (p. 14)


To delete   

red


After con

fi

 rming, press


red


To add 


green


After con

fi

 rming, press 

green


To move 


yellow


Select destination   

yellow

Programme edit

Prog.

Chan.

Name

Lock

Sys

1    :
2    :
3    :
4    :
5    :

CH44
CH51
CH41
CH47
CH37

ABC
XYZ
FTP
123
456

Off
Off
Off
Off
Off

SC1
SC1
SC1
SC1
SC1


To change sound system based on signals

Select the "Sys" 

fi

 eld

Select sound system

SC1 :   PAL B, G, H / SECAM B, G
SC2 :   PAL I
SC3 :   PAL D, K / SECAM D, K
F :  

SECAM L / L’

Summary of Contents for Viera TH-50PV60E

Page 1: ...ent which could otherwise arise from inappropriate waste handling Please contact your local authority for further details of your nearest designated collection point Penalties may be applicable for incorrect disposal of this waste in accordance with national legislation For business users in the European Union If you wish to discard electrical and electronic equipment please contact your dealer or...

Page 2: ... Warning Caution Notes 5 Maintenance 5 Be Sure to Read Advanced Features How to Use Menu Functions 14 picture sound quality etc Editing and Setting Channels 16 Displaying PC Screen on TV 19 External Equipment 20 Q Link Control with HDMI Connections Basic Features Watching TV 10 Watching Videos and DVDs 11 Viewing Teletext 12 Enjoy your TV Technical Information 26 FAQs 29 Licence 31 Specifications ...

Page 3: ... not move the TV with the lead plugged in the socket outlet Do not place a heavy object on the lead or place the lead near a high temperature object Do not twist the lead bend it excessively or stretch it Do not pull on the lead Hold onto the mains plug body when disconnecting lead Do not use a damaged mains plug or socket outlet Electronic equipment In particular do not place video equipment near...

Page 4: ... signal receiver Switches TV AV Sound mute On Off Volume Contrast Brightness Colour Sharpness Tint NTSC mode Bass Treble Balance Tuning mode p 18 Changes aspect ratio p 10 Normalizes p 14 Resets settings Selects programmes in sequence Direct channel access During normal TV viewing or when in the Tuning Programme edit or Manual tuning menus press and then enter channel number using the numeric butt...

Page 5: ...ng Q Link p 20 Watching TV To record TV programmes Auto Setup is now complete and your TV is ready for viewing You can now use the remote control to turn On the unit or turn the unit to standby mode Power lamp On 2 Connect after all the other connections External equipments and cables shown in this manual are not supplied with this TV Please ensure that the unit is disconnected from the mains befo...

Page 6: ...wing procedure to view the input To connect the equipment p 24 Select the connector connected to the equipment AV1 AV2 S video AV3 S video AV4 S video Component PC VCR DVD VCR DVD switch Select VCR DVD Standby Set to Standby mode Turn on Play Playback VCR DVD Stop Stop the operations Rewind Skip Search VCR Rewind review during playback DVD Skip to the previous track or title Press and hold to sear...

Page 7: ...red and stored in the TV s memory Store Frequently viewed pages p 13 To change mode Teletext in Setup menu p 14 To adjust contrast MENU As the blue bar is displayed FULL TOP BOTTOM Reveal hidden data MENU red Re hide red Reveal hidden words e g quiz page answers Using teletext conveniently MENU green TOP BOTTOM Normal FULL Expand the BOTTOM half INDEX TOP FLOF mode only Return to the main index pa...

Page 8: ... and left speakers Balance Headphone volume Adjusts the volume of the headphones Headphone volume MPX Select stereo monaural Mono Stereo Normally Stereo Stereo signal cannot be received Mono M1 M2 Available while mono signal is transmitted MPX Stereo Mode Improves sound quality for music and dramas Music Speech Mode Music Ambience Gives a greater spatial effect by using dynamic enhancer Off On Amb...

Page 9: ...cters Select the Name field Select the character To next character Repeat Select the programme number to edit Programme number Name Edit Programme edit Prog Chan Name Lock Sys 1 2 3 4 5 CH44 CH51 CH41 CH47 CH37 ABC XYZ FTP 123 456 Off Off Off Off Off SC1 SC1 SC1 SC1 SC1 To lock Select the Lock field Select On Off to unlock You cannot select the channel with number buttons or the C button when lock...

Page 10: ...PC if available Volume correction Side panel Power save OSD language p 14 Sound menu p 14 Displaying PC Screen on TV Editing and Setting Channels Set automatically Auto setup Set manually Manual tuning Manual tuning 02 78 01 41 CH12 1 Exit Search down up Return Direct entry Store C 0 9 OK Select the programme number and search through the channel Store search Programme number Channel Repeat and No...

Page 11: ...onic DVD Recorder DIGA Panasonic Player theatre Panasonic Amplifier etc allow you to enjoy the easy playback or home theatre About connections see Connections p 23 Read the manuals of the equipment too Non HDMI compliant cables cannot be utilized About applicable equipments consult your local Panasonic dealer next select select Easy playback Automatic Input switching When the connected Panasonic e...

Page 12: ...nect DVD player Playback Connect Set top box RGB input Connect VCR DVD recorder and Set top box example Connect DVD recorder and VCR example Easy playback For connection to HDMI2 terminal refer to p 24 Rear of the TV Rear of the TV Front of the TV Rear of the TV Front of the TV Rear of the TV Rear of the TV Rear of the TV This TV Panasonic Player theatre Panasonic DVD recorder DIGA Panasonic Ampli...

Page 13: ...recorder To watch DVDs DVD player To watch camcorder images Video camera To watch satellite broadcasts Set top box To play games Game equipment Q Link Control with HDMI Recommended Connection SCART cable PC Viewing Listening Q Link Control with HDMI p 21 To watch satellite broadcasts To record playback To watch DVDs Types of connectable equipment to each connector DVD player External Equipment Con...

Page 14: ... 31 to 69 kHz vertical scanning frequency 59 to 86 Hz more than 1 024 signal lines could result in incorrect display of the image A PC adapter is not necessary for the DOS V compliant D sub 15 pin connector Note Some PC models cannot be connected to this TV unit For details of the applicable PC signals see p 28 Max display resolution D sub 15 pin connector signal 1 6 7 8 3 9 4 5 10 15 14 13 12 11 ...

Page 15: ...hen radio menu etc lasts for several minutes after image p 5 Only one part remains dark A pixel or luminescent spot may occasionally be missing in plasma displays Not a faulty symptom Pictures from an equipment are unusual when the equipment is connected via HDMI Is the HDMI cable connected properly p 24 Turn Off the TV unit and equipment then turn them On again Check an input signal from the equi...

Page 16: ... Audio Video out RGB in AV2 Scart terminal 21 Pin terminal Audio Video in Audio Video out S Video in Q Link AV3 Scart terminal 21 Pin terminal Audio Video in Audio Video out RGB in S Video in Q Link AV4 VIDEO RCA PIN Type 1 1 0 V p p 75 Ω S VIDEO Mini DIN 4 pin Y 1 0 V p p 75 Ω C 0 286 V p p 75 Ω AUDIO L R RCA PIN Type 2 0 5 V rms Others COMPONENT Y 1 0 V p p including synchronization PB PR 0 35 V...

Reviews: