background image

10

11

Quick Start Guide

 First 

T

ime 

Setup

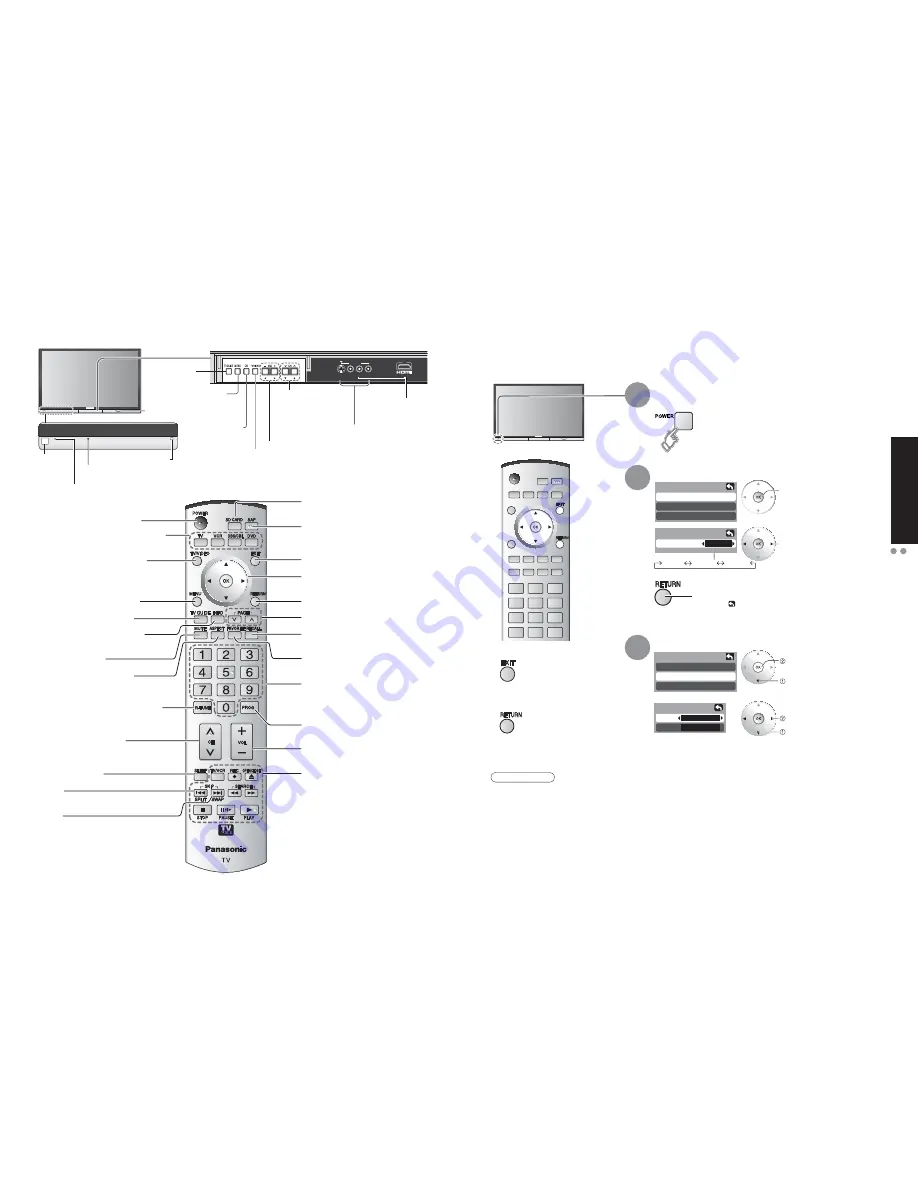
 Identifying 

Controls

First time setup

Language

Clock

Auto program 

Language

Language

English

First time setup

Language

Clock

Auto program 

Clock

Date

Time

4 / 1 / 2006

9 : 43 AM

-

-

S VIDEO VIDEO

INPUT3

L-AUDIO-R HDMI3 AUDIO IN

AV IN

3

First Time Setup

“First time setup” is displayed only when the TV is turned on for the first time after the AC cord is inserted 
into a wall outlet. Available only when “Auto power on” (p. 30) is set to “Off”.

Turn the TV On with the 
POWER button

1

Select your language

2

Adjust the clock

3

Date: 

Adjust the date


(Press and hold to change the month.)

Time:  Adjust the time 

(If the button is held, the speed of change increases.)

Press to go to previous screen.
Or, select   icon, then press OK for same results.

Ŷ

Press to exit

Note

To change setting 
(Language/Clock/Auto
program) later, go to 
Menu screen 
(p. 30)

Ŷ

Press to return to 
previous screen 

(Continue to next page.)

English  

Español  

Français

next

select

 next

 select  “Clock”

 set

 select  item

Identifying Controls

Switches TV to On or Standby

Sets the remote to communicate with 
other equipment (p. 43)

Changes the input mode (p. 26)

Display Main Menu (p. 28, 30)

Press to enter the TV Guide

Press to display an information 
screen on TV Guide

Sound mute On/Off

Changes aspect ratio (p. 16)

Switch to previously viewed channel 
and input modes.

Channel up/down buttons

Sleep Timer (p. 16)

SPLIT

Split Screen (p. 16)

SWAP

Swap pictures in SPLIT operation (p. 16)

Viewing from SD Card (p. 24)

SAP (p. 17)

Exit menus

Select/OK/Change

RETURN (to previous menu)

Page scroll on TV Guide

Display or remove the channel 
banner (p. 16)

Operate the Favorite channel list 
function. (p. 17)

Numeric keypad to select any 
channel (p. 15) or press to enter 
alphanumeric input in menus.
(p. 26, 27, 36, 38, 43)

Direct channel access for DTV and 
DBS (p. 15)

Volume

External equipment operations
(p. 26, 46) (VCRs, DVDs, etc.)

Changes the input mode.

POWER
button

Remote control sensor

Video Input 3
connector

Power indicator 

(on: red, off: no light)

C.A.T.S. sensor 
Plasma C.A.T.S. (Contrast Automatic Tracking System). 

(p. 28)

Display the Main menu.

Choose menu and
submenu entry.

Display the TV
Guide.

SD CARD slot

HDMI input 3 
connector

Adjust the volume level.
(Move cursor to right or left during menu mode.)

Change the TV 
Channel.
(Move cursor to 
up or down during 
menu mode.)

Summary of Contents for Viera TH-65PX600

Page 1: ...ienen solamente fines ilustrativos TQB2AA0731 For assistance please call 1 888 VIEW PTV 843 9788 or contact us at www panasonic com contactinfo U S A For assistance please call 787 750 4300 or visit us at www panasonic com Puerto Rico For assistance please call 1 800 561 5505 or visit us at www panasonic ca Canada Español English Para solicitar ayuda llame al 1 888 VIEW PTV 843 9788 ó visítenos en...

Page 2: ... factors may make it impossible for TV GUIDE to be used Panasonic shall in no way be liable for any damages or losses related to the use of TV GUIDE R Manufactured under license from Dolby Laboratories Dolby and the double D symbol are trademarks of Dolby Laboratories HDMI the HDMI logo and High Definition Multimedia Interface are trademarks or registered trademarks of HDMI Licensing LLC Manufactu...

Page 3: ...not place the unit where it s exposed to sunlight or other bright light including reflections Use of some types of fluorescent lighting may reduce the remote control s transmission range ŶSetup Notes Responsible Party Panasonic Corporation of North America One Panasonic Way Secaucus NJ 07094 Contact Source Panasonic Consumer Electronics Company 1 888 VIEW PTV 843 9788 email consumerproducts panaso...

Page 4: ... tipping over Handle the TV carefully during installation since subjecting it to impact or other forces may cause its paneling to crack Pedestal TY ST65PV500 Speakers TY SP65PV600 ƑProduct Registration Card U S A ƑOperating Instructions ƑCustomer Care Plan Card U S A Connection If the external device has DVI output only use a DVI to HDMI adapter cable to connect to the HDMI terminal Connect the au...

Page 5: ...x the AC cord in Cable clamper How to fix Fix by pushing in until a clicking sound is heard Example of connection cable routing Cable clamper Snap open Do not bundle the RF cable and AC cord together could cause distorted image Fix cables with Cable clampers as necessary When using the optional accessory follow the option s assembly manual to fix cables Remove from the TV unit Push both side hooks...

Page 6: ... the remote to communicate with other equipment p 43 Changes the input mode p 26 Display Main Menu p 28 30 Press to enter the TV Guide Press to display an information screen on TV Guide Sound mute On Off Changes aspect ratio p 16 Switch to previously viewed channel and input modes Channel up down buttons Sleep Timer p 16 SPLIT Split Screen p 16 SWAP Swap pictures in SPLIT operation p 16 Viewing fr...

Page 7: ...r your area a Select your country Which country is yourTV located in Canada Next USA b Enter a ZIP Code or Postal Code To return to left column press Ż button Please enter the 5 digit ZIP Code where yourTV is located Next Back Select the connected video source s for which you would like to receive show listings Please select which service s you would like yourTV Guide On ScreenTM to support check ...

Page 8: ...OFF you should begin to get listings PressTV GUIDE on your remote If listings are not yet available you ll see aTV Guide Setup Progress Screen If listings sre available you ll see a listings grid Note It may take up to 6 days to get the full 8days of listings To make sure you get the latest daily listings updates remember TV OFF And don t forget to update yourTV Guide On Screen Setup if you move t...

Page 9: ...on with the cursor or using number keys see below Switches the unit OFF in a preset amount of time from 0 to 90 minutes in 30 minute intervals Display or remove the channel banner ŶSelect Audio Mode for TV Viewing Digital mode Press SAP to select the next audio track if available when receiving a digital channel Audio track 1 of 1 English Analog mode Press SAP to select the desired audio mode Pres...

Page 10: ...annel lineup p 19 LISTINGS Select LISTINGS in p 18 LISTINGS Select LISTINGS in p 18 Lock Unlock icon Indicates status of the Video Windows 2 Select the menu item from the Service Bar SCHEDULE LISTINGS SEARCH SETUP or on the front panel Listings is always the first Service displayed in the Guide Use to move the highlight within Listings to View show listings for today plus 7 days 8 days total Read ...

Page 11: ... shows for recording Select the upcoming show and press MENU Select set recording on the panel menu Select an item and follow the on screen instructions for further settings Select SETUP in p 18 SETUP Change settings Change system settings Changes your system settings selects an alternate channel lineup Change channel display Modifies your channel settings Change default options Changes your Guide...

Page 12: ...lect Select HISTORY record results ok select Caution A conflict message appears when a show you schedule to Record overlaps with any part of another show previously set to record Record overlaps with a reminder previously set to auto tune Remind and auto tune overlaps another auto tune reminder Remind and auto tune overlaps with a scheduled recording From TO DO press MENU The Schedule Options menu...

Page 13: ...played in single play mode Navigation Area ŶPress to return to TV ŶPress to exit ŶPress to return to the previous screen Total number of images Note Depending on the JPEG type Info contents may not be displayed correctly ŶTo adjust picture Adjust SD Card In select set Start single play mode select ok Picture menu p 28 Remove the card Press in lightly on SD Card then release Label surface Push unti...

Page 14: ... return to TV Displaying PC Screen on TV The screen of the PC connected to the unit can be displayed on the TV You can also listen to PC sound with the audio cable connected To connect PC p 44 Displays PC screen Select the external input 1 2 Select PC ŶPC menu setting changed as desired Making settings How to Use Menu Functions to p 28 Corresponding signals p 26 Menu Item Adjustments Configuration...

Page 15: ...m for HD size Scanning 100 HD Size size1 Audio Normal Reset Bass Treble and Balance adjustments to factory default settings Set Normal Bass Increase or decrease the bass response 7 Bass Treble Increase or decrease the treble response 7 Treble Balance Emphasize the left right speaker volume 0 Balance Other adjust AI sound Equalize overall volume levels across all channels and external inputs On Off...

Page 16: ...played for about 10 seconds when power on for the second time after turning the power off by No signal shut off 3 2 1 flashes per minute in rotation before 3 minutes from the power off Set No signal shut off No action shut off For saving energy TV automatically turns off when no operation of remote or front panel key is continued more than 3 hours No Set Note Not in use when setting Auto power on ...

Page 17: ...els with Control with HDMI Display menu Select Home theater or TV speakers ŶHome theater Adjustment for Panasonic Amplifier Panasonic Player theater Panasonic RAM theater When selecting Home theater the sound of TV speakers is muted When Home theater is selected the home theater volume control can be raised or lowered using the TV remote volume button The TV will display Home Theater on screen If ...

Page 18: ... correctly recognize the connected equipment and check that DIGA RAM theater and Player theater playback operates Back of the unit HDMI cable ŶSetting of this unit after connection After making connections as shown above set Ctrl with HDMI under Other adjust to On using the Setup menu p 32 Note HDMI AV OUT HDMI AV IN HDMI AV OUT DIGA Panasonic DVD Recorder Panasonic AV amp ŶConnecting this unit to...

Page 19: ...ch as EAS messages weather warnings and others Locally originated programming News Political Public Service Announcements Religious Sports Weather Select up to 7 1 7 channels to be blocked out These channels will be blocked out regardless of the program rating Select CH in on p 36 Select Channel ŶTo select the channel or the rating of the program to be locked next select Channel Lock Select Lock 2...

Page 20: ...t next Caption Favorite Add Caption Preset Caption detail Rename maximum 7 characters available Select the number Favorite Favorite Add Press OK to select Yes add or No delete Select Apply Press to move cursor to Apply Signal intensity select channel ok Editing and Setting Channels Select Setup 2 Display menu 1 3 4 ŶPress to exit The current channel settings can be changed according to your needs ...

Page 21: ...providing a text display of the audio The program being viewed must be transmitting Closed Captioning CC information p 50 ŶSelect the item and set Size Text size Font Text font Style Text style Raised Depressed etc Foreground Color of text Fore opacity Opacity of text Background Color of text box Back opacity Opacity of text box Outline Outline color of text Identify the setting options on the scr...

Page 22: ...f time settings p 11 0 30 60 90 minutes ŶTo set Timer 1 5 On Off Timer Select the item and set Operating Peripheral Equipment You can operate other manufacturers components using this TV s remote control 4 1 2 Press both buttons simultaneously for more than 3 seconds Release the buttons when the equipment selection buttons start flashing 3 5 Caution Registration will fail if the wrong code is inpu...

Page 23: ...erminal or AC Cord Connect after all the other connections Back of the unit Digital audio amplifier Theater system IR Blaster Supplied VCR Only VCR G LINK CableCARD Insert a card to watch cable channels serving digital high definition video Consult the cable company for information IR Blaster p 54 You can operate the VCR from the TV remote control or reserve recording with TV Guide Install the lig...

Page 24: ...r 1972 Daewoo 0045 1278 Dell 1972 Denon 0042 DirecTV 0739 Durabrand 0039 Dynatech 0000 Electrohome 0037 0043 Electrophonic 0037 Emerex 0032 Emerson 0000 0037 0043 1278 1479 Fuji 0033 0035 Funai 0000 Garrard 0000 Gateway 1972 GE 0035 0060 0807 1035 1060 GoldStar 0037 1237 Gradiente 0000 Harley Davidson 0000 Hewlett Packard 1972 Hitachi 0000 0042 0089 Howard Computers 1972 HP 1972 Hughes Network Sys...

Page 25: ...nt scenes or one or more sufficiently violent scenes to affect them Adult supervision strongly suggested 16 ans Programming may not be suitable for children under the age of 16 Contains frequent scenes of violence or intense violence 18 ans Programming restricted to adults Contains constant violence or scenes of extreme violence ABS 1972 Alienware 1972 CyberPower 1972 Dell 1972 DirecTV 0739 Gatewa...

Page 26: ...site is in English only Photo Still images recorded with digital still cameras compatible with JPEG files of DCF and EXIF standards Data format Baseline JPEG 160X120 2 560X1 920 pixels Sub sampling 4 4 4 4 4 2 or 4 2 0 Max number of files 9 999 Image resolution 8 x 8 to 5 120 x 3 840 DCF Design rule for camera file system A Japan Electronics and Information Technology Industries Association s stan...

Page 27: ...e Vivid default Provides enhanced picture contrast and sharpness for viewing in a well lit room Standard Recommended for normal viewing conditions with subdued room lighting Cinema For watching movies in a darkened room It provides a soft film like picture TV Guide Reminder Screen If you skip TV Guide On Screen Setup you see the TV Guide On Screen Reminder screen the next time you power On your TV...

Page 28: ...ge the surface coating If using a chemically treated cloth follow the instructions supplied with the cloth Do not attach sticky tape or labels as they can make the surface of the pedestal dirty Do not allow long term contact with rubber vinyl products or the like Doing so will cause deterioration PC Input Terminals Connection Pin No Signal Name Pin No Signal Name Pin No Signal Name R 6 GND Ground ...

Page 29: ... Panasonic Service center for assistance For details p 61 62 No sound is produced Whirling sound is heard Sound is unusual Are the speakers cables connected correctly Is Sound Mute active p 10 Is the volume set to the minimum Is Speakers set to Off p 28 Change SAP settings p 17 Check HDMI1 in HDMI2 in or HDMI3 in settings p 28 Set SAP setting to Stereo or Mono Check the HDMI device connected to th...

Page 30: ...er blackout The list will be downloaded within 24 hours Channel display is not correct Set to the correct channel in Change Channel Display p 20 Unable to execute the reserved recording Is VCR turned Off Is the videocassette inserted Check Schedule if the show is set in the list p 22 Check the position of IR Blaster p 44 Unable to receive the reserved broadcast Check Schedule if the show is set in...

Page 31: ...RE ARE NO EXPRESS WARRANTIES EXCEPT AS LISTED UNDER LIMITED WARRANTY COVERAGE THE WARRANTOR IS NOT LIABLE FOR INCIDENTAL OR CONSEQUENTIAL DAMAGES RESULTING FROM THE USE OF THIS PRODUCT OR ARISING OUT OF ANY BREACH OF THIS LIMITED WARRANTY As examples this excludes damages for lost time cost of having someone remove or re install an installed unit if applicable or travel to and from the servicer Th...

Page 32: ... OR CONSEQUENTIAL DAMAGES In certain instances some jurisdictions do not allow the exclusion or limitation of incidental or consequential damages or the exclusion of implied warranties so the above limitations and exclusions may not be applicable In home service requires clear complete and easy access to the product by the Authorized Servicentre and does not include removal or re installation of a...

Page 33: ...64 65 Note Note ...

Page 34: ...s New Jersey 07094 U S A Panasonic Puerto Rico Inc PSC Ave 65 de Infanteria Km 9 5 San Gabriel Industrial Park Carolina Puerto Rico 00985 Panasonic Canada Inc 5770 Ambler Drive Mississauga Ontario L4W 2T3 CANADA Customer s Record The model number and serial number of this product can be found on its back cover You should note this serial number in the space provided below and retain this book plus...

Page 35: ...es similares pueden hacer imposible la utilización de la guía de TV Panasonic no se hará responsable de ninguna forma por cualquier daño o pérdida relacionado con el uso de la guía de TV R Fabricado bajo licencia de Dolby Laboratories Dolby y el símbolo de la doble D son marcas comerciales de Dolby Laboratories HDMI el símbolo HDMI y la Interface de Multimedios de Alta Definición son marcas comerc...

Page 36: ...ncionamiento y no está cubierto por la garantía Imágenes fijas típicas Para impedir la imagen remanente el salvapantallas se activa automáticamente después de pasar unos pocos minutos si no se envían señales ó no se realizan operaciones pág 57 ŶNo muestre una imagen fija durante mucho tiempo No ponga la unidad donde quede expuesta a la luz solar directa ó a luces brillantes incluyendo reflejos La ...

Page 37: ... las conexiones como se muestra arriba ponga Ctrl con HDMI bajo Otros ajustes en Sí utilizando el menú Ajuste pág 32 Instalación de las pilas del mando a distancia 1 Abrir Gancho 2 Ponga las polaridades ó en las posiciones correctas Cierre Precaución La instalación mal hecha puede causar fugas de electrolito y corrosión lo que podría dañar el mando a distancia No mezcle pilas viejas y nuevas No me...

Page 38: ...lavija de alimentación al zócalo del cuerpo principal Fije el cable de CA en la abrazadera Cómo de fijarlo Fíjelo empujándolo hasta que se escuche un sonido de chasquido Ejemplo de instalación de los cables de conexión Abrazadera Abrir No ate juntos el cable de RF y el cable de alimentación porque la imagen podría distorsionarse Fije los cables con abrazaderas según sea necesario Cuando utilice el...

Page 39: ...mbia la señal de entrada pág 26 Visualiza el menú principal pág 28 30 Pulse para entrar en Guía de TV Pulse para visualizar una pantalla de información en la Guía de TV Encendido Apagado del silenciamiento del sonido Cambia la relación de aspecto pág 16 Cambia al canal visto previamente Selecciona canales en orden Cronómetro de apagado pág 16 SPLIT Pantalla dividida pág 16 SWAP Cambia imágenes en ...

Page 40: ... de TV para su área a Seleccione su país Which country is yourTV located in Canada Next USA b Introduzca un número de distrito postal o un código postal Pulse el botón Ż para volver a la columna izquierda Please enter the 5 digit ZIP Code where yourTV is located Next Back Seleccione la fuente o fuentes de vídeo conectadas para las que usted quiere recibir listas de programas Please select which se...

Page 41: ...de On Screen setup Within 24 hours after yourTV is powered OFF you should begin to get listings PressTV GUIDE on your remote If listings are not yet available you ll see aTV Guide Setup Progress Screen If listings sre available you ll see a listings grid Note It may take up to 6 days to get the full 8days of listings To make sure you get the latest daily listings updates remember TV OFF And don t ...

Page 42: ...tra a continuación Estéreo SPA Mono Escucha con SAP Programa de audio secundario Llamada a un canal favorito Configuración de la función de favoritos Utilización de la función de favoritos Seleccione Aceptar 1 Pulse FAVORITE Pulse repetidamente FAVORITE para cambiar entre las páginas 1 3 2 3 3 3 ó salir Al pulsar Ż Ź también cambia la página 2 Pulse Ÿź ó una tecla numerada 1 9 y 0 para resaltar un...

Page 43: ... Icono HD ó Se lista los programas de grupo de canales pàg 19 LISTINGS LISTADOS Seleccione LISTINGS en pág 18 LISTINGS LISTADOS Seleccione LISTINGS en pág 18 Icono de bloqueo desbloqueo Indica el estado de las ventanas de vídeo 2 Seleccione el elemento del menú desde la Barra de Servicio SCHEDULE LISTINGS SEARCH SETUP ó desde el panel delantero Las listas son siempre el primer servicio visualizado...

Page 44: ...menú del panel Seleccione un elemento y siga las instrucciones de la pantalla para seguir configurando Seleccione SETUP en pág 18 SETUP CONFIGURACIÓN Cambio de configuración Change system settings Cambiar configuraciones del sistema Cambia la configuración de su sistema y selecciona un grupo de canales alternativo Change channel display Cambiar visualización de canales Modifica su configuración de...

Page 45: ...se superpone con alguna parte de otro programa programado previamente para ser grabado Cuando un programa que usted ha programado para grabar se superpone con un recordatorio programado previamente para ser sintonizado automáticamente Cuando un recordatorio y sintonización automática se superponen con otro recordatorio de sintonización automática Cuando un recordatorio y sintonización automática s...

Page 46: ...onados con las tarjetas SD pág 51 y 58 Visualizado en el modo de reproducción sencilla Área de navegación ŶPara volver al televisor ŶPara salir ŶPara volver a la pantalla anterior Número total de imágenes Nota Dependiendo del tipo JPEG puede que el contenido de la Información no se visualice correctamente ŶPara ajustar la imagen Ajuste Tarjeta SD En Seleccione Establecer Inicie el diaporama Selecc...

Page 47: ...lver al televisor Visualización de la pantalla del PC en el televisor La pantalla del PC conectado a la unidad se podrá visualizar en el televisor También podrá escuchar el sonido del PC con el cable de audio conectado Para conectar el PC pág 44 Visualiza la pantalla del PC Seleccione la entrada externa 1 2 Seleccione PC ŶConfiguración del menú del PC cambiado según se desee Para hacer configuraci...

Page 48: ...1 Audio Normal Repone los ajustes de Bajos Altos y Balance los ajustes predeterminados en la fábrica Sí Normal Bajos Aumenta ó disminuye la respuesta de los graves 7 Bajos Altos Aumenta ó disminuye la respuesta de los agudos 7 Altos Balance Realza el volúmen de los altavoces izquierdo derecho 0 Balance Otros ajustes Sonido IA Iguale los niveles del sonido en todos los canales y entradas VIDEO Sí N...

Page 49: ...alimentación mediante Apaga sin señal 3 minutos antes de que se desconecte la alimentación 3 2 y 1 empiezan a parpadear en este orden durante un minuto cada uno Fijar Apaga sin señal Apaga sin oper Para ahorrar energía el TV se apaga automáticamente cuando no se realiza ninguna operación con las teclas del mando a distancia o del panel delantero durante más de 3 horas Fijar No Nota No se utiliza c...

Page 50: ... casa equipo de cine para casa RAM y DIGA DVD de Panasonic con Control con HDMI Visualice el menú Seleccione Altavoces ext ó Altavoces int ŶAltavoces ext Ajustes para amplificador Panasonic reproductor de cine para casa Panasonic y equipo de cine para casa RAM Panasonic Cuando seleccione Altavoces ext el sonido de los altavoces del televisor se silenciará Cuando se seleccione Altavoces ext el volú...

Page 51: ... DVD de Panasonic Equipo de cine para casa RAM de Panasonic Reproductor de cine para casa de Panasonic Nota Los equipos HDMI individuales tal vez requieran configuraciones de menús específicas adicionales para cada modelo Consulte sus manuales de instrucciones respectivos ŶConfiguración de esta unidad después de la conexión Después de hacer las conexiones como se muestra arriba ponga Ctrl con HDMI...

Page 52: ...cnología V chip permite que los programas restringidos sean bloqueados según las calificaciones de televisión Seleccione Programa Seleccione la categoría de calificación que quiera seguir Aceptar Seleccione Seleccione la calificación que va a bloquear Seleccione No Sin calificación G Público en general Todos los públicos PG Se recomienda el acompañamiento de los padres PG 13 Aviso para los padres ...

Page 53: ...s los canales memorizados previamente se borrarán Establezca Seleccione Seleccione Ent ANT Seleccione Modo Seleccione Iniciar escaneo Seleccione Editar Seleccione el elemento que quiera editar Seleccione el elemento que va a editar Títulos Favoritos Agregar Siguiente Edite Títulos Cambio del identificador de emisoras Favoritos Registra los canales en la lista de favoritos Agregar Agrega ó elimina ...

Page 54: ... configuración Seleccione Inicializar CC y pulse OK 1 3 Seleccione Establezca La televisión incluye un decodificador incorporado capaz de proporcionar una visualización de texto del audio El programa que esté siendo transmitido deberá tener información de subtítulos ocultos CC pág 50 ŶSeleccione el elemento y establézcalo Tamaño Tamaño del texto Letra Fuente del texto Estilo Estilo del texto Eleva...

Page 55: ...M C U LUN C U MAR C U MIE C U JUE C U VIE C U SAB El canal que va a encenderse CNL El día de encendido Día Seleccione el canal Encender Seleccione el día Apagar Ajuste del temporizador Sí No Fijar Cuando se encuentre el código correcto Operación del equipo periférico Puede controlar los componentes de otros fabricantes utilizando el control remoto de este televisor 4 1 2 Pulse simultáneamente ambo...

Page 56: ...eccionar su VCR Line 1 L 1 y poner su videograbadora en la condición de desactivada Consulte el manual de instrucciones de su videograbadora Conexiones AV recomendadas Estos diagramas muestran nuestras recomendaciones sobre cómo conectar el televisor a varios equipos Para hacer otras conexiones consulte las instrucciones de cada equipo la ilustración de abajo y las especificaciones pág 59 Para obt...

Page 57: ... 0003 Toshiba 0000 Zenith 0000 0525 0899 Receptor de satélite ABS 1972 Adventura 0000 Aiwa 0000 0037 0124 Akai 0175 Alienware 1972 American High 0035 Audiovox 0037 Broksonic 1479 Calix 0037 Canon 0035 Citizen 0037 1278 Craig 0037 Curtis Mathes 0035 0060 1035 CyberPower 1972 Daewoo 0045 1278 Dell 1972 Denon 0042 DirecTV 0739 Durabrand 0039 Dynatech 0000 Electrohome 0037 0043 Electrophonic 0037 Emer...

Page 58: ...odos los niños Los temas y elementos en este programa están especialmente diseñados para un público infantil incluyendo niños de 2 6 años TV Y7 FV Bloquear FV Viewable Visible Blocked Bloqueado Dirigido a niños mayores Los temas y elementos en este programa pueden incluir ligera violencia física ó cómica ó puede asustar a niños menores de 7 años Guidance TV G Viewable Visible Blocked Bloqueado Aud...

Page 59: ...seline JPEG 160X120 2 560X1 920 píxeles Submuestreo 4 4 4 4 4 2 ó 4 2 0 Máximo número de archivos 9 999 Resolución de imagen 8 x 8 a 5 120 x 3 840 DCF Norma de diseño para sistemas de archivos de cámaras Una norma de la Asociación de las Industrias de la Tecnología de la Información y la Electrónica del Japón EXIF Exchangeable Image File Format Terminales DIGITAL AUDIO OUT Puede disfrutar de su eq...

Page 60: ...80i y 1080p Procure que concuerde con el ajuste de salida del dispositivo digital Para conocer detalles de las señales HDMI aplicables vea más abajo Marca Señal de entrada aplicable para componente Y PB PR HDMI y PC Señal de entrada que puede visualizarse No visualice una imagen en el modo 4 3 durante un periodo de tiempo prolongado porque esto podrá ser la causa de que quede una imagen secundaria...

Page 61: ...ón etc Forma de las patillas para el terminal de entrada PC Información técnica Continuación Mantenimiento Panel de la pantalla El frente del panel de la pantalla ha recibido un tratamiento especial Limpie suavemente la superficie del panel utilizando un paño suave Si la superficie está especialmente sucia limpie con un paño suave empapado en agua ó agua mezclada con una pequeña cantidad de deterg...

Page 62: ...ha sonido de giro El sonido procede del ventilador de refrigeración incorporado no es una señal de funcionamiento defectuoso Presione cualquier boton para regresar se mueve en la pantalla Imagen Un punto permanece oscuro Imagen desordenada y ruidosa No se puede visualizar imagen Sólo se visualizan puntos en lugar de imágenes No se produce imagen ni sonido La función para impedir la imagen remanent...

Page 63: ...nes son aproximadas 61 2 1 554 mm 3 9 99 mm 38 7 984 mm 41 7 1 058 mm TV Guide La lista de programas desaparece después de una suspensión en la emisión La lista se descargará antes de que pasen 24 horas La visualización de canales no es correcta Establezca el canal correcto en Cambio de visualización de canales pág 20 No se puede ejecutar la grabación reservada Está la videograbadora apagada Está ...

Reviews: