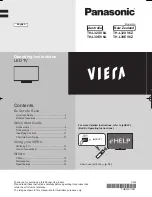
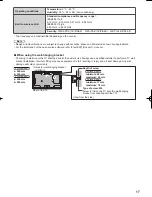
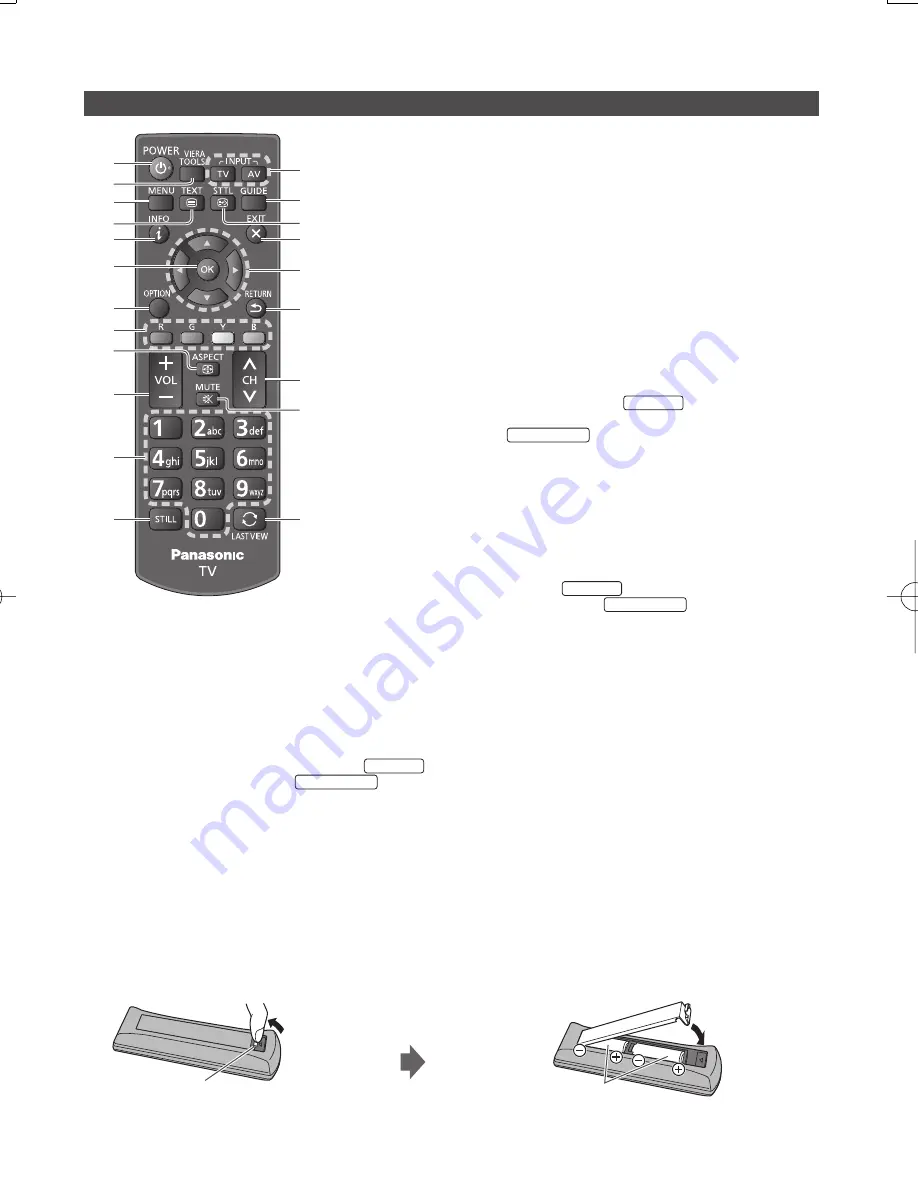
background image

 1

 14
 15

 18

 20

 21

 16

 2

 4

 5

 6

 19

 10

 3

 17

 7
 8
 9

 11

 12

 13

11

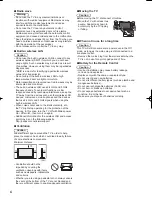
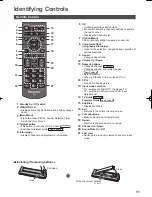
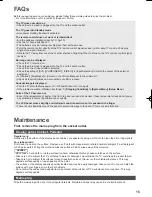
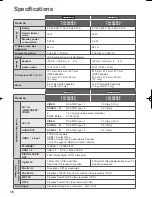
  Identifying Controls

  Remote Control

 1

 Standby On / Off switch

 2

 VIERA TOOLS


 Displays some special feature icons and accesses 
easily.

 3

 [Main Menu]


 Press to access Picture, Sound, Network, Timer, 
Setup and Help Menus.

 4

 Teletext button


 This button is not used for this model. 

Australia


 Switches to teletext mode. 

New Zealand

 5

 Information


 Displays channel and programme information.

 6

 OK


 Confirms selections and choices.


 Press after selecting channel positions to quickly 
change channel.


 Displays the Channel List.

 7

 [Option Menu]


 Easy optional setting for viewing, sound, etc.

 8

 Coloured buttons
 (red-green-yellow-blue)


 Used for the selection, navigation and operation of 
various functions.

 9

 Aspect


 Changes aspect ratio.

 10

 Volume Up / Down

 11

 Numeric buttons


 Changes channel. 

Australia


 Changes channel and teletext pages. 

New Zealand


 Sets characters.


 When in Standby mode, switches TV on.

 12

 STILL


 Freeze / unfreeze picture.

 13

 Input mode selection


 TV - switches to Digital TV / Analogue TV.


 AV - switches to AV input mode from Input 
Selection list.

 14

 TV Guide 

Australia

 Freeview Guide 

New Zealand

 15

 Subtitles


 Displays subtitles.

 16

 Exit


 Returns to the normal viewing screen.

 17

 Cursor buttons


 Makes selections and adjustments.

 18

 Return


 Returns to the previous menu / page.

 19

 Channel Up / Down

 20

 Sound Mute On / Off

 21

 Last view


 Switches to previously viewed channel or input 
mode.


  Installing / Removing batteries


 Pull open

 Hook


 Note the correct polarity 

(+ or -)

 Close

Summary of Contents for Viera TH-L32XV6A

Page 1: ...tifying Controls 11 First time Auto Tuning 13 Using your VIERA Watching TV 13 How to Use eHELP 14 Others FAQs 15 Maintenance 15 Specifications 16 Thank you for purchasing this Panasonic product Please...

Page 2: ...AVC patent portfolio license for the personal and non commercial use of a consumer to i encode video in compliance with the AVC Standard AVC Video and or ii decode AVC Video that was encoded by a cons...

Page 3: ...nto the pedestal Install or remove the TV from the pedestal with at least two people Install or remove the TV by the specified procedure Safety Precautions To help avoid risk of electrical shock fire...

Page 4: ...tc the TV might stop operating for the protection of the devices In this case turn the TV off with Mains power On Off switch then turn it on again Additional information for the wireless LAN and acces...

Page 5: ...ement Fall prevention parts p 6 Accessories may not be placed all together Take care not to throw them away unintentionally For the information of optional accessories refer to eHELP Support Optional...

Page 6: ...injuries caused by the TV falling over However no measure can guarantee protection in all cases Band Screw Wood screw E F G Removing the pedestal from the TV Be sure to remove the pedestal in the fol...

Page 7: ...al TV Analogue TV AC 220 240 V 50 60 Hz Mains lead supplied Aerial RF cable Mains lead Insert the mains plug firmly into place When disconnecting the mains lead be absolutely sure to disconnect the ma...

Page 8: ...ork environment If you do not have any broadband network services please consult your retailer for assistance Prepare the internet environment for wired connection or wireless connection Setup of the...

Page 9: ...stem External equipment DVD Player etc TV Use HDMI2 for connecting an amplifier This connection is applicable when using an amplifier that has ARC Audio Return Channel function As for an amplifier wit...

Page 10: ...tes DVDs VCR DVD Player To watch satellite broadcasts Set top box To watch camcorder images Video camera To play games Game equipment To use amplifier with speaker system To use network services VIERA...

Page 11: ...green yellow blue Used for the selection navigation and operation of various functions 9 Aspect Changes aspect ratio 10 Volume Up Down 11 Numeric buttons Changes channel Australia Changes channel and...

Page 12: ...nu Move the cursor select from a range of options select the menu item up and down only adjust levels left and right only Access the menu store settings after adjustments have been made or options hav...

Page 13: ...area Australia Tick the TV signal mode to tune and then select Start Auto Tuning tune search for the available channels skip tuning Auto Tuning is now complete and your TV is ready for viewing If tun...

Page 14: ...eration in eHELP If this is not the first time to view eHELP from when the TV is turned on the confirmation screen is displayed to select whether First Page or Last Page 2 Select the category and item...

Page 15: ...of parts of the front top and rear panels has risen these temperature rises do not cause any problems in terms of performance or quality The LCD panel moves slightly and clattered sound is heard when...

Page 16: ...Connection terminals AV1 IN COMPONENT VIDEO VIDEO RCA PIN Type 1 1 0 V p p 75 AUDIO L R RCA PIN Type 2 0 5 V rms Y 1 0 V p p including synchronisation PB CB PR CR 0 35 V p p AV2 IN VIDEO RCA PIN Type...

Page 17: ...source software refer to eHELP Support Licence When using the wall hanging bracket Choosing to wall mount the TV shall be done at the owner s risk Always use a qualified installer to perform a TV wal...

Page 18: ...for the name address of the nearest Authorised Service Centre Send or take the product to a Panasonic Authorised Service Centre together with your proof of purchase receipt as a proof of purchase dat...

Page 19: ...stributed in New Zealand by Panasonic New Zealand Limited 350 Te Irirangi Drive East Tamaki Private Bag 14911 Panmure Auckland Tel 09 272 0100 Customer Care Center Email Customerservice nz panasonic c...

Page 20: ...nd retain this book plus your purchase receipt as a permanent record of your purchase to aid in identification in the event of theft or loss and for Warranty Service purposes Model Number Serial Numbe...

Reviews: