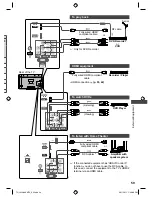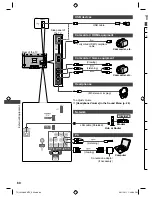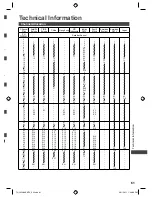
background image

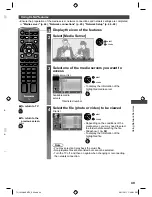
 Using Network Services

51

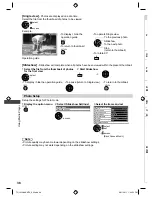
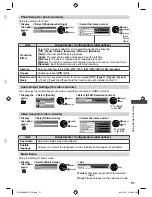
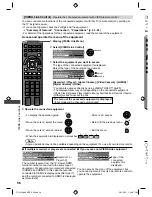
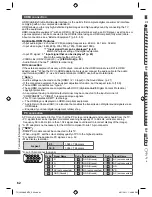
Photo Setup (for photo contents)

Setup the settings for Photo.

1

  Display 

the option 

menu

OPTION

2

  Select [Slideshow Settings]

3

  Select the items and set

Option Menu

Slideshow Settings

Video Setup
Music Setup

 access

 select

Slideshow Settings

Transition Effect
Interval
Repeat
Back Ground Music

Fade
5 seconds
On

 change

  access

[Back
Ground
Music]

 select

or

Item

Adjustments / Configurations (alternatives)

Transition 

Effect

Selects the transition effect for photo switching during the slideshow

[Off] / [Fade] / [Slide] / [Dissolve] / [Motion] / [Random]

[Fade]: 

 The next photo fades in gradually.

[Slide]: 

The next photo slides and appears from the left side.

[Dissolve]: 

The photo is replaced by an indefinite block unit.

[Motion]: 

The photo is replaced with enlarged, reduced, moved up or moved down.

[Random]: 

Each transition mode is performed randomly.

Interval

Selects slideshow interval 

[5] / [10] / [15] / [30] / [60] / [90] / [120] (seconds)

Repeat

Slideshow repeat 

[Off] / [On]

Back Ground 

Music

Selects the background music for photo viewing 

[Off] / [Type1] / [Type2] / [Type3]


[Type1], [Type2] and [Type3] are the fixed music each installed in this TV.

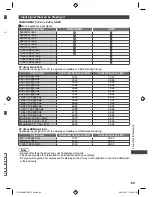
Audio Output Settings (for video contents)

You can enjoy the multi-channel sound via an amplifier connected to HDMI2 terminal.

1

  Display the 

menu

MENU

2

  Select [Sound]

3

  Select [SPDIF Selection] and set

Main Menu

Picture

Sound

Setup

 access

 select

Sound Menu

2/2

SPDIF Selection

Reset to Defaults

 Auto
 Reset

 set

 select


For details


(p. 42)

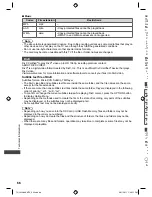
Video Setup (for video contents)

1

  Display 

the option 

menu

OPTION

2

  Select [Video Setup]

3

  Select the items and set

Option Menu

Slideshow Settings

Video Setup

Music Setup

 access

 select

Video Setup Menu

Multi Audio
Dual Audio

Stereo

Dolby D 5.1 ch

Subtitle Language
Aspect Change
Video Preview
Repeat

eng
Aspect1
On
 Off

 set

 select


For details


(p. 42)

Item

Adjustments / Configurations (alternatives)

Dual Audio 

Selects multiplex sound (if available)

Subtitle 

language

Allows you to select the language in which subtitles should appear (if available)

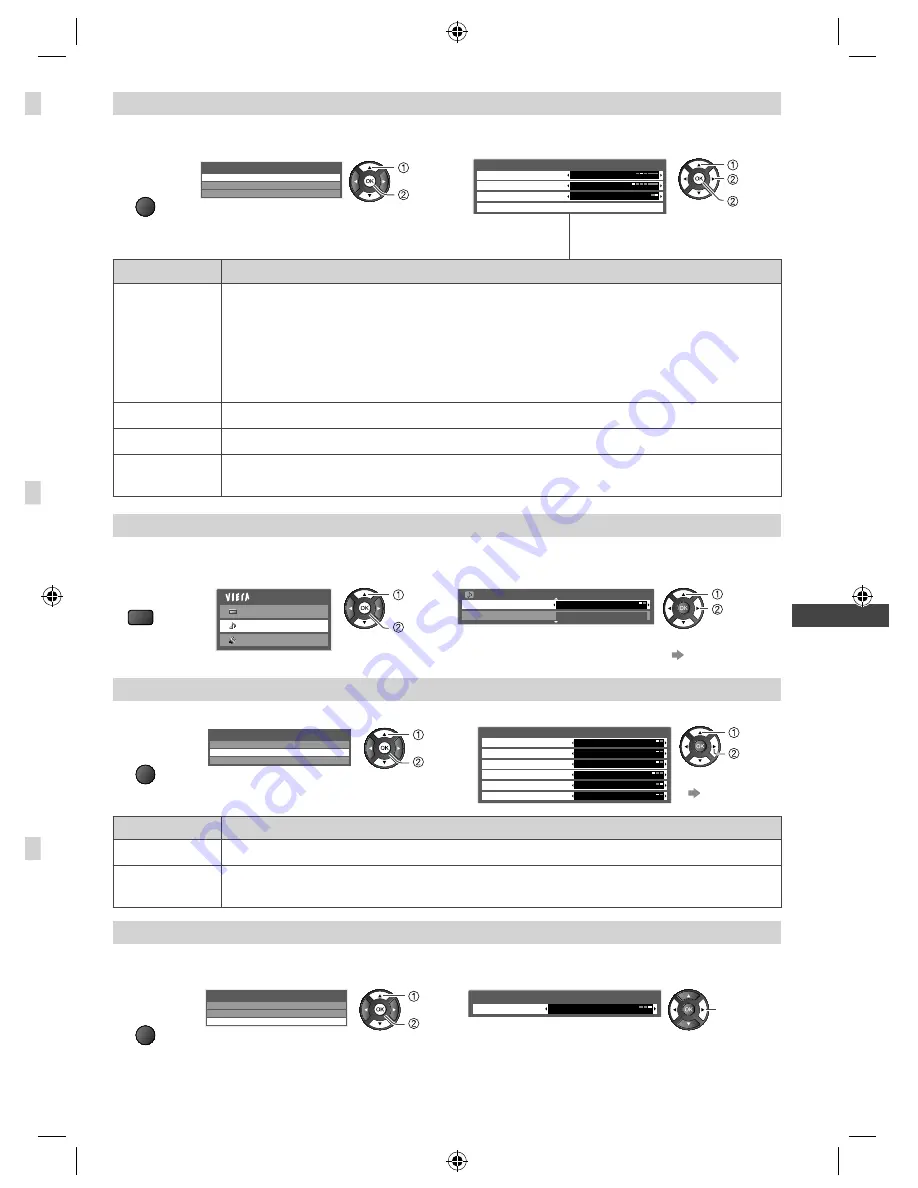
Music Setup

Setup the setting for Music mode.

1

  Display 

the option 

menu

OPTION

2

  Select [Music Setup]

3

  Set

Option Menu

Slideshow Settings
Video Setup

Music Setup

 access

 select

Music Setup Menu

Repeat

One

set

[Folder]:

  Playback repeat within the selected 

folder

[One]:

  Playback repeat on the selected one file

TH-L42U30KMTX_EN.indd   51

TH-L42U30KMTX_EN.indd   51

6/16/2011   4:39:34 PM

6/16/2011   4:39:34 PM

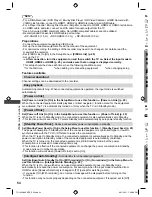
Summary of Contents for Viera TH-L42U30K

Page 1: ...ead these instructions before operating your set and retain them for future reference The images shown in this manual are for illustrative purposes only Model No TH L42U30K TH L42U30M TH L42U30T TH L4...

Page 2: ...he AVC patent portfolio license for the personal and non commercial use of a consumer to i encode video in compliance with the AVC Standard AVC Video and or ii decode AVC Video that was encoded by a c...

Page 3: ...the United States and other countries AVCHD and the AVCHD logo are trademarks of Panasonic Corporation and Sony Corporation Manufactured under license from Dolby Laboratories Dolby and the double D s...

Page 4: ...TV yourself Do not remove the rear cover as live parts are accessible when it is removed There are no user serviceable parts inside High voltage components may cause serious electrical shock Have the...

Page 5: ...erheating fire or electrical shock Do not apply strong force or impact to the display panel This may cause damage resulting in injury Do not expose your ears to excessive volume from the headphones Ir...

Page 6: ...away from other wireless LAN devices microwaves and devices that operate on 2 4 GHz or 5 GHz signals when using the Wireless LAN Adaptor Otherwise a malfunction may occur Depending on the area this o...

Page 7: ...nic dealer immediately During set up make sure that all screws are securely tightened If insufficient care is taken to ensure screws are properly tightened during assembly the pedestal will not be str...

Page 8: ...ld and new batteries Do not mix different battery types such as alkaline and manganese batteries Do not use rechargeable Ni Cd batteries Do not burn or breakup batteries Batteries must not be exposed...

Page 9: ...he correct connection cable and plug between the wall aerial socket and the TV Your local Television Service Centre or dealer may be able to assist you in obtaining the correct aerial system for your...

Page 10: ...ing the F button switches the TV On press either button for about 1 second when in Standby mode 11 Changes the input mode 12 Mains power On Off switch Use to switch the TV mains power On Off If you tu...

Page 11: ...Aspect p 17 Changes aspect ratio 16 Surround p 26 Switches surround sound setting 17 Exit Returns to the normal viewing screen 18 Media Player p 35 Switches to SD Card and USB device viewing listenin...

Page 12: ...ia CATV Other select When selecting CATV Other press the OK button and then select the Channel Plan from Indian CATV South Africa American System American CATV or Japan Auto Tuning starts Auto Tuning...

Page 13: ...dition Shipping Condition p 34 Viewing environment mode Home Recommended mode for viewing at home Select Home for optimal picture power consumption Viewing Mode is set as Normal p 24 Shop Demonstratio...

Page 14: ...ss point Ensure that your access point supports WPS for this method WPS Wi Fi Protected Setup Search for access point Access points found automatically are listed Available Access Points No 1 Access P...

Page 15: ...s the channel Other useful functions Off Timer Turn the TV off automatically after a fixed period of time Off 15 30 45 60 75 90 minutes 1 Display the menu MENU 2 Select Setup 3 Select Off Timer and se...

Page 16: ...eviously viewed channel or input mode LAST VIEW Press again to return to the present view Note Channel switching is not available while Direct TV Recording is in progress Watching less than 10 seconds...

Page 17: ...terbox or 4 3 image without distortion Zoom2 Zoom3 Displays a 16 9 letterbox anamorphic image full screen without distortion Displays a 2 35 1 letterbox anamorphic image full screen without distortion...

Page 18: ...9 EXIT TEXT F P INDEX HOLD MENU TV abc def jk l ghi mno tuv pqrs wxyz R G Y B CH Functions Teletext mode HOLD Reveal hidden data HOLD Stop automatic updating If you wish to hold the current page witho...

Page 19: ...an one page To view specific sub page MENU B Enter the 4 digit number example P6 mno Sub pages The number of sub pages varies depending on the broadcasters It may take some time for searching during w...

Page 20: ...sing the AV button on the remote control or the side panel of the TV p 10 repeatedly until the desired input is selected You can label or skip each input mode Input Labels p 33 Skipped inputs will not...

Page 21: ...t 3 Follow the operations of each feature VIERA Link Control VIERA Link Control p 56 When two or more compatible equipment are connected a selection screen will be displayed Please select the equipmen...

Page 22: ...ss select For details p 24 For details p 26 For details p 28 3 Select the item select 4 Adjust or select store or access Required by some functions change Choose from among alternatives Number and pos...

Page 23: ...characters by using the numeric buttons RETURN Store abc def jkl ghi mno tuv pqrs wxyz Every press changes the character by one Wait for a second to set the character or press OK or any other numeric...

Page 24: ...Mode is set to True Cinema Channel Colour Set Colour density variation among broadcast channels can be adjusted to three levels for each reception channel Select the channel you want to adjust and set...

Page 25: ...of the screen to hide edge video noise Off Displays image in its original size including edge video noise such as lines dashes dots etc Applicable for video signals when the TV aspect is set to 16 9 M...

Page 26: ...r frequency If you want to enhance the treble sound raise the level of the higher frequency To reset the levels of each frequency to the default settings select Reset to Defaults using the left right...

Page 27: ...e format Selects the initial setting for digital audio output signal from HDMI2 terminal Auto Dolby Digital is output as Dolby Digital Bitstream HE AAC and MPEG are output as PCM PCM Digital output si...

Page 28: ...ur PC Reset to Defaults Press the OK button to reset the PC Setup settings to the default Off Timer Off 15 30 45 60 75 90 minutes Set the time the TV automatically goes to Standby mode Eco Navigation...

Page 29: ...s set to On Intelligent Auto Standby Off On With reminder On No reminder Makes non watched or non used connected equipment go into Standby mode to reduce the power consumption p 54 This function is av...

Page 30: ...Off Timer Eco Navigation Child Lock Tuning Menu OSD Language Display Settings VIERA Link Settings Network Setup DivX VOD Access Off access select 2 Select a function Tuning Menu Channel List Edit Auto...

Page 31: ...ally 1 Start Auto Tuning 2 Settings are made automatically Auto Tuning All tuning data will be erased Start Auto Tuning EXIT RETURN Auto Tuning 1 EXIT CH2 Scan 1 120 Automatically retune all TV channe...

Page 32: ...TV TV TV TV TV TV TV TV TV TV TV TV TV TV TV Type Child Lock List TV and AV lock select To cancel Select the locked channel input To lock all G To cancel all locks Y To jump to the top of the next in...

Page 33: ...y using the numeric buttons p 23 Preparations 1 Display the menu 2 Select Setup MENU access select 1 Select Display Settings Off Timer Setup Menu Child Lock Tuning Menu Off 1 2 Access OSD Language Dis...

Page 34: ...to Factory Shipping Condition Completed Please switch off TV Auto Tuning will automatically start when Mains power On Off switch is next turned on p 12 To retune TV channels only e g after moving hou...

Page 35: ...nt The file without record of the date is shown as The picture may not appear correctly on this TV depending on the recording equipment used Display may take some time when there are many files and fo...

Page 36: ...en the SD Card is inserted the input mode automatically switches to Media Player 2 Switch to Media Player 3 Select the icon you want to access Media Player Drive Select SD Card EXIT Select RETURN Acce...

Page 37: ...humbnails grouped by folders The files which are not in a folder will be collected into the folder named Sort by Date Displays the thumbnails grouped by the same date The group of the photos without r...

Page 38: ...view 2 Start Slideshow R select To display hide the operation guide To pause return to Single view To return to thumbnail INFO RETURN Photo Setup Setup the settings for Photo mode 1 Display the optio...

Page 39: ...on is not available when Frame is set to Collage Drift Gallery or Cinema This function is not available when Transition Effect is set to Motion Depending on the photo size the photo may not be enlarge...

Page 40: ...turn off the preview Video Setup p 41 To display the information of the highlighted title INFO 1 15 Trip1 8 Title Number of scenes Date Time Duration 2010 02 19 11 21 00h15m39s Title number Total tit...

Page 41: ...change aspect ASPECT To the previous title scene R To the next title scene G To return to thumbnail RETURN To change the content Change the contents p 40 Video Setup Setup the settings for Video mode...

Page 42: ...Aspect Change Aspect1 Displays the content full screen Aspect2 Displays the content square Original Displays the content original size You can also change the aspect using the ASPECT button Aspect ch...

Page 43: ...lect Media Player Music Folder view My Music_1 Play My Song_1 My Song_8 My Song_2 My Song_9 My Song_3 My Song_10 My Song_4 My Song_11 My Song_5 My Song_6 My Song_7 select R To display the information...

Page 44: ...with this TV current as of January 2011 For installing read the manual of the server software The DLNA control function of Windows 7 is not supported with this TV When a server software for the media...

Page 45: ...ports use a hub Ensure that the Broadband routers and hubs are compatible with 10BASE T 100BASE TX If you use an equipment compatible only with 100BASE TX category 5 LAN cables are required Example 2...

Page 46: ...ork connection as shown is Example 2 p 45 you do not have to set DNS Address Proxy and Proxy Port 2 Select IP DNS Settings and set the items Network Type Connection Test Access Point Settings IP DNS S...

Page 47: ...can also set the characters by using the numeric buttons 3 Store RETURN Proxy Port Sets Proxy port number This number is also specified by the provider with the Proxy address 1 Select Proxy Port Proxy...

Page 48: ...t Access Point Settings IP DNS Settings MAC Address Network Setup Wireless 12 34 56 78 9a bc Software Update Access access select Performs automatic testing of the network connection for the TV It tak...

Page 49: ...t the file photo or video to be viewed File list OPTION P000102 SERVER1 2009 10 05 09 54 P000135 2009 11 20 13 18 P000180 2009 12 07 11 31 P000214 2009 12 10 15 20 P000251 2009 12 19 12 39 P000276 200...

Page 50: ...IA SERVER 00 15 39 00 02 05 Operation guide To display hide the operation guide and information banner INFO To operate playback Rewind Manual skip Skip to a fixed period forward manually for MPEG 2 PS...

Page 51: ...in this TV Audio Output Settings for video contents You can enjoy the multi channel sound via an amplifier connected to HDMI2 terminal 1 Display the menu MENU 2 Select Sound 3 Select SPDIF Selection...

Page 52: ...ts are operated by their respective service providers and service may be discontinued either temporarily or permanently without notice Therefore Panasonic will make no warranty for the content or the...

Page 53: ...7 Power on link Power off link Reduce unnecessary power consumption in standby 5 5 5 Auto standby for unnecessary equipment 3 3 3 8 3 8 3 Pause Live TV programme 4 6 Direct TV Recording 4 Control the...

Page 54: ...the Setup Menu to use this function Power off Link p 29 When the TV is set to Standby mode the connected equipment is also automatically set to Standby This function will work even if the TV enters St...

Page 55: ...ayback stop Operations may be different depending on the recorder In this case follow the operation guide or read the manual of the recorder To return to Live TV stop playback of Pause Live TV cancel...

Page 56: ...Recorder theatre Other means Tuner set top box The menu of the accessed equipment is displayed Input mode will be changed automatically 4 Operate the connected equipment To display the operation guide...

Page 57: ...d If you wish to enjoy multi channel sound e g Dolby Digital 5 1ch via an Amplifier connect with HDMI cable and RCA cables p 53 and then select Home Cinema If your Amplifier has HDAVI Control 5 functi...

Page 58: ...To play games Game equipment To use amplifier with speaker system 2 VIERA Link Equipment Terminal Recommended Connection 1 Only for DVD Recorder 2 Use HDMI2 for connecting an amplifier This connection...

Page 59: ...DMI compliant cable Recorder Player HDMI connection p 53 62 To watch DVDs To listen with Home Theater DVD Player Listening Viewing RCA cable 2 Fully wired HDMI compliant cable Amplifier with speaker s...

Page 60: ...Camcorder etc Camcorder etc Viewing Listening M3 stereo mini plug LAN cable Shielded To adjust volume Headphone Volume in the Sound Menu p 26 Modem Hub or Router Internet Listening Viewing Computer Co...

Page 61: ...S40 S41 21 24 25 31 21 62 63 69 62 63 69 62 63 62 C13 70 73 74 75 76 77 78 79 S 1 S 2 S 3 S 1 S 1 S 2 S 3 S 1 S 2 S 3 32 41 S 1 S 2 S 3 80 81 89 S1 S2 S10 S1 S2 S10 Z1 Z9 S1 S2 S10 S1 S2 S10 42 51 S1...

Page 62: ...atio to 16 9 These HDMI connectors are type A These HDMI connectors are compatible with HDCP High Bandwidth Digital Content Protection copyright protection An equipment having no digital output termin...

Page 63: ...00 1 024 768 70 Hz 56 48 70 07 1 024 768 75 Hz 60 02 75 03 1 024 768 85 Hz 68 68 85 00 1 280 1 024 60 Hz 63 98 60 02 1 280 768 60 Hz 47 70 60 00 1 366 768 60 Hz 48 39 60 04 Macintosh13 640 480 35 00 6...

Page 64: ...eteriorate listening will be easier if the mode is set to the MONO position using the Sound Selection button DUAL also known as DUAL MONO or as BILINGUAL is not currently transmitted in some countries...

Page 65: ...d The data may not be available if a folder structure on the current device is modified AVI avi divx DIV3 DIV4 DIVX DX50 DIV6 XviD MPEG4 SP ASP MP3 Dolby Digital MPEG DivX video file DivX p 66 DivX Ce...

Page 66: ...es may not be displayed at all Some subtitles text may not be displayed correctly Note Depending on how you save into the SD Card or USB Flash Memory files and folders may not be displayed in the orde...

Page 67: ...card reader The combination of USB devices that have been tested for each TV s USB port Combination of USB port 1 port 2 and vice versa USB Flash Memory Wireless LAN Adaptor USB Flash Memory USB Keybo...

Page 68: ...ls Occasionally a few non active pixels may appear on the screen as a fixed point of red green blue or black Please note this does not affect the performance of your LCD and it is not a quality proble...

Page 69: ...turn them On again Check the input signal from the equipment p 63 Use an equipment compliant with EIA CEA 861 861B Network Cannot connect to the network Check that the LAN cable or Wireless LAN Adapt...

Page 70: ...inner or other volatile substances This may degrade surface quality or cause peeling of the paint The surface of the display panel is specially treated and may be easily damaged Take care not to tap o...

Page 71: ...D 1 12 NTSC M Japan 2 13 NTSC M USA UHF BAND 21 69 PAL G H I SECAM G K K1 28 69 PAL B AUST 13 57 PAL D K 13 62 NTSC M Japan 14 69 NTSC M USA CATV S1 S20 OSCAR 1 125 USA CATV C13 C49 JAPAN S21 S41 HYPE...

Page 72: ...r panel You should note the model number and the serial number in the space provided below and retain this book plus your purchase receipt as a permanent record of your purchase to aid in identificati...

Reviews: