background image

Basic Connections

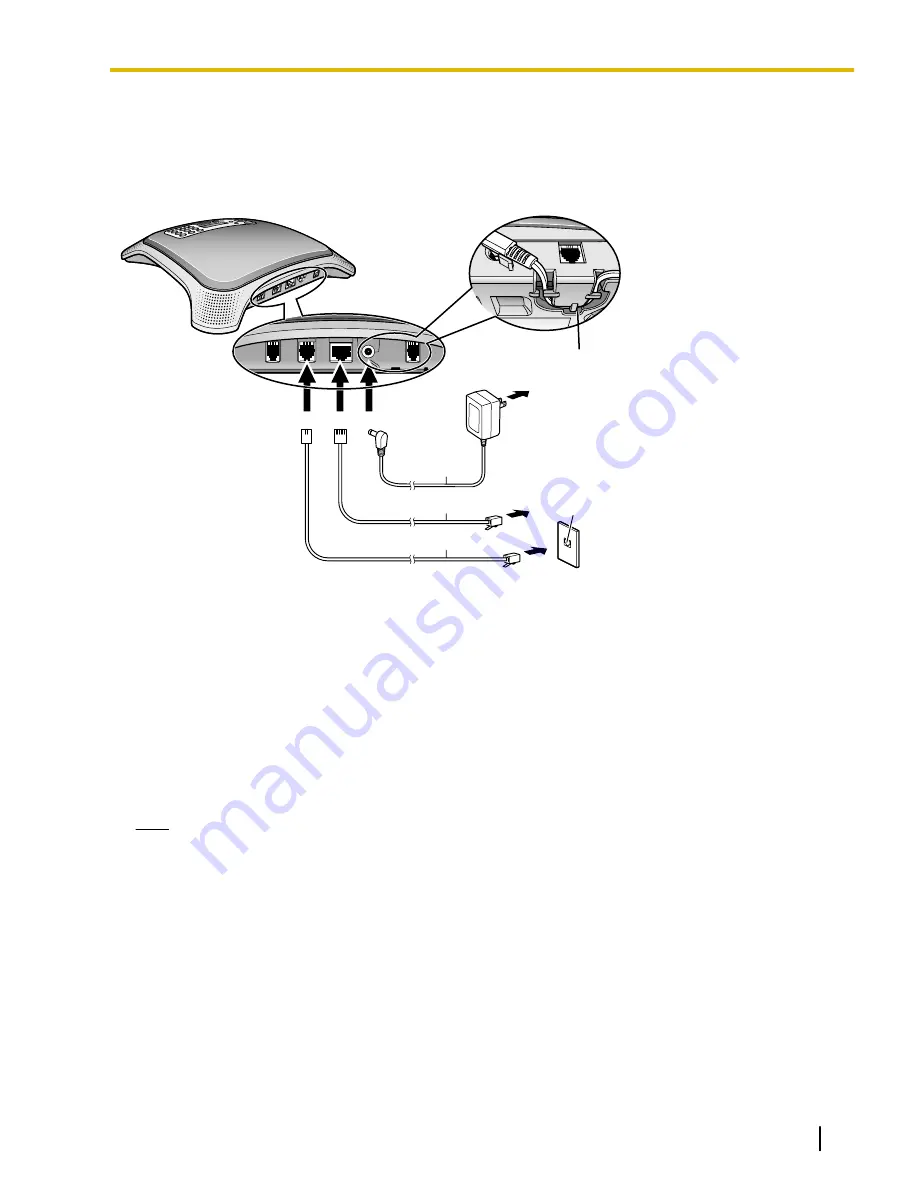
This section explains all connections needed to make and receive IP line and TEL line calls.

To connect a Portable Station (PS) to the unit, see page 44.

To connect a computer to the unit, see page 45 or page 46.

E G

F

D

A

B

C

LINE

DC IN

LAN

A

AC Adaptor Cord

B

LAN Cable

C

2-conductor Telephone
Cord

D

To AC Outlet

E

To Switching Hub

F

Groove

G

Telephone Jack or PBX
(RJ11C)

1.

Connect the unit to the desired IP network and/or telephone line.

To connect to an IP network, connect a category 5 LAN cable to the 

LAN

 port and to a switching hub.

To connect to a telephone line, connect a telephone cord to the 

LINE

 jack and to a modular telephone

jack.

2.

Connect the AC adaptor cord of the included AC adaptor to the unit’s DC input.

To use PoE (Power over Ethernet), connect the LAN cable to a PoE-compatible (IEEE802.3af)
switching hub or power supply. The included AC adaptor does not need to be connected when using
PoE.

If using an AC adaptor, use only the included AC adaptor (PQLV206).

Pass the AC adaptor cord through the groove on the bottom of the unit.

3.

Connect the AC adaptor to the AC outlet.

Note

The AC adaptor must remain connected at all times (unless the unit is powered by PoE). It is normal
for the adaptor to feel warm during use.

Document Version    2011/06

Operating Instructions

25

Preparation

Preparation

Summary of Contents for VoiceSonic KX-NT700

Page 1: ...Operating Instructions IP Conferencing Phone Model No KX NT700 Thank you for purchasing this Panasonic product Please read this document carefully before using this product and save for future use KX NT700 Version 3 0 or later ...

Page 2: ...r participants etc KX NT700 PC IP PT IP Softphone SIP Extension APT DPT SLT CS PS Outside Telephone Lines IP Network Other party of IP call Other party of TEL call The following features are available when the unit is used as a SIP extension Refer to the PBX documentation for details Account Code Entry Personal Speed Dialing Automatic Route Selection ARS Redial Conference as a member only S CO Lin...

Page 3: ...e other party s device 1 If the IP network contains a firewall the firewall must be configured appropriately to allow the unit to communicate over the network See page 58 for information about the unit s VoIP communication settings If the IP network contains a router that supports NAT NAPT features it may not be possible for the unit to communicate over the network Consult your system administrato...

Page 4: ...ence Calls While on a call you can make or receive an additional call creating a 3 party conference call see page 36 or page 38 Conference calls can be made using the following connection methods 2 IP calls While A and B are talking A calls or is called by C A B C 1 IP call and 1 TEL call While A and B are talking A calls or is called by C C A B 1 IP call and 1 PS call or 1 PC call While A and B a...

Page 5: ...the cost of installing a new AC outlet PoE connection requires a PoE compliant hub or similar device The included AC adaptor can be used instead of a PoE connection if you want to connect the unit to a standard AC outlet Conferencing Phone Manager Software Features The unit can be used in conjunction with Conferencing Phone Manager This software can be found on the included CD ROM and allows you t...

Page 6: ...e the property of their respective owners MD5 Copyright Notice This software uses the Source Code of RSA Data Security Inc described in the RFC1321 MD5 Message Digest Algorithm Copyright C 1991 2 RSA Data Security Inc Created 1991 All rights reserved License to copy and use this software is granted provided that it is identified as the RSA Data Security Inc MD5 Message Digest Algorithm in all mate...

Page 7: ...the University of California All rights reserved Copyright c 1982 1985 1986 1988 1993 1994 The Regents of the University of California All rights reserved Copyright c 1982 1986 1988 1990 1993 The Regents of the University of California All rights reserved Copyright c 1982 1986 1988 1990 1993 1994 1995 The Regents of the University of California All rights reserved Copyright c 1982 1986 1988 1990 1...

Page 8: ...ht c 1992 Regents of the University of California All rights reserved Copyright c 1992 1993 The Regents of the University of California All rights reserved Copyright c 1993 The Regents of the University of California All rights reserved Copyright c 1993 Adam Glass Copyright C 1993 by Sun Microsystems Inc All rights reserved Copyright c 1994 Gordon W Ross Copyright c 1994 Winning Strategies Inc All...

Page 9: ...980 1986 1989 Regents of the University of California All rights reserved Copyright c 1988 The Regents of the University of California All rights reserved Copyright c 1992 1993 The Regents of the University of California All rights reserved Copyright c 1994 Christopher G Demetriou All rights reserved Copyright c 1997 The NetBSD Foundation Inc All rights reserved Copyright c 1999 The NetBSD Foundat...

Page 10: ...MODEL NO SERIAL NO DATE OF PURCHASE NAME OF DEALER DEALER S ADDRESS DEALER S TEL NO 10 Operating Instructions Document Version 2011 06 Introduction ...

Page 11: ...lectric shock Do not insert foreign objects into the unit Do not connect or disconnect the AC plug with wet hands Disconnect the unit from the AC outlet disconnect the LAN cable and contact the dealer if The AC adaptor cord or AC plug becomes damaged or frayed The unit is exposed to rain water or any other liquid The unit is dropped or damaged Internal components are exposed due to damage The unit...

Page 12: ...ers or chemical agents to clean the unit The SD memory card poses a choking hazard Keep the SD memory card out of reach of children When left unused for a long period of time disconnect the unit from the AC outlet When the unit receives power from a PoE power supply disconnect the LAN cable Notice Read and follow all instructions warnings cautions etc including those marked on the unit Before conn...

Page 13: ...orized use of the unit interference or suspension of use caused by an unauthorized party We cannot be responsible for damages resulting from the misuse of this product Note This product can be used to store and log user information User information is defined as the following phonebook entry names phone numbers IP addresses SIP extension numbers and SIP URIs call history redial list recordings sto...

Page 14: ...sations only connect the unit to a secure network To prevent unauthorized access only connect the unit to a network that is properly managed Make sure all computers connected to the unit employ up to date security measures 14 Operating Instructions Document Version 2011 06 Introduction ...

Page 15: ...l the telephone company will notify the customer as soon as possible Also you will be advised of your right to file a complaint with the FCC if you believe it is necessary 4 Changes in Telephone Company Communications Facilities Equipment Operations and Procedures The telephone company may make changes in its facilities equipment operations or procedures that could affect the operation of the equi...

Page 16: ...and found to comply with the limits for a Class B digital device pursuant to Part 15 of the FCC Rules These limits are designed to provide reasonable protection against harmful interference in a residential installation This equipment generates uses and can radiate radio frequency energy and if not installed and used in accordance with the instructions may cause harmful interference to radio commu...

Page 17: ...36 Answering Calls 38 Useful Features Available During a Call 39 Phonebook 40 Adding Entries to the Phonebook 40 Editing Entries 41 Erasing Entries 41 Recording 42 Recording Features 42 Recording Conversations 42 Recording Voice Memos 42 Playing Back Recordings 42 Erasing Recordings 43 Using a Portable Station PS or Computer 44 Using a Portable Station PS 44 Using a Computer 45 Connecting Using th...

Page 18: ...tialization Features 65 Erasing Data 65 Erasing the Redial List 65 Erasing the Phonebook 65 Resetting System Data 65 Resetting All Data 65 Troubleshooting 66 Troubleshooting 66 General Use 66 Making and Receiving Calls 66 Sound Quality 69 SD Memory Cards 71 Phonebook 71 Programming 72 Display Messages 72 Other Information 75 Cleaning the Unit 75 Specifications 76 Specifications 76 Index 78 18 Oper...

Page 19: ... About 1 8 m 6 ft PS Cable 1 About 1 m 3 ft 3 in PC Cable 1 About 1 8 m 6 ft AC Adaptor 1 Order no PSWE2NT700N Order no PSJA1123Z Order no PSJA1122Z Order no PQLV206Y Optional Accessories External Wired MIC Cord About 3 m 10 ft KX NT701 Document Version 2011 06 Operating Instructions 19 Before Use Before Use ...

Page 20: ... a compatible SD memory card and record conversations See page 30 for more information about SD memory cards F AUDIO IN OUT Jack Allows you to connect a compatible Panasonic Portable Station PS see page 44 or a computer see page 46 G H I J G External Wired MIC Jacks EXT MIC1 EXT MIC2 Allow you to connect an External Wired MIC to the unit see page 32 2 mics can be connected H DC Input DC IN Used to...

Page 21: ... or PBX features such as extension transfers see page 39 REDIAL PAUSE Button Used to call a previously called party again see page 35 or to enter a dialing pause see page 35 Display See page 22 Function Buttons F1 F2 and F3 Used to select the functions that correspond to the icons shown on the bottom of the display see page 22 MIC NOISE CUT Button Used to reduce noise in the audio signal sent to t...

Page 22: ...ns displayed vary on the current state of the unit e g the icons displayed when on a call are different from the icons displayed when storing an entry in the phonebook Scroll Indicator Indicates that or can be pressed to display the previous or next item Recording Icons Indicates a recorded conversation Indicates a recorded voice memo Function Buttons and Function Button Icons By pressing a functi...

Page 23: ... to establish a conference call see page 36 and page 38 SPEED Used to slow down the other party s speech while on a call see page 39 URI Used when you want to enter a SIP URI Only displayed when making a call on an IP line when the Operation Mode setting is set to IP PBX see page 34 EXT Used when you want to enter a SIP extension number Only displayed when making a call on an IP line when the Oper...

Page 24: ...rrent recording see page 43 ERASE Used to erase a recording see page 43 Other BACK Used to return to the previous screen SELECT Used to select the displayed item SAVE Used to save any changes made while programming the unit YES Used to accept the displayed item or proceed with the current operation NO Used to decline the displayed item or cancel the current operation FORMAT Used to format an SD me...

Page 25: ...nnect to a telephone line connect a telephone cord to the LINE jack and to a modular telephone jack 2 Connect the AC adaptor cord of the included AC adaptor to the unit s DC input To use PoE Power over Ethernet connect the LAN cable to a PoE compatible IEEE802 3af switching hub or power supply The included AC adaptor does not need to be connected when using PoE If using an AC adaptor use only the ...

Page 26: ...ss SAVE 6 Press MENU Note You can select 12 hour or 24 hour time display see page 52 The date format varies by the selection made for the Language setting See page 51 for details TEL Line Settings Selecting the Available Lines To use the TEL line the Line Selection setting must be set to IP TEL This is the default setting 1 Press MENU 2 Press LINE 3 Select IP TEL When Line Selection is set to IP P...

Page 27: ...3 Select IP Address Mode then press SELECT 4 Select DHCP then press SAVE 5 Press MENU Note If this setting is changed the unit must be restarted before the new setting becomes effective see page 47 To confirm the IP address press MENU Show IP Address SELECT Manual Assignment Static 1 Press MENU 2 Select IP Network Settings then press SELECT 3 Select IP Address Mode then press SELECT 4 Select Stati...

Page 28: ... address of the PBX then press SAVE 14 Select SIP Proxy Server Port Number then press SELECT 15 Enter the SIP port number of the PBX or SIP proxy server then press SAVE 16 Select SIP Registrar IP Address then press SELECT 17 Enter the IP address of the PBX then press SAVE 18 Select SIP Registrar Port Number then press SELECT 19 Enter the SIP port number of the PBX or SIP registrar server then pres...

Page 29: ...it can make and receive IP calls as a SIP extension of the PBX To make a call the other party s SIP extension number or SIP URI is specified This is the default setting Peer to Peer Peer to peer IP calls are possible To make a call the other party s IP address is specified USB Audio The unit operates as the USB audio device of a computer see page 45 4 Press SAVE 5 Press MENU Note If this setting i...

Page 30: ...her than a compatible SD memory card Compatible Cards The unit supports the following SD memory cards SD miniSD and microSD memory cards Use a miniSD or microSD adaptor when using miniSD or microSD memory cards respectively and always insert the miniSD or microSD memory card into the adaptor before inserting the adaptor into the unit Cards with a capacity of 32 MB to 2 GB Note The unit does not su...

Page 31: ...om the AC outlet while formatting an SD memory card Do not move or bump the unit while formatting an SD memory card Note The unit cannot format cards that are not already in FAT format Use a computer to format non FAT formatted cards Formatting With a Computer When formatting cards with a computer select the FAT FAT16 format Notice When an SD memory card is formatted all information on the card is...

Page 32: ...best performance when using an External Wired MIC Do not move an External Wired MIC while on a call Feedback may occur Place each External Wired MIC at least 1 m about 3 ft away from the unit Speak within about 2 m about 6 5 ft of the External Wired MIC 2 m about 6 5 ft 2 m about 6 5 ft Note The sensitivity of an External Wired MIC may vary depending on room characteristics The built in microphone...

Page 33: ...d Selecting the Available Lines The IP line is always available when the unit is connected to an IP network if it is not selected i e if it is not shown in the upper right corner of the display you can select it by pressing IP Whether the TEL line PS line or PC line is available is determined by the Line Selection setting For example when it is set to IP PS the IP and PS lines are available You ca...

Page 34: ...ne line and the audio characteristics of the room During this time sound may cut out or fade in and out This is normal If the unit is not connected to an IP network IP is not displayed and the IP line cannot be selected The call length shown on the display is an approximation and may differ from the actual length of the call Call charges accumulate after the called party answers Making a Call to a...

Page 35: ...his number If the Line Selection setting is not set to IP TEL see page 33 TEL line calls cannot be redialed If the dialed number contains too many characters it cannot be redialed correctly The maximum for each type of number is as follows TEL line 128 digits IP line SIP extension number 32 characters IP line SIP URI 97 characters excluding sip Entering Dialing Pauses A pause is sometimes required...

Page 36: ...a call see page 38 Note When Panasonic PBX Compatibility in Protocol Settings is set to On you cannot make a conference call using 2 IP lines in IP PBX mode see page 58 Conference calls using the IP and TEL lines 1 Press CONF to put the current call on hold 2 Confirm that the desired line IP or TEL is selected If the current call is an IP call you can change the selected line by pressing the left ...

Page 37: ...he PS or computer 5 After the called party answers press CONF to begin the conference call Before beginning the conference call press END to end the second call and return to the original call Note When the operation mode is set to USB Audio conference calls cannot be made Ending a Conference Call Press to disconnect both parties or 1 Press END Press BACK to continue the call 2 Press or to select ...

Page 38: ... then join the 2 calls and establish a conference call While on an IP call You can receive either a TEL or an IP call While on a TEL PS or PC call You can receive an IP call Note In order to use this feature the Call Waiting setting see page 53 must be set to Enable this is the default setting When a second call is received a call waiting tone will be heard See page 53 to adjust the call waiting t...

Page 39: ...ed for calls in which the other party is speaking more and you are listening You can select the desired mode by pressing SPEED during a call Each time the button is pressed the setting changes and is shown briefly on the display Conversion Mode Talking Mode Conversion Mode Listening Mode Conversion Mode Off Note Slow is shown on the display while this feature is active If the other party speaks fo...

Page 40: ... SIP extension number instead of a user name 2 To enter press CHAR to switch the character entry mode to alphabet entry mode then press once 3 You can also enter an IP address instead of a domain name If a domain name is not entered after the the value specified in SIP User Domain Name is used as the domain name when dialing see page 56 A period can be entered by pressing 1 when the character entr...

Page 41: ...desired phonebook entry see page 35 2 Press EDIT 3 Edit the name if necessary then press ENTER 4 Press or to select the line TEL IP IP Address IP SIP Ext No or IP SIP URI that will be used when you call the entry then press SELECT 5 Edit the phone number IP address SIP extension number or SIP URI if necessary then press ENTER or SAVE 6 Press MENU Note If you do not press any buttons for 1 minute t...

Page 42: ...dinances guidelines etc regarding telephone conversation recording Recording Conversations 1 Press REC during a conversation Remaining Time and the approximate recording time available are displayed briefly then Conf Recording and the approximate length of the call are displayed 2 To stop recording press STOP Recording stops automatically when is pressed Recording Voice Memos You can record a voic...

Page 43: ...ing Press then PLAY Play current recording again Press then PLAY Play previous recording Press 2 times then PLAY Fast forward Press for 4 speed Press again for 60 speed Press PLAY for playback Rewind Press for 4 speed Press again for 60 speed Press PLAY for playback Pause Press 0 Press PLAY to resume playback Erase current recording Press ERASE then YES Erasing Recordings Erasing 1 Recording 1 Pre...

Page 44: ...3 Connect the included PS Cable to the AUDIO IN OUT jack of the unit A and to the headset jack of the PS A Make sure the plug of the PS Cable is inserted fully into the unit and PS otherwise sound may not be heard or echoing and feedback may occur Place the PS as far away from the unit as possible 4 Press to begin using the unit s microphones and speaker Press again to turn off the microphones and...

Page 45: ...ates the software has not passed Windows logo testing This is normal The software will not cause any difficulties with your operating system Click Continue Anyway to proceed with installation 3 Click Finish Using a Computer 1 Confirm that USB AUDIO is shown in the upper right corner of the display USB Audio mode is selected If USB AUDIO is not shown on the display change the operation mode to USB ...

Page 46: ...ess SAVE 5 Press MENU Using a Computer 1 Confirm that PC is shown in the upper right corner of the display You can change the selected line by pressing the center function button F2 The IP line is selected The PC line is selected F2 F2 If you cannot select PC change the Line Selection setting to IP PC explained on this page 2 Press to begin using the unit s microphones and speaker Press again to t...

Page 47: ...EL Settings all parameters Using Conferencing Phone Manager To use Conferencing Phone Manager found on the included CD ROM to program the unit from a computer see the Operating Instructions for Conferencing Phone Manager for more details Restarting the Unit After changing the following parameters the unit must be restarted in order for the new settings to take effect Data is not erased when the un...

Page 48: ... When using PoE Disconnect the LAN cable from the unit then connect it again 48 Operating Instructions Document Version 2011 06 Programming the Unit ...

Page 49: ...trast page 52 Key Tones page 53 Call Waiting Tone Volume page 53 Call Waiting page 53 Line Selection page 53 TEL Settings Dial Mode page 53 Flash Time page 54 Pause Time page 54 TEL Line Level Reduction page 54 IP Network Settings IP Address Mode page 54 IP Address page 55 Subnet Mask page 55 Default Gateway page 55 Protocol Settings SIP Ext No page 55 SIP Authentication ID page 56 SIP Password pa...

Page 50: ...mber Maximum page 59 DTMF Type page 59 QoS Settings VLAN ID page 59 VLAN Priority page 59 SIP ToS Field page 60 RTP ToS Field page 60 System Status Confirmation Software Version page 60 IP Address page 60 Subnet Mask page 60 Default Gateway page 60 DHCP Server page 60 MAC Address page 60 System Options Erase All Call Log Data page 60 Erase All Phonebook Data page 60 Reset System Data page 61 Reset...

Page 51: ...operated as a SIP extension of the PBX a peer to peer IP conferencing telephone or a computer s USB audio device If this setting is changed the unit must be restarted before the new setting becomes effective see page 47 IP PBX Peer to Peer USB Audio IP PBX Basic Settings Language Description Available Settings Default Setting Determines the display language Use the following procedure to change th...

Page 52: ...play language see page 51 English US MM DD YYYY Español DD MM YYYY Français DD MM YYYY Français C YYYY MM DD Italiano DD MM YYYY Nederlands DD MM YYYY Português DD MM YYYY Deutsch DD MM YYYY English UK DD MM YYYY Time Format Description Available Settings Default Setting Determines the time format 12 hour 24 hour 12 hour Ringer Volume Description Available Settings Default Setting Determines the r...

Page 53: ...e Settings Default Setting Determines whether a call can be received when you are already on another call Enable Disable Enable Line Selection Description Available Settings Default Setting Determines which lines can be used to make and receive calls IP TEL IP PC IP PS IP TEL TEL Settings Dial Mode Description Available Settings Default Setting Determines the dial mode used for the TEL line Set th...

Page 54: ...evel is reduced Set this feature to On if the volume of your voice heard from the speaker is too loud When set to On the other party s voice will be slightly quieter We recommend setting this feature to On when establishing conference calls that use the TEL line On Off Off IP Network Settings Consult your system administrator for the appropriate settings IP Address Mode Description Available Setti...

Page 55: ...see page 47 255 255 255 0 Default Gateway Description Available Settings Default Setting Set this parameter to match the IP address of the IP network s default gateway This parameter is only available when IP Address Mode is set to Static If this setting is changed the unit must be restarted before the new setting becomes effective see page 47 0 0 0 0 Protocol Settings Consult your system administ...

Page 56: ...PBX programming If this setting is changed the unit must be restarted before the new setting becomes effective see page 47 Max 32 characters SIP User Domain Name Description Available Settings Default Setting Set this parameter to match the IP address or domain name of the IP PBX If this setting is changed the unit must be restarted before the new setting becomes effective see page 47 Max 64 chara...

Page 57: ...arted before the new setting becomes effective see page 47 0 0 0 0 SIP Registrar Port Number Description Available Settings Default Setting Set this parameter to match the SIP port number of the IP PBX or SIP registrar server The communication protocol used is UDP If this setting is changed the unit must be restarted before the new setting becomes effective see page 47 1024 50999 5060 Hold Method ...

Page 58: ...ing Determines the preferred codec for IP calls G 722 G 711μ law G 711A law G 729a G 722 RTP Packet Size Description Available Settings Default Setting Determines the size of outgoing RTP packets 20 ms 30 ms 40 ms 50 ms 60 ms 20 ms SIP Signaling Port Number Description Available Settings Default Setting Determines the port number used for SIP signaling The communication protocol used is UDP If thi...

Page 59: ...r RTP Port Number Minimum 51002 52000 even values only 52000 DTMF Type Description Available Settings Default Setting Determines the type of DTMF signal sent during a call In band Out of band Out of band QoS Settings VLAN ID Description Available Settings Default Setting Determines the VLAN ID If this setting is changed the unit must be restarted before the new setting becomes effective see page 4...

Page 60: ...ged the unit must be restarted before the new setting becomes effective see page 47 8 bit binary code 00000000 System Status Confirmation Description The settings for the following parameters can be displayed for confirmation Software Version IP Address Subnet Mask Default Gateway DHCP Server MAC Address System Options Erase All Call Log Data Description Allows you to erase all entries in the redi...

Page 61: ...ou to reset all system data i e the parameters described in this section user data and all settings The unit is returned to its factory default state when this feature is executed After executing this feature the unit will restart automatically The following data and settings are not erased when this feature is executed SD memory card recordings The following data and settings are erased when this...

Page 62: ... User Domain Name see page 28 Character Tables SIP Extension Number or SIP URI Entry When Dialing or Storing in Phonebook Dial Key Alphabet Entry Mode Uppercase Lowercase 0 1 2 A B C 2 a b c 2 3 D E F 3 d e f 3 4 G H I 4 g h i 4 5 J K L 5 j k l 5 6 M N O 6 m n o 6 7 P Q R S 7 p q r s 7 8 T U V 8 t u v 8 9 W X Y Z 9 w x y z 9 Changes between uppercase and lowercase character entry Note can only be ...

Page 63: ... q r s 7 8 T U V 8 t u v 8 9 W X Y Z 9 w x y z 9 Changes between uppercase and lowercase character entry Changes between uppercase and lowercase character entry Note A space counts as one character A period can be entered by pressing 1 when the character entry mode is alphabet entry mode or extended character entry mode Document Version 2011 06 Operating Instructions 63 Character Entry ...

Page 64: ... 4 5 J K L 5 j k l 5 6 M N O 6 m n o 6 7 P Q R S 7 p q r s 7 8 T U V 8 t u v 8 9 W X Y Z 9 w x y z 9 Changes between uppercase and lowercase character entry Note A period can be entered by pressing 1 when the character entry mode is alphabet entry mode 64 Operating Instructions Document Version 2011 06 Character Entry ...

Page 65: ... Redial list Note These features do not erase the contents of the SD memory card To erase the SD memory card see page 43 Erasing the Redial List 1 Press MENU 2 Select System Options then press SELECT 3 Select Erase All Call Log Data then press SELECT 4 Select Yes then press SELECT 5 Press MENU Erasing the Phonebook 1 Press MENU 2 Select System Options then press SELECT 3 Select Erase All Phonebook...

Page 66: ...cable wait 10 seconds then connect the LAN cable again page 25 Making and Receiving Calls Issue Possible Cause Solution Reference I cannot make IP calls The IP line is not selected Before dialing confirm that IP is shown in the upper right corner of the display Press the center function button F2 to change the line if necessary page 33 The IP address was entered incorrectly Confirm that you have e...

Page 67: ...ive IP calls The Operation Mode setting is not correct Change the setting to Peer to Peer if you want to make or receive peer to peer IP calls i e calls made by specifying the called party s IP address Change the setting to IP PBX if you want to make or receive intercom and outside calls as a SIP extension i e calls made by specifying the called party s SIP extension number or SIP URI When the set...

Page 68: ...PC calls Refer to the operating instructions for the device I cannot redial by pressing REDIAL PAUSE The number you are trying to redial is too long If the dialed number contains too many characters it cannot be redialed correctly The maximum for each type of number is as follows TEL line 128 digits IP line SIP extension number 32 characters IP line SIP URI 97 characters excluding sip You pressed ...

Page 69: ...d or change the ringer volume setting page 38 I cannot make a 3 party call using 2 IP lines in IP PBX mode The Panasonic PBX Compatibility setting is set to On Change the setting to Off page 58 Sound Quality Issue Possible Cause Solution Reference The other party cannot hear my voice The unit is muted If Mute is displayed press to turn off the mute feature page 39 Objects are obstructing the micro...

Page 70: ...from the microphone Try speaking closer to the microphone page 32 The environment is not suited to speakerphone calls Do not use the unit within 2 m about 6 5 ft of projectors air conditioning devices fans or other audible or electrical noise emitting devices If using the unit in a room with windows close the curtains or blinds to prevent echoes Use the unit in a quiet environment The unit or an E...

Page 71: ...age 30 Phonebook Issue Possible Cause Solution Reference I cannot add or edit entries to the phonebook You are on a call or playing back recordings You cannot add or edit phonebook entries while on a call or while playing back recordings The Operation Mode setting is not correct Change the setting to Peer to Peer if you want to add or edit peer to peer IP call entries i e entries stored by specify...

Page 72: ...lution Reference The unit returns to standby mode while programming the unit 1 minute has passed since you pressed a button If you pause for over 1 minute while programming the unit the unit returns to standby mode I cannot program the unit You are on a call Program the unit once you have finished the call A call is being received The unit exits programming mode automatically when a call is receiv...

Page 73: ...Error An error occurred while formatting the SD memory card Remove the SD memory card and use a different card Unable To Use The SD memory card is not compatible with the unit Make sure that you are using a compatible SD memory card SDHC miniSDHC and microSDHC memory cards are not compatible with the unit page 30 The SD memory card is not formatted in FAT format Use a FAT format SD memory card pag...

Page 74: ...ator No Connection To IP Network The LAN cable is not connected Check all connections page 25 The unit cannot receive IP settings from the DHCP server Consult your system administrator Hold Failure The call could not be put on hold Check the status of the other party or IP PBX Wait a while and try again Resume Failure The call could not be retrieved from hold status Check the status of the other p...

Page 75: ...to a soft cloth wring the cloth thoroughly and wipe the unit When finished dry the unit with a soft dry cloth To avoid damage or discoloration do not clean the unit with the following materials or with cleaners containing the following materials Petroleum Scouring powder Alcohol Paint thinner Benzine Wax Hot water Powdered soap When using chemical cleansers follow the instructions on the label car...

Page 76: ...e Automatic DHCP manual static DTMF Out of band RFC2833 In band Dial Mode Tone pulse Speaker 1 Output 85 dB Frequency range 300 Hz 7000 Hz Built in Microphone 4 locations 8 total Sensitivity area about 3 m about 10 ft IP Network Interface Jack LAN 1 RJ45 Telephone Interface Jack LINE 1 RJ11 USB Port 1 USB 2 0 Full speed SD Memory Card Slot 1 32 MB 2 GB Audio Interface Jack AUDIO IN OUT 1 ø 3 5 mm ...

Page 77: ...ication Operating Environment Temperature 0 C 40 C 32 F 104 F Humidity Less than 90 with no condensation Ambient noise Less than 50 dBA recommended Document Version 2011 06 Operating Instructions 77 Specifications ...

Page 78: ... Initialize 65 IP Address 55 IP Address Mode 54 IP Network Settings 27 IP PBX Mode 29 K Key Tones 53 L LAN Cable 25 LAN Port 20 Language 51 LCD Contrast 52 Line Icon IP TEL PS PC USB AUDIO 22 Line Selection 33 53 M Making Calls 34 MENU Button 21 MIC NOISE CUT Button 21 Microphones 32 Mute 39 Mute Clear Button 21 N Navigator Volume Buttons 21 Noise Reduction 39 O Operation Mode 29 51 P Panasonic PB...

Page 79: ...trar Port Number 57 SIP Settings 28 SIP Signaling Port Number 58 SIP ToS Field 60 SIP User Domain Name 56 Speaker 20 Speaker Volume 35 38 Speakerphone Button 21 Specifications 76 Speech Speed 39 Subnet Mask 55 System Status Confirmation 60 T TEL Cord 25 TEL Line Level Reduction 54 Telephone Line Jack LINE 20 Time Format 52 Troubleshooting 66 U USB Audio mode 29 USB Cable 19 USB Icon 22 USB Port 20...

Page 80: ...etworks Co Ltd Panasonic System Networks Co Ltd 2010 When you ship the product Carefully pack and send it prepaid adequately insured and preferably in the original carton Attach a postage paid letter detailing the symptom to the outside of the carton DO NOT send the product to the Executive or Regional Sales offices They are NOT equipped to make repairs Product service For product service ship the...

Reviews: