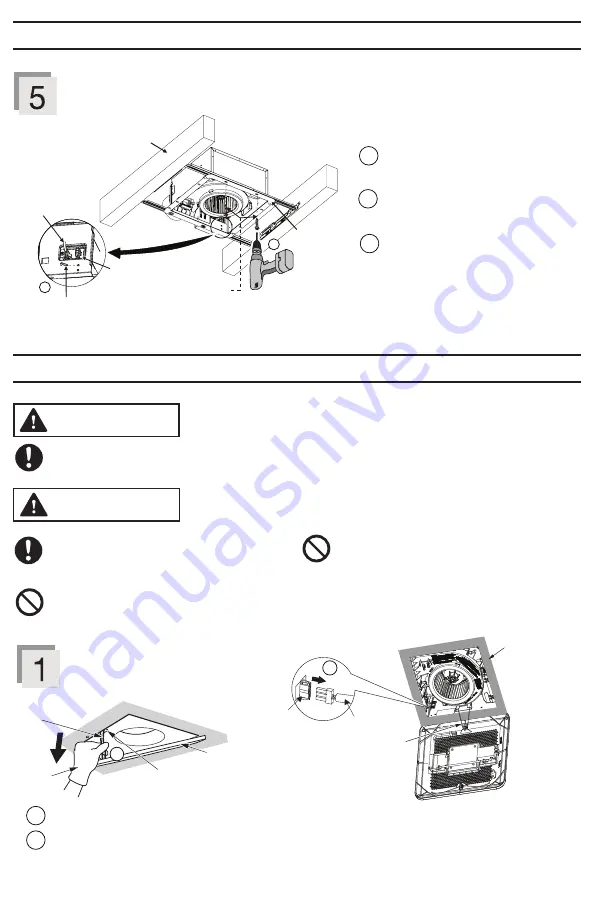
background image

Secure fan body

Flange

Joist

1

2

Plug connector

Receptacle

Machine screw (M4X8)

2 self-drilling screws

WARNING

CAUTION

Disconnect power supply before working on unit.

Routine maintenance must be done every 
year. Please wear gloves during the 
cleaning work.  

Do not immerse motor in water when
cleaning. Do not soak resin parts in 
water over 140° C (60

° F

).

Never use gasoline, benzene, thinner or 
any other such chemicals for cleaning the
ventilating fan.

Remove grille

1
2

1

Gloves

Slot

Grille

Mounting spring

Remove grille by pulling down one mounting spring.

Disconnect the wire from the receptacle, then pull down the other mountain spring. 

1

2

Plug connector into receptacle and secure 
fan body to adaptor by using the machine 
screw (M4X8). 

When the flange overlaps Flex-Z Fast™ 
bracket, secure it by using 2 self-drilling 
screws.

Follow the steps 7 to 8 in INSTALLATION 
(RETROFIT) 

3

Mounting spring

LED lamp wire

Receptacle

2

Drywall

10

MAINTENANCE (CLEANING)

INSTALLATION (NEW CONSTRUCTION) (CONTINUED)

Summary of Contents for WhisperRemodel RG-R811LA

Page 1: ... of life electric shock fire malfunction and damage to equipment or property always observe the following safety precautions WARNING CAUTION Denotes a potential hazard that could result in serious injury or death Denotes a hazard that could result in minor injury Denotes a hazard that could result in property damage The following symbols are used to classify and describe the type of instructions t...

Page 2: ... the flue chimney of fuel Ducted exhaust fans must always be vented to the outdoors If this unit is to be installed over a tub or shower it must be marked as appropriate for the application and connected to a GFCI Ground Fault Circuit Interrupter protected branch circuit These models are UL listed for tub and shower enclosures This product is not to be installed in a ceiling thermally insulated to...

Page 3: ...ight light feature consumes around 0 1 to 0 4 W These products are listed by UL under UL file No E78414 FCC Note This equipment has been tested and found to comply with the limits for a Class B digital device pursuant to Part 15 of the FCC Rules These limits are designed to provide reasonable protection against harmful interference in a residential installation This equipment generates uses and ca...

Page 4: ...st to verify that all parts are present 1 Grille Self drilling screw Installation instructions Warranty sheet Machine screw M4X8 3 inch duct reducer optional part Unit inches mm 4 DESCRIPTION CONTINUED DIMENSIONS SUPPLIED ACCESORIES UNPACKING 5 5 8 140 12 1 8 307 4 3 7 8 96 7 11 1 3 7 6 5 2 13 330 5 5 8 143 10 9 10 3 4 271 2 3 4 69 7 2 7 8 71 4 1 3 8 32 6 1 1 2 37 8 13 330 10 3 8 263 5 1 4 133 Par...

Page 5: ...e built using DC motor technology The DC motor is 30 70 more energy efficient than the minimum ENERGY STAR requirements Air volume option CFM 80 110 80 CFM Factory setting Pick A Flow Feature This product comes with Pick A Flow speed options The Pick A Flow switch on the face of the product allows the option to choose 80 or 110 CFM This product can run continuously or intermittently depending upon...

Page 6: ...to the opening and extend Align and install bracket to joist by using 2 preinstalled tapping screws Joist 5 2 Tapping screws ST4 2X20 Extend 4 Install circular exhaust duct 2 1 Remove screw from junction box cover to remove the knock out hole and secure conduit or stress relief to junction box knock out hole Install the circular exhaust duct and secure it with clamps or ties and seal it with masti...

Page 7: ...ode NEC Use UL approved wire nuts to connect fan wires After connecting wires replace junction box cover Install adaptor 1 2 Self drilling screws Circular exhaust duct Conduit 1 Self drilling screw Drywall Joist Joist Drywall 1 Install the adaptor to Flex Z Fast bracket by using 2 self drilling screws Insert fan body Insert fan body and slide into adaptor assembly using the guide parts until you h...

Page 8: ...oes not strip or come in contact with the Flex Z Fast bracket Insert the mounting springs into the slot as shown to mount grille to fan body 2 Connect the LED lamp wire to receptacle 1 Install grille CAUTION IMPORTANT Remove the tape placed on the damper and adaptor before installation Failure to do so will cause the product to work inefficiently and create a loud noise If you require use of the 3...

Page 9: ...or approved foil tape A 3 or 4 inch circular duct is needed to connect to the relevant part of the adaptor Install the adaptor to Flex Z Fast bracket by using 2 self drilling screws Connect wires Black White Green Wire nuts Switch Blue Live Light Neutral Conduit Live Fan Neutral Live Night Light Earth ground L N AC 120 V 60 Hz Power supply Earth ground Switch box Refer to WIRING DIAGRAM Page 5 Fol...

Page 10: ...ther such chemicals for cleaning the ventilating fan Remove grille 1 2 1 Gloves Slot Grille Mounting spring Remove grille by pulling down one mounting spring Disconnect the wire from the receptacle then pull down the other mountain spring 1 2 Plug connector into receptacle and secure fan body to adaptor by using the machine screw M4X8 When the flange overlaps Flex Z Fast bracket secure it by using...

Page 11: ... subjected to these limitations The ducting from this fan to the outside of the building has a strong effect on the air flow noise and energy use of the fan Use the shortest straightest duct routing possible for best performance and avoid installing the fan with smaller ducts than recommended Insulation around the ducts can reduce energy loss and inhibit mold growth Fans installed with existing du...

Page 12: ...n how long an implied warranty lasts so the above exclusions or limitation may not apply to you Obtain Product Information and Operating Assistance locate your nearest distributor or make Customer Service and Literature requests by visiting our Web Site at us panasonic com ventfans or send your request by E mail to ventfans us panasonic com You may also contact us directly at 1 866 292 7299 Monday...

Reviews: