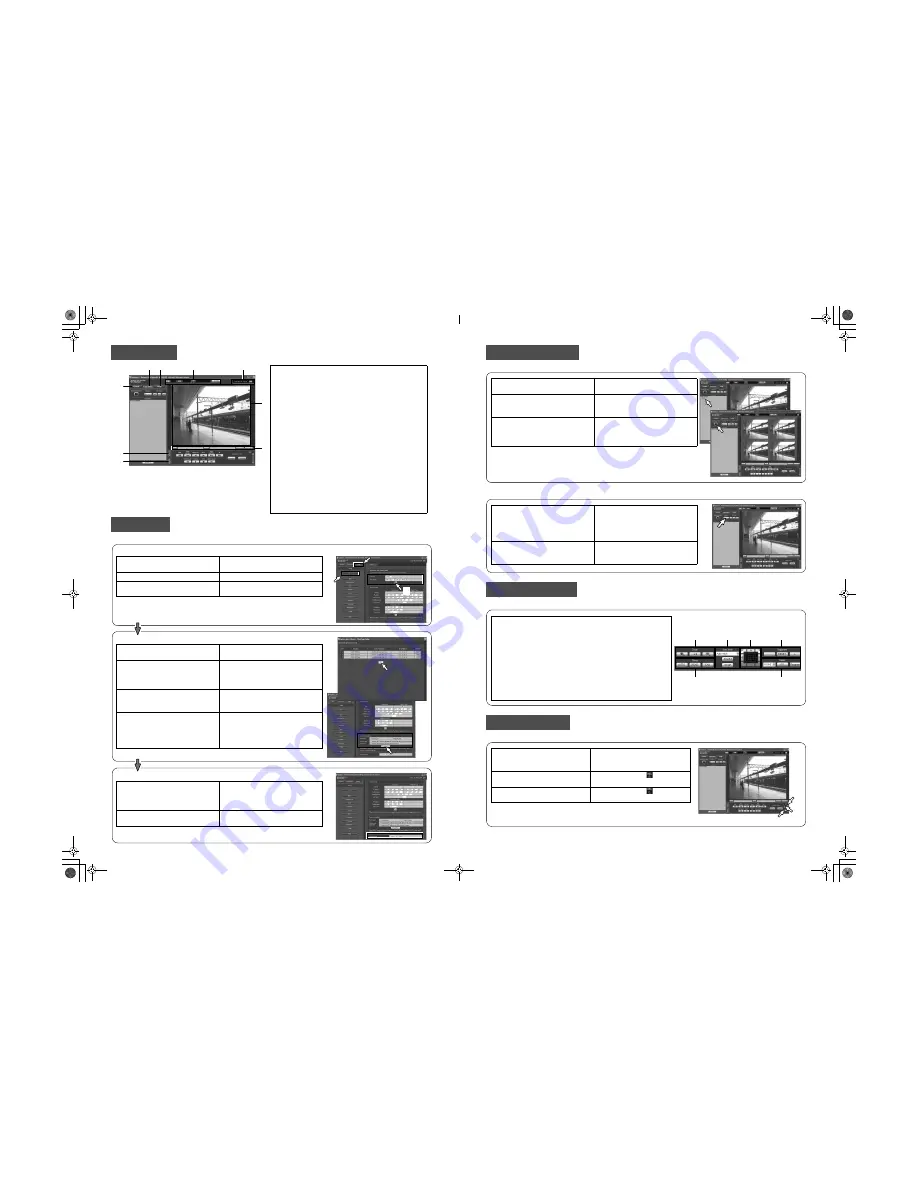
Set up the minimum settings necessary to use the recorder.
Control Items
Basic Setup
(1) [Control] button
Search for and play back recorded images, as well as
switch camera channels.
(2) [Cam. Select] button
Switch camera channels for the image displayed.
(3) [Setup] button
Set up the recorder.
(4) Status display area
Display the recording and playback status of recorded
images.
(5) Current time display area
Displays the current time.
(6) Image display
Display live and recorded images.
(7) Playback point operations area
Specify the current position in an image being played
back, and play back the most recent image.
(8) [HDD] tab
Control playback of recorded images.
(9) [CAM] tab
Control zoom, focus, and automatic functions of the camera.
(9)
(1)
(8)
(2)
(3)
(4)
(5)
(6)
(7)
(
Ι
) Set the current date
Click the [Setup] button, and then click
[Quick].
This will display the "Quick" menu.
Set up the current time and date.
Under "Time & date", click the [Set]
button
(1)
(2)
(3)
(
ΙΙ
) Register the cameras
Select the network port for detecting
cameras.
Select camera port or client PC port.
Use the camera auto-registration item
to specify whether a detected camera
should be assigned an IP address.
Select [Register the IP address
automatically given by this unit to a
detected camera] or [Register the IP
address set with a detected camera].
Click the [Registration]
J
[OK] buttons.
A "Camera registration result" window
will appear after registration is
complete.
Check the results of the recording and
click [OK].
Up to 64 cameras can be registered.
• If a camera you want to register is not
detected or if you want to change the
settings of a camera, do it in "NW
camera" set up.
(
ΙΙΙ
) Programming
When cameras have been registered,
the live video and manual recording
rate settings of the "Program1" page
are set to 1ips.
Click the [Display] button to check
programming details.
Display live images on a 1-screen or on a 4-screen (multiscreen).
Display live images in the sequential display.
You can control cameras that can pan and tilt from the [CAM] tab.
You can record manually.
Monitor Live Images
Control the Camera
Manual recording
Click the [Cam. select] button.
The camera list is displayed in the
[Camera select] box.
Click [WJ-ND400] and select in order
the camera group title and camera title.
The live image from the selected
camera channel is displayed on a 1-
screen.
Click the [Multiscreen] button.
The camera image is displayed on 4
separate screens.
• Each clicking the [Multiscreen] button
switches the 4-screen displays.
Click the [Cam. select] button and then
click the [Sequence] button.
Live images are displayed in the
sequential display.
• The [Sequence] button indicator
lights green and [SEQ] is displayed
on the Status display area.
Click the [Sequence] button again.
The [Sequence] button indicator goes
off and the sequence operation is
stopped.
(1)
[Zoom]
: Zoom in/out the image from the camera.
(2)
[Focus]
: Adjust the focus point of the image.
(3)
[Auto mode]
: Select the camera's automatic mode
function.
(4)
[Control buttons]
: Adjust the direction of the camera.
[Control pad]
: The pan/tilt movement increases as you
move from the center of the pad to the
edges.
(5)
[Brightness]
: Adjust the lens iris. (brightness)
(6)
[Preset]
: Registers the preset positions of camera
and moves the camera to the registered
preset positions.
(2)
(1)
(3)
(4)
(5)
(6)
[CAM] Tab
Click the [
S
] button in the [REC] box
on the [HDD] tab.
Click the [
S
] button until the
[Recording] and [Recording stop]
button are displayed.
Click the [Recording] button.
In the status display "
[REC]" lights
red, and recording starts.
Click the [Recording stop] button.
In the status display "
[REC]" turns
off, and recording stops.
(2)
(1)
(3)
ND400_A3_E.fm 2 ページ 2008年4月8日 火曜日 午後2時59分


